Hi all;
Here's the part 2 of the spring making stuff. The first one dealt only with making fine wire springs that
you could do without any extra tooling, and it only concerned itself with small extension springs.
There is not much difference for making compression springs, except you need a way to evenly space
the coils. There is something you need, though, when using wire larger than about .025", to keep
things on the safe side.
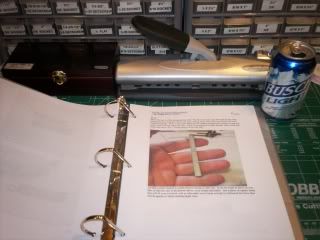
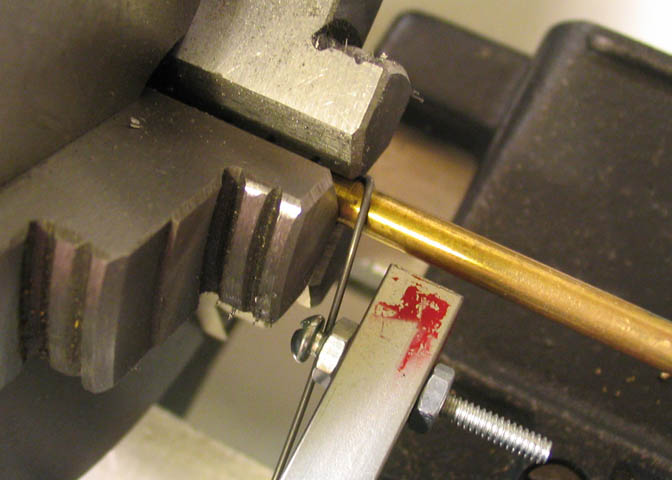
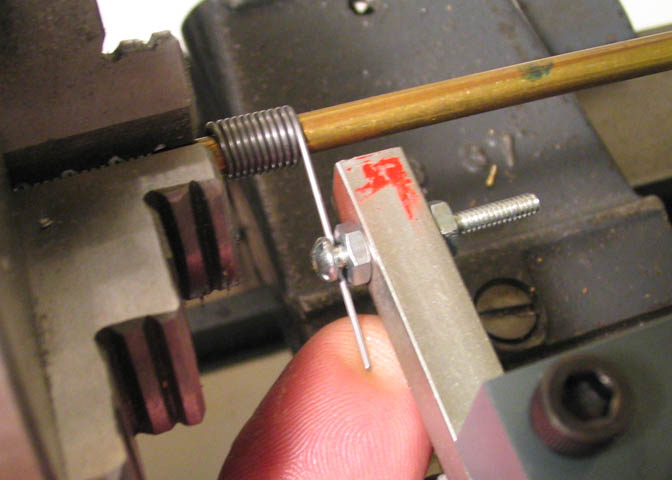
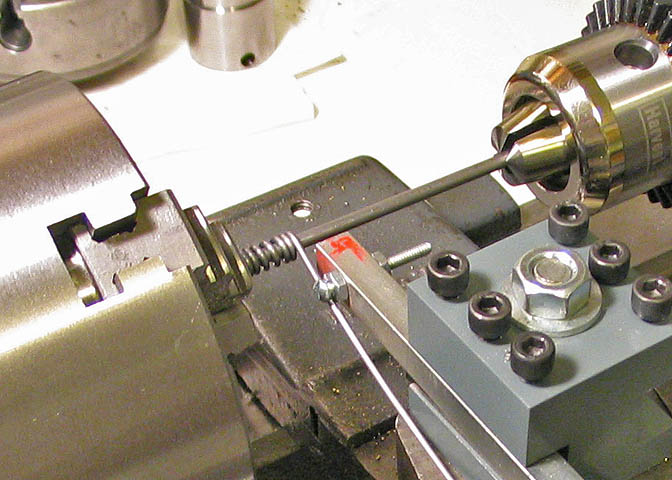
All that's really needed is a little fixture similar to this one. It can be made as fancy as you like, or like
the one in the picture above, very simple and basic.
Just a piece of square stock that will fit your tool post, and an adjustable screw large enough to
withstand the force that will be against it when running larger wire.
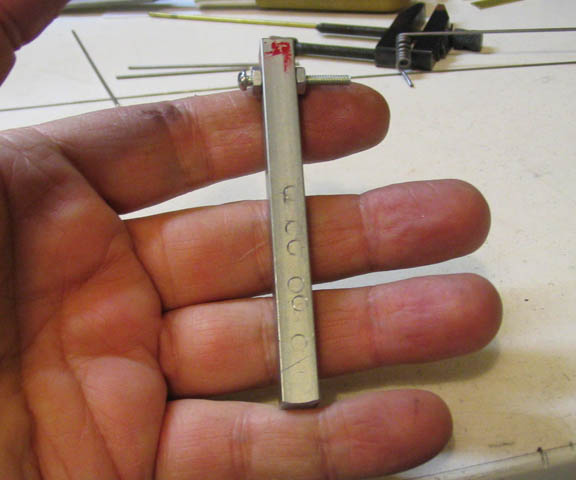
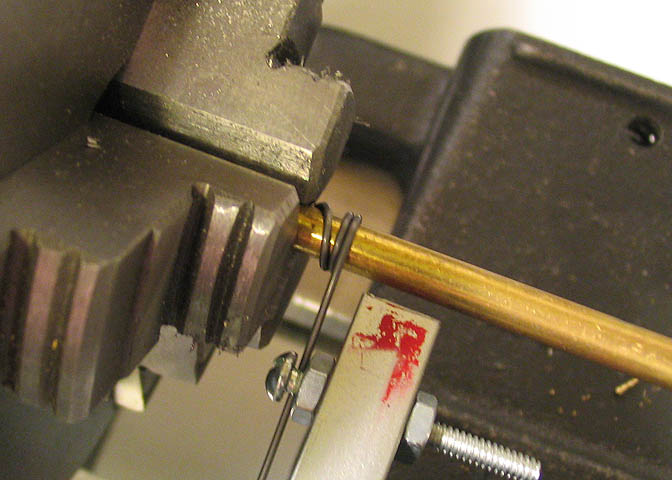
Here's a closer shot of the working end. This one will make springs using wire up to about 1/16", which
would make a fairly stout spring if it was of small dimension.
There are only a couple of things to note when making this thing; The hole through it needs to position
the bottom of the diameter of the screw slightly below centerline on your lathe. It's not a critical
measurement. You can eyeball it.
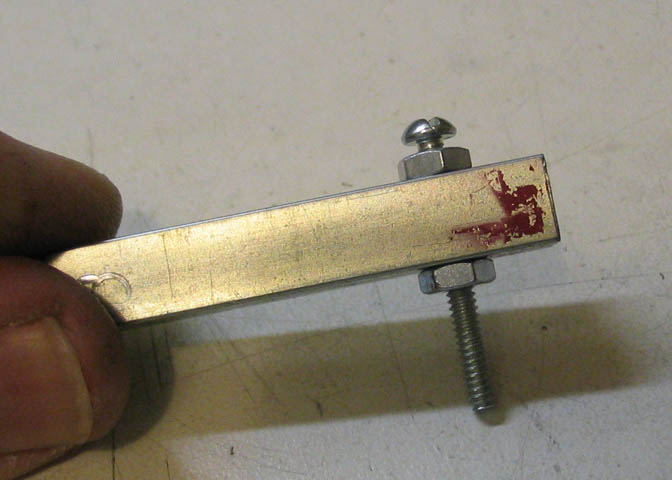
The other thing is, the screw needs to be back a ways from the end of the square stock to allow the
wire to roll up over the top of the arbor you need to form whatever spring you are making. Also not a
critical measurement, since you can adjust it some simply by cranking the cross slide on your lathe in or
out. I would just put the screw hole back from the front edge of the square stock about 1/2" and call it
okie-dokie.
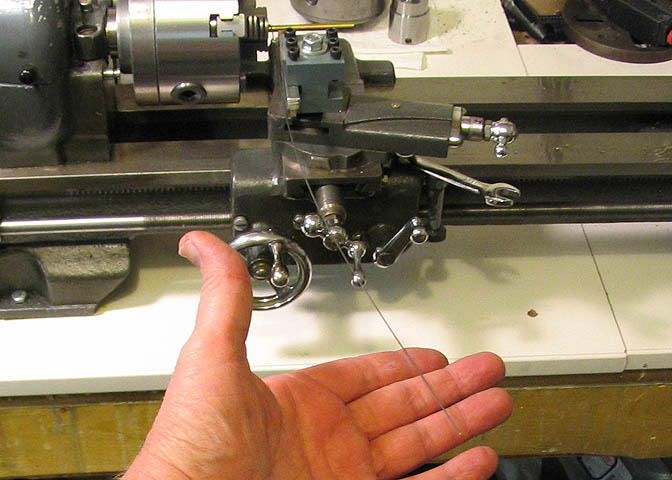
I'm going to do this using a hand crank to rotate the spindle, and I would suggest that until you have
lots of practice and a good feel for it, that you do too. So, the lathe is unplugged.
I do make extension springs using the lathe power fairly often. I've done a lot of those. For
compression springs, you have to watch pretty close to get the right amount of coils, and you don't
need to be counting coils, thinking about when you need to turn off the lathe, and worrying about the
tail end of your spring wire getting loose and whipping you like a bad dog all at one time. So do it
without power.
This piece of wire that I'll start with is .032" diameter regular music wire. It's quite light, but still, at this
diameter it's stiff enough that you would really have to tug on it to get a good coil if you were using
pliers to hold it. So it is done with the tool post jig, which makes it quite easy.
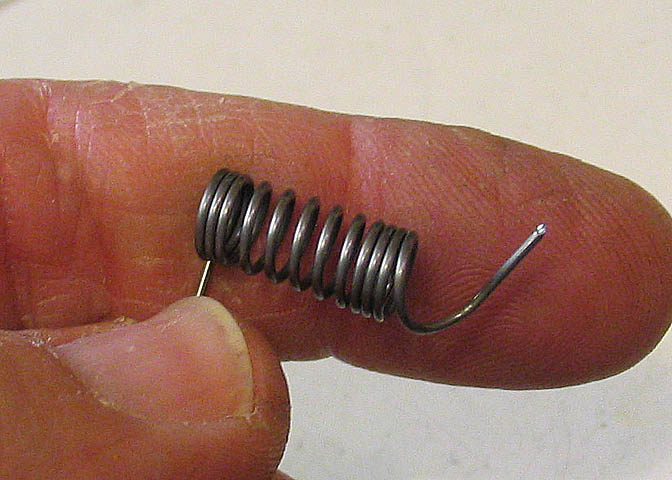
I'll just show a regular close coil spring for this first few shots, so you can see how the tool post thing
works. The wire is trapped in the chuck same as I did for the thinner wire in the first part of this write
up.
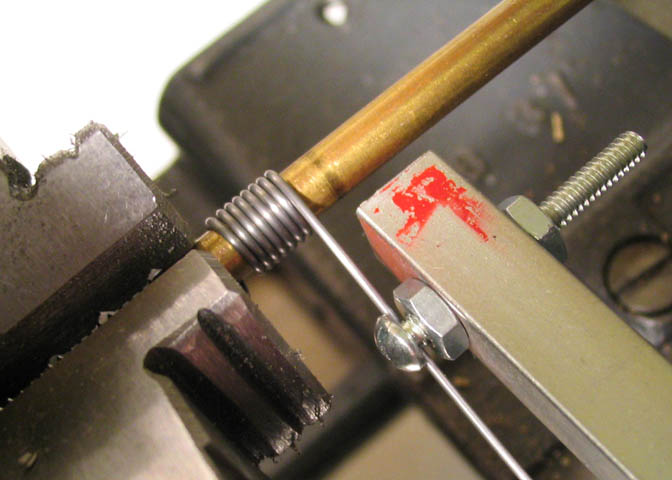
The wire is then put under the screw on the tool, and allowed to trail out past the top of the cross slide.
Here, you can see how it hangs off the end of the cross slide. Have a care about it as it sets there. It's
small wire, and you can loose it in the background and forget it's there as you are making the spring.
Don't put your face in that area.
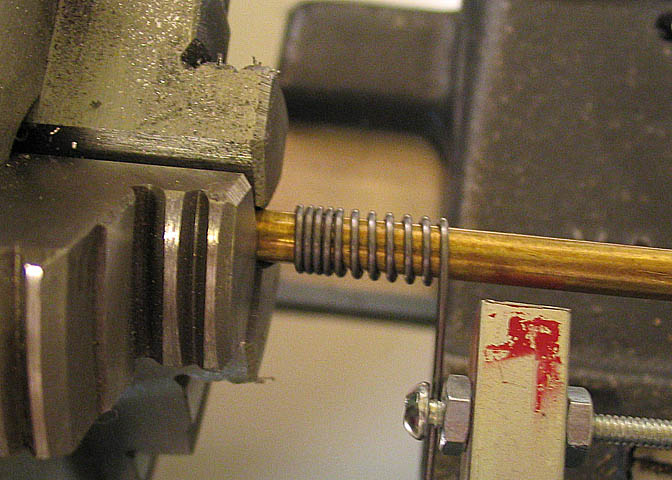
The lathe spindle is cranked backward and the coils form over the top of the arbor. The screw on the
tool keeps the wire in line, and prevents it from flipping over the top of the arbor.
As you crank the lathe spindle, watch the coils form, and advance the carriage (toward the tailstock)
slowly, keeping the head of the screw roughly lined up where the previous coil has been formed. You
want it to move so the coils are just about to roll up over the top of it's neighbor, but not quite.
It might seem finicky to do it this way, but it works very well, and you'll soon find that you can crank
the lathe and the carriage in a way that will produce a bunch of well formed coils in short order.
You can see here how the wire pulls up over the top of the cross slide. The screw/tool will keep it in
line. Just mind the end of the wire.
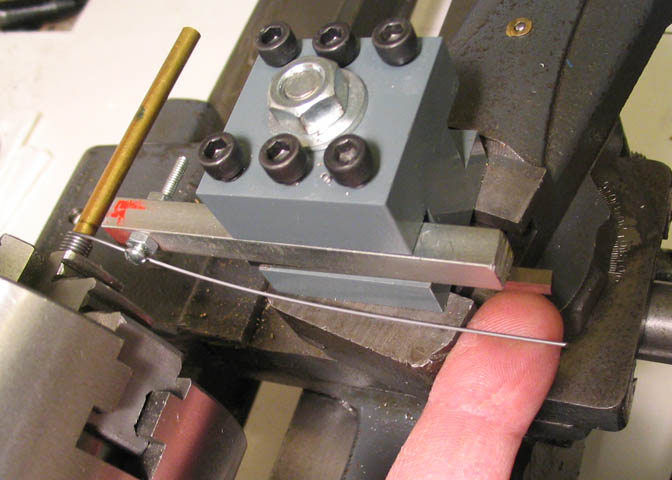
This is where you need to stop. Don't let the end of the wire get past the screw or it may pop! and
make you jump. If it's fairly large wire, like 3/32", it can do damage. Keep your mind on your
business, here.
When you have your spring as long as you want, or when you run out of wire, release the tension on
the spring by unwinding until it relaxes, and you can take it out.
For compression springs, you need an even spacing between the coils. This can be done by eye, using
a ruler to judge the distance between the coils, but it's not terribly precise.
A better way is to let the lathe space it for you by setting up the threading gears and running the ratio
through the lead screw, just like if you were threading a rod.
To start, set the change gears to what you need. An easy example would be if you needed a spring
with 16 coils and an inch long. Set the lathe to cut 16 threads, and you're ready to get started.
Begin the spring just as if you were making a extension spring. Leave the lathe halfnut disengaged, and
wind on a few coils. Doesn't matter how many, really, as long as you give yourself two or three close
coils at the beginning and end of the compression spring.
In the shot above, I've wound a couple of close coils, and will now engage the lathe halfnut to make the
compression coils.
Just as with threading, the lathe spaces the coils nice as can be.
When you have enough compression coils to make your spring, disengage the halfnut, and put on two
or three close coils at the end, just like at the beginning.
You have to do a little figuring to get the length right, but it's not a big chore. Start with the length you
want, and subtract 2x the wire diameter. What is left is the length that can be filled with compression
coils. The coil on each end has to be there, but it doesn't do any work. It's basically a flat ring. What
you can fit between the end coils is the length that does the work, (but it's not the overall length).
When you have that length figured, you can decide how many coils will fit for a given pitch, or, what
pitch you want for the wire size you need. Then set your lathe to thread that pitch for your given
distance.
I hope that makes sense! Explaining stuff like that isn't my high point.
Now, you probably won't get the exact length you want the first time. The back lash in the lathe
comes into play a little, and judging the exact point at which your first compression coil starts is left up
to your eye. It will help a little if, before you engage the halfnut, you reach into the gear box and take
out the back lash on the geartrain. (Remember, your lathe is not plugged in, right?)
Enough of that, then.
The compression spring will look something like this when you take it off the arbor. Look at it closely,
and determine where the last compression coil on each end meets the first tight coil, leave a little extra
on the flat coil side, and snip the extra coils off.
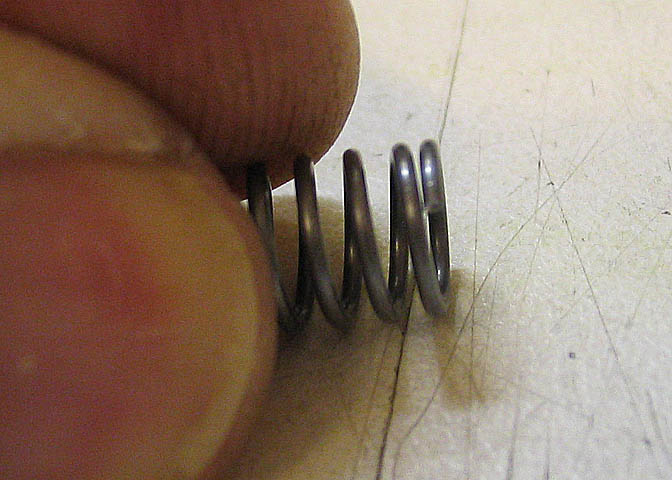
When you have them snipped off, should look something like this. I've actually cut just a little bit too
much. Would have been better if I had left another 1/8" on the tail, here, but it's okay for this demo.
Now, before you cook the spring, just like in the the other write up, take the spring to your grinder, or
break out your Dremel tool, and flatten the ends. It only takes a little touch on the grinding wheel to do
it for a spring this size. See the next pic.
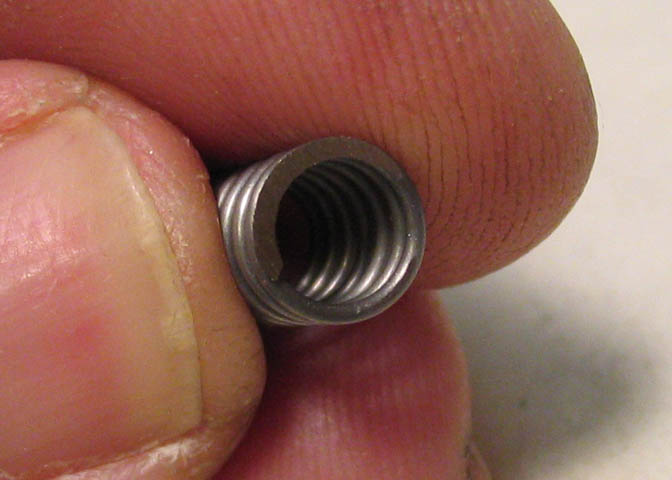
You can see how it came out, here. The last coil now has a flat end. If I'd left a little more of that coil,
like I said to do, the flat would go almost 3/4 of the way around the end of the spring.
As it is, though, the spring sits nice and flat. It just needs to be stress relieved as explained previously,
and it will be ready to go.
Note in the shot above that the very end of the top coil is a little blue. Take care not to do that.
That was just about one second on the grinding wheel. One second too long.
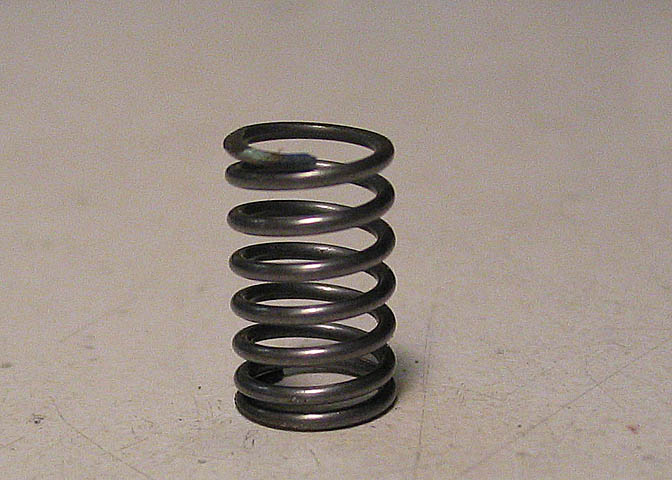
Just for Matt, who was interested in this stuff;
This spring is .450" long, .280" dia, .032" wire, made with a 3/16" arbor, and will do about 4.5 pounds
before it's been heated. May do slightly more after that. It's not exactly the size you had mentioned,
but maybe this will give you a starting point.
One last shot, of some fairly heavy wire being coiled for a very short compression spring. The wire
diameter is .055", which may not sound like much, but it's very stiff. This spring will take probably
20-25 lb.
Now, I say this was fairly heavy wire. It's all relative, you know. I've only made springs up to about
3/32" wire thickness. That's quite a bit for a small shop. I've watched big springs being made, and it's
a different world. If you get a chance to see it done with big wire on a lathe sometime, have a good
look.
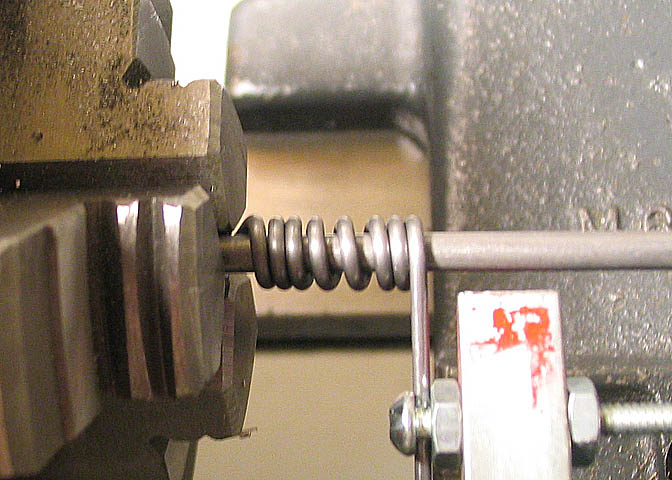
Okay, another last shot of that heavier wire, mainly to show the tailstock chuck being used to support
the arbor. For larger music wire, especially, (and this is fairly large wire in my shop) the arbor must be
supported. The wire being coiled here would bend the arbor on the first rotation if it wasn't.
For what it's worth, and I mentioned this in the other spring making post, I'm not an expert. This stuff
I'm showing works well for me. Simple as that.
Don't forget, safety glasses, especially when working around wire! And, keep an eye on your wire end,
(not the other way around!).
That's it. Thanks again for looking.
Dean
Here's the part 2 of the spring making stuff. The first one dealt only with making fine wire springs that
you could do without any extra tooling, and it only concerned itself with small extension springs.
There is not much difference for making compression springs, except you need a way to evenly space
the coils. There is something you need, though, when using wire larger than about .025", to keep
things on the safe side.
All that's really needed is a little fixture similar to this one. It can be made as fancy as you like, or like
the one in the picture above, very simple and basic.
Just a piece of square stock that will fit your tool post, and an adjustable screw large enough to
withstand the force that will be against it when running larger wire.
Here's a closer shot of the working end. This one will make springs using wire up to about 1/16", which
would make a fairly stout spring if it was of small dimension.
There are only a couple of things to note when making this thing; The hole through it needs to position
the bottom of the diameter of the screw slightly below centerline on your lathe. It's not a critical
measurement. You can eyeball it.
The other thing is, the screw needs to be back a ways from the end of the square stock to allow the
wire to roll up over the top of the arbor you need to form whatever spring you are making. Also not a
critical measurement, since you can adjust it some simply by cranking the cross slide on your lathe in or
out. I would just put the screw hole back from the front edge of the square stock about 1/2" and call it
okie-dokie.
I'm going to do this using a hand crank to rotate the spindle, and I would suggest that until you have
lots of practice and a good feel for it, that you do too. So, the lathe is unplugged.
I do make extension springs using the lathe power fairly often. I've done a lot of those. For
compression springs, you have to watch pretty close to get the right amount of coils, and you don't
need to be counting coils, thinking about when you need to turn off the lathe, and worrying about the
tail end of your spring wire getting loose and whipping you like a bad dog all at one time. So do it
without power.
This piece of wire that I'll start with is .032" diameter regular music wire. It's quite light, but still, at this
diameter it's stiff enough that you would really have to tug on it to get a good coil if you were using
pliers to hold it. So it is done with the tool post jig, which makes it quite easy.
I'll just show a regular close coil spring for this first few shots, so you can see how the tool post thing
works. The wire is trapped in the chuck same as I did for the thinner wire in the first part of this write
up.
The wire is then put under the screw on the tool, and allowed to trail out past the top of the cross slide.
Here, you can see how it hangs off the end of the cross slide. Have a care about it as it sets there. It's
small wire, and you can loose it in the background and forget it's there as you are making the spring.
Don't put your face in that area.
The lathe spindle is cranked backward and the coils form over the top of the arbor. The screw on the
tool keeps the wire in line, and prevents it from flipping over the top of the arbor.
As you crank the lathe spindle, watch the coils form, and advance the carriage (toward the tailstock)
slowly, keeping the head of the screw roughly lined up where the previous coil has been formed. You
want it to move so the coils are just about to roll up over the top of it's neighbor, but not quite.
It might seem finicky to do it this way, but it works very well, and you'll soon find that you can crank
the lathe and the carriage in a way that will produce a bunch of well formed coils in short order.
You can see here how the wire pulls up over the top of the cross slide. The screw/tool will keep it in
line. Just mind the end of the wire.
This is where you need to stop. Don't let the end of the wire get past the screw or it may pop! and
make you jump. If it's fairly large wire, like 3/32", it can do damage. Keep your mind on your
business, here.
When you have your spring as long as you want, or when you run out of wire, release the tension on
the spring by unwinding until it relaxes, and you can take it out.
For compression springs, you need an even spacing between the coils. This can be done by eye, using
a ruler to judge the distance between the coils, but it's not terribly precise.
A better way is to let the lathe space it for you by setting up the threading gears and running the ratio
through the lead screw, just like if you were threading a rod.
To start, set the change gears to what you need. An easy example would be if you needed a spring
with 16 coils and an inch long. Set the lathe to cut 16 threads, and you're ready to get started.
Begin the spring just as if you were making a extension spring. Leave the lathe halfnut disengaged, and
wind on a few coils. Doesn't matter how many, really, as long as you give yourself two or three close
coils at the beginning and end of the compression spring.
In the shot above, I've wound a couple of close coils, and will now engage the lathe halfnut to make the
compression coils.
Just as with threading, the lathe spaces the coils nice as can be.
When you have enough compression coils to make your spring, disengage the halfnut, and put on two
or three close coils at the end, just like at the beginning.
You have to do a little figuring to get the length right, but it's not a big chore. Start with the length you
want, and subtract 2x the wire diameter. What is left is the length that can be filled with compression
coils. The coil on each end has to be there, but it doesn't do any work. It's basically a flat ring. What
you can fit between the end coils is the length that does the work, (but it's not the overall length).
When you have that length figured, you can decide how many coils will fit for a given pitch, or, what
pitch you want for the wire size you need. Then set your lathe to thread that pitch for your given
distance.
I hope that makes sense! Explaining stuff like that isn't my high point.
Now, you probably won't get the exact length you want the first time. The back lash in the lathe
comes into play a little, and judging the exact point at which your first compression coil starts is left up
to your eye. It will help a little if, before you engage the halfnut, you reach into the gear box and take
out the back lash on the geartrain. (Remember, your lathe is not plugged in, right?)
Enough of that, then.
The compression spring will look something like this when you take it off the arbor. Look at it closely,
and determine where the last compression coil on each end meets the first tight coil, leave a little extra
on the flat coil side, and snip the extra coils off.
When you have them snipped off, should look something like this. I've actually cut just a little bit too
much. Would have been better if I had left another 1/8" on the tail, here, but it's okay for this demo.
Now, before you cook the spring, just like in the the other write up, take the spring to your grinder, or
break out your Dremel tool, and flatten the ends. It only takes a little touch on the grinding wheel to do
it for a spring this size. See the next pic.
You can see how it came out, here. The last coil now has a flat end. If I'd left a little more of that coil,
like I said to do, the flat would go almost 3/4 of the way around the end of the spring.
As it is, though, the spring sits nice and flat. It just needs to be stress relieved as explained previously,
and it will be ready to go.
Note in the shot above that the very end of the top coil is a little blue. Take care not to do that.
That was just about one second on the grinding wheel. One second too long.
Just for Matt, who was interested in this stuff;
This spring is .450" long, .280" dia, .032" wire, made with a 3/16" arbor, and will do about 4.5 pounds
before it's been heated. May do slightly more after that. It's not exactly the size you had mentioned,
but maybe this will give you a starting point.
One last shot, of some fairly heavy wire being coiled for a very short compression spring. The wire
diameter is .055", which may not sound like much, but it's very stiff. This spring will take probably
20-25 lb.
Now, I say this was fairly heavy wire. It's all relative, you know. I've only made springs up to about
3/32" wire thickness. That's quite a bit for a small shop. I've watched big springs being made, and it's
a different world. If you get a chance to see it done with big wire on a lathe sometime, have a good
look.
Okay, another last shot of that heavier wire, mainly to show the tailstock chuck being used to support
the arbor. For larger music wire, especially, (and this is fairly large wire in my shop) the arbor must be
supported. The wire being coiled here would bend the arbor on the first rotation if it wasn't.
For what it's worth, and I mentioned this in the other spring making post, I'm not an expert. This stuff
I'm showing works well for me. Simple as that.
Don't forget, safety glasses, especially when working around wire! And, keep an eye on your wire end,
(not the other way around!).
That's it. Thanks again for looking.
Dean
")