Horizontal Stirling - Terry Coss design

Home Model Engine Machinist Forum

Help Support Home Model Engine Machinist Forum:

This site may earn a commission from merchant affiliate links, including eBay, Amazon, and others.

David Morrow

Well-Known Member
Joined
Sep 8, 2008
Messages
227
Reaction score
60
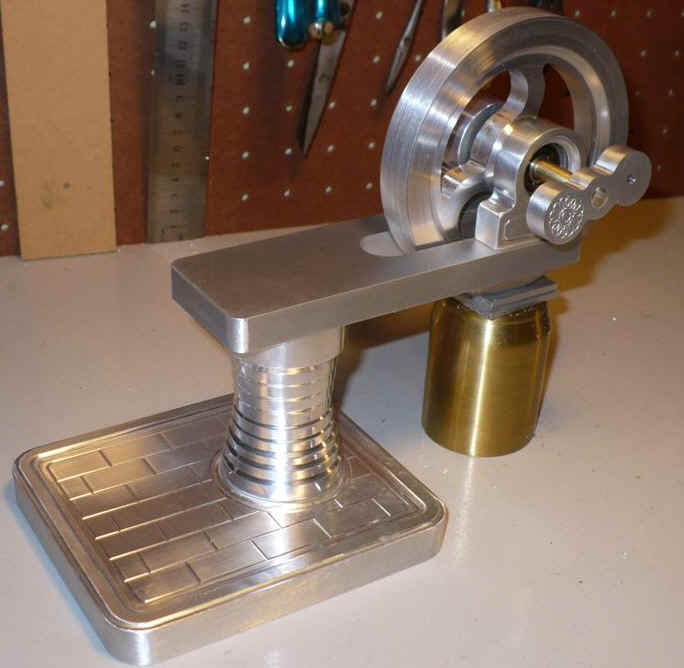
I'm mostly following the plans from HSM Nov/Dec 2005. I've sort of pimped it up a bit though. The column may be shortened a bit before it's done.

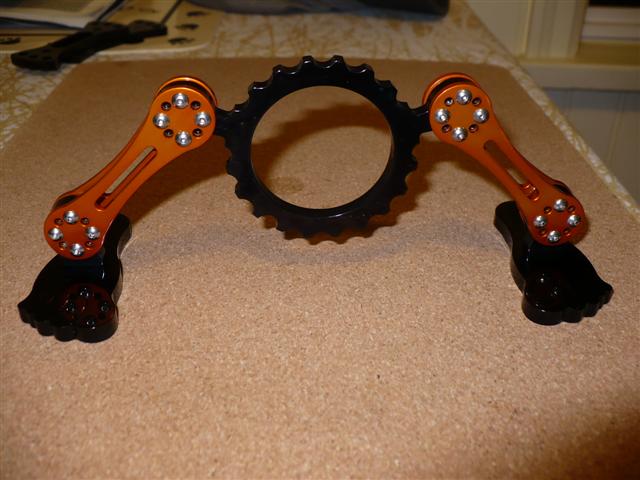
I've been playing with anodizing and have been quite happy with the quality and the ability to add some colour to my projects. I think this one will be a mix of black, red, and raw brushed aluminum.

Ignore the brass cylinder on the right - it's a part for another project and is just there to hold things up.

P1010428_Large.JPG
 
Dave,

Beautiful work. :bow:

Best Regards
Bob
 
Nice work Dave. That is a popular engine to build. I've seen several of them at shows. My attempt(s) did not run well but I was quite new to this hobby at the time. At some point I'll go back and do some tweaking. Meanwhile good luck and success in your build. I really like the staging you've built :bow: :bow:

Cheers,
Phil
 
Looking Great David.
I like that brick pattern in the base.
Nicely done! :bow:

Rick
 
your stirling engine is looking very good :bow: ............i really like the crankshaft design 8)

keep up the good work and thanks for the photo's

chuck
 
That looks great, i also like the brick and rose design, looking forward to the other instalments. 8)
 
Very nice, David. I've gotta give that anodizing a shot some day. How finiky is the process?

Chuck
 
cfellows said:
Very nice, David. I've gotta give that anodizing a shot some day. How finiky is the process?

Chuck

I bought my gear a couple of years ago and sort of put things off for a long time fearing all the fussy details. In the end, I just made up my own simple checklist of steps and it's all very simple and easy.

1) Clean well
2) Anodize for 1 hour in mix of 1/3 battery acid & 2/3 water
3) Rinse well in clear running water
4) Dye for 15 minutes
5) Rinse again
6) Seal - I put mine in a kitchen sieve over boiling water using steam to seal for 1 hour.

I bought the power supply & chemicals for about $400 or so from:
http://www.focuser.com/atm/anodize/anodize.html

I bought 5 gallons of battery acid locally for $25 or so. I only used 1 gallon.

Here's an example of a clock I designed - it's just the body, the picture was taken before I put in the clock insert which is about 2" diameter.

footclock.JPG


I should probably make up a page on my web site with some very simple anodizing details.
 

Holey carp
Thats stunning !!!!!

The cost seems rather high but the results just blow me away
Nicely done.

Kind regards

Malcolm
 
malcolmt said:
Holey carp
Thats stunning !!!!!

The cost seems rather high but the results just blow me away
Nicely done.

Kind regards

Malcolm

I didn't think it was too expensive when I considered that I probably had a power supply that would last a lifetime and dyes enough to last 5-10 years or more. And it isn't nearly as messy as powder coating.
 
David,
Thanks for the photo of your progress :bow:. It's virtually unrecognizable as a Terry Cross design and I built one. Can't wait to see the finished engine

Cheers,
Phil
 
David,

That is one beautiful looking engine. :bow: :bow:

Best Regards
Bob
 
Beautiful work... can't wait to see it run!

Chuck
 

Latest posts

Back
Top