1st post and a newbie intro

Home Model Engine Machinist Forum

Help Support Home Model Engine Machinist Forum:

This site may earn a commission from merchant affiliate links, including eBay, Amazon, and others.

greener

Member
Joined
Feb 5, 2008
Messages
7
Reaction score
0
Hi, all

Well this is my first post here and I thought I'd intro myself. Thanks to BobW's cookbook i found this site. Although machining is second to woodworking for me, this site really peaked my interest in model engineering. Thanks, Rak. I'm sort of like a BobW except on a much let's say leaner budget. I have a 1960's southbend 9a with some tooling and a wells index milling maching. I used/bought these to build an ali extruded frame cnc gantry router and have a full compliment cabinet shop. My dad's business is stamping so I've got access to press brakes, punch presses and a B&S grinder.

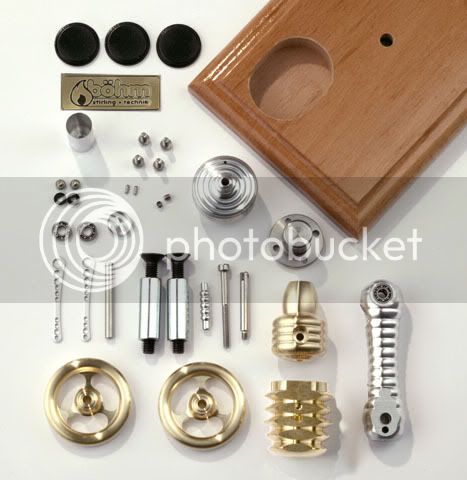
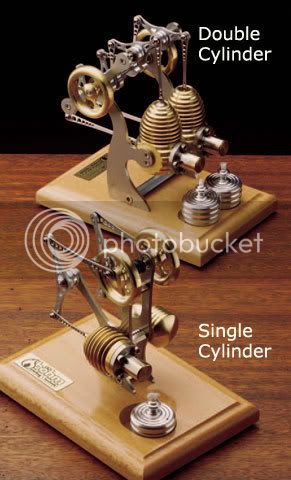
So now on to the meat of the post. I found this stirling on the garrett-wade catalog and it looked like a good place to start. So my question to everyone how would you go about designing this from a pic. So here if this works is the pic, the base is 4.25"x6.25", and that's the only scale that I have. I like the twin.

stirling.jpg


So, instead of a team build how about a team design based on the pic. I'm clueless about how the stirlings work, I'm still studying the basic of them online. How do you design the drive mechanisms and cams etc. Hopefully Bog will see this and maybe have a few moments while he's out of the shop to sketch up some idears.

Maybe this too ambitious a project to start out here, but I like starting in the deep end, sink or swim...you usually learn more along the way.

Thanks everyone
Brian
 
Those are some cool looking Stirlings.. Basic Stirling engine plans are available here and elsewhere, the rest is in the bling.. and if you're going to go to the trouble of reverse engineering the plans, it'll probably be easier to just do your own bling..

 
I'm not that creative and these looked like a place to start. I've seen some boxy looking, plain jane stuff that just isn't intersting to me although I'm sure if you were to see them run maybe a guy would feel differently.

The kit for these, supposedly discounted is like $150. I'd rather buy some more tools like a 4 jaw chuck and add to the scrap bin...Just like the kitchen I did for our house, start with 6k in materials, add 4k for machinary upgrades, 2 months later and the result is a 35k kitchen (BORG wanted 26 with less bling)for only.. honey honestly...10grand. Ha.

BG
 
Hi Brian,

I have replied to your PM.

I am the first one to admit defeat when it comes to something like this.

I know at the moment basically how they work. But never having actually made one, I can't give any pointers on that side of things. Maybe in the future I will get to try one out.

I am sure that there are members on here that can point you in the right direction.

But looking at the pics, they have taken a basic engine and made it look 'complicated'.
They have done this by using linkages and cranks to take the operating linkages on a roundabout route to get to where it should have ended up in the first place. So in theory, if friction can be kept under control, and a bit of basic geometry, you can can make an engine like this whatever size and shape you want.

But I think you are trying at the moment to take a step too far. I admire your tenacity and positive thinking, but there has to be a bit of sound judgement and feet on the ground mentality in there as well.
So unless you can get a basic model machined and running (just to prove you can get one to run, and it won't be easy, for a first engine), you might just end up with months out of your life, to end up with a pretty looking pile of junk, and so giving you the feeling of total failure, and might put you off machining for life. The basic knowledge has to be learned before the next step. It is no use looking at the moon, and think you can get there by using a ladder, there is a bit more to it than that.

I am sorry to be so offputting, but reality has to have its say.
Don't be put off, make a few little engines first, then go for the moon.

John
 
Brian,
That double cylinder looks great. I could see how those stirlings could catch your eye. If it were me ( I'm new to the small engines myself) I would build a simpler stirling from a set of good plans to get familiar with how it works. Trying to reverse engineer an build an engine you are not familiar with may be a pain. Also with an initial simpler build, it gives you some feeling of accomplish when you get discouraged. Like I said I'm new to this also , and if there is one thing I know better than most it is how to jump in way over my head :-[ And if you are like me and that is the way you work, good luck you couldn't have come to a better place for help and info.
Tim
 
Welcome to HMEM Brian.

Those are sweet looking models!
Stirling engines are a challenge even with a full set of plans.
Reverse engineering one from a picture would be impressive.

Rick


Hi Brian, just a little something I found in a shop a while back and helped me fall into the 'I want to build an engine!!' trap ! ;D

A trap of which I am quite glad I am in too ;) ( or will be when I get back into my shop!!)

DSC01055.jpg


Hope this helps fuel some brain cells out there? (I could do with a better understanding of these too!... I will learn, thats a guarantee ;D )

Ralph.
 
They are mass produced by CNC engineering in Germany by Bohm see http://www.stirling-technik.de/htmlpages/english/stirling_engl.htm
for both their web site with many examples and an explanation of hoe they work + a cut away view of the inside.

They are expensive and may be kits or built. their site shows both made up engines and pictures of their kits so you can see how much would be involved in making one.

Also try http://www.keveney.com/Engines.html for an animated view of how stirlings (and other engines) work.

My best guess is that to make one of theses engineered from a drawing with little experience would be very difficult. ALTHOUGH not impossible. Do make the plans available if you get that far ;)
 
The basic Stirling cycle is fairly simple to understand.

In the most common design, the gamma configuration exemplified by Ralph's cutaway picture, there are two airtight chambers. In one chamber is the power piston. In the other chamber is the displacer.

The displacer fits loosely in its chamber with enough clearance to move air from the hot end of the chamber to the cold end. When the air in the chamber is at the hot end , it heats and its pressure rises. The rising pressure is communicated to the power cylinder via a tube/channel of some sort and the rising pressure forces the power piston outward, creating the power stroke.

The motion of the displacer then forces the hot air to the cold end of the chamber where it contracts with a consequent decrease in pressure. This partial vacuum and the flywheel inertia then force the piston piston inward, thus completing the cycle.

A little reflection will make it evident that, when the displacer is at the cold end (i.e. the gas is at the hot end) the power piston needs to be near the top of its stroke. Thus the displacer and power piston are always 90 degrees out of phase with each other in the gamma configuration.

An animation of what I'm talking about can be seen here:

http://web.mit.edu/2.670/www/spotlight_2005/engine_anim.html
 
It doesn't take a lot of experience, but some is necessary. I know a guy that built a little oscillator. Then he built a slightly more complicated one. Engine #3 was a 1" scale live-steam locomotive.
 
This shows the supplied kit of parts - Perhaps a good start to producing drawings for a build.

HB7-102520u_002.jpg
 
The website talks about applying a ceramic paste to the power piston. I assume this is a lubricant. Anybody have any knowledge about the ceramic paste?

Chuck
 
Brian,
My first few engines I built were Stirlings. I learned how to machine metal while building them. They never ran real well. I was discouraged from learning on Stirlings by many experienced model engine machinists because Stirlings require very good skills, but my thinking was if I could build one of those and get it to run I could build anything. The problem is that they produce little torque, and so, cannot overcome even the mildest friction points. I have since built 4 steam engines and they all run quite well and reliably. Someday, when I think I'm better at maching than I am now I'll go back and get those Stirlings running ;D. I also have met some folks at engine shows that have built running models first time. They learned faster than I could.

Cheers,
Phil
 
Thanks everyone,

Rickharris, david, and marv thanks for the websites, and the kit parts pic, only 32 odd parts. I'm starting to see what I'm up against. I guess I though (there you go thinking again, dooh :eek:) that people started with stirlings and graduated to steam or IC.

philjoe and John, if it works it works and if not you should at least learned alittle something along the way. I initally thought that these would be simpler than lets say the bogstander "standing steamer" . I don't give up easily and I know where to come for help...now.

Brian
 

Latest posts

Back
Top