Zeroing a vernier height gauge ?

Home Model Engine Machinist Forum

Help Support Home Model Engine Machinist Forum:

This site may earn a commission from merchant affiliate links, including eBay, Amazon, and others.

clivel

Well-Known Member
Joined
Jan 20, 2012
Messages
101
Reaction score
9
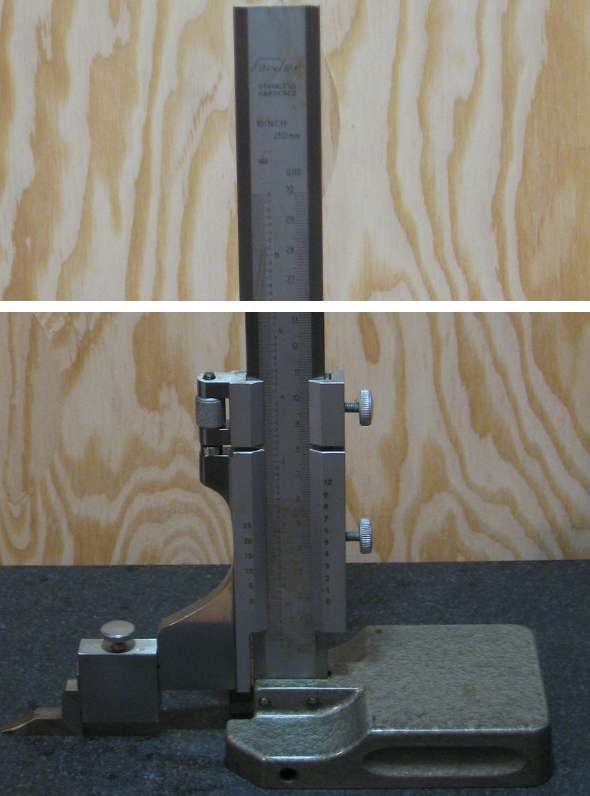
A while back I bought a 10"/250mm vernier height gauge on eBay. It is marked "Fowler" but has no model number on it so I had no luck with an online search for a manual.

Yesterday while struggling to mark out the little rectangular block of brass that is to become a cylinder for my Elmer's wobbler using an odd-leg, a scriber, a square and only two hands I decided it was time to quit being a masochist and to figure out how to use the height gauge instead.

There were three items in the fitted box seen here still covered in packing grease. With the 'foot ?' flat against the surface plate the vernier read 0.

heightgauge00.png


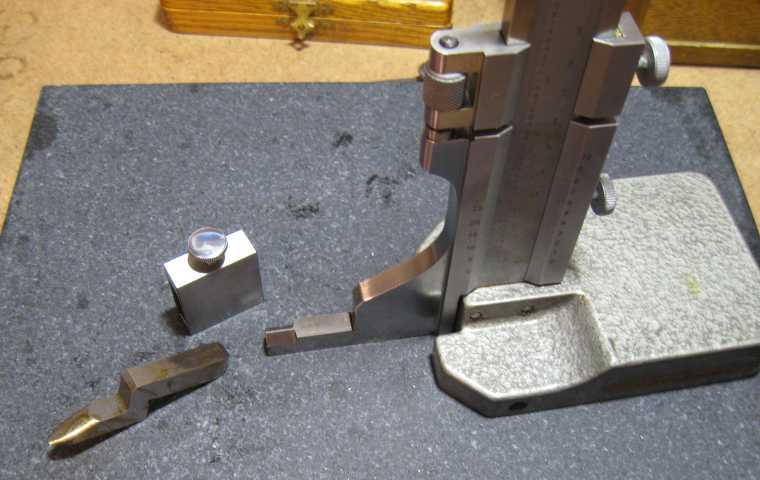
how hard could it be to assemble, but looking closely once assembled the clamp that holds the scriber to the 'foot' raises the scriber and the zero by approximately 3mm.

heightgauge01.png


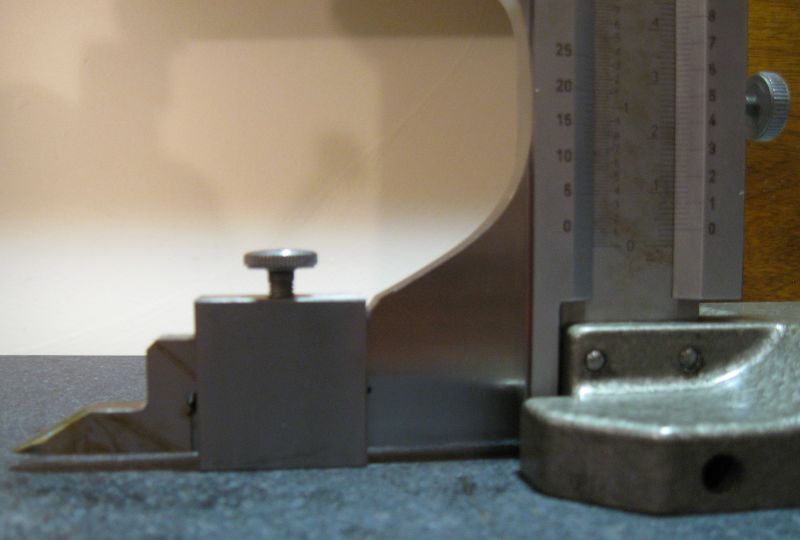
I am probably doing something really stupid, but surely there must be away of adjusting the zero, or affixing the scriber some other way?

On a related note how does one read the height gauge while wearing bifocals? The alternatives seem to be a neck brace to ease the cramps in one's neck after twisting it into pretzel while getting ones eyes level with the vernier else a good pair of tweezers for picking out the bits of swarf from kneeling knee deep in it :)

Thanks,
Clive
 
Clive

I do not have mine at hand now (not a Fowler) but I think the scriber should be at the bottom and not on top of the leg. Also at the top of the ruler you might have another adjustment for zeroing the ruler.

Vince
 
Yep, the scribes goes at the bottom then use the zeroing screw at the top

IMAG0317.jpg


J
 
Vince and Jason,
Thanks for taking the time to answer. I tried the scriber at the bottom, but if anything that exacerbates the problem. When the scriber is bottomed onto the surface plate, instead of zero the vernier now reads a fraction over 20mm. Unless I am missing something I see no place for any sort of adjustment. There are no screws or anything like that at the top of the rule.

heightgauge02.png


Clive

Maybe I am asking the obvious, but did you have a look at the bottom of the base to see if there are any adjustments there? Also, in your last photo, there is a hole in the side of the base. Any screw in there?

As you said there must be a zeroing facility somewhere.

Vince
 
Hi Vince,
The blade seems to be fastened to the base via what looks like 3 rivets or studs. Two can be seen in the photo, the third in the hole that you refer to which extends to both sides of the base.
There are no visible screws or other means of adjustment at the bottom.
I am really puzzled by this gauge. It seems unlikely that a reputable company would go to all the trouble of supplying an item like this without ensuring that it is functional.
Thanks,
Clive
 
Clive,

Very strange, did you buy it from a private sale on eBay or from a reseller. Has the bottom of the base been altered at all, maybe someone has machined off 20mm in the past, although a bit of a long shot. Can you add 20mm to the base somehow. Googled Fowler but could not find the same item.

Paul.
 
Looks to me that the "scriber" bit is not original.
 
Some height gauges simply don't have any form of scale adjustment and you have to do the math.

Mine is bolted to the base such that you can adjust the column up and down slightly but its somewhat hit an miss.

Yours looks fixed in every way.

As Noitoen said that may not be an original scriber - it clearly does not fit on top - if you fit it to the bottom does it "zero" on some convenient number like 10.00 - if not make or modify it until it does.

That will simplify the math.

Ken
 
With that little difference, all you had to do is to braze a little piece of hss or something and make it look like the normal scribers with the flat tip. To do fine adjustment then you just shim it until it's correct.
 
Hey Clivel,

Try inverting the position of the scribe block.....in the photo it's below the arm....try mounting on top of the arm...?
The clamp doesn't care. Maybe that's enough.

20 mm is a lot!

Dave

 
Now, looking at the first photo, I see the vernier at 3mm and the tip at about 3mm from the base. The sciber clamp will never let the tip touch the base indicating 0mm. To see if it's correct, try to measure the hight of a block and correct the difference with shims.
 
I've got a Starrett height gage. Same issue. I've concluded that the easiest solution is to take a relative zero reading with the scribe touching the surface plate (in your case, 3mm-whatever) and subtract it from whatever the height measurement is.
 
I had a height gauge like that and it drove me nuts doing the math to get zero readings.

I sold it on ebay and bought an electronic one that I can push the zero button wherever I need it. I love it, Id never go back.
 
Hi clive.
I can see the only problem you will have is if you have something really thin and need to mark less than 3mm.
Otherwise so long as the bottom of the scribe is the same as the bottom of the mount then the tip of the scribe will be where it indicates on the scale.
If your game and you want to make it possible to have the scribe go all the way to the bottom you might cut the bottom off the clamp and silver solder it onto the mount or cut the bottom off drill two holes and bolt it to the mount ?
But like I said so long as the bottom of the scribe is the same as the bottom of the mount ( which you said was set at zero ) then the scribe will be what is indicated.
Just MTCW. :)
 
Araldite , screw or pin and loctite a couple of strips of 6mm gauge plate (or even some 8mm key steel, given the price of gauge plate) to the base .
set clamp as in first photo and bring it down on to a piece of accurately measured scrap plate
carefully note reading on vernier
subtract this from the the scrap plate thickness and make a new scriber like the original incorporating this measurement. gauge plate would be ideal (hardend and tempered) but casehardend mild steel would do as well. make a couple so you always have a sharp one to hand.

given my machining skills , I would probably make the scriber to read (at table level) a couple of thou' to high , and after hardening , try to bring to zero by tickling it on the side of a grinding wheel.

I know what you mean about 'pretzeling' your neck. I use a surface gauge and rule and got fed up with 'squint and bend' so built an eye level shelf to set the gauge against a rule before transfering to surface plate (read scrap granite worktop!), but ...erm....surely with a vernier hight gauge can't you just pick it up to adjust?

best of luck with your dilemma

yours

peter
 
Look on the back of the top of the scale, No nut?, on mine the scale is the piece that is adjusted to zero, not the beam. The scale slides within the beam.

In use I have found that its almost always a relative reading not an absolute reading that is made, I measure to the block or whatever is holding the work, write down that number then measure the wrork from there. Then do the math.
 
::) dose it zero without the scribe fitted ? ,,,,,,,,,, if so its not for marking out and not designed to have a scribe fitted .

T
 
Maybe I'm missing something but I don't see anything wrong. ??? In the picture the scale reads about 3mm and the tip of the scribe appears to about 3mm high, just as it should. If you changed your scale to where it read 0 at the position the scriber is at now, all of your measurements would be 3mm too long.

Try measuring a known entity such as a 1-2-3 block (or it's metric equivalent ;D ) and I think you will find the scribe agrees with the scale. You've already proven that the bottom of the arm zeros, so as long as the bottom of the scriber is flush with it it will zero also. There's no real need to have the scriber touch the surface plate, if you need to get down farther than your 3mm just set the part on said equivalent block and subtract the thickness of the block.

As to reading the scale, I have found that it's easiest to pick up the gauge and hold it horizontal while sighting across the scale. A good light source also helps immensely.

Cheers

Jeff
 
Back
Top