Webster build - one from Michigan

Home Model Engine Machinist Forum

Help Support Home Model Engine Machinist Forum:

This site may earn a commission from merchant affiliate links, including eBay, Amazon, and others.

kquiggle

Well-Known Member
Joined
May 29, 2012
Messages
412
Reaction score
137
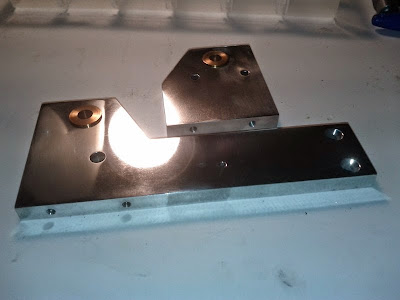
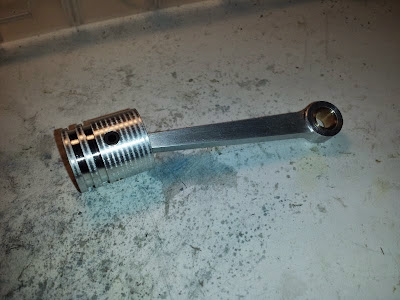
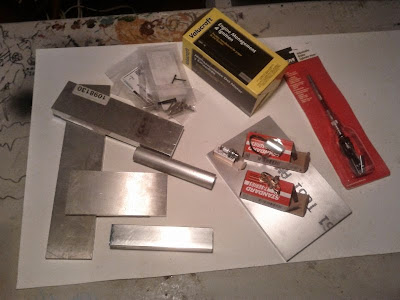
The recent posts by another member (http://www.homemodelenginemachinist.com/showthread.php?p=264688#post264688) have inspired me to start posting on my own Webster build. I started this build way back in September 2014, but put it on the back burner for a bit while I worked on some other projects. Recently I resumed work on it, and have been making good progress. Here is where I started.

IMG_20140801_164342.jpg


You can see a build log of my progress on my website (link below), but I also plan to post updates here as I complete various stages of the build, as well as playing catch up on work already completed.

My build log - a work in progress:

https://sites.google.com/site/lagad...s-mills-etc/build---webster-engine#components
 
WebsterEngineBuild
I made the cylinder from a piece of mystery metal given to me by a local machine shop (seems to be some kind of steel as it is ferromagnetic and has a bit of rust; gives a nice finish when machined).

You might notice that I left the port as a plain hole, instead of elongating it as called for in the plans - didn't seem to be any need for that.

IMG_20150407_090135.jpg


Link to build log:

https://sites.google.com/site/lagad...hes-mills-etc/build---webster-engine#cylinder
 
looking very nice. can you post a link to the buffer you bought? I have been thinking about what to get. yours seemed to do a great job. thanks
 
looking very nice. can you post a link to the buffer you bought? I have been thinking about what to get. yours seemed to do a great job. thanks

I got the 6 inch buffer from Harbor Freight (link below), along with the buffing compounds. I've only used it a bit, but it seems to work well. As I recall I got it on sale with a 25% coupon (and they are local - so no shipping cost) so it was a pretty good deal.

http://www.harborfreight.com/6-inch-buffer-94393.html
 
  • Like
Reactions: gus
Looking good. The finish looks great. I will also take a look at the buffer.

My Webster build is going well - but slow. I have other projects on so I try to spend some time in the workshop as well as other projects. However, I am enjoying building this engine. For me, as a newby to model engineering it is a great learning curve.

John
 
thanks for the link on the polisher. I had been considering that one form HF, but was not sure. I think I will buy one now.
 
About the buffer, I should add this: HF also sell polishing compound - I got the "Brown" and the "White." I dedicate a polishing wheel to each compound and I never mix them up. Probably also a good idea to keep them capped when you are not using them, as they can dry out and get too hard to use. My basic technique is this:

First, use fine grit abrasive paper (if necessary) to clean up the surface by hand and remove any surface dirt or scratches. Follow up with the buffer and the "brown wheel", clean off any polishing compound, and finish with the "white wheel." Clean once more and hand polish with a good car wax (optional).

Finally, when using the buffer it will throw a considerable amount of cotton fluff and polishing compound behind the wheel and will make a mess of your workbench if you are not careful. I use a the open end of a cardboard box behind the buffer to catch all the crud it throws off - just don't have enough room for a dedicated buffing area.
 
Finished the crankshaft. Instead of silver soldering, I decided to go with a shrink fit; it was tricky to get the diameters right, but it feels like a good solid fit. While I was at it, I made the crank pin out of O-1 drill rod and hardened it.

The shrink fit left the counterbalance with a black oxide coating - I could polish it off but I like the way it looks so I'm keeping it.

You may also notice that I went with a true counterbalance (modeled after one by Brian Rupnow) instead of the simple straight piece in the original plans.

IMG_20150403_091528.jpg


Link to build log:

https://sites.google.com/site/lagad...lathes-mills-etc/build---webster-engine#crank
 
Looks pretty good mate! I checked your site too and you're doing a pretty good work there.
 
Hi John, when you see a reference to a shrink fit, it refers to the method of leaving a slight interference fit between shaft and hole, but before assembly, the part with the hole is heated up to expand the hole, allowing it to slip on the shaft. When it cools it is a very tight fit. I have used the kitchen oven in the past to heat up rims for flywheels, it certainly doesn't have to get red hot to work. Of course, different materials have different rates of expansion. I'm a keen advocate of shrink fits, just be careful that the parts don't grab when they are only half way on.

Paul.
 
John -

Paul is correct. In my case I heated the counterweight with a MAPP torch and pressed in the crankpin first using a quick and dirty tool I made for the purpose. I used an Arbor press to press it in, but (done right) it goes in pretty easily. After everything cooled down, I reheated the counterweight and pressed in the shaft.

If you get the hole and part diameters exactly right, then the part should just drop into the heated hole; in practice - at least in my limited experience - it's more like a press fit. When the "hole" cools down and shrinks the "press fit" becomes a really tight fit.
 
A member just asked me:

  1. Where can Webster gears can be purchased?
  2. Are you planning to make your own gears?
As I think the answers may be of general interest, I am posting them here:

Where to purchase gears?:

I believe you can buy the gears online from Berg (http://www.wmberg.com/). I have never purchased from Berg, but from looking on line the cost for both gears totalled around $70.

You can get the part numbers from the Bill of Materials I prepared here:

https://drive.google.com/open?id=1oMlNHqiy-nVVgTG-yp_lvXv3PweLqRxAzLXx9enckYI&authuser=0

Are you planning to make your own gears?

I am planning to make my own gears. I have two plans in mind:

Plan A: Make the gears out of nylon. I don't know if nylon gears will hold up in this application, but I'm going to try it and find out. In addition, instead of making 48 and 24 tooth gears, I will make 38 [correction: 36] and 18 tooth gears - this has two advantages: A larger tooth works better for plastic, and they are easier to make with my Spin Indexer (I don't have a dividing head). This is also going to require some redesign to make this work with the shafts, cams, and flywheel, so this is going to take a while.

Plan B: If the plastic gears fail, I'll make metal gears instead. I'll need to modify my Spin Indexer for this.

I've never made gears before, so I am really diving into the deep end on this.
 
Last edited:
I picked up a buffer from HF today. 39.95 on sale and I had a 20% coupon so I got it for 20% less. then they had 24 free AA batteries also. what a deal.
 
Last edited:
I am planning to make my own gears. I have two plans in mind:

Plan A: Make the gears out of nylon. I don't know if nylon gears will hold up in this application, but I'm going to try it and find out. In addition, instead of making 48 and 24 tooth gears, I will make 38 and 18 tooth gears - this has two advantages: A larger tooth works better for plastic, and they are easier to make with my Spin Indexer (I don't have a dividing head).

Should that not be 36 and 18 tooth gears, the gears that you mention will be the wrong ratio.

Paul.
 
Back
Top