Tool crash?

Home Model Engine Machinist Forum

Help Support Home Model Engine Machinist Forum:

This site may earn a commission from merchant affiliate links, including eBay, Amazon, and others.

Jos360

Member
Joined
Mar 23, 2014
Messages
8
Reaction score
2
I've been reading this forum for a while now, but decided to sign up. I can learn a lot from each of you and maybe I could even contribute some day...

I've been reading a lot about threading and especially about what can go wrong. Which made me wonder:
I always thread towards the spindle on my lathe, and keep a close look and quickly retract the tool when it approaches the end of the thread (I usually use the parting tool to make a relief where the thread should end).

But I'm curious to what will happen if the tool crashes in the workpiece. Speaking for itself, I'm not going to try it out but certainly someone here unfortunately will have the experience? Is the tool going to break, the workpiece, a changegear, or...?
I understand not every lathe is the same so this will differ, but any experience would help. Maybe I should start threading from the spindle back to the tailstock..
 
Welcome to the forum. Not done it but on my Lathe I expect the tool would attempt to cut a champer on the work then the chuck would stop when the motor drive belt starts slipping! Belt drive IS a good thing!
 
I've been reading this forum for a while now, but decided to sign up. I can learn a lot from each of you and maybe I could even contribute some day...

Welcome and when you get a chance post an introduction in the welcome section .

I've been reading a lot about threading and especially about what can go wrong. Which made me wonder:
I always thread towards the spindle on my lathe, and keep a close look and quickly retract the tool when it approaches the end of the thread (I usually use the parting tool to make a relief where the thread should end).
Sounds like you are threading the way many of us were trained.

But I'm curious to what will happen if the tool crashes in the workpiece. Speaking for itself, I'm not going to try it out but certainly someone here unfortunately will have the experience? Is the tool going to break, the workpiece, a changegear, or...?
I understand not every lathe is the same so this will differ, but any experience would help.

What will happen??? like you said depends on the lathe. for this reason many machines are set up with a weak link if the lead screw has a steel pin a brass or aluminum one will shear as an easily replaced sacrifice link.
What can happen any number of things. Anything from the lathe stalling to belt slipping to the part being ripped out of the chuck to the chuck slipping and losing index. and like you said stripping a gear.


Maybe I should start threading from the spindle back to the tailstock..

well you can if you want a left hand thread. !!

what you are not saying is what kind of lathe you have or more specifically what spindle nose the lathe has.

If you want to machine a rh thread working away from the chuck you need to turn the tool upside down and reverse spindle direction. and this is not recommended on a threaded chuck.
Tin
 
Thanks for the replies, I'll try to upload some photo's for introducing myself in that specific section.

I have a Weiler Matador lathe. It has a camlock spindle so unthreading is not a risk. I can run it in reverse to cut the threads with the tool upside down.

I've had it happen once on a short-chucked workpiece where I had too much feed and the part unchucked itself, but fortunately nothing serious happened.

I'm just starting in precision machining. I started a couple years back at work, haven't done it for years, bought an old machine about 3 years ago that was worn down to almost scrap and recently I decided I should really invest in good machines and buy a good lathe and mill. But I guess I should start a new topic on this subject. :D
 
Early in my own experience on my own lathe (I never worked as a machinist, always my own hobby work, I mistakenly allowed the toolbit to do exactly as you suggested, running in "back gear", slowest possible spindle speed, outside diameter thread, and the bit, a 1/4" X 1/4" H.S. bit, broke off with a mighty grunt! I was 14 years old!

One trick I learned along the way involves cutting internal threads. If the bit is mounted away from the operator, such that the cut takes place at the rear of the hole, with spindle rotating backwards (that is, clockwise as viewed from the tailstock end, it is much easier to observe the action than if the cut is done with bit facing the operator, especially with small holes.

Now, would that thread resulting thusly be right-handed? hmmmmm... jack
 
Depends if the feed is inward or outward ;) But on an inside hole I would always let it go outward to not let the tool crash. In that case it would produce a right-hand thread.
 
More than one way to set up for threading.

And if you flip the tool upside down there are another 8 possibilities.
Tin

Threading Guide..JPG
 
Also You may find out that once the crash starts the half nuts seem to become almost unengageable as they seem to self lock in place.:fan:
 
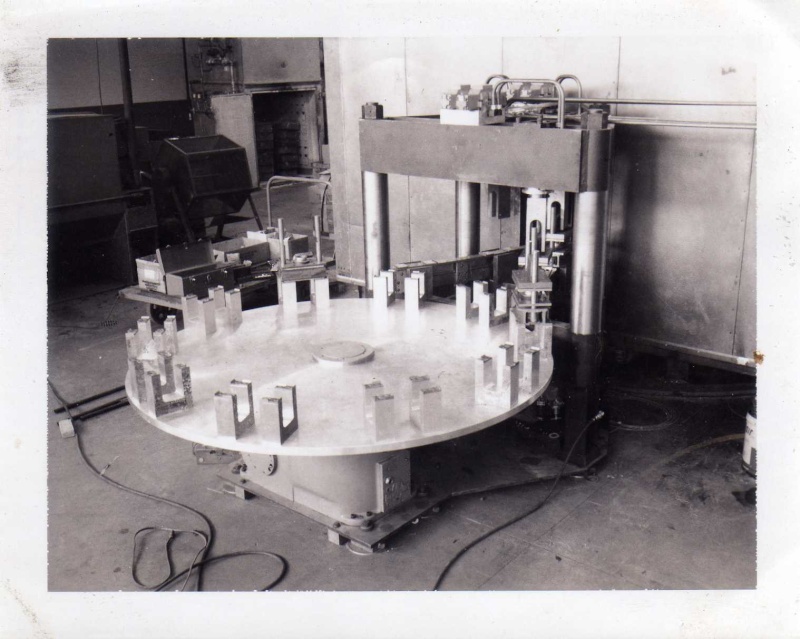
In 1970, my co-worker and I embarked upon the design and construction of an automated oil seal molding machine. I had proven that, setting aside the traditional huge molding-press method, and simply "locking" the mold with it's inserted metal case and uncured rubber "hunk" under the indicated tonnage load for that particular seal, would result in product fully as acceptable as the normal, cumbersome method of molding.

The idea was to carry a single mold cavity mounted in a "carrier" which could allow the cavity to be loaded and locked; we used 30,000 lbs. as the operating closed force applied. The locked and loaded carrier was then moved into a huge oven operating at the correct molding temperature, having a 60-position turntable within. Each machine cycle allowed the oven turntable to index 1/60 of a turn. Outside the oven a smaller turntable having ten index stations, only 8 used, allowed the closed and locked carriers to be unlocked, opened, the newly-molded oil seal within the mold was blown out onto a collection chute, mold lubricant was sprayed on the mold, a new seal case, then an uncured rubber ring were inserted into the mold which was then loaded to 30,000 lbs. momentarily, load released then reapplied and the carrier locked, after which it was lifted and transported into the oven.

Cycle time was 3 seconds. In other words, every three seconds, the outside table would index 1/10 turn, one of two curved sliding beams within the hydraulic press lifted and transported a locked carrier out of the oven, setting it on a "nest" on the outside turntable, the other beam lifted and transported a newly-locked and loaded carrier into the oven, and the big oven turntable indexed 1/60 turn. These actions of course did not happen all at the same time, but were carefully synchronized by a mechanically-driven pneumatic programmer. The machine received a U.S. patent.

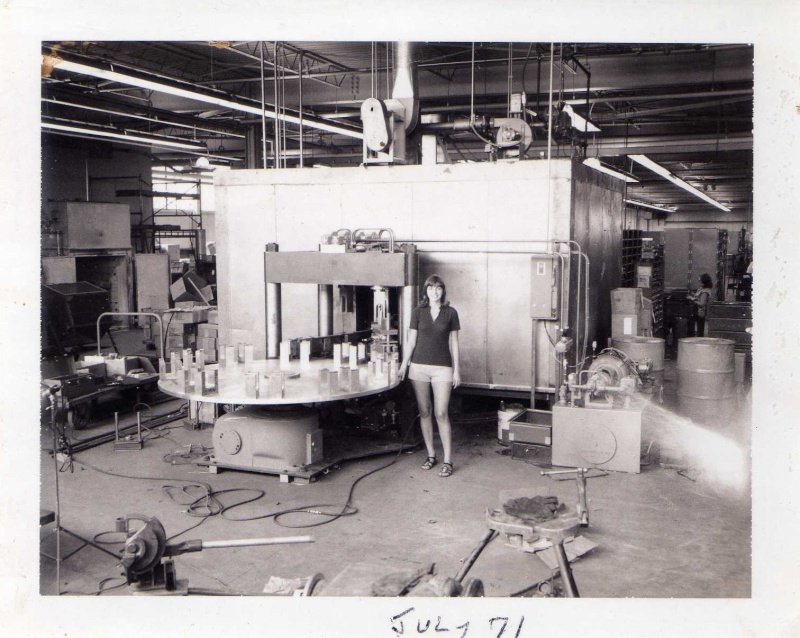
The purpose of writing about this beast is that we used a safety device capable of mechanically disconnecting the drive mechanism from each turntable, as well as the indexer for the curved transport beams. These safety devices consisted of necked-down "shear pins", which were commercially-available in a large variety of ratings. An unprotected "crash" of parts of this magnitude would have been a nightmare realized. Below are a few pictures taken during construction.

img07911.jpg


This shows the outer work turntable, with it's carrier nests, the hydraulic press which eventually had 4 rams (not complete here, yet), and a mold carrier sitting on the table, about to enter the press.


img08211.jpg


This one shows close-up the press with two carriers within, and a peek into the oven, which ran at around 400 degrees F.


img08310.jpg


Finally, a view of the whole deal, including the hydraulic power unit, and my wife's sister, then 15, who grudgingly accompanied me on that trip to the plant, which was located in Churubusco, Indiana, from Chicago, where we lived. If this thing warrants interest, I will be glad to venture further. jack
 
Having made many many threads of all sorts, a few times things did not work as planned. If you overrun with aa carbide insert the insert breaks, of course the work is nicked as well. With a HSS cutters the tool often digs in and bends the work, bends the tool, sometimes stalls the lathe but only small lathes.

Some things I do when threading, I always position the crossfeed handle at 6:00 position, feed is with the compound, this way left hand gives a quick spin to the handle almost without thinking to retract the cutter, while the right hand disengages the half nuts. The lathe has a built in stop on the cross feed, which makes resetting for the next pass a bit faster.Many other have the threading stop which clamps to the dovetails of the crosslide.

Practice if you have not done threading in a while, Buy a set of measuring wires to check out your work, using an existing sample to try on a thread is handy, how many have a 1.250 x 24 nut in the drawer.
 
I've been reading this forum for a while now, but decided to sign up. I can learn a lot from each of you and maybe I could even contribute some day...
Welcome aboard. You posted so you have already contributed.😜😜
I've been reading a lot about threading and especially about what can go wrong. Which made me wonder:
I always thread towards the spindle on my lathe, and keep a close look and quickly retract the tool when it approaches the end of the thread (I usually use the parting tool to make a relief where the thread should end).
There are ways to take out the human element and set a lathe up to stop automatically. A mechanical approach is a clutch that kicks out the lead screw drive. It is also fairly simple to electrically stop a lathe if the controls are already there. Either way such feature do no good if they aren't set up properly.
But I'm curious to what will happen if the tool crashes in the workpiece. Speaking for itself, I'm not going to try it out but certainly someone here unfortunately will have the experience? Is the tool going to break, the workpiece, a changegear, or...?
I understand not every lathe is the same so this will differ, but any experience would help. Maybe I should start threading from the spindle back to the tailstock..


I'm not sure I can add much more as the other guys have done a great job. Eventually something like this will go wrong, that is why E-Stops are so nice.

One thing to note though; don't expect a belt drive to slip to save you or the machine! It might slip if the belt is loose but it also might grab delivering all the power the motor can manage. Of course the type of belt, pulley sizes, pulley materials and other factors play a role here. There is a good possibility of breaking mechanical parts even with a belt drive.

Some of the tricker threading ops might be better done with a CNC conversion or an Electronic Leadscrew. These days the option of CNC or automation should always be considered as it can actually lower you shop costs while allowing you to do things you might not be able to do manually. If you do a lot of difficult threading it is worth looking into.


Sent from my iPad using Model Engines
 
I'm a coward. If I am threading on my manual lathe, I use a crank handle I fitted to the rear end of the chuck shaft. That does not crash.
But more likely I cheat and do the threading on my CNC lathe. It does a far better job than I could anyhow.

Cheers
 
i have done it. ended up breaking 2 gears on my lathe (both broke in the sam crash), cast iron gears. 1 just broke a couple of teeth, the other cracked to the center hole but did not come appart.

also ruined the piece i was cutting.

and in reply to mcostello's post above about the half nut not wanting to release, thats exactly what happened, i had just kissed the end of the stock when i jerked the half nut and it did NOT want to release, and thus dug in hard, i emediately hit the shut off but it was to late. it happens so quickly.

i got a new to me book in the mail the other day, "the model engineers workshop manual" it has a retractable threading tool that looks really cool, a bit beyond my abilities at this point to make, but looks like it would be a very handy tool.
 
One thing about the threading lever, once You have a hold of it You must be prepared to put some muscle on it quickly if the need arises.
 
Back
Top