Thumper--a 1 3/8" bore i.c. engine

Home Model Engine Machinist Forum

Help Support Home Model Engine Machinist Forum:

This site may earn a commission from merchant affiliate links, including eBay, Amazon, and others.
Nick P--It's a neat trick. A hundred people have asked me how I do that. I had a piece of 1" diameter 01 oil hardening steel. I chucked it up in my lathe and drilled and reamed a 1/4"center hole in it. Then I used my cheap old squeeze type Chinese knurls to knurl the outer diameter x about 1/2" long. Then I parted off a slice 0.100" thick which had the knurl on the outer diameter. Used my oxy acetylene torch to bring that slice up to cherry red, then dumped it into a tin can of old motor oil. This hardened the round slice harder than the devils horn. Then I put a .125" slot in the end of a piece of 1/2" square mild steel, with a hole thru at 90 degrees for a 1/4" mild steel axle. Loctited the axle in place, the hardened slice of knurled material is free to rotate. After the slot in the pulley I'm making has been cut with a parting off tool, I mount my newly made skinny knurler into a tool holder for my quick change toolpost and use the topslide to bring it in against the bottom of the pulley slot, with the lathe turning at about 150 rpm. a little bit of pressure, and there you are.
bFVXWy.jpg
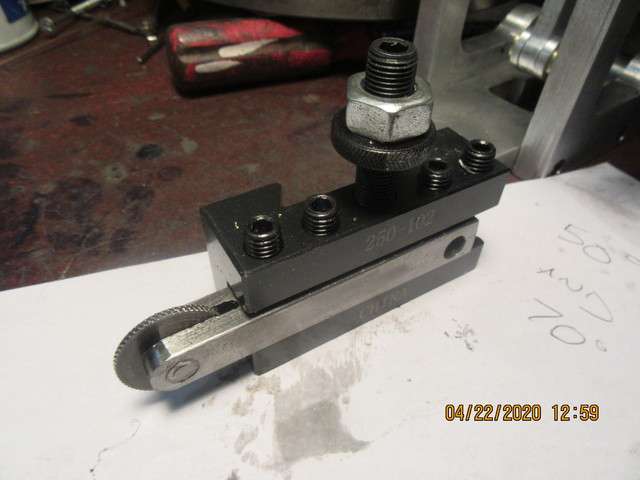
Thank you Brian. A really helpful and clear answer - I really appreciate it and the tool looks great. Like a41capt (John W) said - ‘and now I have one more piece of tooling to make’ 😉
Great thread by the way - I’m really enjoying catching up on the engine build. Such a great resource thanks to you and everyone who contributes and takes time out of their day to answer queries and share their knowledge.
Thanks again, Nick
 
I wanted to buy a spray can of John Deere green today for the flywheels, gas tank, and rocker support, but the hardware store is closed because of Covid. I wanted to practice some more tig welding today, with special attention given to the foot-pedal, but it was too cold in my main garage. I wanted to take a longer "fat mans walk" but I've got bad arthritis in my left knee. I wanted to go see my grandkids, but I can't because wife and I are "social distancing". All in all, I haven't done a hell of a lot today except cruise the internet and read the forums. I've had a very much "useless old man day"!!!
We are never " useless old men" just slowed down a little, and in my part of the world we are still getting days of 33 C Ted
 
Hi guys, newbie to the forum and following this build. I'm retired from 32 years as a sheet metal fabricator and just throwing this out there. Acetone has been commonly used as an aluminum welding pre-clean for many years and is used every day. I'll also say that chemical pre-clean is only the last step. Mechanical cleaning is the most important step, chemicals can never remove what a stainless wire brush can. If you want an aluminum weld to be proud of you need to get the spot to be welded down to as close to virgin metal as possible. Also on the tig welder pedal thing, as a general rule, it's all about practice and muscle memory. For the most part, if you can drive a vehicle and operate the steering wheel and the brake pedal and look out the windshield at the same time you can get used to using a tig pedal.
 
Yesterday I bought two new stainless steel brushes. I have trouble chewing gum and walking at the same time, but I'm sure practice with the tig pedal will give me a much better result with my welding. It is still unusually cold here, and my main garage is unheated. I hope to get out into my main garage for more practice sessions with the tig welder later this week.
 
Yesterday I bought two new stainless steel brushes. I have trouble chewing gum and walking at the same time, but I'm sure practice with the tig pedal will give me a much better result with my welding. It is still unusually cold here, and my main garage is unheated. I hope to get out into my main garage for more practice sessions with the tig welder later this week.

Ha ha, I hear the walk and chew gum thing. I was the kid in school who couldn't operate a baseball glove. We had some snow flurries on the west coast of Michigan yesterday but it's supposed to get hot today, 54 F.
 
YouTube! That's what I've been missing as I drive. Gotta add that one in. Hmm ... do you think the police would object if I set up a projector to put YouTube as a HUD on the windshield?

:)
 
No machining, no tig practice!! I'm sick. Not the killer virus, just a nasty flu bug---more in my guts and body aches than anything. No temperature and no congestion. I needed something to do, so today I came down to my office and filled in the "custom properties" for all the components on Thumper. Filling in the "custom properties" of each component lets the description of that part appear in the main bill of materials, both on the main assembly drawing, and also on any sub assembly and part drawings. This is not something I would normally do on model engine drawings, but boredom makes me do strange things. I bought a spray can of John Deere Green paint for my flywheels, but after my wife went to the trouble of picking it up for me, I decided I didn't like the color. I've arranged to pick up a spray can of darker green tomorrow.
SamVif.jpg
 
Still feeling crappy, but good enough to go for my "fat mans walk" and watch YouTube videos. There is a 4 part series of videos about "This Old Tony" making a go cart for his son. There is nothing too amazing about the go cart, but my God, the man is a virtuoso with a tig torch. He makes it look so easy to weld up all the different joints. I've built a couple of go carts over my lifetime, but the frames were either stick welded together out of old bed frame angles or oxy-acetylene brazed from electricians conduit.
 
TOT is one of my favorite channels, he has a lot of good content and is also very entertaining. Especially when he does his magic material chopping.
 
Hi Brian:
I agree with fabricator, I sure do enjoy Tony. On tig welding you will be surprised how good and what you can do with tig
as you continue to use it. I was working on a test stand attached to a lab oven and had to weld about a 2 1/4" square box with
a 2" round tube in the bottom in the lower side of the oven. The round tube cam half way through the wall of the oven and I was
installing the box to the tube. The box was being added to fit the test stand I had designed and built. I found a flex head torch
that I could flex inside the box and weld the tube to the bottom of the box. The box was about twice the thickness of the thin tube
so by aiming the heat into the box from the opposite side of the tube I was able to feed the rod straight into the joint while standing
bent over almost onto head. (No room to lay down or get in a good welding position.)
NOW still stuck in the house till May 15, 2020 (NOTE: over a 100 people died in one day in the next county)
Bill Thomas
Michigan usa
 
I follow several forums and this build came up on my radar. Reading through from the first to the the last I must commend you for a a very educational sequence of design and build. One statement in post #116 was reference to cam cutting in a video by Chuck Fellows and an old thread of yours on his method. I looked for Mr Fellows and found that he has passed, and no references to his videos came up. Can you direct me to his video and your past thread on the subject? I will continue to follow to the first put-put.
 
And here we have the second flywheel/fan hot off the welders bench. Ignore the stuff to the left of the flywheel---thats just practice welding. I spent an hour this morning playing with the foot-pedal while welding, to get used to changing the size of the arc puddle and not letting everything run away out of control. The flywheel still has to be cleaned up, and "trued" on the lathe but it looks a lot better than the first flywheel did immediately after welding. I am an old dog, but I am learning new tricks.
ObXJfA.jpg
 
SO what did you find with your pedal experiments. Were you able to "throttle back" to the point where nothing was melting and you just have the tiniest of arcs?
 
dsage---Yes--I did exactly that. things went much better.---
Leapin' Lizards Annie--Just look at that thing!!! Both flywheels fit where I intended them to. I could probably spend a day "fettling" around the welds to blend everything in, but I'm not going to. Plan is to knock down any high spots and any sharp points, then paint them. I had purchased a can of John Deere Green, but decided that I didn't like it. Went back and bought a darker green which I think will look nice.
gHNtM9.jpg
 

Latest posts

Back
Top