TB1 - Elmer's OC Reversing valve

Home Model Engine Machinist Forum

Help Support Home Model Engine Machinist Forum:

This site may earn a commission from merchant affiliate links, including eBay, Amazon, and others.

Tin Falcon

Well-Known Member
Joined
Jul 9, 2007
Messages
7,207
Reaction score
787
Ok guys I am finally pushing forward on the reversing valves. Making the valve blanks was pretty straight forward. turn the material to diameter, drill the center chamfer the side and part off. I then machined the pot chuck and faced off the back side I did 16 just for extra margin.
Today I finally got to the interesting part milling the slots. Ir i was just going to do one or two the obvious choice would have been to set them up on the mill. but I had to be different. the first thing I did was make an indicator holder. The other thing was make a spindle nose protector that doubles as an indexer the index stop is attached to the indicator holder. As for milling I set the hand piece for the dremel in a QC boring bar holder. Once the contraption was in place i centered the end mill in the hole of one of the parts then lowered the holder the required amount and set up my thread stop as a cross slide stop . So I pop in a blank in plunge cut .020 crank the cross slide between the stops and repeat to depth. Then rotate the lathe spindle 180 and do it again.
Tin

MVC-023F.JPG


MVC-026F.JPG


MVC-025F.JPG
 
Guys I was planning on making the studs for the reversing valve the mini lathe was the tool of choice.
to make a long story short on or about 7-29 a power sure took out the control boards on my mini mill and mini lathe. I did not discover this untill 7-4 .
I can send 4- 40 screws in lue of the studs and the pieces for the ball and handle stem or I can finish . This next week I will be working long hours and out of town a couple days.
My apologizes for procrastinating, not meeting the dead line and setting a poor example.
My intentions were to have the assembly done for all.
I plan on meeting up with Brass machine next week end to exchange what parts I can. Sorry for any inconvenience. please pm or email your wishes.
Tin
 
We all get Busy Tin. No need to apologies. Just finish mine up when you get a chance.

Later, Wes
 
Finish up Tin. This isn't a race, but a fun thing to be involved in. Wes is still waiting for screws... I am having some personal problems that have tied me up as well. I have to finish up... I hope to tomorrow or Monday. I think we all understand that life gets in the way sometimes. If we make it stressful, then it isn't fun anymore.

Know what I mean?

Eric
 
Tin: finish the parts when you finish the parts. THEN I'll build. There is no-one hanging over our shoulders with a deadline for this, it's for fun!

Joe
 
Don't feel any pressure from me. I just sent a message because I thought I might have missed something. I haven't had time to keep up with the board this summer. This is supposed to be for fun! There is no hard date that I am aware of so just do what you can when you can! ;D
 
Thanks for the support guys.
I did manage to get out in the shop and push things forward a bit. I wanted to get the studs out of the way but things happen . anyway I did grind a new boring bar from a HHS bit. This is a first I have a similar one but this is the first one i have ground like this. i then counter bored the valve disks did a little more machining on the or chuck and counter bored a small handful of 4-40 brass thumb nuts one for each engine and a couple extra. So I feel like I am moving forward again. thanks for the patents. An I would be amiss without posting at least one photo
Tin

counter bore.JPG
 
Just a comment from an "outsider" as I'm not involved in the build .......... but ......

imho ........... I think you guys are doing a first class job but ...... the teamwork and support between you all is just as good as the engineering ..... well done ... :bow:

CC
 
So, Did you get your lathe and mill problem fixed? That stinks to have them both go out, at the same time.

Wes
 
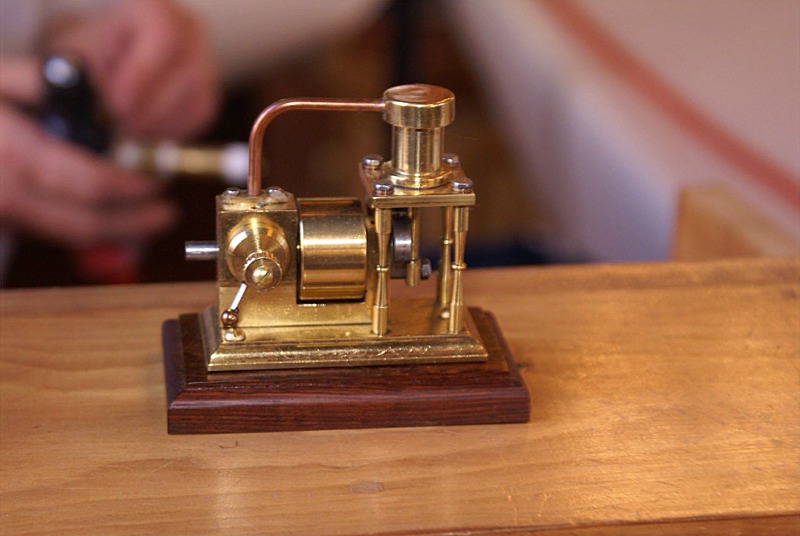
well here is an idea of how things are going to look . I put the parts together with a 4-40 by 3/4 screw I was going to trim it to 5/8 but do not have the mini screw cutters available at this moment. another pebble in the road of life. I was surprised it actually feels pretty good no noticeable slop i think the spring is keeping thinks centered it could actually work this way with out making studs. . this thing only turns 90 degrees once in awhile . I still need to make and attach the handles.

Wes :no problem not fixed the South Bend was fortunately not affected. Only the little modern import stuff with the electronic motor controls. I was planning on turning some 1/8 stock down to .116 to make the studs and take advantage of the higher spindle rpm on the little lathe.
Here is the pic of the assembled parts

Tin


MVC-033F.JPG
 
left the house for work at 4 am this morning got home about 10:30 tonight needless to say no machining on the parts today . And no time to work on the circuit boards.
Tin
 
Just a follow up note. The mini mill and mini lathe were finally back up and running sometime in September/October .A tech at work helped me out and about $10 in electronic parts fixed things.
The valve assemblies were finally all delivered IIRC sometime in February in a kit form (Some assembly required. )Several moths late.
The TB was a great experience.
May do it again once the mill cnc project is done.
Tin
 
Back
Top