Super Tigre G32 1cc diesel - a 5cc version

Home Model Engine Machinist Forum

Help Support Home Model Engine Machinist Forum:

This site may earn a commission from merchant affiliate links, including eBay, Amazon, and others.
Yes - me too John :D

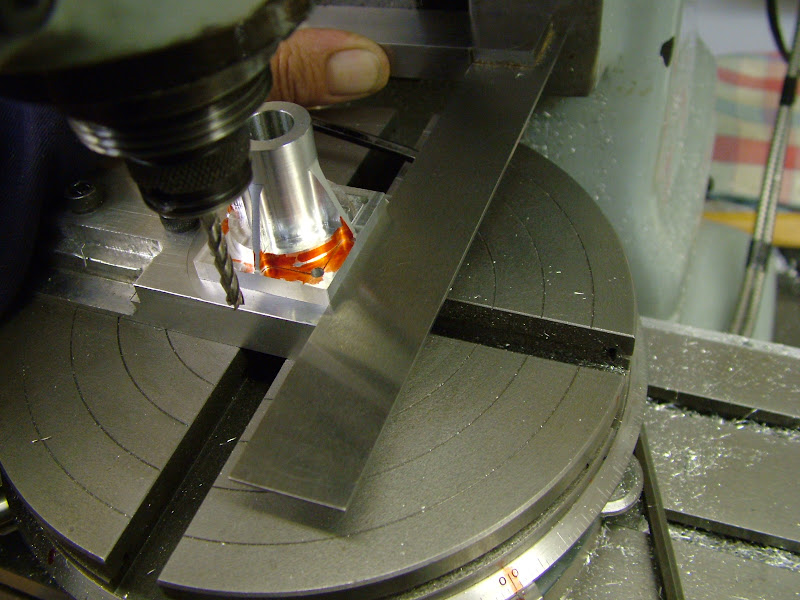
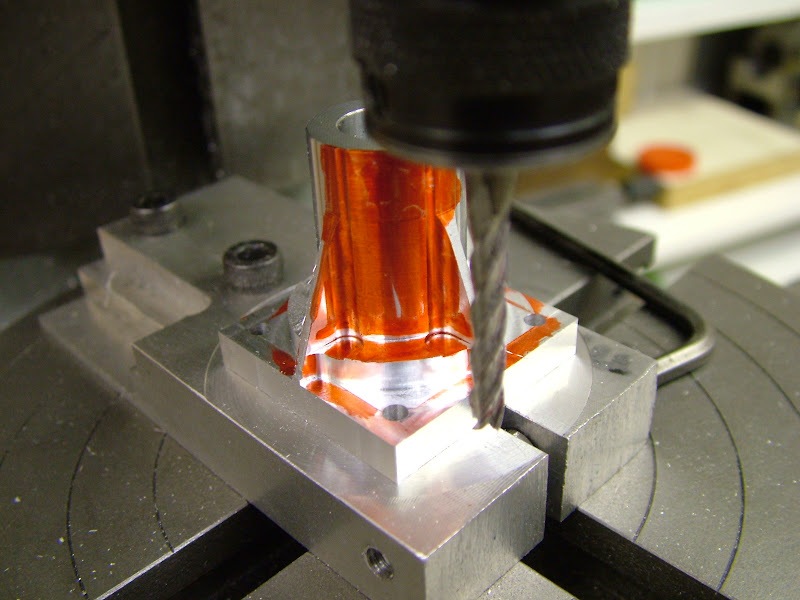
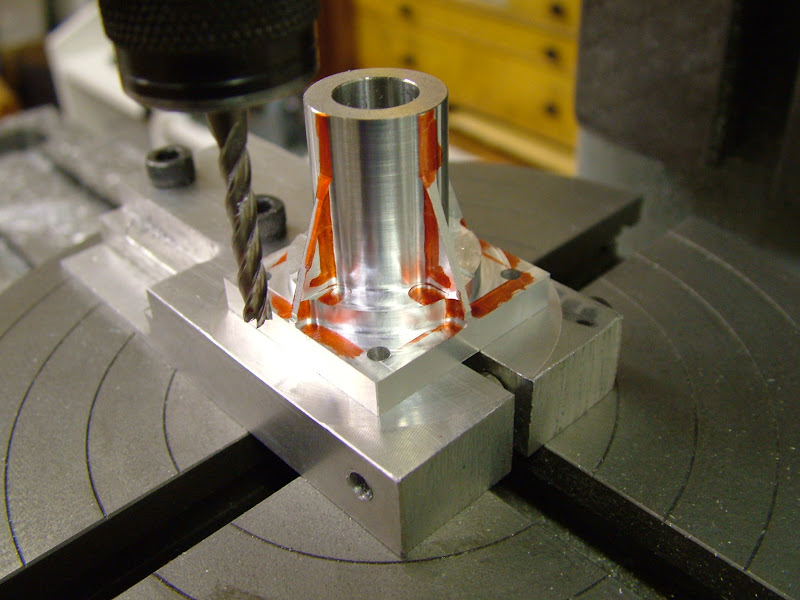
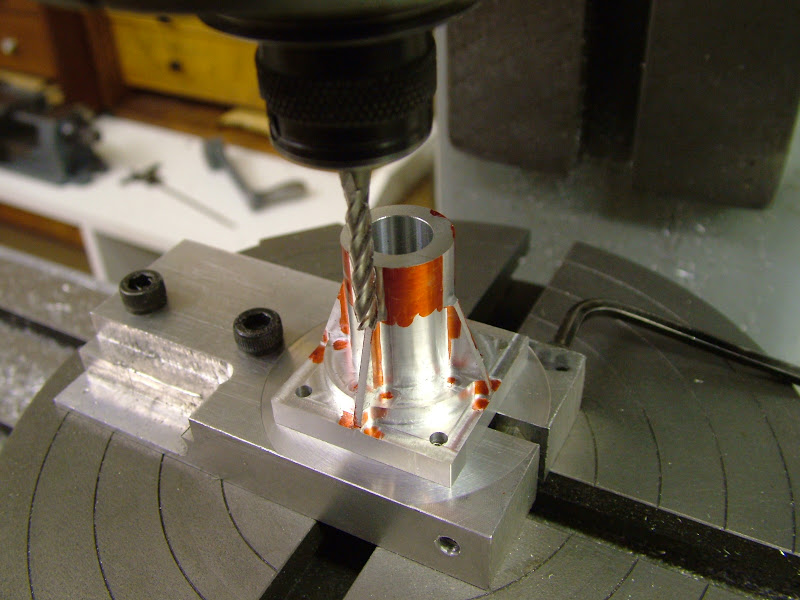
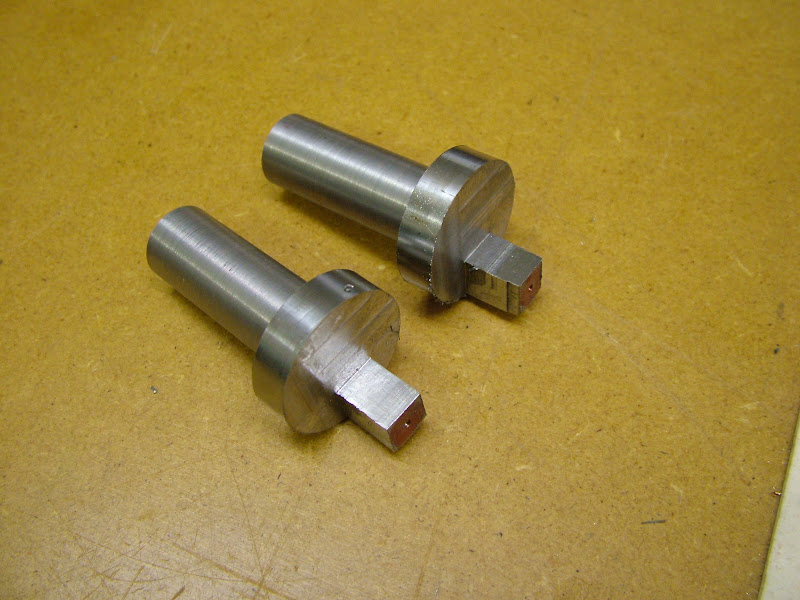
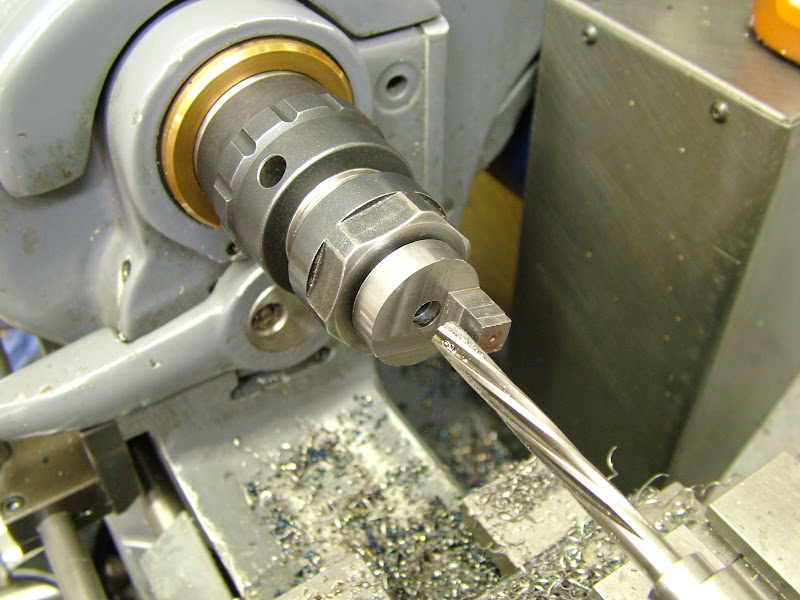
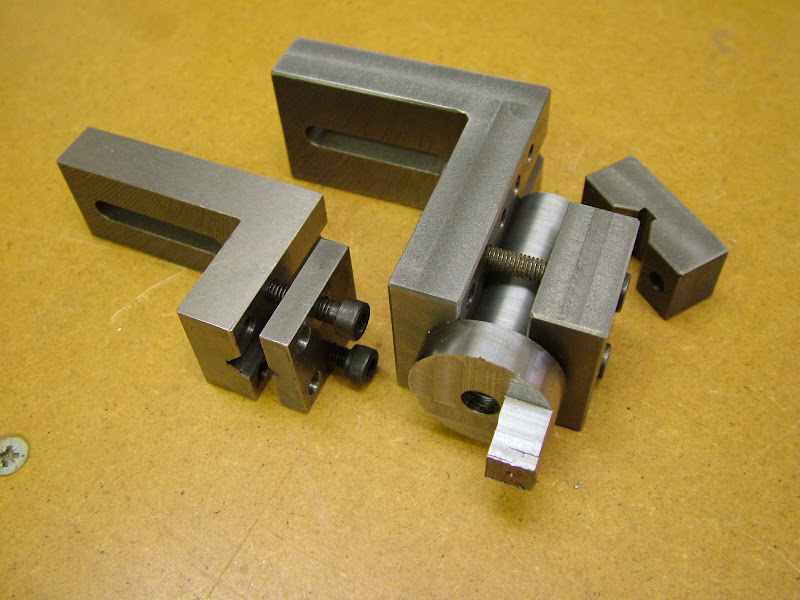
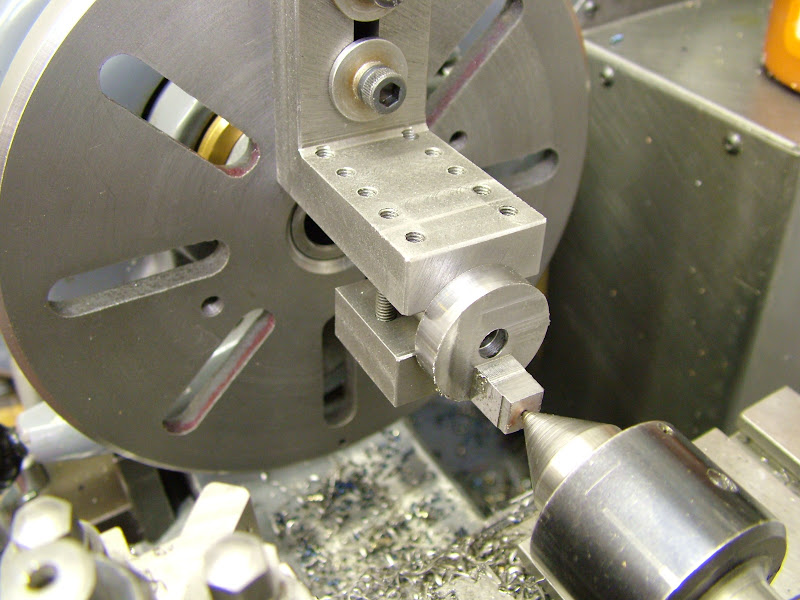
I would certainly agree about keeping the load as constant and consistent as possible. Likewise your sentiment on the way one goes about things - it's the end result that matters as most time nothings ever really cast in stone. One can always learn a new way to walk the dog. I trained in my early thirties as a milling machinist (Not a miller! :)) but once into work always preferred turning - and still do. Although I have good and clear memories of major aspects of my life I find some of the minutiae hard to keep a grip of and that definitely is an age thing. I find retaining the way I go about things on a daily basis harder and harder to recall - the digital camera has been a great asset in that respect.

Regards - Ramon
 
Hi Guys, just a little update and yep the cases are finished woohoo1

I confess they have come out much better than I anticipated - well I think so ;) - as it would have been so easy to mill away material that should have been left. It's certainly increased confidence to tackle something on similar lines. Breaking the machining down into small but progressive steps it's surprising how quickly the shape materialises.

Last few days has seen the odd opportunity to finish those front ends.........

Setting the part square to the machine. R/T at '0'
DSCF0223.JPG


Inking up gives a good indicator as to where and how the cutter is performing
DSCF0227.JPG


DSCF0233.JPG


DSCF0214.JPG


That plate fixture was pressed into use again to bring the edges square and true to the register
DSCF0237.JPG


And once more to mill the webs to size
DSCF0243.JPG


Using double sided sticky tape and some hardwood sticks some custom emery sticks were quickly made using various grades of wet and dry
DSCF0132.JPG


The 'fettling' kit as used for all faces - a few files , emery sticks mainly 400 and 600 grit and pieces cut off Garryflex abrasive blocks.
DSCF0251.JPG


And after a few pleasurable(?) 'finger stressing' hours there they were - finally finished. Hope you think it was worth it after all this time ;)
DSCF0280.JPG


DSCF0284.JPG


DSCF0291.JPG

As mentioned previously these parts will eventually be bead blasted to give the surface finish a more consistent appearance but that's a while down the road as yet.

I have not machined or renovated an engine with a single bearing and an inserted sleeve before. It occurred, well after both housings had been removed from the chuck, that when boring the bearing housings that I should have had the sleeves finished on the OD ready to Loctite into the bore and then bore the sleeve and bearing housing to ensure absolute concentricity. That situation is not important for the rear sleeve but it will be at the front. The sleeves will have to be turned inside and out in one hanging - I can hear the Phos bronze 'ringing' now ::) - made a press fit and lapped to fit the shaft to stand the best chance now - fingers crossed.

It was worth the extra effort making two cases, the minor slip up when milling the transfer passages shows just how easy it is to make an error but having now ended up with two usable cases well ...... ;)

The drawings for the case and front housing have been updated as work has highlighted the need. Once finished I'll post them here - no downloads until it's finished and proven - lesson learnt there :-[

The major, time intensive, part is over. Next up after those sleeves will be the cranks and the drum valves then onto my 'favourite' parts the piston and liners

As always, I hope this has been of use or benefit to someone

Regards for now - Ramon


Ramon

:bow: Wow, those are some beautiful castings. I believe that you have talent that you didn't know that you had. It just goes to show what a bit of time and patience can do. You certainly are doing a top notch job on this engine. I'll be watching as you complete it. :bow:

Cheers :)

Don
3965​
 
It seems that you have raised the bar to another level with these fine examples of your work, Ramon. Gees, a guy can't catch a break here. :big: :bow:

BC1
Jim
 
"As always, I hope this has been of use or benefit to someone

Regards for now - Ramon"


Oh come now Ramon! What an understatement!

I don't really need to answer that! :bow: :bow:

Dave


Fantastic

Stew
 
Wonderful hand finishing there Ramon, it is nice to see another true artisan at work. :bow: :bow: :bow:

George B. is the only other one I have seen who seems to get this sort of fantastic finish by shaping with their hands.

I don't think a lot of people realise just how effective hand tools and elbow grease can be.

Nothing can beat it for quality looks, and your bits sure are lookers.


John
 
Ramon

Beautiful work and finish. I do not think I would have that patience to hand finish it to that standard.

I have been meaning to ask a question. Ramon, there a two wide slots opposite each other in the cylinder bore. Could you please tell me which tool you used for those slots? A long series end mill?

Thanks and keep it up

Vince
 
Absolutely brilliant - watching you "sculpt" metal the way you do is both impressive and inspirational.

Ken
 
BOY!!!!! What can I say. :bow: :bow: :bow: :bow: :bow:

Ian (seagar)
 
Gee!! Ramon you are a metal sculpter. You take metal a sculp it into beauty. And one thing about you is that you make it look so easy. :bow: :bow: How do we get it to rub off on us here? I am so inspired by your work and can only wish to be as good as you are. Please don't stop give us you documentation and detail progress.

Don
 
Hi guys - thanks for your very kind and encouraging remarks - all of you.

I think I have said before that for me 'skill', 'expertise', 'whatever', is all relative. I firmly believe that. There will be those of less skill and definitely those of more out there and we all have the opportunity to give and take from each other. I don't see what I do in this or my other hobby (plastic modelling) as anything 'special' - it's just 'what I do'. I certainly don't see myself as any kind of knowledgeable tutor either but I will happily share what knowledge I have acquired (and thats getting a lot bloody harder to recall at times ::)) and whatever I've made or details of how I've made it with anyone who's interested. I can say though that nothing does give me greater pleasure in realising that someone else has been inspired enough in having a go at something because of something I have made. Hell, I hope thats not considered as egotistical cause it 'very much aint' - I don't look for it but its a nice feeling when it happens :)

Vince the two wide slots are the transfer passages and were cut radially using a 1/8 (3.2mm) long series round nose slot drill.

Nothing done today - Sues on holiday and I had the pleasure of accomanying her to the city for 'shopping' :eek: However the forecast is wet and windy for tomorrow - ha-ha, ha-ha ;)

Something that slipped the net on the last posting for those who may wish to know - those initial blocks began at 605gms for the case and 165 for the housing and finished up at 88 and 43 gms respectively - quite a bit of swarf!

Regards for now - Ramon

Mod - I see my dyslexic side got to grips with the weight - 605 should have been 560 ::)
 
Beautiful work on your crankcase pieces. It takes a lot of work to get aluminum parts smooth looking. It's just a testament to how well you machined them in the first place. These ought to be a pair of fine looking engines when complete.
gbritnell
 
Amazing work Ramon! Really can't wait to see how the rest of the parts turn out!

Ramon said:
'LADmachining'
Good to hear you are still holding an interest in I/C Anthony. Never fear you'll get there in the end though your latest project sounds as good a reason as any could be for firing up the lathe ;) BTW (and I have a vague feeling I may have asked you this before but if so call it an age thing) - 'Sparey -(x2) is that 2 off or twice size - that'll swing a good sized prop if it's the latter

I am building two Spareys - well, it could be three. I found some porosity in one of the castings, which Hemingway replaced FOC. I don't think it will be detrimental to the running of the engine, but I may just make a 'sectioned' version from all of the bits that don't make the grade for the two good engines!

A post about my build is here:- http://www.homemodelenginemachinist.com/index.php?topic=6789.msg72848#msg72848

A twice size Sparey would be a formidable beast - 40cc of finger biting Diesel goodness. Do you think it would be possible to turn it over by hand? :) :)

I did take some progress pics of the wedding ring manufacture, but they are either out-of-focus or lost completely. Only decent pic is of the finished items. May put it up in one of the other sections when I get a moment.

Keep up the great work - the more words and pictures the better!

Are you planning on entering these jewels in one of the UK ME shows this year - just so I know not to bother entering any of mine, as they wouldn't stand a chance. ;)

Anthony
 
George - thank you for your thoughts, much appreciated I assure you.

Anthony - that's a freudian slip on my part - wot another? - I meant of course twice capacity :D - but you're right, something twice size and around 40cc would be some beast. The largest model 'diesel' I know of is a .60cu in - 10cc does anyone know if anything larger has been made and successfully run? I seem to recall reading somewhere that there is a limitation on capacity due to the ether based fuel used. Anyone have any thoughts on this and whether this is so?
You've made a good start - get back onto it as soon as you feel able, they make nice engines and run steadilly. I like the idea of a sectioned one too

Despite best intentions little done to day but near disaster tonight. Got in the workshop a bit late but turned the first sleeve and turned up a spigot to hold in the pillar drill to use it as a press. Got everything ready, parts lightly Loctited, heated up the housing with a hot air gun and then with one swift movement pressed home the sleeve OOOPS :Doh: infact Double OOPS :Doh: :Doh:. I'd forgotten about the depth of the bearing housing and hadn't allowed for it on the length of the spigot so the sleeve stopped short with about 5mm left to go. Aaggh :eek: :eek: - engage rapid action mode (that doesn't come easy these days!) and drop spigot in chuck - retighten. Too late, Loctite rapidly gaining a hold. Frantic unveiling of little used home made flypress and with a couple of heart stopping seconds of 'will it - wont it' a couple of thumps saw it home - Pheewwww

Sorry guys but there was no time to take any pics :big:

Regards for now - Ramon
 
Well Guys, the second sleeve got pressed in with a little less panic today ;).

As the flypress had now seen light of day for the first time for yonks I used that. Here it is ready to go...
DSCF0305.JPG


You may be interested a little in it's 'history' - I made this press a long time ago but it's seen little use and usually sits under it's cloth cover out of sight and mind. It began life after a chance 'scrounge'. I see theres another thread on here on scrounging - I would guess this meets the criteria ;). At my last but one place of work much of the work was surface and form grinding. At one stage we had a Jones and Shipman fitter in to replace some cross motion leadscrews in the 540 grinders. There laying on the floor were the two replaced leadscrews looking very shiny. Investigation showed a two start thread with a lovely big bronze nut. Once further investigation determined they were destined for the bin it was straight into the manager 'on the cadge' - instant result ;D The press was 'built around' one screw which was modified to suit, the other modified too to be kept as a spare. It was all built from spare plate scrounged over the years and machined up after work finished. Incidentally the steel used for the ram was without doubt the toughest material to machine experienced in the best part of thirty years. Heaven knows what it was - probably tool steel sent in from the parent company but redundant and never used as there was no spec.

Made a start on the cranks today too. As with all the engines made so far the cranks will be 'composites'. In order to preserve the limited stock of EN24T (another scrounge - I occasionally get bar ends from auto feeders from a local machine shop) the main body, web and crankpin are all turned from EN24 with the front reduced diameter turned from a caphead screw and inserted through the main shaft. It's not drawn as such - that's done as one piece but just my way of doing it. So far it has proved more than substantial enough to take the forces involved.
Heres a few pics of the start of the process.......

The initial blanks, turned to overall length plus 1mm and with a small centre in one end. Note the lovely finish as bought in on this bar feeder stock
DSCF0307.JPG


First up was to reduce the main shaft area to fit inside the largest collet available (16mm)
DSCF0312.JPG


Then set up using a vee block to place a very small centre at the correct offset for the crankpin
DSCF0315.JPG


Next up is the worst bit on this part, removing the waste around the crankpin. There are basically two ways- milling it away as here or turning it off. Personally, milling is preferred to turning due to the amount required to be turned as 'interupted cuts'.
DSCF0325.JPG


Due to the size of the mill I prefer to use small diameter cutters so light cuts - .6mm / .025" and a fairly fast feed rate soon bites into it despite the toughness. I have no coolant set up so apart from the odd drop applied with a brush if things get a bit hot the cuts can't be too big anyway. I try to use old cutters for this op as finish is not important and preserving the good ones is
DSCF0321.JPG


And this is the stage tonight ready for the next ops back on the lathe..
DSCF0331.JPG


Looks like a garden day tomorrow cleaning up after the last two windy days but I'll get back with some further pics of the next ops before too long ;)

Regards for now - Ramon


Hi Guys, - a few more pics of the crankshaft ops....

First up was to drill and ream right through 7mm and counterbore 7.5 dia about 2.5 deep
DSCF0333.JPG


Next up was to rough out the pin. The smaller of these turning fixtures was made at work many years ago but the one to be used was made recently to take larger shafts - boy do I miss the opportunity to jump on the J&S1400 grinder at lunch times :(.
DSCF0337.JPG


Extremely versatile in their capacity they make setting up a crankshaft to turn the pin a very easy op. Quick alignment using a centre...
DSCF0340.JPG


..followed by truing with a wobbler
DSCF0341.JPG


The inner shafts were turned from the shanks of 8mm high tensile caphead bolts and made a size for size fit. Using a parting tool set at a very slight angle the heads, .05mm up on the c'bore, have a fine taper applied on the leading edge to get a good 'plug' fit in the bore. They were then pressed home after liberally coating with Loctite 638 High Strength Retainer.
DSCF0348.JPG


DSCF0350.JPG


All being well these will get finish turned between centres tomorrow before finishing off the crankpins

I'm not certain how the strength of the bolt material compares with EN24t but it's tough old stuff and so far this method has held up well on the engines made to date.

Regards for now - Ramon


A few more pics on these shafts .....

This is the small 'drive plate' which has proved very useful for turning shafts made so far between centres. The centre is removable/replaceable once turned too short and the crank pin locates in the slot for driving.
DSCF0354.JPG


The shafts were centred at the crankpin end first and the diameters then turned to plus .02mm and screwcut. I finished the first shaft by my (to date) usual method of using 240 grit emery followed by wet and dry paper........
DSCF0357.JPG


......before I remembered I had a new toy ::) The new hone bought some time back at very reasonable cost on Ebay finally had it's christening ;D
DSCF0360.JPG

The actual surface finish didn't seem to be improved by any significant amount versus using emery etc but the control on how much was removed certainly was.

Last turning op was to finish the crankpins and bring the web to thickness
DSCF0363.JPG


It was hoped to get these finished tonight but a visit from a friend curtailed that - more a bit later then.

Regards - Ramon
 
Thanks for keeping us up to date ,I am really enjoying your build and learning lots about set ups. :bow:

Ian (seagar).
 
Thanks for the update Ramon I am learning more about turning crank shafts between you and JasonB. I really like your setup. I am trying to get more familiar with the use of the faceplate. The more operations I see using them the easier it looks. I look forward to more of you expert documention and photos.

Don
 
Back
Top