Sometimes, you just have to laugh.

Home Model Engine Machinist Forum

Help Support Home Model Engine Machinist Forum:

This site may earn a commission from merchant affiliate links, including eBay, Amazon, and others.

Deanofid

Well-Known Member
Joined
Jul 18, 2009
Messages
2,673
Reaction score
16
Hi all;

I needed to do a bit of threading today. Just a shaft, 3/4-16. Simple. Done it lots of times.


4-1.jpg


Turned down the piece, right to the last zero on the mic. Cut a thread run out, and put a nice bevel on the end. You know, to make a good job of it.


5.jpg


Blued the end to be threaded and took a skim to check my gearing, just like a guy should.
You know, to make a good job of it.


6.jpg


Used plenty of lube, and made sure I had a nice chip rolling off the bit.
You know, to make a good job of it.


7.jpg


Thread looked close, so tried my fastener, and it just wasn't right. Would just catch the first thread, barely.
What the dickens... Put the mic on it. .775", right down to the last zero, all right. Well, there's a zero every .025" on a mic. At least I hit one of them.

I know... Measure twice, yadda, yadda. I did. Read it wrong both times.
Now I have to make a .775"-16 nut, just to freak someone out someday when they inherit all my stuff.

It was still a good day.

Dean
 
It's ok Dean. We are all just sub-human! ;)
 
Beautiful job roughing that that thread in Dean!

Now you're ready to skin that OD to finish size and
take the thread to to finish depth.

Never Let On! ;)

Rick
 
You sharp eyed guys may notice the peaks of the threads are just a touch sharp.

After figuring out what I had done, I made a couple more passes with the tool, just for the heck of it. Was ruined by being over sized anyway, so, what the hey.

This is the confession section of the forum, right?

:)

DW
 
What I really love about this one is that you have photographic evidence of the whole process of your mistake too.
Shame you didn't take a photo of the mic showing that reading dead on zero too. :big:

Besides it being oversize you did do a nice job of it though.
 
Dean, Couple of questions...

What is the material you are cutting (Yea, I see it's steel what variety)

And those photos are magnificent. What camera?
 
Hi Mike;
I think it's 1018. Can't be positive, though. I usually buy only two kinds of CRS. Either 12L14 or 1018. All the 12L I've bought has a purple end, but the piece here had white. Still just a guess.

The camera is an old 3mp Canon A70. I have a bunch of film cameras, but I use them for "real" photography, and do the shop stuff with the digi thing. It's handy for that!

Dean
 
Deanofid said:
The camera is an old 3mp Canon A70. I have a bunch of film cameras, but I use them for "real" photography, and do the shop stuff with the digi thing. It's handy for that!

Dean,

Great practice run ::) As Rick says take it down to size and depth and apart from the world and it's wife no-one will ever know.

Gee and I thought my film cameras were for the scrap bin and I was doing real photos with the digital job. Not that it makes much difference to this Photoklutz. ;D

Best Regards
Bob
 
like looking at one of my mega blunders ,great to know i am not alone with iffy mic readings ,best thing about garage engineering is the ability to use the drawings as a guide rather than the law
 
Believe me, that problem only gets worse with age or a phone call in the middle of the job. I have a system for when the size has to be precise, and my mic says I am on target, I double check with a dial caliper. That quarter turn or half turn is immediately obvious.
 
Been there, done that!! ;D ;D ;D

Like Stan says, it only gets worse with age.

I keep a bunch of small bits of various short shafts available (1/4, 3/8, 1/2 etc.) and use them to check against the mic to make sure I am not off one turn. The barrel on my old Starrett 1" inch mic covers up part of the line so I am never sure about the reading.
 
chillybilly said:
like looking at one of my mega blunders ,great to know i am not alone with iffy mic readings

Hey! There's nothing iffy about my mic readings! Was dead on zero. Just 25 thou big.
; )


Stan said:
Believe me, that problem only gets worse with age

Shoot, Stan, I'm 53 now. It gets worse?


putputman said:
Been there, done that!! ;D ;D ;D

Like Stan says, it only gets worse with age.

Shoot, Arv, I'm 53 now. It gets worse?

Where did I hear that before...? Oh no. It's happening already!

The barrel on my old Starrett 1" inch mic covers up part of the line so I am never sure about the reading.

Ah, I've found an excuse. I'm used to my old Brown & Sharpe, but grabbed an import mic to check this. It must be the fault of the folks in China.

That's my story.

Dean
 
One of my 1" mics the "0" line on the thimble when lined-up with the reference line, the 1/10" line is not yet quite visible.

Gets confusing. Anyone else seen this?

jack
 
jack.39 said:
One of my 1" mics the "0" line on the thimble when lined-up with the reference line, the 1/10" line is not yet quite visible.

Gets confusing. Anyone else seen this?

jack

Not exactly that situation, Jack, but similar in the confusion dept.
I have a couple of cheapo mics, (not American made). One of them has an oddity that messes with my head. The tick marks are just plain goofy.

DIticks.jpg


Long tick marks on the .050's, medium ones on the .10's. Then you get to .4 which has a long one, then back to medium on the .5. Just wrong all around!

Those "guys"!

Dean
 
Far out! Much more confusing than mine. But I will say, I wish I could take good close-ups like your pic, just excellent! Is there a secret? jack
 
Dean,
That's positively disgusting! I've never seen markings so messed up!
 
jack.39 said:
Far out! Much more confusing than mine. But I will say, I wish I could take good close-ups like your pic, just excellent! Is there a secret? jack

No secret, Jack, unless you don't know it, I guess. ; )
This is what I do;

1. Set the autofocus to the center of the screen.
You may have to go through the menus to find this function, but unless the camera is very basic, it will have that option.
If you don't do this, the camera will pick a random point from anywhere between five and twenty five preset points. The one your camera pics may be two feet away, when you want to get something two inches away. Setting the autofocus to the center of the screen will make it focus on what you have in the center of your picture.
Most cameras will show a small square in the part of the screen that will show the focus area you have selected. I leave this function set to "center" on my camera at all times.


2. Set the camera to the "macro" function. This is right on the back of most cameras, and has a symbol of a flower to indicate it.


3. WAIT for the camera to focus, and shows that it is in focus. Usually indicated by a colored (often green) light on the screen or in the viewfinder. Sometimes it's a dot by a letter "F" or some similar thing.
Find out whatever it is on your camera that indicates the camera is in focus, and use it.

Pointing the camera at something and just pressing the shutter release without waiting for focus will make the camera pick the first thing it can focus on, and take a picture. It may not be what you wanted to be in focus.

Autofocus cameras have a two step shutter release. Press about half way down, and you will feel a little resistance before it travels the rest of the way to release the shutter. The first step in that button is the autofocus pre focus function, and will allow you to check that the camera is focusing on the thing you expect. Push down a little, wait just a sec, and it will give you the signal that it is ready. You can often set that signal to be an audio indication, so the camera will beep when it is focused.


4. Set the camera's white balance to match the lighting in your shop. This will stop weird colors showing up in your pictures, like the greenish or tan (warm) hues you sometimes see.

If you have incandescents, set it to that. For florescents set it to that, etc.
If you have odd lighting, like window light and lamp light combined, or two different types of lamps in the shop, use the "custom white balance" function. Sometimes it is in the menus, sometimes a single button on the camera somewhere.

To set a custom white balance, find the custom balance function, activate it, put a white piece of paper on your bench, point the camera at it, filling the whole frame with the sheet of paper, and hit the shutter button, or whatever other button is required to enable the function. This tells the camera to adjust the colors it "sees" to a true white reference. It helps all the colors to come out a more natural hue.

When you take the camera out of the shop, set it back to the "normal" or "automatic white balance" function so your best beloved's face doesn't come out a strange color when you take a picture of her outside your shop.


5. Don't use flash. Especially the on camera flash. Unless it's absolutely necessary, this is one of the worst ways to take a nice picture. It makes terrible shadows, almost always blows out the light objects, while often under exposing dark items. The problem is often magnified on close-ups. If you know how to use the flash properly, great. Otherwise, leave it (force it) off.


6. Check your picture right after you take it! If it's not what you want, do it again.


7. It's nice if you size your pictures so others don't have to scroll around the page to see them, or click open a new window, (please). Sometimes that part is an unknown, because you don't know the size of monitor others are using.

The camera used for all my color shots on this forum is a seven year old Canon A70 3 mp job. Ancient by digital standards.
You just have to make it do what you want, no matter what kind of camera you have. Sometimes I forget to set the white balance, which shows up now and then, but for the most part, it's good for what goes up on the interwebs.


black85vette said:
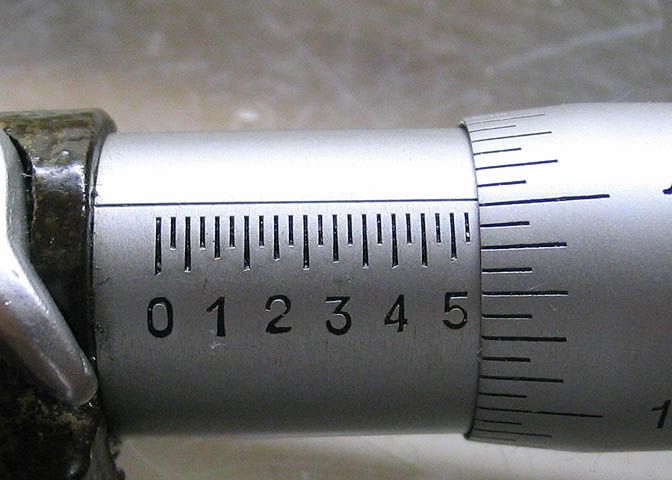
That is the most messed up markings I have ever seen!

ksouers said:
Dean,
That's positively disgusting! I've never seen markings so messed up!

Yes, it is very crummy. You know where it was made. Some things, they do well. Some... not.

Dean
 
Back
Top