Small Locomotive & Boiler (ME Northumbrian)

Home Model Engine Machinist Forum

Help Support Home Model Engine Machinist Forum:

This site may earn a commission from merchant affiliate links, including eBay, Amazon, and others.
An eventful weekend. During the week the first sections of the new track had been delivered after being galvanized. Saturday morning I was in a small working party installing the six sections

mi93p6sh195w57f4g.jpg


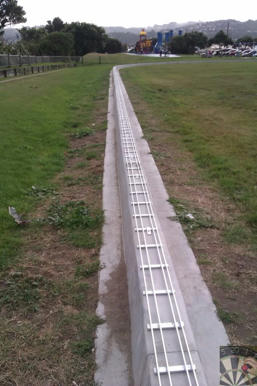
They look pretty smart, its only 36 meters at the moment but gives a clue what its going to look like when its all done. I can't wait to get running on it.

Also arriving during the week were some #15 jets from Polly Model Eng. This was to replace the #5 jet I had been using. The #5 allowed allowed me to raise steam but there wasn't enough heat to get to full pressure. Theoretically on propane a #5 jets at 30psi gives 4,160 BTU/hr and #15 jet at 10psi gives 7,355BTU/hr (here http://ronreil.abana.org/BTU_Calculator.xls

Using the #15 jet the safety was blowing in less than 5 mins from cold. Conclusion, the burner I presented in the previous posts with a #15 jet and propane at 10psi is adequate to run this loco. If you need more heat try a bit more gas pressure. You'll need to use an external blower although with care its possible to use a lower pressure bring it up to heat slowly get some pressure and get the loco blower going, then slowly bring up the gas pressure. An external blower is quicker.

With this now working it meant I was in a position to do the boiler accumulator test. Running hard on the safety valve and no increase in pressure. That worked fine so I arranged to meet the boiler inspector for the boiler test.

wt1zqnrq8dm9q354g.jpg


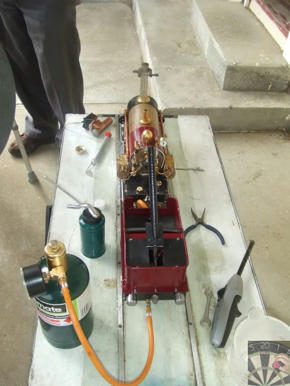
That went well and now I have a certified boiler!!!!

So what next.....................

Am I a happy chappy? ;D ;D ;D

Pete
 
Looks good, I bet you ar chuffed with that. Will be interesting to see it when you have a riding trolly available to see what its capable of.

J
 
Nice one Peter

I could hear lots of chuckles on the vid looks a lot of fun.

:big: :big: :big: :big:

Stew

 
Thanks Jason and Stew

It was a great day. The guys were running up and down with me like school kids, most of them are retired.

We were just about to hitch up a trolley when the seal on the regulator flange started to leak. So that was it for the day. It's in a bit of a state at the moment with all the disassembley, reassembly that goes on getting these things to run. Heat and oil everywhere it's a bit of a mess. That's why the wooden cladding is off, the boiler was in and out so many times I just gave up putting the cladding back on each time.

I'm going to do another strip down during the week and tidy it up, touch up paint etc.

regards

Pete
 
Thanks John I really appreciate that.

Yes, Dad's been following along on the journey. Having him looking over my shoulder, his Rob Roy as a standard to compare to and this forum providing advice and also setting standards has been a powerful inspiration to do my best.

I go so far to say that these forums are probably grossly underestimated in their influence on this hobby. When the question is asked "how do I start" the normal responses are

1) Join a club
2) Take a magazine subscription
3) Do a course (if you can)
4) Read the books

These days #1 should be "Subscribe to a forum"

Thanks again

Pete
 
Very well done Pete,sent a copy to my brother.
Don
 
Thanks Don, hope he enjoys it.

It's a pile of bits again. If you look at the video the reverse runs are slightly uphill and you'll see the wheels spinning. So it does need that lump of lead between the front wheels. That meant the lump of steel that is part of this versions design had to come out

1rwsjxzighwms3y4g.jpg


It now has 2 x 2ba holes 1" apart either side of the centre line. Ready to bolt a lead block onto. (guess where I got that idea from?)

A lump 2.875" x 1.5" x 1.25" will weigh about 2.1lbs, just under a kilogram. Which should help a bit.

Pete
 
Marvelous stuff Pete ;D

That diet must have worked wonders - the driver has faded away to nothing :D :D :D

Won't be long before we'll hear you giggling as it pulls you around the track

Pete
 
What happened to last night's reply? I know, I was in the workshop putting it back together again.

Pete - yes the driver has shrunk and bit, I've had more than one suggestion of little people being installed. Trouble is Barbie and Ken don't really look the part, and the safety police would have something to say about all that hair and open machinery.

Kvom - I'm searching around for more places to hang lead from, but this is a very small model compared to yours. The loco is barely 12" long, if that.

On progress; the rolling chassis is all back together and all fixings now Loctite'd in place. repaint the backhead tonight ready for a barbecue session tomorrow to fuse the paint, then reassemble the boiler, Friday will be making a casing for the ballast weight. Nice weekend on the way I may even get it back to running for Sundays club session.

regards

Pete
 
If you look at the video of running at the track something had to be done about the wheelespin, especially on the slight gradient on the reverse runs

http://www.youtube.com/v/mYLRDaZdYwg&hl

The clue to the solution is in Don Tuckers 45year old version of LBSC's Rainhill. A big lump of something between the drivers.

I stripped the whole thing down and removed the lump of steel the Northumbrian drawings provide for and drill and tapped 2 x2ba holes to attach the lump to. Then put it all back together.

pwswtd5rw2tps264g.jpg


The weight box was fabricated out ot 20swg stainless, in the same manner at the burner, and filled with molten lead. In fact as I had silver soldered the box together it became its own crucible and I just melted the lead straight in the box.

2.875" x 1.5" x 1.25" gives weight of just over 2 lbs or 1 Kg. Not a lot but when the loco is only 6kg I'm sure it will make a difference.

wpi8b93bbl96gsb4g.jpg


A couple of holes drilled once it had cooled and it mounted straight between the frames

h52wwb25ala6j2i4g.jpg


zqn88gwleadt5d24g.jpg


It can come off while the loco is looking pretty on display and go back on for track running.

While I had the boiler out time to paint the back head and give it the barbecue heat treatment. The footplate was done at the same time

b6nboq9e8bbp3zj4g.jpg


Its all back together now, once the Loctite gasket has cured I'll give it a steam and then maybe go to the track in the afternoon to see if it really will pull me.

Pete
 
If that weight doesn't work Pete, sling a couple of largish Neo magnets on a U-bracket, just off the rails. They have a pull of many Kgs each.

In fact, put on two, one on the front and one at the back.

Instant stiction.


John
 
Wonderful wonderful Pete.
It's been a dream of mine to build a locomotive. Can't until I retire.
In the mean time, I enjoy living the dream through others like you.
Well done and thanks.
 
John

Alternative technology had crossed my mind but I'd rather see if I can get it going old school. At least I have the mounting on the front, the back may be a problem its getting very busy there. Out of shot there are a couple of neo magnets attached to the left hand driver. I was using the oscilloscope and reed switch to do some timing tests.

Carl

I understand where you are with "until I retire". I had a practice run last year, between contracts, it was extremely enjoyable but my services were required so I'm back on the treadmill.

Its a nice day here in NZ, a steam up on the rollers this morning and if that goes well I'll take my driving trolley to the track and see if it can pull me.

Pete
 
Congratulations on getting Project of the Month - very well deserved :bow:
 
Thanks Pete and I said over on the PoM thread, I was a bit surprised but flattered

I’ve just realised I haven’t reported on the riding trolley event last weekend……..

Well it didn’t go at all well; the loco pulled/pushed the trolley OK but when I sat my 110kg plus on it it wasn’t going anywhere. So still some work required there. It could have been a disaster though, as you know the track isn’t complete so I was running back and forth. On the first return run I was coming near the end of the track and just shut the regulator, as normal. The momentum of the riding trolley caused it to run off the end and clatter along the top of the raised plinth. I managed to grab it all before it dragged the tender and loco off with it. A close call.

Pete
 
Hi Pete,

I bought the plans and wheels.Your thread will be very good instructional material to follow. Looks like I have to make a faceplate too.
But I planning to make a Boring Head from bar stock using Harold Hall's plans.Will faithfully follow your thread.

Gus from faraway Singapore.
 

Latest posts

Back
Top