Slitting Saw Arbor for ER32 collet

Home Model Engine Machinist Forum

Help Support Home Model Engine Machinist Forum:

This site may earn a commission from merchant affiliate links, including eBay, Amazon, and others.

joco-nz

Well-Known Member
Joined
Feb 21, 2016
Messages
566
Reaction score
209
Finally I have finished off the slitting saw arbor I have been making. This is designed to hold saws with a 16mm mounting hole.
Some points of interest, well perhaps of interest. :)
- All material is 1215 free cutting steel using 25mm, 12mm and 6mm sized round bar as source material
- Threads are M10x1 with external threads cut single-point on lathe and internals done with a tap
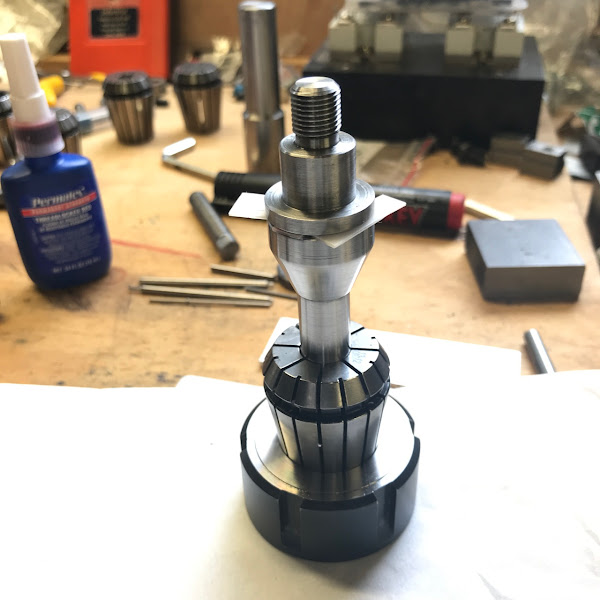
- Arbor fits a 20mm ER collet ( I'm using ER32)
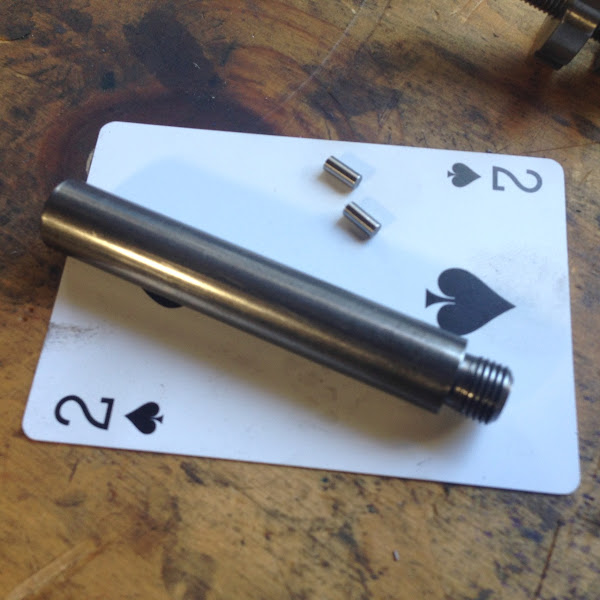
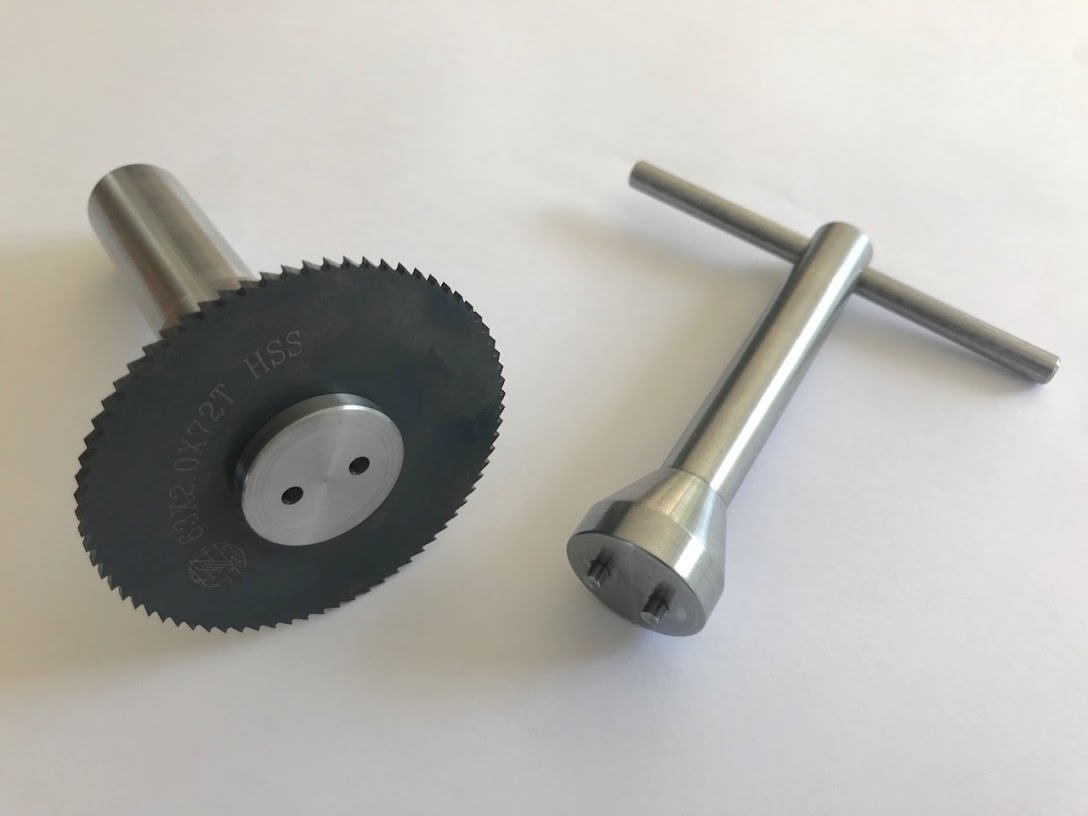
- The pins on the locking key are salvaged from a printer and are 3mm diameter
- The locking key is made of three parts with the head and shaft M10x1 threaded and secured with loctite

I think that's probably the main items. On to the long list of pics :-D

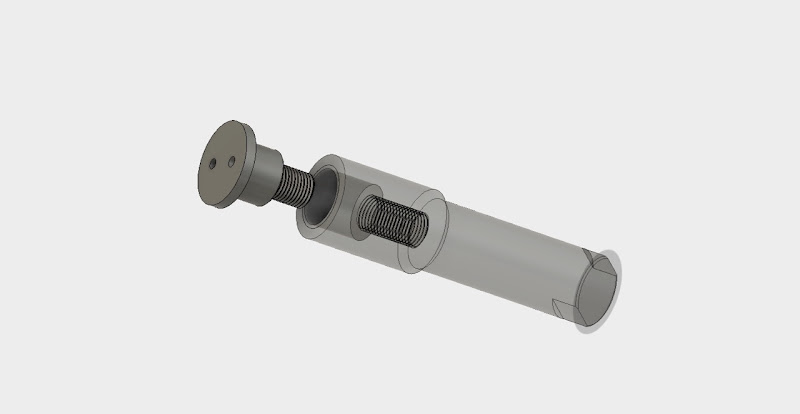
A render from the CAD model.
4SMBU0JdNUpGLlJx7CkEfIafxfmWsT-1Xgyo9Tjal18nlfpjBqjHkK2KNeOC83ypd4Xq0j5AhFf3hIL7REaYCbpZEUUh0N3P8isQvjTInPAFT6m1s9UlvxnVTixPGoKOihlutlkGaqEuThLeiuNA7lXNdCRFYz4gy01KwxJNk5dTcL8nymPSekhWA0FZTk667jt5X53xEc7tp7U47Oot6vAUhOGLLaSEP9jYonCUzq5jYeEZUG4v-54DKWcS7lSOxHTuNWhTDjRzj9o2dUUe3zIB__Z3qHVdzZUYeKJ7rqdr7aVF1UF2T5DTDtF4L6ioXj4s4-ZhYf42mhlpEvNz0qkI4AN5OGWjUPOcfY-4hqSUZ4m9z8e-l0oDJHwjh7UGBgEa8sNWakijCyGYGayvs96auw900a_TqwSID1FTyABoAEgyaGceWtQHqf2y28mNAv0jYtsVwvuS9rses5d5qqRTBa84GQTF4oABtGQgk69RT0l80Yxz84C1WfyXMa5jmXbgxR4A1uJkcLRddcew8Todo8EjwUUR0p7JKqcPPhsW2L0pLhxwvS9NEzL-oCpm=w800-h600


Starting to shape out the arbor, reasonably pleased with the finish from the Diamond tool holder and its crobolt bit
zmwhNZlf5BVPOR9bLktwHI82UdCH1ahsslq-MFr80d0hOnQ5M7zofVaJmrNaloOWzmYCr7WUP1XiToXuU8Gv_HsnwtF4TrKGPL46T-pM4HnpQub_Xu7xKa4BXEh87_mI2XMUnPnniXloi9BgPcab60ysE68nYvL_IF6duROKiGrjvDpvCFCWNxXP19pgUILXukM8wz6XeE1Hm3sNACyUQ0BEdCHPkztHYo8F7SBYrzMNhpjJFbQi-osLf3Cnp0unJIrtCv5oZRWUZucCj-Je0b_wJIqIPoV8lutWlwE289A9lWGM4MkpYuGwS3F8uPpk1cM7_jQ61qz3nIb1UX9oX5UM3un0YJn5W0sIrEpkGgV4aT95m9T7xBHiExVOyaMk_T2-MoVF0YPKKXl9SdYpD-9qg6wvBGt0b6oW_6-giwSC2YUlqyKYYzwhTiZOv-2N-hUIX_cgOANeFJqDzi5ALi1UWI9HQ_GXQp3uMPyeOh0l8mLLRFBTTDvyUXPNhDKTqCQirE2Lw9IH0PAG8qxUD_ymgJ-q0szTIMUG4D5fcVuPcIas_DSF7_4wiee3tf-9=w800-h600


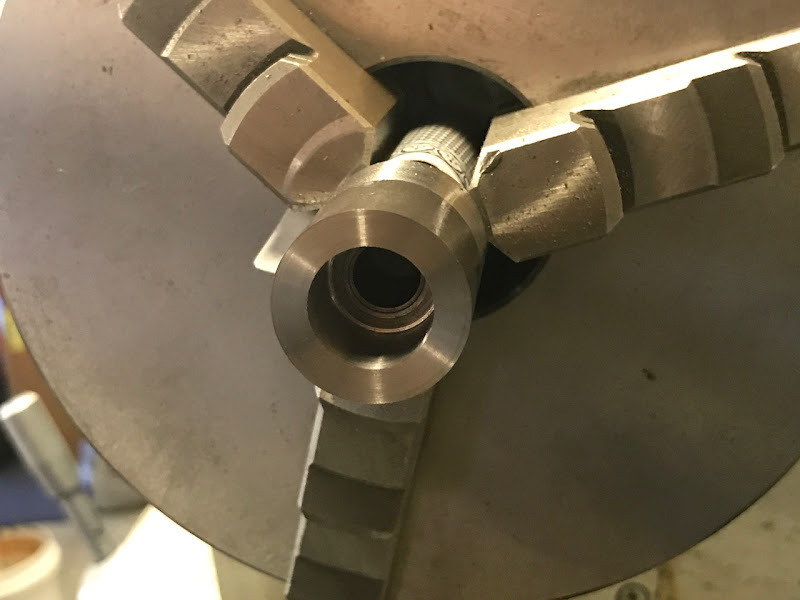
The hole for the shoulder screw is drilled and bored out as accurately as I can managed it. Test fits and checks with telecopic guages show its within within 0.02 of 16mm.
xREzw3ITQm_RGdJGeZT9rPiWmm1tvbAuHI4Qj4nyqXdJxTUFgu7VedtnVtbArYXPkFoba3YwsID96fZX9dH743B1pNXxZh41U7bq4vv8InIs6SHu90yvf14k2n1-74nxVu1aaVfPIenzXaqVqCCsj68fGQdZZQkZNSc2o4wDK1UcvVhLS7jsweRXnOK6L76HdTWCUAMeJf02qKxZap-DA7ROByDiL1_SalHr7zdGny4ptq3RfUZH3uwvaIDqFHo-DFY_4CqdQx6z32UmOEfKjVsj5vDVEns2Rqell1F9upZcq85l6xRc5Sa43hwlTPtAp6XVhIIgJ2RWMFrXUmdD0TwcrXbufTdWrnxwdJDkdP3L2mqb_sXFvrY-3MMNHqcabIUcxnbt1EcqVbrwdWEYxIA8M0rftJ7V2mhvVib5UOxJKyUUjrej6_OAOwg6DULEgYWOi_7VosisToxJy7e_ZB1zhphFst0urbrrme2xoVPSiok_FU_liHuY_oPaFu5btgnoTkDzMVA7Rlu3HgtJW5rs1NyYb3YcClaU-qHa9KOGTTaGdHdhFi3HNdd13ozX=w800-h600


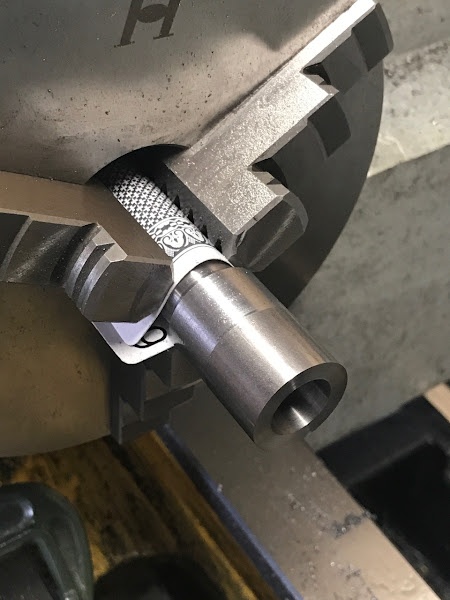
You can see from this that I have rechucked the part after turning. Since my 3 jaw is mounted to 3 bolt secured registered plate (like many smaller lathes) I lossened the bolts a little and using a DTI and some careful tapping got the runout of the rechucked part down to ~0.02mm. I used the machined area past the chamfer transition as the register point as it will be concentric with the arbour since it was turned at the same time.
U6Mwzeg-kUmptPnBR70x1qvU-Q710cC7S6IzTi2ZED9dBbu36IG16zCR1RbEO8b7Cg02DVlx9nhRZ2yHsYNZh2rSrLyR0M644u6hwzkUbakXi9FAUnbE64znBvl__y_Tk3Jw_W-E3dM802Yb3O6-FBGo4idOyBWq_n6x3exhgQJajV3HwtZUYKYWWichTP6bp7DETQFcC0OyJWwkVOGvvpKxjT7BYMWbEBf8wLiBi1AKkA2mfontnQrQrt-eyxrJ-kHbPrIjXqpt5Y6p7k4Bupa7Gq1_flnztNPepqKDyVnGWpp3yPCX4wJyxPvSXWberDcdJFQMXNqiie__YD-kbAmqCknzuaEsWuJusnR-MJ0ONyYspxnkl3Je_879DAU297gNYUL7dtZot0x8L94rtJriGktqb4dZRZXywRXNVxeazrhX_OYiADKndAeZJBPjVdxCYDDF0r4UDz2QMLu_aYnJozctOqKPwd3ILqHetVGSTXucYcJqXnDnSyvr45Fp2gVA2iYA8_z15qGDZhz72WR9ajSWTRiv5fPaVnZ2oEyytQql-RAjqY5-iyhXUDVh=w800-h600


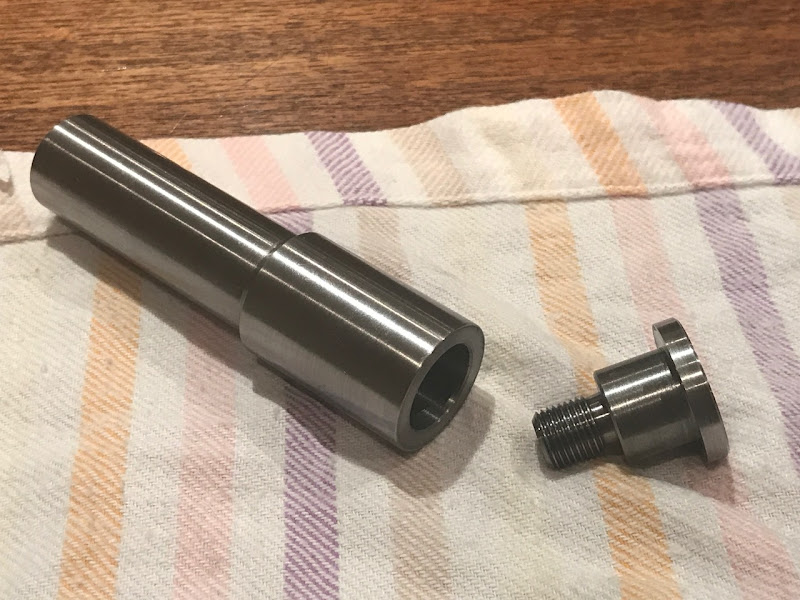
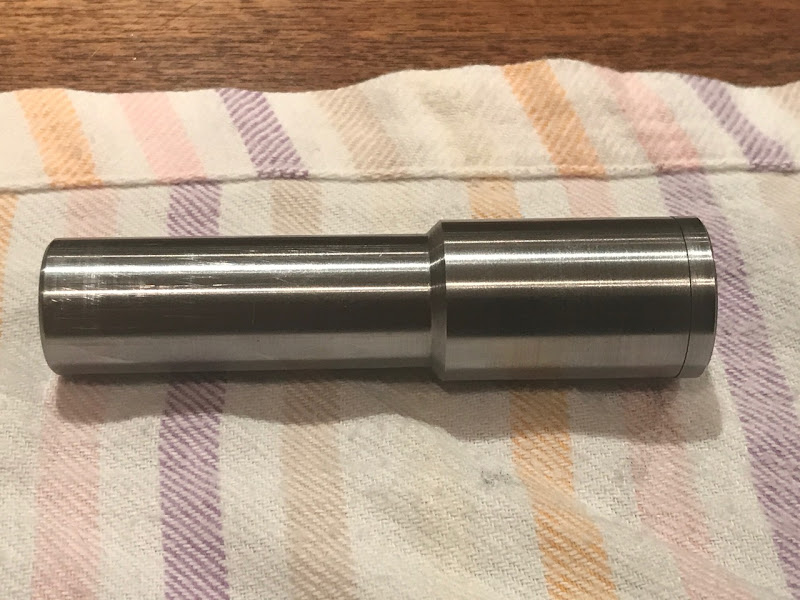
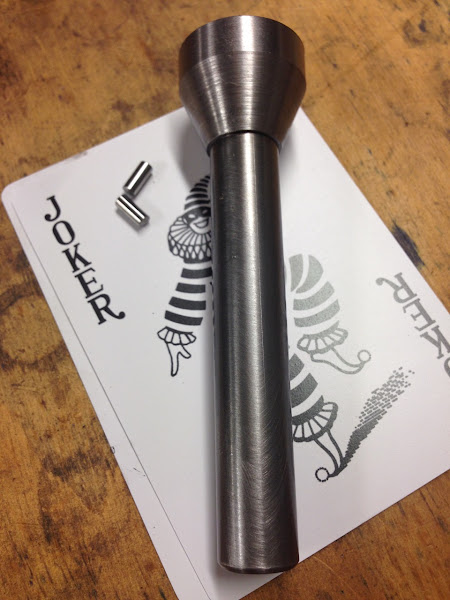
The arbour and retaining shoulder screw done as far as the basic turning is concerned. Still need to drill holes for the pin key/wrench.
a5n3PUzHBeM2VYi45i8sr4bg2rksq2mw25Sv0qIsOEBvg2mQl8NGwfDzkBLD-AVBAASqtrYcey6gA6zHbeLIk9bGZmtHqFbCLmWbDIpTVk8LZj8A1s2PY-ewRK5bkpwn6zQSZga1kFys8nodyOc2x3AZ65yLB8s_zFGZAUNsSPXGd8zEMSV-FETDglQxfK5PwyaYcgrErJrD4zfxM6-AeouNjo26heNFDEwRwRb4CTaR3yxv4kj9uv8f4qDVfVYwlSUNwQrL-v6LtUKvR_zhMWqr9RyWomXr7nGq3OYPncG_RZz_StQ7gwms5hEzDf58XFyAHKhvwNIC1veqLKiwpkIU8QBFeNweFl1a1HycCHzIQl9OPxfp9rUXZpkGDs0xeiQdcH2cBWSFZqTcw9SHv-4UgpPSDreX5O_NL1sQnwteysSqXe7buSe84ZDEoYQ4WvLIqkXSR-ZGeBvPj0bRM348LMcwhiBlXE62zYLjRU-4CQiilcUnaUDnqNjNnmwB8pJiUAt-qO9eRSirblfdyT5GWiVz8uUDGVVoyfOqVQ-wHzO5s0y-Tei0ws-GaylM=w800-h600


g87bd167w_W-VK6fVj2ZxttmYbzfaHSDDg7sBqn2iNhNDcIoCP3raT1lFXT14bvHC-UmQKG8PwdJeM69jP8rxe8O-QLEA1BhfvbK1X5DXaibR-R1qTZJpGbyWzosBi2yNj1vtMYg20FlS4TPlchWmHUsoRV6-fTIRFu5KuMXv-zb3rz7Vpqz3MWoVRgu6eZtOgGBYNhOcnv-M8Lcw1cyc9vJ8GL0laWD5ahf1LttE5wuF2eun1P-vTkYK_QYJLZWyEBY7ycIRNCOS1047ynHT_lKRUDddT8Fmj4jgi5Oexpe9fGuAgTBFMvTGH-AZlXO2cvsHqph0eT55ZwwAX1qnVKVRJDOJASL4CPPCRaYSHtTErflxNIdoRvgpHy4k61qIYTw2I7Ok3r5MGxQgxqBTPtCNFA0WD9Svdf1sHtdYl1AuZpbFuK5uODCu6qHd4z1-B_TxG8wagBb40Cl6xqzi4ix_nCuVep48aHpEmGF0t1VVv5VGr3GLtHrYKS-EjUo99Z3GeMGUgrU1DQjMA6Dlwt8mXOnkEMHucD1jHY0lLzUyts1TGtu3TfsDyCynG8X=w800-h600


nMG1-M29ncSCy4HoVbshW3I6aTXQbxV88VZ8_RpD3cV5ZmMLVCDMHckqI7jrFHF5GhBZLoV2-Hh-tJlIB2TqHcISiF27_MHDabRFdo5wkcVMzGYVF39T1iKzetdHHk1WkmB4JyhG2nNpjZ_u7ALMcB1QQWThowAeAoNM8hj2l8LX3v4U2Y28EWxl2KpCmJawf8ES1Smv7dPo579Cjm6q5_N6-_JOfGEBB2EQgwoUEQjHA-qbDStWvfPwR73i9vT8Bd5bSerKIlXW8flEcPsRhC0LlF_pCE_9rkSv8OX4IxvACK7GSxaGg6iVh432-QnCFTIuPJdNmzer9OQeBbUYjjxvbYjaqYGGr8NjFvpldIW4NflkPpYxCY1osMEw_pcaD0OgVT8RGdKgkd6sIY09IfayI1ELnq2Tx0ju4M_FbeHLXE9MMyYPQHtloRDeXA7p7RxjyoYDZX4jn9uzYEDhlHDhvOR83JryLOLEKWAH8K0tIPv5P2ieB6GNRaPzxVkBi4PZETVvu4c9qDne1xGoewGLmqFbxsvvr2l8Tu3URruXg3Arn9lSZlsAtHVagO8O=w800-h600


ynA1gIzJGOAtqfdIyt1-Mv2wSPBYCrEUMpXpRjHIWNoD_JedJKOk6n-WeC-0XNJl5D04qsKOBAa6GhVqKHkBlb_4wio1Ddbt-ilMNWtvQozGUbZAX1KBgHmJXZpXwN-e1Y3wD0LQ7lNynGoFnFyHKKFEqABLkQ3fwiMDIRgijqgvrZW2Kkq3mAXOkL_LctNzUTskay1kl-l73_98mD-7rVmZYBMH5E5UUGRK9LW3sEdAjzNk4tBm2UHb9PX_kUEqRy9cK5qO3mEJBe0Bg5txb6FGZZf7-Yc0dGwFrLKsfveobzn0TlnptNtb0shawId-sBebzKlmKFT13mL2KPvKqTym8VWHtwMkSDafYaIuci4YJr4T8dx9htxkBR9HNZoEEwqbElYI7TErfueWR-fllalvQyHB6KnYJ_Rc9ptSNeZrNf87PKkgcDJOLgnY607WUmAAhE-vSuCU6bE1-1rDKr8IjoYB55Mvj5HJX7vElED0Z8-sGL3NEqcCFgKpEAHkezZfGW5TyP1oEI-lZWV3_1DfNbzXq9Uac7ShDjmg1HxCfqwDTiWYFuHSxk6TnU42=w800-h600


Next is the locking key/wrench. I debated with myself quite a bit on this. Initial plan was to do a wrench/spanner style model like what you see with the pin wrench that comes with an angle grinder. However the more I thought about that idea an the potential for slipping with your hand in line with the edge of a slitting saw blade the less I liked it. So I ended up going with the key that comes in end on. The next series of photos will show what I mean.
The shaft and the pins for the locking key.
ze73CcVF2ATugtMczBPhsTj_lkKywP7L44OGaDd0WHbaEaCIF1lVsi9owu4UuTD2mkypD6O_49NIg0LE-wDZ8ncOyjECJ1h8eHrVl1b-uhyPy-3UWZvRE19792lOUmxFyES6G_omre-jFxFwFis_y_J_lqivhlEpwROAOvebcmd0C-BoeQXQG7W9XFl2x8b_1a-a6E-YfKWW1wCkMIq-giEJicbz9VEBE6usFS5sQJ6tBdfOHgZzaDwoseyPkELk9qAJ0Z7vFFrR8EzowT_a7LYIlsDQPZhsBycys5wUfk1rMJtK8SsOZEFSpRRblr1FmIAQm-WVjNuNP1smgnMNfDMPnFOpqYMuQqIj57sZmIhIdFMloYeD6axDfU1mWSggu8062moix2qLrbNvTTVfi6QEy6gXI0mG5jwzv1FK3iRDKnbI5sERoc30UiG901pFVLi6QkZSKZvfX0IJeg5Wk0FOi09YqaDkgJkMBvDzs8E9FBReW4ae_Pp9IHs3_cNH130Kv_mbqJd93b6HC2qlnjGVQiJTWr40AZlUeQI9wedUCkWCdMo--b7Z1ygE0L2R=w800-h600


The shaft and head secured togther. I dont have any pics of the head being turned. But nothing special. 25mm round, turned to 24mm, angle on compound set to 23 degs and used to turn the taper. Then the thread for shaft drilled and tapped.
uWkrPFK8sdBaizcuHcB1Xm625Eu2c0dcgyj2Gw19fGLJy8dWNTAYCmL1NlCgmmEKbA-U9UWDEr4hIzup2PrHjjmOmLOVlJ_v7SOLqJrT81PUuY4QjGWKa6L6ZAu7l7Jy3zyZXor_4jLCv4tXvQetZKTdliuPcZTTGh6DprIeLqOVV4wsVvTs69f686Z9DOhIk17A_20FMR8RnDYhcxUAhEZni0bFZJmtVphArtKnD1C75afcHr2ktm8R6svPaLjdsZdDTNwrsmclX4ePrmc1LubtZlqYOvGXbYWJgJPG0drkIQLnTWH_33ERZxzpdcoIBGVC10jp6gyAQ5tLNVsKL-tyNVBL-2hHsdb52LU2oAe88f5mm82EWclhyiEua8_NH-xppLPT_R8-gY9plaARuXUT5vT7Ed1uBXogHxftGg2xEVxz0IrR9yElQMxOnKaPqJ-vX0BkDh_dgQj1is0Nb9f9CqxnWPhmi181adKnVM8OrR226ujpVWPpPRObS_ysoaPbq2Y0kzzmpzkrIW1rwTb4WqTDdk9G4jYjKSqT_iU12kHnTBoavxY1tpLlqaXW=w800-h600


The pins setting in the head. Using the shoulder screw from the arbor to keep things aligned while the inital setting period (20 mins) passes.
fnTvSrz8fruCwk9SwbSXFIO-Hsr7Bh1Wfve2UPTYRF3MxINZfUQkFcED6nEXDTofX0RnEWg0OG-_PzxSJNiZEq1TuQqXBNqZJ0eXN-4pKpCWfsCQfby-U2LokjpE7ETeJPkwEjL64IvGJK37UeP68aFAwlPOcopHx9D6Wgi_TVzQvclJ6wC8oN85egDGCojy0PvVcpwV0joq5ny7tzPJpd4B01Q2aMjhbPmR4JChdX83nInkJqLzEO1mDO28yLfbFhhhsFv58CWP6PqNnRNZPfvEgmMRXhUkRAN9pyWoqKYtPANTcl8QnZFnFMYeF-wdpKjN8yVqpNcYrhoERAPp54yqUTVaxXwypAPJ52p1GMjnBFgFxhJ5OOMMtgzazdVXMXOxO4OWjc6IZOwFAH_jWI309AJOlIZake59F7WO3NxuST21iyOgmCCjQQXa_iDMjDQp6jzfUG1z0p8egx1upPEUZ_gzDQ_J3WVgMMuqspUR66lUKlKpEBFQALjU0PTCxssLjZkDBuZOapivdJMnUtNnhAO-dvPWW9c10NxGD5JGXwP3B0HI4NI5p-X8-SOU=w800-h600


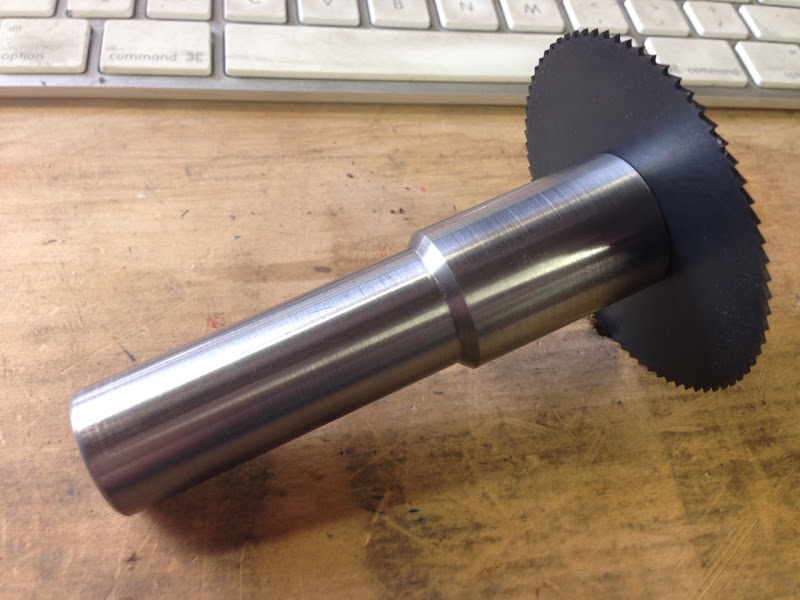
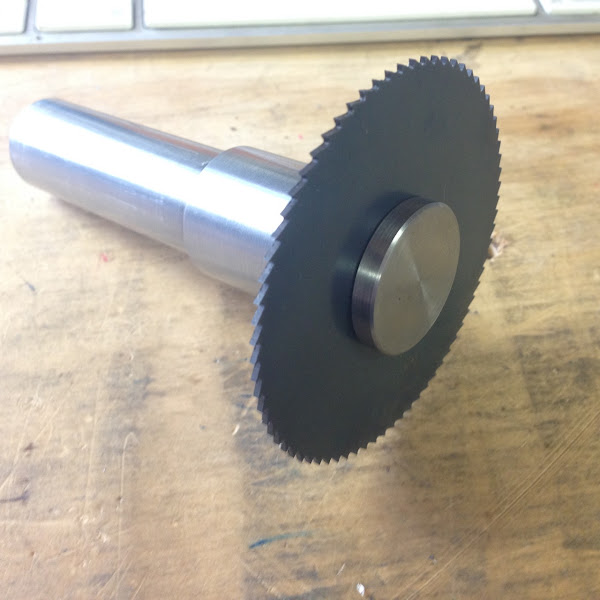
The grand finale picture. The arbor with a saw in it and the locking key all finished.
HdD3soVwNaq-N7EtSrBZi03bST8pxBo0S6HLyA5hRJBmvj4glWDtBRJXaX4CMs4W3u4Rea9A2PasfmxTpMOBOko1AsAGfGhSw5wiRPZokbq34vyTMPC2yZd29wsmL3uABqtwYMeWTrm9Kgkwyg4ESO6RvT1wAU_qoW39_le_rLwqPtKMBAVt-r-vXVLF5SqeEU4j8SkTWdvDB0mmmOkkkpANELCCDQd5pAyqcB6JkKGIdQNUh51dQozC0q7quCagEOaDu5naWyKUS8OD0GQJ1QZNToFVNVnKGeYl3uF8Nkr--HerEyv7eyeMRHAFXdZoXSBNck_pZQh0-uODZeMr1idiDnBsCvJW-kZ-KOAHC22ZCoK6YoAe5n1hbC2Qn5tF-a93mJzq85M1zuOtfoO3Y2M9HF6npW5m5NC2xgoqYnD3XfnwunhD4JqR5V-gVy5fkyD4xPsImA04stxH_OUwswmVFRDTLEDssyNa4lpSojn_isS_1utPVXCp4ycW7Vyfq3q45sdPrAQ8eRdL8UYTiFThJY5MSH4JMB2Qwb9Jnrrl2mrlriKvZrhB4dNLQxZY=w1436-h816


Hopefully of interest to some people.

Cheers,
James.
 
Nice work but you forgot the spanner flats shown in the CAD model !!!!!!

xpylonracer
 
Nice work but you forgot the spanner flats shown in the CAD model !!!!!!

xpylonracer

Yeah - CAD model got adjusted a little as I went on. Decided I didn't need the spanner flats.

Cheers,
J.
 
Very nice James, particularly like the spanner.

Thanks for sharing.

Cheers,
Adrian
 
Nice. Particularly like your threading. I have 2 of these, both commercial. Yours looks just as good. Funny, they both have low runout specs but the blades themselves seem like they were stamped at a soup can lid factory, they always seem to scuff at some part of the OD.

One has a simple allen bolt to tighten an end cap, the other is a hex ut used with wrench, but that one accommodates bigger saw blades. Seems to me at a certain size, the blades start having key slots in them? But I have yet to have a non keyed one loosen so far.
 
Yeah - CAD model got adjusted a little as I went on. Decided I didn't need the spanner flats.

Cheers,
J.


Very nice work.

As for that spanner you may need those flats in the future. At least on the arbors we use at work the cutting action can tighten them up something fierce.

I must say though this is a bit of a work of art with the matched spanner and all.
 
Re the spanner flats, they are obviously still an option and easy to add at some stage. My rational at this point is that when the arbor is in the collet on the Mill I have spanner flats on the Mill's spindle I can use if things get too tight. Heck if things are so tight that it slips in the collet I'm not sure I could ever get it open.

The design is modelled off Stefan Gotteswinter's work (http://www.gtwr.de). Check out his youtube channel for some great stuff.

Cheers,
J.
 
One has a simple allen bolt to tighten an end cap, the other is a hex nut used with wrench, but that one accommodates bigger saw blades. Seems to me at a certain size, the blades start having key slots in them? But I have yet to have a non keyed one loosen so far.

Wizard69 said:
At least on the arbors we use at work the cutting action can tighten them up something fierce.

My slitting saw arbour has a Allen CSK bolt holding the cap.

I ended up grinding spanner flats on both the cap and the arbour body, because there was no way I could release the cap just using the Allen bolt. I managed to destroy an Unbrako Allen key trying.

I keep meaning to get another arbour with a key in it. At least it will stop the blade locking up the cap.

I ran into something similar with my 2MT slitting saw holder for 1" diameter holes. I 'ragged' the Allen key holes.

So I drifted the csk bolt with a 'cow mouth' chisel and bought a lot of stainless steel replacement screws from Screwfix.

I'd had trouble with seized CSK bolts on one of my Chinese made branch shredders and my 6x4" bandsaw.

So the pack of replacement bolts is kept for future use.

Others may have different solutions

Norm
 
Here is the "flat" pin wrench to go with the arbor. I tried to keep a similar style to the key style wrench. I'm not too good at this style thing so hopefully this isn't too far off the mark.

Key elements:
- source material is 25mm and 8mm round bar, 1215 steel
- M6 thread on the handle for a total length (including threading "gutter") of 8mm, into a 15mm deep hole into the head which is 8mm tapped M6 and 6mm at 8mm, leaving a little air to ensure the hanlde seats into the 8mm hole really solidly.
- 3mm pins from the same source as the previous wrench
- everything loctite together with the high strength varity that requies you heat to 230C+ before it will release

YqsjU5qjngqRFOj3u9Rh_uticstxM2L-J9BNcPOIYFfpfYWj5_LbZ2n1QXcQjjrUz9WcTPBkbSc4CtqB7takuBbkMLmnkbBZCN4shpy7VgC5L5EhNraCc4RpiDhUcQNz81ejOQ5Q3HfI8sGLpt44qSxrHBeHFtsMhH9CG2Edp4zIIXUU0H1XCHnyn6SE86rgBmna3QVAojpdheFA995uRYVl8DLAGmqkzeAKEy5u3tga_H3woCVR5H2XnRQHg3vhYOFdZ56pZtW9Ub79fH2mm9omfZ9zRX2NtiPHMDK_ysAbBP_Tt9JNCTCOIaUxbPBQIczel4iIOSIfxxR1Pdl5gzJwdKHaK9AbK6u7CKqqGQglhGUieo0XbTJ131wghwR_-GdRfZIgMBC8lnubwxc-1N2Ag-Z2371KdGoPxf-wGhBo1PgFaSjQFPiqxurBrfPQgeHVW2XjVYxVFo4Ab2GwfBfGW43RXi1tl4YNZV2bBHSJ4YGtx-PcL72Jv6JWU63cFT_2pWOL25jWLScl_53HZlP87QJQyXWM1gCOvm8kOKwqQy3xig7lqEyRdL2sPDvD=w800-h600


R_JZJYPGjV6nkMvKgelSepzUQBp2HFFUH5BJR5zNuMxWaxmDFQX-TakD0H89J5JHDFX6bavCjOLiB9OcoYjYjg3Nt5Psj9E0JTUezbaOUQiYHpg0NiNPa3fjhMQri92wIvbXFSAWhCb3nSaTbxX6iGdhq9bopspNySeh04H6FnKGPp0yKsOFGSO5nRyT7wDnNcjiCUEYCNaSJUcK5Vr9YGAk4pO8CZF5SAoqGeGJEghRY9kn8idi8nwsjBWyt-fQW_aQCEvco4olRexv9xJN8jy4acr7OXuvu3c2hUJCfsfKnl5p27mZ_OuCKoa3Ns4IFJzXj0kxpeKq3rvKSPqm5gauet_Zer4dLxgdIxgTyHqQK--1iVaE24R1n44NQYOiC8xQW6KAFZXL3u4QVfXRN3Go4k9Vsj3AoeZbB3luMPiJ9fJZIiy3_HgUX2NB01d6oMfRIz4LGovp9WrzEHuA5kTUyeTQmtPvsRXNdbuG2QiAUL1yCHD12NQGdOfoVriWb0Ns0OrO2sawNy1qkWlGM2EOnBe6VKTja9L_VtHA0OmorMqLR3fcOrpd-LjWZ4XH=w800-h600


hqGX9-54Kr_t4B2W2U5gam3GMHp5XcE4qE4lI8NfKDPgFKzGcW2Zis5qlBvJnqVUX2xn6_eLJHj6oW6Zb8gqLQMUUOnFWNt4_SxBCgAF0SserJwBLyS83teEq73aHNZekHiXgR1pm-7YquJy-56jYsnLvlrDaP4MHI4j3nT4tucBefycIHjneUk8ito4vgQnmquL7VJCQDkFu8uQFNnRJ9AlyCPb6uqxlrRvRZgCFuYzLxlsCCFA8-noPJhoRCctOLR80F7RVFw-NgyzRWOQknIz2GY1bak7Hoac_3HjWxj3EomRo954gY0-XVyDjV_L5kIzQAWEWzH3rj5tbVuWbEbbKM8tfk64n3mD_r0d8TFCyh9kii-douYVu0dfzNPoO58N3BK7ED3xk_dJzhw1gxOKMaLJFQfyAYhx4wg3D7s3s6QQ1aDMyVYIDYVN9Hq7TRuDFKFD_fXXSD5bBK2i1XzIce2DSXKiahsHKbKsmByz5NFHqMeQllnp7owTFhrnGTlNdeq-8TZ6qgdExkHd802fFrSqpw3k-rtD3uNvPAPdszhHhj5dNawQAZEpIJU_=w800-h600


Cheers,
James.
 
Hi James,

Looks good ! But as they say "proof is in the pudding" only time will tell !
just needs a ball on the end :)
 
Hi Norman,

Hope you are keeping well.

My arbour has a SS Allen CSK screw originally, the socket didn't chew up, the Allen keys failed. I broke the Unbrako one by clamping it in the vice and using a spanner on the arbour body flats. I originally tried one of those 1/4" hex drive to Allen head bits, and it just twisted off, (Chinese Junk), from a B&Q socket set...:eek:
 
Hi John

Thanks for your comments.

As I have a new Fred;s Shed, I was wrecking cross points and whatever driving hardened screws for lining it and shelving- Classic brute force and bloody ignorance
So I bought a couple of battery drills from Aldi but bought professional drill bits from ? Erbaugher ? from Screwfix and these have been brutalized and brutalized
Clearly this is the way to go and to dump the rubbish

Moving back to James;s topic, this suggest something about how my blacksmith father did things. His tactic was to use soft bolts as drifts but to caseharden them so that they didn't snap but had a hard facing to avoid rapid wear.

The other way( probably ) to remove a butchered screw is to Mig weld a bolt onto the offending piece.
Meantime, I'm waiting for my new toy/t&c to arrive and bid you good health and happiness in 2018.

Growing old--disgracefully

Norm
 
Stainless fasteners are notorious for galling and sizing of the threads. Unless you use anti-seize on the threads and contact surfaces things get ruined quickly. I like the idea of adding a key way slot to the blade and a pin in the holder.

Some way to heat the holder to release the threads may also be prudent.

It's a beautiful holder and wrench but under heavy use it may not survive.

Just my opinion for the discussion.
 
When your new toy arrives Norm please give us some input
I have been looking at this T & C grinder.The chinese copy
I am still not happy with the acute system etc etc.Just looking for a simple way
of revitalizing end mills etc
 
Someting similar happened to me at work. In this case a store bought arbor with a flat head socket screw. After failing with a brand new Allen i ended up drilling out the bolt.

If i where to do an arbor for my home shop id most certainly would go with a design that uses a disposable bolt. Going with a keyed arbor is even better but sometimes it gets in the way.

My slitting saw arbour has a Allen CSK bolt holding the cap.

I ended up grinding spanner flats on both the cap and the arbour body, because there was no way I could release the cap just using the Allen bolt. I managed to destroy an Unbrako Allen key trying.

I keep meaning to get another arbour with a key in it. At least it will stop the blade locking up the cap.
 
Well proof in the pudding ... first cut of the mill. I used the flat style wrench to tighten things up fully once in the saw and to unlock it all once cutting was done. Things worked rather well.

This is a 50mm diam tube of aliuminium with a 6mm wall. The slitting saw is HSS, 1mm thick, 72 teeth and about 63mm diameter.

DC4_6WqPX_E4_i6QdngD1M97cXnHn7SC6PRr_NraGOBq6o_Jhj_r9hZlWDLa9gYhQHTU-FjA1Q-KudTqa6NBm0dlmWdumyaQxSSd-4PaPcwvH_EfeS-mb_idQAB0UBhKJ94nPwnU594euEN2d19mss3znlUEVTAlRYNo6pKa4V13wGnbTDuD2zAwoEXRwnYNpgwHIefV4oN78x6NmmmuFzOWk9irGa5TCU3Fsnd1388MGkBNJBfKAK1_-DX281X3-uGSoDf92VhvCgybCZ5eBZHH_JNm2fZMfHyekANP_sBC_L8BOgELrZZs4wIyr-aq-IwaZWokD6YM0e_hflt51RUfj4dUIRHKmszXEkfs0vS3MCDAiGYjsHd5pjtlWHHwX9iCK0S1crA-8W7HYUwSHYo4JTkmxtJJlwuj8EBVo8a26uwa08xIgJ9Zf9OGPWmGqJnD47rAhTFxmG978-ZDumsN-EZfBFm6lRpRmPLcTXnp0A_BWHthwSMuMpXL3abyor1nHKcK2zIpFgzbVcMmVN11FjG_PX4k_NIvEsigXTWTSIBGhBiXaZtDVVxXDhs6=w800-h600


zmiXnuZRg7jHpqDT8mazZipSUB4wg79cpe4RX3NMXdema8VXzbT_sSSQbELQ9v28gsKfFl0zIltj4m8BVmmRiBRgy_0oc4ija3eHRH5upQu8og_KgMN6P60-znybtE1jvEQU2Tb7tz2btGf67wBygcjXhzWyj2UB6h-M7DOAif4R62RlfqJfXel2wbq6HDKO1TurTT6Byda0XRLnCXHLy_EF_qQdAqwE6QLlKgmRdRiKiArAEU1GDKvdZxl8-gDff0okGIomY89MoYPyGnPgo9t7Gm1Dh0k1IbP2X_ZQXEYOL6_wiZPC_BCoWRY91AWxpyO8Xf0-sGneklBpaQXYQyqYjGxGuoI_cpYL3YpckLpEju1kJ9z081aSqG1RQ7wafxsr92b2WJB7PI6i8IxqfvLiOZYeaBwCOZ0ce3ZA8VYXizEYKBlu8_iy9AI7B3Sx4_f-ucupNMGJ16l1hs0oXCqKJfwjHbTF0Bj0czzGK_nPKwhwn_reIXGmLWCKMCINWPsZlOmBjVtxrbegAZiSfshux96SdQUnpRcXtN83swwYeQYfAvIOjaqqedlKgBAa=w800-h600


OqO0IFiLDSQSts-3rpu-aJ_7A__e_X09_n-BTRNQkeBR_uP2R_8vozWGHNaU1yaFkRfr9If0beXj38boQPQ9PHXQKbqGQqJebTE1P0vR_QuWM60HEYV44BDK-xBwQXThf0DP5ZnGEC06S7btJks-GtmALdBGV5iMXmULvIfhr_mMweBO1MIAjeoB7K6crjHH9Y036UCUuYufCatX03kwCegooO89eP2EfnYcdgjFY6BWElmQzngxWvbp4qDdBRAUz_WD8gsEDbx-y60PBRzIN_fMn0pEwhDcxdTJ79WCkL76OA_RjXGBqyFHC1Xe2xjXOAvvAiLIntmt3j23IpnJBiFYVmAiYoN_gtX0GySFD5nGH-eYc8O-3MrxuYL2WX2wsp-Bq2BVwJFCrlnu6UpdwwaPYz5T7veY87b4tYvfhrVtA8dNn-Q5cbmvUTpkia8W19d9beletX9Ki7x6MMBk3UEfS1CtK0WtESRMFb0tYlc9A1qfXRxtmxFGpAVP_u8D8U18fgtyN4VGilv4iqYz5mp3w2EZwZC2HNse4f4GdFo9RDyvNmCt3WHunegDnWKw=w800-h600
 
Hi James,

That looks like a piece of alloy scaffold pipe. Nice material to machine, just a squirt of WD40 every now and then, to stop bits sticking to the blade. Looking good.

As an aside it was doing more or less what you have done that caused the plastic gear in my mill to fail, when the saw jammed for a fraction of a second. I ended up making a new dual gear assembly in steel to replace it. It actually cost less to make than buying a new plastic gear.

Did the fastening screw on the arbour tighten up after use ?

The screw did tighten up a little bit but not a lot more than the tension on tightening. And no issue opening it up after.
 
Back
Top