Scratch-built Stirling

Home Model Engine Machinist Forum

Help Support Home Model Engine Machinist Forum:

This site may earn a commission from merchant affiliate links, including eBay, Amazon, and others.
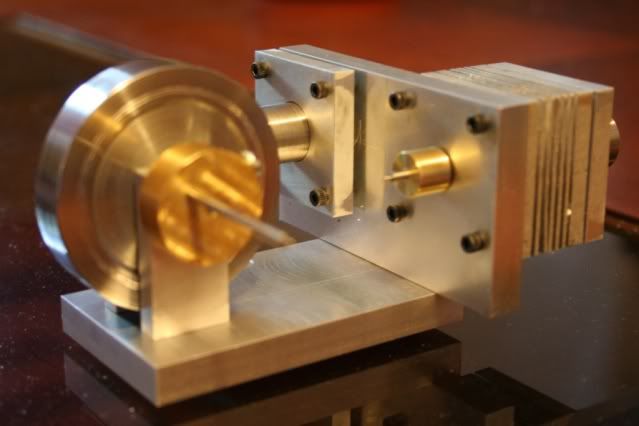
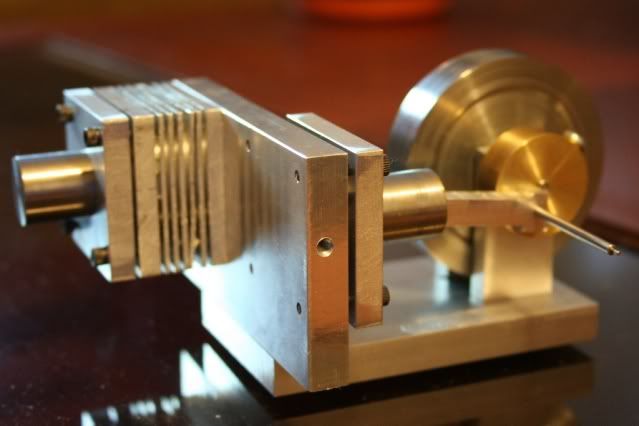
Thanks Zee. Yep, I got tired of those itty bitty 2-56 threads and wanted something a little more hefty.

Thanks Dean, but today I hit the wall. Spent a goodly amount of time but little to show for it.


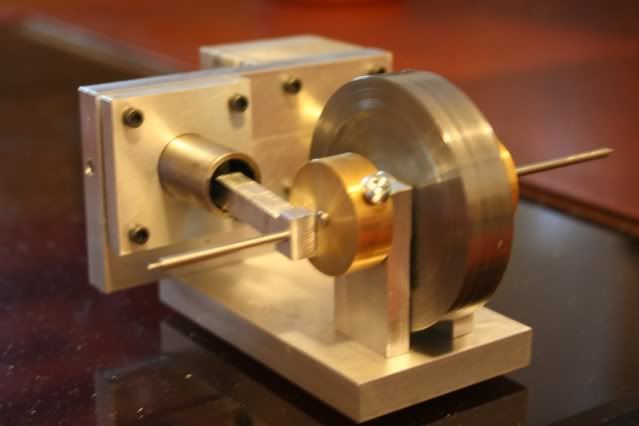
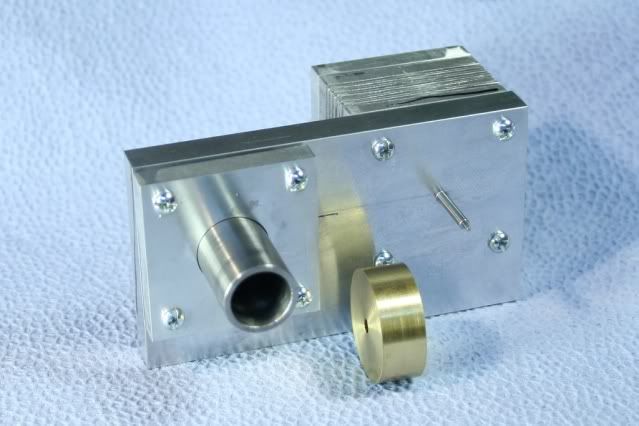
Not much to show today for a fairly lengthy session in the shop. I lost a lot of time making a messed up con rod for the power side. Actually, the mistake was made rather quickly, as usual, but only after putting a couple hours into it.


st_conrod1.jpg


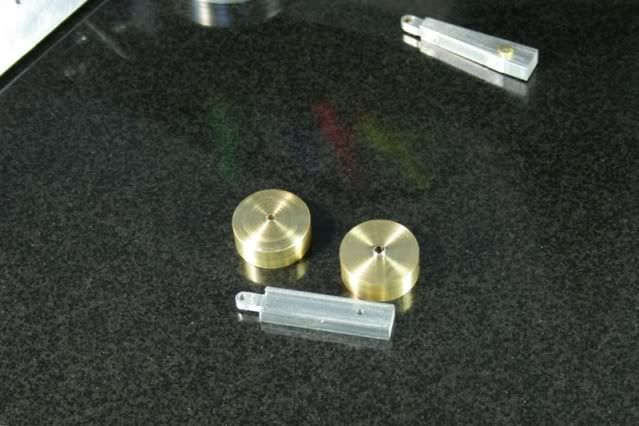
My original plan was to make some crank arms out of aluminum, but the engine is looking way too silver and needed a little color. So, I decided to make a couple crank disks ala Elmer out of brass. I still need to clean them up some; they’ll be locked on the axel with grub screws so I can play with the angle between the two pistons. The boogered up con rod is in the background, remake in the front. I also finished up the power piston but forgot to include it in the group shot.

Thanks for looking.

P.S: As a side note, I see a lot of beautiful pictures. The focus is great, color, lighting, depth of field, composition. Everything is perfect. On the other hand mine all look washed out and crappy. Could one of you guys offer up a thread on taking pictures?

I’ve got a good camera, Canon EOS Digital Rebel SLR, but I seem to get better pictures with my old Kodak point-and-shoot.
 
Ken,

Actually, I think your photos look pretty good.

Photographing shiny metal objects is tricky at best.

Here are some hints in no particular order...

Don't photograph parts on a shiny black surface plate. Use a single color, unpatterned cloth with a fine, unobtrusive weave. Darkish blue is a good choice. Avoid bright colors.

Check the white balance on the camera. The auto setting isn't always the best. After setting up the lighting, cycle through the available white balance settings while watching the color of the background cloth. If you can't get a true color, you may have to use the camera's custom white balance setting.

Use diffused lighting to minimize "hot spots" and reflections. If you want to go over the top, build a simple light box - cardboard box with large windows cut in top and sides, said windows covered with cheese cloth diffusers.

Use a small aperture setting to maximize depth of field. This will necessitate a longer exposure so a support for the camera may be required.
 
Thanks Marv.

Yep, I've tried all those things except the blue background. White balance is set with a stack of several pieces of printer paper to avoid any shadow bleed through.

I've tried moving lights around; diffuse, reflected and bare light; ASA from 200 through 1600.

I've had the best luck closing down the aperture.

Unfortunately getting away from the auto focus is difficult. The lens is very awkward to focus manually, and my vision is not great. It's the lens that came with the camera when purchased. I'm loathe to blame the machine but perhaps an aftermarket model is needed. I've seen some very wonderful macro shots of corals with this same model camera but a different lens.

I don't have any fabric handy but I do have some blue paper towels to try for a background. It seems better, still it appears to me that some details are washed out. In particular the crosses on the phillips head screws and some chatter on the inside lip of the cylinder. I'm more readily to believe the operator is the problem rather than the camera.

test.jpg


As examples of what I'd like to achieve I offer up:
http://www.homemodelenginemachinist.com/index.php?topic=8169.msg89167#msg89167

http://www.homemodelenginemachinist.com/index.php?topic=8768.msg94104#msg94104

http://www.homemodelenginemachinist.com/index.php?topic=8897.msg106001#msg106001
 
Try a darker colored cloth. It doesn't have to be blue - that was just a suggestion, not a dictate.

Diffuse the light coming from the left and add a (maybe weaker) source of diffuse light on the front of the subject.

Most Canon cameras have an autofocus lock feature. That may help you to solve the focus problem.

It takes time and a lot of experimentation. Also, I'm hardly an expert photographer. Check some of the books written by the professionals.
 
I'm pretty much on Marv's side of the fence, Kevin, in that your photos don't look
as bad as you seem to feel they are.
The shop is kind of a hard place to light for photos. Often shiny stuff, that wants
to flare, and then some dark corners where detail is lost.

You mentioned that you felt you often did better with your point 'n shoot. That very
well could be, and there's a good reason if it's true. The depth of field on that kind
of camera is very deep relative to the lens, and so puts a lot of things in focus.
Shooting close up on your EOS may actually involve a magnification factor, and camera
movement becomes more evident.

For which ever camera you use, force it into macro mode as long as you're closer than
about 2.5 ft. Most cameras have an option to use a single center point
reference as your focus point. I set mine to display in the center of the finder, and
always put that point on what I want to be critical focus.

Leave the flash off. (It looks like you do that already.)

Set the color balance to a white sheet each time you change your lighting. Put that
white sheet in the same place your are going to be doing your shooting when you set
the balance.

Most of our shops don't have diffuse lighting, because we prefer bright direct light
while we work. You might just look around the shop for a place where light is falling
from multiple directions and take your photos there. For taking them while your parts are
on your machines, you're stuck with what you have, but a couple of large
white pieces of card or poster stock will make a good soft bounce to fill in some of
the dark corners.

Dean
 
Hi Kevin, I think your pictures look good.

The camera I used in your examples has a large lens and is fairly expensive. Small cameras with smaller lenses won't capture as much detail nor light despite pixel count.

I use a mixture of light for my photos. Sometimes a sharp light directed from a particular angle will show off the metal highlights well, used in conjunction with an LED lamp, a swing arm incandescent and overhead florescent (std shop lighting).

It's all a balancing act.

-Trout

<edited for clarity>
 
Dean

I have seen you make reference to the white card camera set up in other posts; could you please elaborate a little more?
I have two digital point and shoot cameras that I use in the shop; Pentax and Canon. I always seem to have mixed results with them.
I wonder if this technique may also help my picture taking in the shop.

Thanks,
Dave
 
mklotz said:
... It doesn't have to be blue - that was just a suggestion, not a dictate.
...
It takes time and a lot of experimentation...

Thanks Marv. I took it as such. My choices were blue or white towels. I'll have to see if my wife has any fabric squirreled away somewhere, or find some colored construction paper.
Bytes are cheap :)


Thanks Dean. Actually the corner I use for pictures is very poorly lit from the overhead lights, so almost all the lighting for pictures is from the floods arranged for the task.


Thanks Trout. The camera wasn't cheap, but it's toward the lower end of Canon's DSLR line. The camera was selected after seeing some amazing macro shots of corals, but sadly all his pictures have disappeared.

Due to those pictures I know the camera is capable of taking great pictures, so I'm left with operator error as the culprit.

I'm familiar with the basics of camera operation; aperture, shutter speed, "film" speed and such. I guess what escapes me is the art of taking pictures rather than the pure mechanics of it. I think I was hoping to gain some insight into the artistry, probably something you folks do automatically without thinking about it.

Jackson Pollock splatters paint on a canvas and it gets called art. I splatter paint and people ask if I've had an accident ??? I have no artistic talent but certainly recognize it when I see it. I just can't duplicate it, and that's what frustrates me.


The place where I take the pictures is my marking and layout area, not really conducive to taking pictures but it has convenient power outlets and purchases for the lights. When I stage a photo shoot I take about 50-60 pictures, I may find one or two that I find tolerable or less objectionable than the others.

I'll have to see about constructing a light box.

Thanks guys, for all the suggestions. I appreciate the time taken to help me on this.
 
A minor update, but no pictures yet. I'll have some tomorrow.

It was very hot today, the shop was 95 at 8:00 this morning when I started. By noon it was over 100 inside! Still, it's been a relatively "cool" summer, we haven't officially broken 100 yet. But 75 straight days of 95 is a bit unusual.

Anyway, I started on the base. I needed to start anchoring things down. Cut a piece of ali and got is squared up and fly cut the faces to make it pretty. Drilled the holes to mount the bulkhead and drilled and tapped that as well. Put it together for a test fit and looks great. Checked it with a machinist's square and it is spot on.

I got all my measurements and calculations together for the bearing standards mounting holes and proceeded to center-drill and through drill all the holes. First up, I noticed one of the holes looked to be in the wrong place. Double checked, yep, it's off. The hole isn't in a critical place so I left it and continued with the rest. It looks beautiful. It looks great. All shiny and gleaming. It's also completely wrong!

It seems when I was setting up and zeroing in the edges I forgot to take out the edge finder radius on one side. Stupid me. The brain gets addled with age, and the heat just turns what is left into mush. Tomorrow it should be cooler, there is a front moving in tonight, so I can plug the holes and start over.
 
Gosh, way to hot for too long, for me, Kevin. Hard to work that way. When it gets into
the 90s here, I have to pack it in. Thankfully, we only have a few weeks of 90-100° f here,
and when it's past, I can get to the shop again. Most folks here have no form of AC, including
me. Hope things cool down for you soon!

I suppose we all do that with edge finders, now and then. It happens. Sometimes, when I
have a crazy amount of holes to do, I put Sharpie dots at each one so I know if I've lost
count, or forgot to start on the center of my edge finder or wiggler.

Oh well. It's easy enough to plug a hole in aluminum! Still a pain in the breeches.
Didja get that chunk of graphite?

Dean
 
I've forgotten the edge finder radius often enough that I've finally developed the habit of moving he edge finder down to the part to double-check by eye. The radius is large enough to see I'm off.

I wish you'd get some AC Kevin. With global warming it's just going to get hotter and stay hot longer. ::) You need the shop.
 
zeeprogrammer said:
With global warming it's just going to get hotter...

Hey! I thought we weren't supposed to talk about religion on this forum...

Dean
 
Thanks Dean. I usually avoid the shop this time of year unless I just HAVE to make something. Normal shop time is an hour or so Saturday morning just to clean up a bit and get ready for the comfy weather. But this stirling has been gnawing at me for years and now that I've started it I have to finish it. I guess I'll have to change my name to Ahab and call the engine Moby ;D

Thanks for the concern, Zee. It really is appreciated. Wife and I (that's her name, "Wife" :) ) have discussed putting A/C in the shop. We did again this morning. She left a couple hours ago to go shopping, though she didn't say it, something tells me she's going to come home with one.

Actually, Zee, we are running a little cool for this time of year. The heat broke a little today and it only got up to the high 80's. We usually have a couple weeks touching the 100's by now. Last summer was very mild with only a few days in the 90's. Really what is changing is my tolerance of the heat. I can't take as readily as I could when I was younger. Each year seems tougher to deal with.


On to the project...
I plugged the holes in the base and redrilled them. Got it right this time, though one of the plugs came out while drilling. The proper location just touches the old holes, so there is a little bit of overlap. Spent the rest of the morning tweaking everything since I finally got to test assemble things. Then a break at noon to go spend a few hours in the air conditioned house ;D

Then a short session for some more fiddling and started whittling on one of the con rods.

Yippee!! I got things that go round and round now!

Sorry for the crappy pics. I was too hot, tired and cranky to set up for staged shots. I took some outside in the sun but they were even worse than these. I just took some shots on coffee table on full auto.

st_oblique1.jpg


st_oblique2.jpg


st_oblique3.jpg


Thanks for stopping by.
 
Kevin, I too struggle with quality pics and purchased a DSLR in March. I expect to be a grandfather someday and I think it's not far off and I wanted better pics of the shop projects. My problem is I just don't take the time to stage the shots and use total control of the camera. ISO, aperture, shutter speed, whitebalance and focus all come into play....

I am following along on your project and learning while I read. Thanks for taking the time to document it!
 
Thanks for stopping by Bob. If you're looking to learn how to make mistakes you've come to the right place!

We've had the DSLR for a couple years now and I'm just beginning to learn how to use it. My wife is the photographer of the family taking thousands of pictures a year. She has a Canon AE-1, but film has gone the way of the dinosaur so I picked up the Rebel for her one year at Christmas.

I took photography classes many decades ago but unfortunately I've never really had the eye for it. The Canon is really tricky to work, you have to push this, then hold that while twiddling with this little wheel. It has auto settings but I don't really like the results so I've been fiddling with the manual settings.


Dean, I almost forgot. I talked to my rocketry buddy and I can grab a chunk of graphite whenever I need it. He lives just around the corner so it'll be easy to get hold of.
 
Kevin, that's coming together very nicely, you'll soon have another engine done.

Dave if you've got any of that liquid sunshine to spare we could do with a drop here in Twyning Gloucestershire, things are starting to get quite dried up and our sheep are getting short of grass. :)

Nick
 

Looking good Kevin.

I have been following along and look forward to the final vid.

 
Neat, Kevin! Suddenly it looks very... engine-y. You know what I mean!
:D

Dean
 
Dave, thanks for stopping by.

Nick and Kevin, thanks guys. It won't be long now. Just a few more widgets to make and some minor details and it'll be ready for a test run.

Dean, yes I know what you mean ;D It's no longer just a collection of oddball parts, it now has context. It's got parts that move, and they move other parts and you can wiggle them and watch them do their thing ;D
 

Latest posts

Back
Top