Running a model engine on LP gas

Home Model Engine Machinist Forum

Help Support Home Model Engine Machinist Forum:

This site may earn a commission from merchant affiliate links, including eBay, Amazon, and others.
Propane is a great fuel. Lots of references to it if you Google. It has a higher octane than gasoline and it's pretty straightforward to convert any gasoline engine to run on propane.

Very powerful engines can run on it. I grew up in West Texas around oil drilling rigs that largely had their big industrial engines powered by LPG, propane, and similar gasses. Sometimes they could get it from a nearby gas well.

Lots of propane appliances around you can cannibalize or "borrow" from a regulator standpoint.

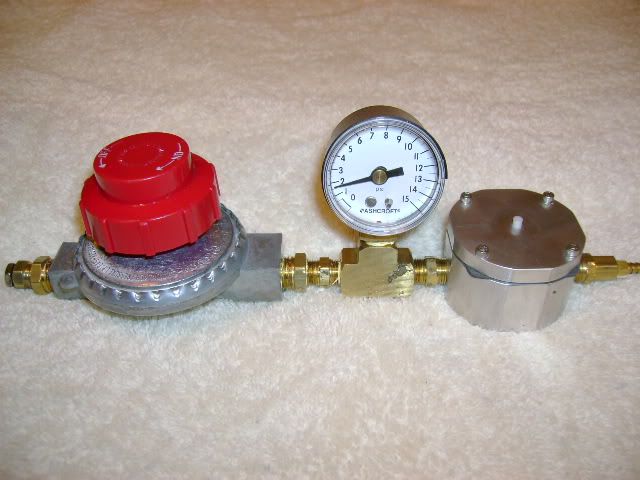
For example, I bought a turkey fryer (some on sale about now I'll bet) that came with a regulator setup to go back to a normal sized bottle. Flow control valves like Paula shows are readily available on eBay and are great metering devices if you don't know the right metering size.

BTW, that turkey fryer is great for boiling shrimp. It's fast, easy, and always a crowd pleaser as an appetizer before the main BBQ event. It's also easy to haul down to the beach. In short, I'd want one around even if I didn't ever borrow it to run my model engine.

Cheers,

BW
 
I made a demand valve from Carl Carlsens prints several months ago but never tried it out because I didn't have a regulator and was scared to run without one. After reading this post and getting info from Paula on regulators , gages etc, I went ahead & purchased them.

I tried the setup out on two of my engines and the results were the same. The engines would run very well as long as I manually held the demand valve open. When I let up on the manual button, the engines would stop. I thought maybe I had a bad diaphragm so I replaced it with a new one. Same results. I have run both of these engines on their built in gas tanks, on aux gas tanks, and on Jan Ridder's Vapor gas tank with no problems so I feel the compression and vacuum is OK.

They seem to run best at about 2.5 psi on the gage. I opened the needle valve on the mixers just slightly. I have also blocked the air intake to various degrees with my finger. None of this seems to help.

Have any of you had these problems? I am open for suggestions on what to try next. ??? ???
 
I built one of the demand valves a couple of weeks ago but have not tried it yet. the only regulator and gas supply I have is on the barbecue, and I'm not sure if that will work (don't know why not) Ive just been waiting for a elcheapo regulator show up. I'm sure some of the one's here that have tried and tested the gas thing will let us know just what is needed.
Mel
 
Wal*Mart sells a great propane regulator kit. It is designed to convert a Coleman camp stove from Coleman lantern fuel (white gas) to 1lb propane bottles. It costs about $ 20.00. I use this along with the demand regulator. Works great!
 
putputman said:
The engines would run very well as long as I manually held the demand valve open. When I let up on the manual button, the engines would stop. I thought maybe I had a bad diaphragm so I replaced it with a new one. Same results.

Hi Putt-putt Man,

The fact that you can run your engines with the needle valve depressed manually seems to indicate that there is too much spring pressure holding the needle valve closed. Also, how close is diaphragm to the needle valve actuator rod when the diaphragm is "at rest" (no differential pressure)? It should be just clear of the actuator rod.

Grace note: I have no experience with building my own demand valve (or regulator) -- I have only used the setup I purchased from Leo Fellman. Out of curiosity, I purchased the Tecumseh engine parts called out on Mr. Carlsen's page (the diaphragm & needle valve). To me, the needle valve does not seem suited to the application -- either it is made wrong, or it is not the correct part. The needle will not seal against the seat in the brass housing. There is a rubber washer that might conceivably need to be inserted in the housing for the needle to seat against, but then the actuator rod (which un-seats the valve) does not protrude far enough from the brass housing. So I'm confused. (I would post some pictures, but my camera went belly-up recently, and I'm still waiting for a replacement.)

Paula
 
Mike N said:
Wal*Mart sells a great propane regulator kit. It is designed to convert a Coleman camp stove from Coleman lantern fuel (white gas) to 1lb propane bottles. It costs about $ 20.00. I use this along with the demand regulator. Works great!

Mike,

Where did you obtain your demand valve?

Can you post a picture of your setup?

Paula
 
Paula,

This is the setup I used to run my Upshur Farm Engine. I used a coleman regulator for the single burner stove


Propane Demand Regulator - Richard Williams - [[email protected]]

I give the plans for the demand regulator out free to my fellow modeler's. Using propane you will need to enlarge the fuel orifice. For instance if you have a hole for gas .040 propane would be .060 to .080. Also you may need to make the intake hole on the carb smaller to pull more vacuum. A easy way to check this is to put a piece of masking tape over the intake on the carb and put a small hole in it. If the engine runs to rich, enlarge the hole. When you can control the fuel with the needle valve, about two turns open the hole is just right. Take the tape off and measure the hole then put a bushing in the carb with that size hole. The only other thing on the demand regulator I think the drawings say to use a regulator on the bottle.

here is a link to the free plans
http://209.160.2.112/Plans/propane_demand_regulator.pdf


I don't have a single regulator, mine is a piece of aluminum bar stock which is 1 "x 2" x 9" with four regulators built in a row. This is what I use at shows and I can run four engines at one time. You can make these as long as you want, you just drill the inlet hole all the way through and tap and plug one end. When I made mine I left about 3/16 to 1/4 inch between the tops. You may want to drill in from both ends because drilling that far the drill wants to go crooked.

When I measured it is1" x2.500" x 9", that is the piece of aluminum that I had on hand at the time, but the measurements you have are correct. You might state that the one in the picture is wider than it should be. Also you may add that you can run one engine at a time or four at once.

I Hope this helps
Dave
 
Well Dave & Paula, you really got me wondering now. 1st of all Dave, I used your prints to build the demand valve, but I didn't hit the dimensions right on the money. The .400 dimension is actually .418. The rest are within a couple thousands.

The .418 dim will actually put more preload on the spring than your design calls for. When I check the free length of the spring and the preload, it is actually compressed about 38% in assembly. This leads me to believe Paula's statement about too much spring pressure. I think the best way to change the spring pressure is to increase the .830 dimension. I doubt that I could control trying to change the spring itself in any way.

To answer Paula's ? on the actuator rod, it is below the diaphragm mounting surface by .054. When I set the diaphragm on the mounting surface it seems to droop enough to actually set on the actuator rod. It is very difficult to tell as it is very floppy untill it is clamped in place.

On my needle & seat the actuator rod does stick above the brass seat. I would guess your rubber seat is not all the way in.
LPdemandvalve.jpg


This is the asm. I am using. The regulator is 0 - 15 psi and the gage is also 0 - 15 psi.
LPasm.jpg


This is the way I will attack tomorrow.
1) change the spring pressure (in small steps)
2) work on the air intake
3) change the inlet size. I can do it on the mixer I made for my homebrew
engine but I hesitate to change the Red Wing engine as I still want to run
it on gas.
 
putputman said:
I would guess your rubber seat is not all the way in.

It’s definitely fully seated in the valve housing -- I made sure of that by using a .180” drill shank to push it in. Here is an exact scale CAD drawing I made showing how the parts assemble together:

TOOSHORT.jpg


The actuator rod only protrudes from the housing about 5-10 thousandths. Why? There are few possibilities, but I think the most likely cause is that the housing was not bored deep enough, which should be easy to correct. There is no way these parts would work as they are.

One thing I noticed from your first picture, Arv. The (hex) top of your valve housing seems flat, such that when the diaphragm disk is sucked down it could block off the flow of gas:

PROTRUDE.jpg


Could this be a reason why the valve is not working properly? I noticed that on my housing there is a cross-slot on the top, such that if the diaphragm is sucked down on the top of the housing, gas can still flow thru the slot (another CAD drawing):

MYNEEDL1.jpg


This is the asm. I am using. The regulator is 0 - 15 psi and the gage is also 0 - 15 psi.

Arv, did your gage get pegged? It looks like it didn’t return to zero. ???

Paula
 
When I made my demand valve I could not come up with the exact numbers that where shown on Paula's link. I ended up with a Tecumseh carb repair kit with the same parts in it. One thing I found when assembling it was, if you put the gasket that came with the kit under the diaphragm it appeared that there would be too much space between the diaphragm and the needle and it might not open the needle. So I put the gasket on the upper side of the diaphragm. Hell I'm not even sure the gasket would be needed. Just a thought.
Mel
 
Finally got it to work. ;D ;D ;D

I had to make a new thicker base for the demand valve so I would be able to drill deeper for the spring. I took the depth down in steps until I could see the valve trying to work. I am within .050 of the relaxed spring depth.

Next I blocked off the air intake with my finger and it started to run better. I then followed Dave's tape procedure and started poking holes in it. It progressively got better to a point and then started going south again, I covered up the last hole and it was running nice and smooth.

I am in the process of making an adjustable air throttle that I can just screw into the mixer valve so that I can run on either gas or LP. I will finish that this afternoon and will post a video.

Paula, it is very obvious that your needle & seat won't work. Did you buy the P/N that was listed on the print? Perhaps yours is an older or newer model than mine. These companies are always changing something even when they work. You can't see it on my picture but there is a cross hole drilled through the hex that allows the gas to pass through.

The gage housing was cracked when I received it and it has never peg on "0". The engine runs best when the gage shows about 2.5. I guess I don't really know what psi that really is but as long as it repeats, I won't replace the gage.

We got dumped on with snow again last night so I have to do some plowing now and Tues is my day to go to town & deliver "meals-on-wheels". I be back in the shop this afternoon.


Paula,
With my Tecumseh parts kit, the rubber seat was not the same on both ends. One end was very square. On the other end the center bore was noticably chamfered. The chamfer would allow more seating area and allow the needle to seat somewhat deeper. My Tecumseh part no. was 630978.
Jeff
 
Well it's running. It was kind of a team effort and I thank everyone for pitching in with their comments & ideas.

I made an adjustable air intake valve. It allows me to adjust all conditions including LP pressure, intake LP flow, & air flow.
LPdemandvalveairvalve001.jpg

It is a simple two piece valve.
LPdemandvalveairvalve002.jpg

Here you can see how I determined air intake was important. I wouldn't have thought it was so critical until Dave pointed it out.
In the following video you can see how touchy it is when I adjust the valve very slightly.

If any of you are interested in comparing how the engines runs on LP in comparison with running with a standard gas tank, & a vapor gas tank you can go to www.putputman.com and hunt around a little. I think they are all on there. It is just a connection to photobucket.
 
Way to go, Arv!!
woohoo.gif
Love the video! You did a nice job with that Red Wing. And that's a neat design for your adjustble air intake, and looks like it works perfectly.

I think I commented earlier in this thread that propane seems to give a "softer" firing, as compared with running on gasoline. At least that's what I noticed when I used it. I had a difficult time getting the engine to "single-fire" when using propane, even though it single-fired with gasoline. I tinkered around with governor settings, spring pressure, etc. The best I could do was a double-fire (two power strokes before it would start missing). I attribute this to the fact that the propane was not giving as hard a "push" on the crank when firing, as the gasoline was, and therefore required two consecutive power strokes to trip the governor.

putputman said:
...it is very obvious that your needle & seat won't work. Did you buy the P/N that was listed on the print?

It's supposed to be equivalent to Tehcumseh #630932, and the parts look exactly like the ones I've seen others using. But this assembly wouldn't even work in a carburetor, as far as I can tell. I am going to try getting a set from a different supplier, even if I do modify this housing to make it work.

Good job with your engine, Arv! Thanks for the video.

Paula


Rustkolector said:
With my Tecumseh parts kit, the rubber seat was not the same on both ends. One end was very square. On the other end the center bore was noticably chamfered. The chamfer would allow more seating area and allow the needle to seat somewhat deeper.

Hi Jeff,

Yes, I noticed the same thing. One side has the square-edged hole (and a mysterious annular depression):

SEAT1.jpg


...while the other side has a slightly-radiused-edge hole:

SEAT2.jpg


...which does allow the needle to seat a bit deeper, but not enough to make a substantial difference.

My Tecumseh part no. was 630978.

My needle/seat number is 630932 -- which is the number I got from a couple of different sources. 630978 is the number that I ordered for the diaphragm. ???

Paula
 
Paula,
Sorry for the wrong pn. All I had were the empty parts envelopes. My needle assembly pn is 630932A, but I doubt the "A" has any real significance.

Dimensionally, my demand regulator drawings show a center hole depth of .800" with a counter bore that is "bored" to a depth of .360". Gives a nice flat bottom for the needle valve fiber gasket. Dimensions are from the top surface of the base piece. The cavity depth under the diaphragm is .140". Everything seems to stack up correctly with these dimensions. That said, my engine is not ready to run yet, but the demand regulator seems to test ok.
Jeff
 
I will post pictures/video later but I got the Otto running on propane today using the demand valve.

The local mower parts store (BPS Superstore aka Buckeye Power Sales in Columbus, Ohio) had the full carb kit in a single pack. It was cheaper than buying the parts seperate and you get a few extra seals etc. The tecumseh part number is 631893A and it is labeled "repair kit".

I didn't have to modify the carburetor at all. I used a camping stove LP Gas conversion regulator from Wal Mart and got the brass fittings and adapters from Lowes. The thing runs great on the second detent of the regulator adjustment knob.

This engine has been run on pump gas in the past (it was designed to run on pump gas) but I like the propane better. It is easier to control and runs pretty smooth.
 
Getting my latest engine running on propane has been a frustrating experience for me. Frustrating primarily because my engine problems were not related to propane fuel as I had assumed. Now that it is running great, I thought I would offer some insights on propane from my limited experience.

The Tecumseh parts demand regulator works very well. I added one feature to it that may, or may not be of benefit to most, but it helped me in fine tuning. I added a soft balancing spring and threaded vent cap to to the top of the regulator. This spring opposes the Tecumseh diaphram/spring pressure. This allows the draw vacuum to be adjusted to almost "0" if need be. If I made another regulator I would make the top half an 1/8" higher to more easily accomodate this addition.

I did a lot of research on the handy camp stove type propane bottle regulators. They all are "fixed pressure", variable volume regulators. You don't need much pressure. I settled on the Weber grill regulator. It provides about 4-5" water column fixed pressure output. I also fabricated another higher variable pressure regulator system, but the higher pressures offered no operational benefits that I could see when using it with the Tecumseh type demand regulator. I would never put over 5 psi on the supply to theTecumseh demand regulator. My engine is a throttle governed 1" bore x 1.25" stroke, and it starts and runs well on 4" WC pressure to the demand regulator. A little choking is needed initially, but once running choking is no longer needed.

Model engine propane use is best suited to fixed speed throttle governed, or hit and miss engines. This is due to the fact that changing the throttle opening changes the fuel draw vacuum, and the resulting fuel/air ratio. This then requires a corresponding change to the gas jet to keep the engine running. Commercial variable speed/load propane carburetors are usually pressure fed at about 6" WC, and have an internal regulating diaphram, or feed back circuit for the fuel/air ratio control. This is more complicated than we need for model use. I built a carb for my engine with a larger fuel jet, but I was able to run the engine on one of my OS brand RC carbs. You will need approximately 30-40% larger passageway for fuel when using propane in a standard carb. The spray bar may also have to be increased depending on the carb

Here in upstate NY, it is cold this time of year. Being able to run my engines indoors occassionally is a real plus. Propane is great for this, in that it doesn't smell up the shop, and annoy my wife. If you do run propane indoors, however, I would suggest that you keep a few houseflies buzzing around the shop. When they drop on the bench with their legs up and wiggling, it is time to shut'em off, and get some fresh air.

Jeff
 
I run all my engines on propane with a Webber {go any where} regulator its for there small barb unit. Ive made the demand valves from the posted information only use chain saw carbs diaphragms due to there size. .5 lbs is plenty the reg is adjustable. Should you mention to Webber that your using for other they won't sell but there available several other places. My shop made carbs are troublesome. The are intake {coke} is supper critical. Would like some feed back about this.
Harvey
 
Jeff - you can buy (e&@y or other site) domestic CO detector alarms that are just a few dollars and louder than listening to the silence when your flies stop buzzing..... I use one for my garage and only once, with 3 blowlamps going on a boiler soldering job, have I heard it scream! But a cigarette can set it off, for a test if held close to the sensor. Maybe too sensitive for you garage? But my car doesn't set it off, perhaps because I have to open the door wide?
Did you know that blow flies are attracted to the CO in animal breath? That's why you attract them with the CO from your engines, I guess?
K2
 
Back
Top