Rigidity

Home Model Engine Machinist Forum

Help Support Home Model Engine Machinist Forum:

This site may earn a commission from merchant affiliate links, including eBay, Amazon, and others.

doubletop

Well-Known Member
Project of the Month Winner
Joined
Mar 1, 2010
Messages
865
Reaction score
82
I'm making my Northumbrian locomotive serialized in ME in 2009/10. I've got to the point of doing the wheels and got stuck with the limitations of my equipment. I only have a small lathe, a 1930's Lorch that has seen a bit of service over the years. Its a clockmakers lathe, although I've managed to to everything I've wanted to up to now. I've even faced off the ends of my boiler barrels with it.

31zwzxglwame0yw4g.jpg


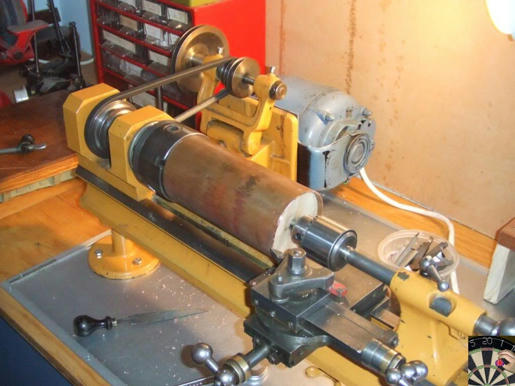
However machining the cast iron wheels for my loco I just couldn't stop the chatter when doing the treads.

leua3f7enbwrm1i4g.jpg


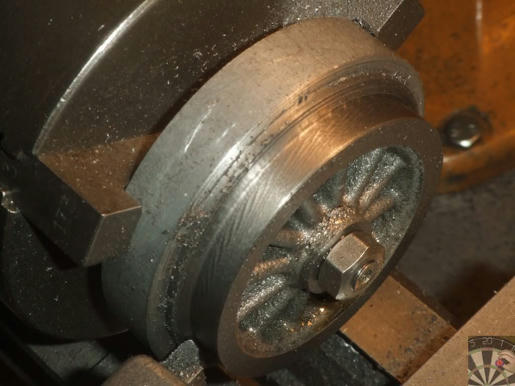
I knew it was a rigidity problem I did everything I possible could to get it sorted, , sharpened the tool, shortened the tool overhang, slowed the speed to the lowest I could achieve, tighten the gibs to the point I could just about turn the hand wheels. Whatever I tried didn't work, and I was running our of metal on the wheel to mess with. I'd leave it for days come back and hope a fresh start would achieve results. I had six of the wheels to do and couldn't afford to stuff one up. The lathe was out of action for this period as I couldn't remove my mounting arbour/jig otherwise I'd have to make another because I'd never get it back into alignment if I removed it from the chuck.

Then I had a flash of inspiration and fixed the problem........


jc864k1m2lx9kd64g.jpg


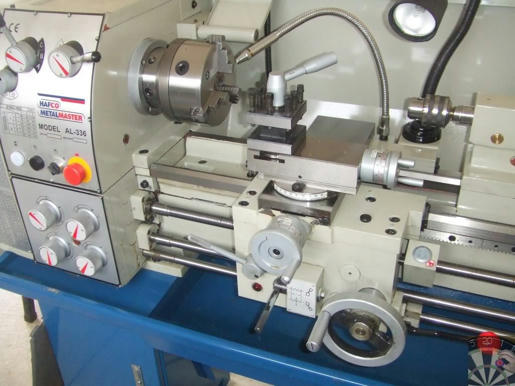
;D There are many ways to skin cats but chucking $ at the problem is sometimes the only way to go. ;D

It arrived Thursday and Murry helped me unpack it and we installed it on Saturday. Its a 600Kg (1320lb) so took a bit of maneuvering to get it in place. A clean up of all the gunk today and the wheels were finished in no time at all.
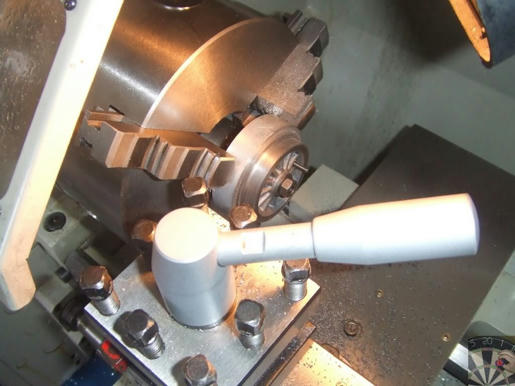
8p7bckqjna1bvtp4g.jpg


One happy chappie

Pete
 
Good move Pete, enjoy! Thm:
 
Nice one Pete, :bow: enjoy :D

Best Regards
Bob
 
I have had an AL335A for about 8 years now and have been more than happy with it. Just the usual things with chinese machines, some dodgy grinder cut bolts, no lead and feed screw gearbox oil and a chunk of unknown material in the spindle bore which made an interesting noise when I first cranked it up. But a good machine.
Brock
 
Tel, John, Bob, Brock

Thanks for your good wishes. I'm enjoying it already, the ease that it allowed me to finish my wheels left a big smile on my face.

It took a bit of decision making to make the leap, but truth be known it was more me up-selling to myself rather than going for the wrong model to regret it later. SWMBO gave it the seal of approval and all it took was a phone call.

Mine seems a bit noisy in some gears and I'm not sure if that's a function of geared heads or something I need to worry about? It's just the motor drive/head that's noisy, when the feed gearbox is connected there is no additional noise.

I did look at the DRO version but they wanted another NZD1000 more with it fitted with Easson DRO's. A two axis Sino DRO kit is NZD400 on ebay. So a good decision not to go that way, and better now I know John has a similar model and I know he uses Sino DRO's.

So John did you do a write up of your DRO conversion or could I get you to email me some pics please? Are there any other of your threads that would be useful to me?

regards

Pete
 
doubletop said:
Mine seems a bit noisy in some gears and I'm not sure if that's a function of geared heads or something I need to worry about? It's just the motor drive/head that's noisy, when the feed gearbox is connected there is no additional noise.

The geared head drive was noisy on my AL320 when I fired it up. I lifted the lid on the headstock and all seemed OK, no lumps of metal in the oil and no nasties I could see on the gear teeth. My fix was to overfill it with oil, quietened it down a fair bit and the head does not get any hotter than warm to the touch when running for a couple of hours at 1000rpm. Maybe the gear teeth are just an approximation of an involute. :eek:

Hope this helps.

Best Regards
Bob

Edit - The oil I used was Shell Tellus 68 and I filled it about 1" over the full mark on the headstock sight glass.
 
Pete,

As Bob says, there is nothing to worry about with the noise.

All I did was a couple of close together oil changes, just to get rid of the wear in flak, and it soon quietened itself down. It will never be as quiet as a direct drive, but it should go a lot quieter over time.

Again, like Bob, I slightly overfill mine, just to the top of the sight glass, but it was recommended to me by the Chesters engineers to fill the box with medium grade hydraulic oil, so I use a Tellus 32 or equivalent (whatever my mate gets me that is the correct grade). I think either Bob's or my oil selection will be OK, as long as the gears are getting a good lube.

Mine came fitted with the saddle and crosslide Sino DRO's fitted, and because I was left with a spare Sino readout from when my mill was converted to three axis readout, I used the left over one to put topslide and tailstock readouts as well. The tailstock one is a bit of an overkill now that I don't do production stuff any more, but the topslide one I find indispensable.
If ever you come to fit the normal two axis ones, I can get the numbers off my ones and take a few pics to start you on your journey.

BTW, the thread cutting gearbox is spot on for both metric and imperial. The drop in dial is a PITA as when cutting metric threads, you have to swap the gears over in it depending which thread you are cutting, plus it doesn't cover all the range, you are on your own with the smaller pitches. I have done a mod where I showed fitting all three gears to save the hassle.

http://www.atfreeforum.com/chesteruk/viewtopic.php?t=383&mforum=chesteruk

For Imperial you have to cut using the permanently engaged half nuts. Now I have perfected my swing up threading tool, I use that method all the time for all threads, it's just quicker and easier.

Hope this helps


John
 
Bob

Overfilling the gearbox had occurred to me also. I've just been out for a play and took the lid off the gearbox for another look. Not sure how the gears operated we did have a quick look when installing it. The gears on the layshaft for the right hand (1,2,3) lever do seem a little sloppy, however giving it another run in all the gears it did not seem as bad as I thought. I also have a squeak when I turn it over by hand, or the motor is running down, I can't work out whether its in the motor or the foot brake band. I need to take the drive belts off to isolate it to one or the other.

One point about this model; it may have 18 speeds but the second 9 speeds require the drive belts to be shifted from one set of pulleys to the other. It looks like the motor needs to be slackened off to do that. Which means the back panel has to come off to get to the inboard mounting nuts. Not good if you've installed against a wall. Also if you've installed against a wall you can't get to the suds pump as the access is in the rear of the right hand leg.

It happens that the guy I borrowed the engine crane from also has one of these. When I take it back next weekend I'll get him to run his up.

Regards

Pete
 
Thanks John and Bob that makes me feel a lot better, once I've tracked down the squeak I'll be fine. I had intended to do an oil change early on, as the manual advises, I'll use oil that has a bit more provenance than the stuff that's already in there.

I had noticed those little gears but had no idea what they were for, I thought they had something to do with the quadrant. Its all a learning curve for me, last time I used a lathe of this size was a Boxford at school when I was 16. For now I don't have much in mind by way of cutting threads, so that exercise may be some way off yet. Sometime I do want to make a new chuck back plate for the Lorch as it needs a new chuck. Doing a 25mm x 2mm pitch internal thread should be good training.

BTW those lifting thread cutting attachments are becoming a mandatory piece of equipment, one of the guys at the club showed one he'd made last month. They'll be in the Chinese catalogs soon.

Pete
 
Try a bit of colloidal graphite on the belts, also ensure all is tight on the quadrant etc.

Best Regards
Bob
 
Hi I May be a bit late with my reply to "Doubletop" To quote

"Mine seems a bit noisy in some gears and I'm not sure if that's a function of geared heads or something I need to worry about? It's just the motor drive/head that's noisy, when the feed gearbox is connected there is no additional noise."

Good Choice a great piece of kit!

Gear box noise will subside with use. It is "Brand New" and just needs running in

Some of the noise comes from the motor if it is "Single Phase" they do not have perfectly smooth rotation Something to do with
50 Cycles per second = 3000 per minute. Motor speed 1425 rpm don't ask me how this is I do not know

My preference is for a Direct Current Motor @ 180 volts supplied from a K B Electronic Speed Control driving a six speed Gear Box lathe
This has been in service for over four years now and runs very well with very little noise

After reading this thread I ran the lathe on the 'Single Phase Motor". Guess what It makes a lot more noise

 
Pete,

I too have the double sheave 18 speed setup.

I tried to address the situation with two Redthane belts, they allow easy stretch off/on, but it didn't work. The sheaves must have been slightly mismatched somehow and it kept throwing one of the belts. I should really have used longer link belting and put a tensioner in there, but I never got around to it. I left it on the lower range and I have found that is all I really need, the lowest one of 65 RPM is ideal for me for my threading, and the others go plenty fast enough for what I want to do. Another plus is that I am not overloading the motor at all by staying on the lower range.

I know what you mean about the flip up screwcutting holders, the chap who originally raised the spark for me to develop it has come up with an internal one as well. I don't like his design, but it works well enough I suppose.

With regards to the suds pump, I too have my lathe against the wall and can't access the tank. I took the whole lot out and fitted spraymist instead, no mess and no getting covered in cutting fluid, and a lot cheaper to run with regards cutting fluid wastage. The only down side, you must have a compressor in your shop to run it. I suppose you could cut a new door in the front of the stand to allow you access to the tank.

John
 
It seems I'm in good company and the concessus is the noise will reduce over time. I think I may have said I borrowed a hoist from one of the club members and when I picked it up I found he had a similar model. So when I took the hoist back the discussion turned to the noise, and yes, he has the same story. He and a mate both bought one about the same time and when they did the oil change they purchased 20ltrs of "the right stuff" so I have a source of oil on offer. He also advised fill the main box about an inch above the sight glass.

On the suds pump I can’t understand why they didn’t use the right hand cabinet from one of the other models, with the door in it, so the tank could be accessed from the front. The other option it to leave the tank out on the floor behind the "vainty panel" or even leave the panel off altogether. The pipework is just about long enough to do that.

However, there is yet another reason why you wouldn’t want it against the wall. The power box has three circuit breakers in it. If one of those trips you’ll have to shift the lathe to get the back cover off and reset it. Dave has taken his box off the lathe and mounted it on the wall above the lathe. His model doesn’t have the pump or the 2 speed drive belt option so no problem with locating against the wall. Moving the power box isn’t a minor task as there are numerous cables going to the box. He and an electrical engineering mate rewired it using multicore power cable they happened to have available

So with three reasons not to place it back to the wall mine is tailstock to the wall for now, until it gets well into the reliability “bathtub”.And of course I can get to it when I come to do the DRO’s After that I may borrow the hoist again and shift it.

I'll come back to you for pictures of your DRO setup at some point John. The finance commitee will need some convincing, but given the major difference decent DRO's made to my SX3 mill, it will happen.

regards all

Pete
 
Pete,

I did have one fault just after I had it installed, one of the caps on the motor burnt out, but a call to Chester UK had a brand new motor sitting on my doorstep first thing the next morning. A friend from NZ had the same problem, but they just supplied new caps. They didn't want the old (new) motor back, so eventually (round tuit) I will get that cap changed and I will have a spare motor. BTW, Stew (of overcrank engine fame) came around and changed it for me in about an hour.

The cables to the main box are just too short to reposition it anywhere else without rewiring, as your mate has done, so I purchased myself a pair of wheeled toe jacks, in conjunction with my wheeled pry bar, they will allow me to get the lathe out and back in again in minutes, just in case something goes wrong around the back, then just a quickie level check and I will be on the road again.

http://www.williamandjones.co.uk/pro/mj1000a.htm


John
 
Bogstandard said:
.................... I purchased myself a pair of wheeled toe jacks, in conjunction with my wheeled pry bar, they will allow me to get the lathe out and back in again in minutes, just in case something goes wrong around the back, then just a quickie level check and I will be on the road again.

http://www.williamandjones.co.uk/pro/mj1000a.htm

It something like that is what's needed. The item on offer from my supplier is expensive and only rated to about 290kg as the whole thing is 600kg the headstock end is going to be way more than 290kg so I flagged it
 

Latest posts

Back
Top