Redwing #1009

Home Model Engine Machinist Forum

Help Support Home Model Engine Machinist Forum:

This site may earn a commission from merchant affiliate links, including eBay, Amazon, and others.

AlbertdeWitte

Well-Known Member
Joined
Apr 17, 2015
Messages
242
Reaction score
144
Hi Guys

Last night I unpacked the boxes and studied some of the plans. At first I was wondering where to start. Its a lot of parts, castings and plans and clearly a lot of work where one cannot afford mistakes.

Looking at the serial number I was also wondering how many of them were successfully completed? I don't see much on the Forum.

I was also wondering should I share all my built photos on the Forum? Are there any members also busy with this engine?

Well I decided to start with the Bottom Frame and finished facing the bottom last night.

Till next time

IMG_3334.jpg


IMG_3335.jpg


IMG_3341.jpg


IMG_3342.jpg


IMG_3343.jpg


IMG_3345.jpg
 
That's about as good as it gets, opening a new kit for the first time. Congratulations!! Well, you've started the
build log now and it's too late to go back so your question about whether or not to post is now rather moot.
You simply must continue.

I don't know about any other of those engines being built, but I've always thought I would like to build a
hit-and-miss like that so I will be following right along.

Pete
 
Good start on your Red Wing. Please keep posting your progress and pictures ... there are never too many.
Charlie
 
That's about as good as it gets, opening a new kit for the first time. Congratulations!! Well, you've started the
build log now and it's too late to go back so your question about whether or not to post is now rather moot.
You simply must continue.

I don't know about any other of those engines being built, but I've always thought I would like to build a
hit-and-miss like that so I will be following right along.

Pete

Hi Pete

Thanks for the kind words! Why I wondered if I should paste photos is that I am most probably take a good year to build this engine. I took 6 months on #6 which had its own challenges, but a walk in the park compared to the Red Wing. But we here goes!!
 
A lot of good information here
http://www.rcdon.com/html/red_wing_engine_project.html
I have one of those kits but havent started it yet
Keep posting your progress
Dougie

Hi Dougie

Thanks for the information sharing. I must submit that Don Giandomenico is actually the guy who inspired me. After I have completed #5 with boiler I accidentally came across his site one day and there and then decided I want to build those engines also. I ordered #6 and the Red Wing the next week!

Why don't you start yours also and we can exchange ideas?
 
Also some info here:
http://www.nbutterfield.com/Pages/RedWingEngine.aspx
Although he now charges for a CD with lots of set up pics.

Dave
The Emerald Isle

Hi Dave

Thanks for sharing, I had a look. It excites me to think my engine might look like that. I love the woodwork on it also. I got the construction CD from PMR and I think it should do for now. Should I encounter challenges I will certainly order that one also. OH MY GOODNESS, when I look at the cover its the same CD!!!

A blond moment there right!!

Regards
 
Last night I finished facing of the Bottom Frame. It was most probably the easiest part to machine. I enjoyed once more the auto feed on my milling machine and results are smooth.

IMG_3346.jpg


IMG_3347.jpg


IMG_3348.jpg
 
I have unpacked the main frame and close inspection revealed that I have some markings from the long courier to South Africa on the side of the frame. I will see how to deal with that later. I cleaned away most of the molding flash, but left the center lines for aligning during the milling process.

The Main Frame will surly the center of attention for at least the next month.

IMG_3349.jpg


IMG_3352.jpg


IMG_3353.jpg


IMG_3354.jpg
 
Albert,

Can you please put a scale next to some of these parts? It's hard to tell how big this engine actually is. I have to think that the smaller the engine, the harder it's going to be.

...Ved.
 
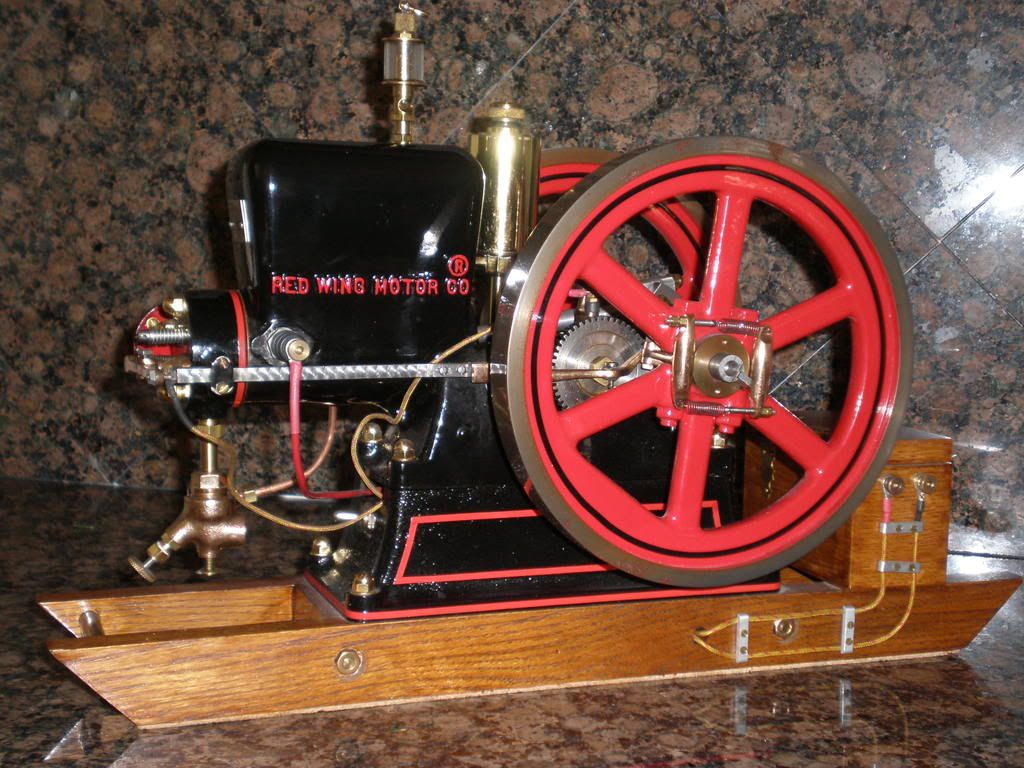
The RED WING is one of the nicest models available and a really nice running engine. I'll watch your progress with interest. I've done the "MERY" 6 cycle using castings from the same company and they are always top-shelf. I made a plate to attach the frame to that allows holding and re-positioning during the boring of the cylinder drilling/tapping and then boring the crank journals perpendicular. Since I wanted a nice surface for painting I used Bondo to smooth out the casting texture on the water tank. I used some license in making the fuel tank as I wanted it up top.
I even "Jeweled" the push rod, I had a lot of time on my hands. I used a motorcycle coil and an automotive relay to simulate a "Buzz" coil and placed a small rechargeable 12V battery in the wooden box.


Albert,

Can you please put a scale next to some of these parts? It's hard to tell how big this engine actually is. I have to think that the smaller the engine, the harder it's going to be.

...Ved.

Thanks for the suggestion Ved, I will do that.
 
The RED WING is one of the nicest models available and a really nice running engine. I'll watch your progress with interest. I've done the "MERY" 6 cycle using castings from the same company and they are always top-shelf. I made a plate to attach the frame to that allows holding and re-positioning during the boring of the cylinder drilling/tapping and then boring the crank journals perpendicular. Since I wanted a nice surface for painting I used Bondo to smooth out the casting texture on the water tank. I used some license in making the fuel tank as I wanted it up top.
I even "Jeweled" the push rod, I had a lot of time on my hands. I used a motorcycle coil and an automotive relay to simulate a "Buzz" coil and placed a small rechargeable 12V battery in the wooden box.


Philip

I am sure I will not be the last one to congratulate you on building that beauty of a Red Wing. I see other details that you did not mention like the pin striping on the flywheels. I love it. If mine can come close to that I will be really impressed!! Thanks for sharing.
 
Hi Guys

I did some work over the weekend. I could not get a base plate to do the milling as suggested so I had to clamp it in my own way. Facing the bottom came out nice. I expected some "chattering" from the cutter but it went well.;)

IMG_3355.jpg


IMG_3358.jpg


IMG_3365.jpg


IMG_3367.jpg
 
I then slotted the base to accommodate the bottom plate for the fuel tank, I decided to screw it using M3 set screws in the absence of UNC screws in my town. I will later on use fuel tank sealant which I have good experience on when I sealed the tank of my plane. It should do the job well. In the same clamping position I drilled and tapped all holes and even fitted the drain cock, so all machining is completed from this position.

IMG_3378.jpg


IMG_3383.jpg


IMG_3386.jpg


IMG_3388.jpg
 
Hi,

A nice bit of fixturing. I'm enjoying your build very much!

Dale
 

Latest posts

Back
Top