PM Lathe Progress

Home Model Engine Machinist Forum

Help Support Home Model Engine Machinist Forum:

This site may earn a commission from merchant affiliate links, including eBay, Amazon, and others.
C

chiliviking

Guest
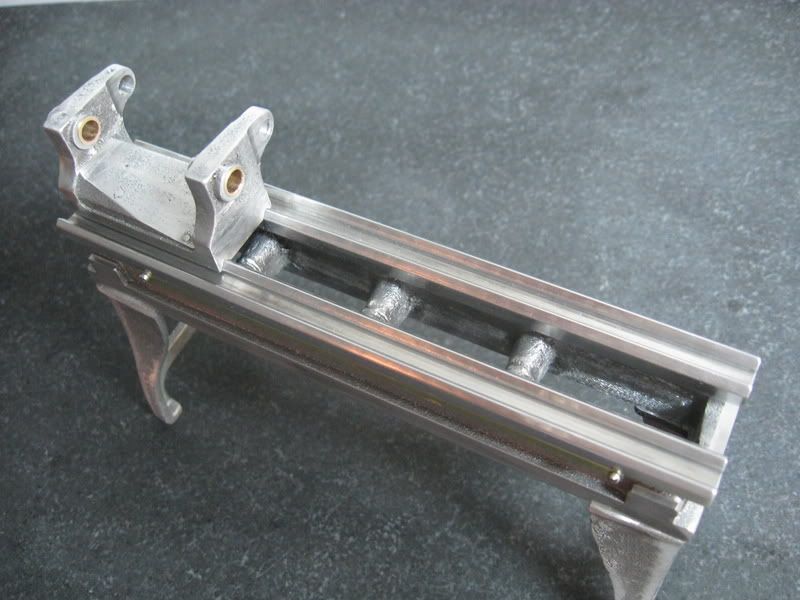
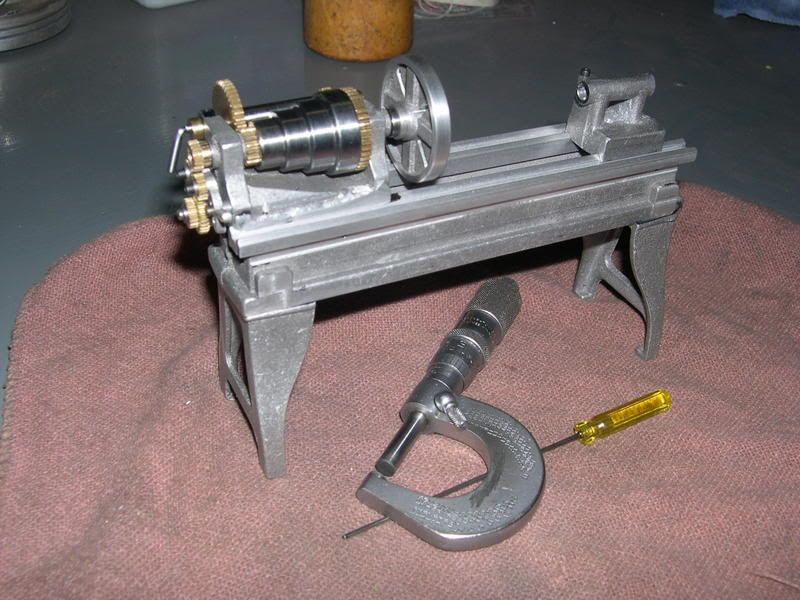
Got back to working on my lathe project last week and have made some signifigant progress. Laid awake several nights thinking about the process to machine the ways as I thought this would probably be one of the difficult steps. Once the process was laid out in my head and great care was taken to get the lathe bed square on the jig it went quite well and the setup took much longer than the milling process. I was quite pleased with the result.

DSCN2709.jpg


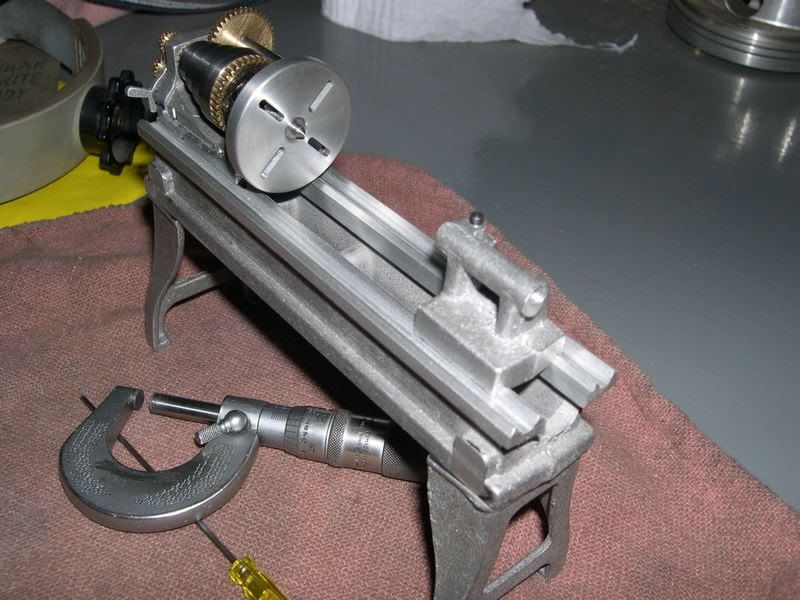
I also have most of the gear assy. on the headstock completed and that was pretty straight forward however the spacing between the gears needs to be carefully done to get the gears to mesh correctly.

DSCN2707.jpg

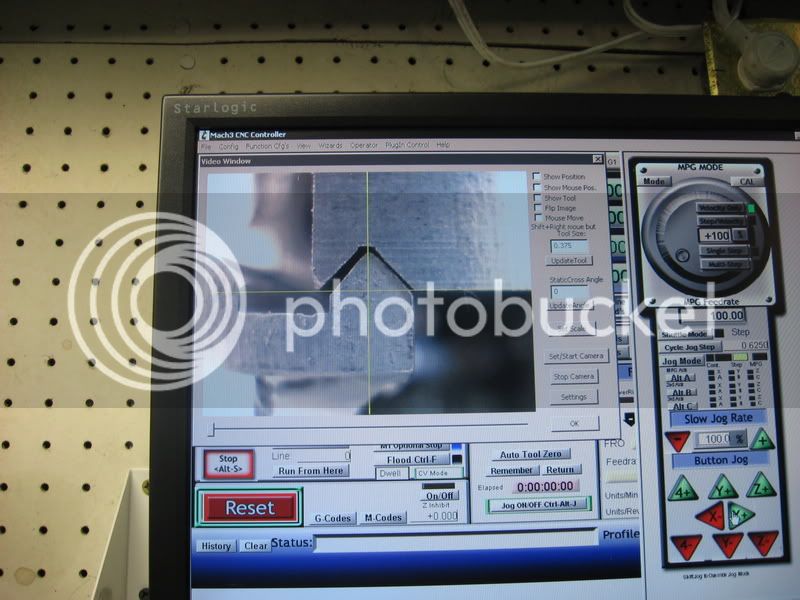
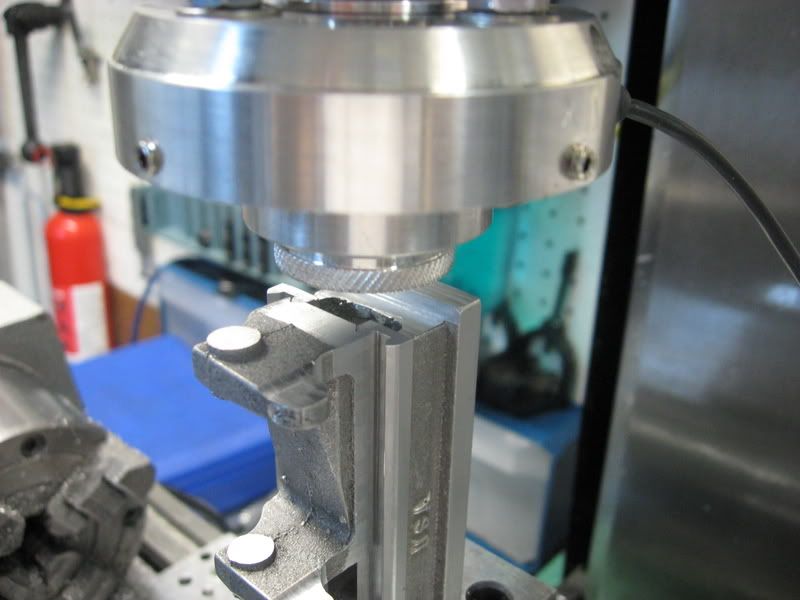
I have begun work on the tailstock and to insure the ram was in the same plane as the headstock I machined the bore for the spindle with the tailstock clamped on the ways of the bed.

DSCN2698.jpg


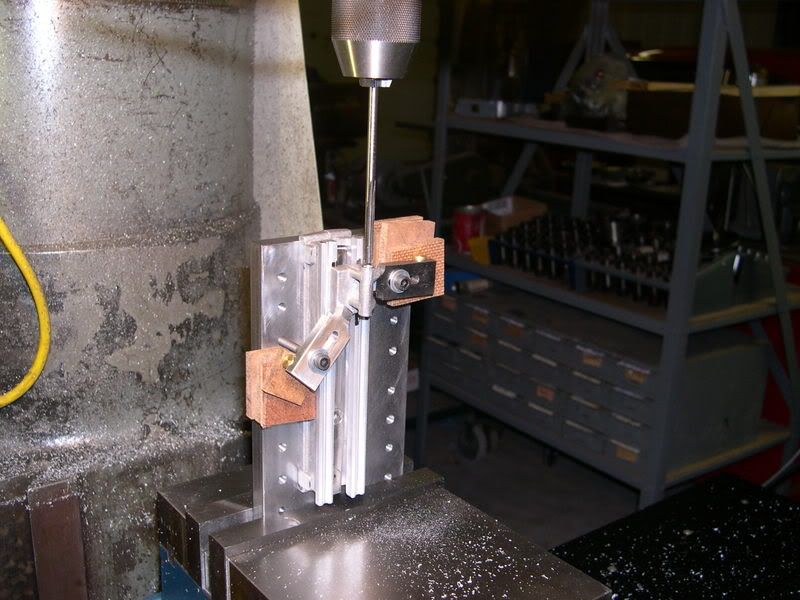
I have found that the castings in this kit are a little marginal in dimensions and the bore as it exited at the rear of the tailstock was a little thin. (Blame it on the casting). The real truth is that I must have not gotten the casting perfectly lined up when I machined the V cuts in the bottom of the casting. I have built up the casting with a little J-B Weld over the thin spot and all will be fine.

This is a great project and I am learning a lot as I go on with it.
 
Cool project!

BTW, how did you go about machining the ways? Any pictures?

It's funny, but I find setups I fuss over often machine very quickly where those that I just throw something in the milling vise may not be as easy as they looked.

Cheers,

BW
 
Looking great, chili.

I too would like to hear/see how you machined the ways just so I can compare it with the way I did. I must have spent a full day on making and checking and rechecking the setup when I did it but I'm glad I did.

I did the tailstock bore exactly as you did, too.

In reality, you have to do most of the things one would do to build a real lathe except at 1/12 scale.
 
Beautiful Model Machining Work chiliviking!

That little guy is really starting to look like it has an appetite for steel.

I really like your setup pic of the tailstock boring.
More in process pics would be greatly appreciated!

Please keep them coming!!!

Rick
 
Oh that looks real nice so far!!!
I think this weekend I will start on my mine. I have been studying the blueprints and trying to get good mental visions of how I will go about each part. One of the reasons I built my Mill webcam was for help aligning up with these small parts.
Keep the build pics coming.
Steve
 
S_J_H said:
Oh that looks real nice so far!!!
I think this weekend I will start on my mine. I have been studying the blueprints and trying to get good mental visions of how I will go about each part. One of the reasons I built my Mill webcam was for help aligning up with these small parts.
Keep the build pics coming.
Steve

That mill cam is trick, dave coffer is a wiz with stuff like that too. I would love to play with that stuff but I have too many things going now. Im buying 2 more computers soon so I will have one for the shop.
 
I spent an hour typing in a response explaining how I milled the ways in a step by step fashion. When I was done I selected the spell check option and my post was displayed in a seperate window. There were no misspelled words so I closed the window and my hours work disappeared and was gone. Anyone know of a way to get it back or is it lost forever?
 
Oh that's a bummer! yeah I have had the happen to me( not on this board) and it's very frustrating. It's usually gone for good and I normally find it time to step away from the computer before I put a brick through it.

Well, if you get some spare time and feel like trying to repost it I would be interested in reading your procedures.
Steve
 
Great Job!! Just think, You'll be able to use this to make small engines on:O)

Wes
 
Hi Chili,

Great job on the lathe!

You can try pressing Ctrl Z just after the dreaded lost typing event happens and sometimes it'll come back.

2 things I always do when posting:

1) Before making any state changes (like posting or spell checking, anything other than the simple typing) always highlight the entire post and press Ctrl C to copy everything into the copy buffer. If for some reason the post disappears, just press Ctrl V and everthing comes back.

2) If you know beforehand it's going to be a long, detailed post, type it up in Windows Notepad or Wordpad first, then select/copy/paste it into the post box.

As long as it takes this ol' untrained typist to type things, I take all precautions to keep from losing it. Besides, I destroy far less monitors & bricks that way! ;D
 
Thanks to all for the kind words and suggestions to keep this typing fiasco from happening again. This time I will type it up in WORD and then post it to the BBS.

Again I will give an outline of the procedure I used to machine the ways on my little lathe project.

1. I mounted the lathe bed on the 4”x7” jig plate that I had made for this small project and lined the bed up parallel with the edge of the jig using the depth gauge end of my dial calipers.

2. I placed the jig plate in the milling machine vise on parallels and fine tuned the alignment of the lathe bed on the jig plate using a test indicator in the mill spindle and traversing the X axis back and forth to get a 0 reading along the entire way surface.

3. Using a 3/8 end mill I milled the overall outside dimension to the width required on the print.

4, I moved the end mill to the center of the lathe bed and machined each side of the bed to the .375 dimension which also brought the center gap to the required .500 opening.

5. I now put an 1/8 end mill in the spindle and centered it over the first .375 segment and milled the slot that divided the two V-ways. I then repeated this on the other segment at the rear of the lathe bed.

6. In preparation for milling the V on the ways I took the jig plate to my faux surface plate( A piece of 3/8 glass) and scribed a line on the right side of the lathe bed about ½ inch long and .055 down from the top surface of the way to mark the height required for the V cut.

7. I returned the jig plate to the mill vise and using an edge finder located the spindle exactly centered on the outside edge of the first way surface.

8. I placed a ¼ V cutting end mill in the spindle and lowered it very slowly until the depth of cut just creased the line I had scribed on the bed. I now locked the depth setting and did not disturb it for the remainder of the process.

9. Moving from right to left in a climb cutting direction I milled the first V surface. I found using a climb cutting direction of travel to greatly improve the surface finish in this application.

10. With the end mill clear of the casting at the left end I moved the spindle in .125 which centered it with the inside edge of the first V-way. Now I milled from left to right again using a climb cutting direction. The first way is now complete! Moved the spindle in another .125 and repeated Step 9. and alternated these motions across the lathe bed till all the surfaces were machined.
 
Thanks for writing that up! It's pretty much as I would expect.

You've got a little beauty there, but it needs a mill to keep it company, or perhaps a shaper. Any plans to carry on with the rest of your tiny shop?

Best,

BW
 
I just about finished up the bed on mine this afternoon cutting the v ways. Yep, the castings do not allow for much error that is for sure! Is this stuff cast aluminum or some sort of pot metal? Seems like pot metal but it's actually pretty hard.
I increased the speed on my mill to 6000rpm for a better finish.
I did all the machining on the bed in a 3" vise.

Chili, do you mind if I post pics of my progress in your thread? I don't think anybody wants to see 2 threads going on about the same project. You are quite a bit ahead of me with yours and if nothing else we could share notes on how we each go about setting up for machining.
What do you say?

Steve
 
Steve,

Feel free to post on this thread. The castings are definately aluminum as I overcut on the bottom of my headstock casting before I realized that the castings were minimal in size and welded it up with the TIG so I could bring it back into spec. It welds real nice with 5356 rod. I now figure you better not take more than about .oo5 off any rough surface before verifying that you have enough to work with.
 
Thanks Chili.
Well here is my progress so far.
I used a 2 flute 90' V bit for the ways and I probably should have used a 4 flute for a better finish right off the mill. But a little elbow grease and they look pretty good now. The mill cam makes it easy to locate dimensions on these little parts. In these pics I am locating the spindle center location by first zeroing off of one of the V ways.
I got a little carried away and bronze bushed the spindle bore.:D
Steve
pmrlathe020.jpg

pmrlathe021.jpg

pmrlathe025.jpg
 
Neat stuff!!! The bronze bushings will make it last longer:O)
Wes
 
Hello Steve,
I have just joined this group, and I am enjoying slowly working my way through all the earlier posts, although I still have a way to go to catch up. You mentioned a web cam, and I see it is displaying on a Mach3 screen. Have you described this webcam anywhere in this group, or elsewhere?
Regards, Ian Kirby.
Wollongong NSW Australia
 

Latest posts

Back
Top