Open Column Launch Engine from Kit

Home Model Engine Machinist Forum

Help Support Home Model Engine Machinist Forum:

This site may earn a commission from merchant affiliate links, including eBay, Amazon, and others.

zeeprogrammer

Well-Known Member
Joined
Mar 14, 2009
Messages
3,362
Reaction score
13
So I ordered the Elderberry Launch Engine Kit from LittleMachineShop. I hope this will become my second engine. A mini-lathe and mini-mill is needed.

As you all know...I am very new to this hobby. No engine experience (bore and stroke?) and no machining experience (wobbler?) save for the last four months.

That's the main reason why I chose this kit. It comes with the materials (right...I know nothing about metal either...half hard brass?), the plans, and what looks like a decent intro into machining.

My first engine was from a casting kit. Some people suggest an engine from raw stock would have been a better choice. I can't say for sure yet but I currently lean towards agreeing. Mainly from the frustration I had with the flywheel. I had bought several of the same kit and found the two halves of the flywheel to be a little off. I couldn't figure out how to hold and/or cut the part so that I had a square rim and concentric hub. On the other hand, it was the simplest kit I could find and it ran despite my sloppy job. I got a lot of satisfaction out of it. A big portion of that satisfaction must be attributed to this forum from which I received a great deal of excellent help as well as recognition.

In thinking about what I just said...a raw stock kit is better. I was bound to make mistakes...hence I had to buy additional kits. (I found out later I could probably have bought replacement castings for the parts I mutilated.) I expect to make still more mistakes...but buying more raw stock is much easier especially when the kit tells me what type and size I need. This kit looks more complicated but it comes with more information on how to do it.

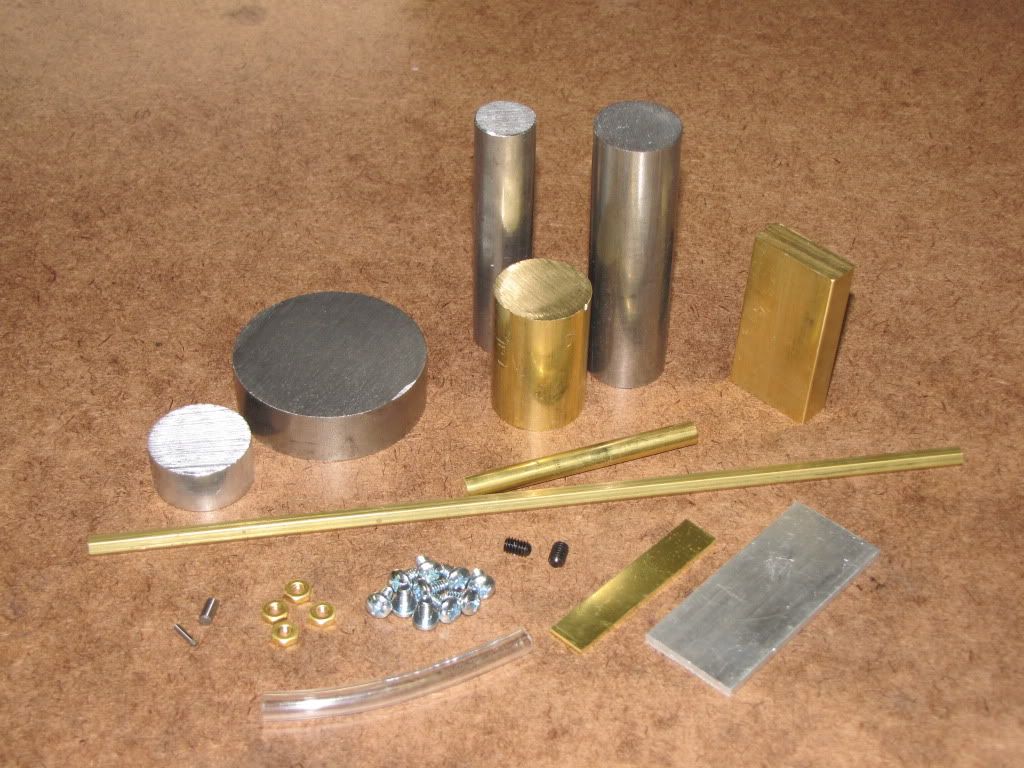
This is a picture of the raw bits that came with the kit...

IMG_0085.jpg


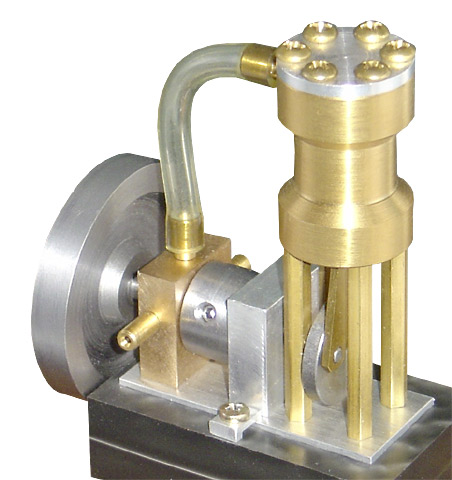
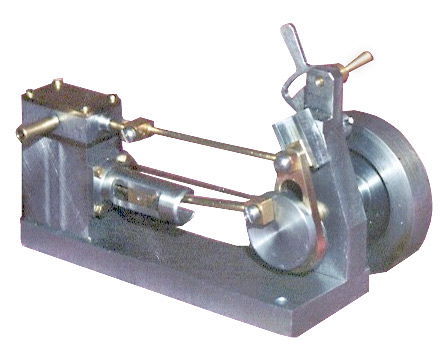
The manuals are copyrighted so I don't think I can show you a picture of it. But the following link shows an engine that is nearly identical (thank you Harold Lee). The major difference is that the metal tube is plastic in the kit I got.

http://www.homemodelenginemachinist.com/index.php?topic=1863.msg14696#msg14696

The kit comes with two documents. One is the Drawing Set. I understand most of it (I had taken a drafting class back in high school...back when you used pencils and pens and liquid ink. And, I've had the pleasure of working with some fine mechanical engineers.) Still there are some symbols I don't know and will have to get some help on.

The 2nd document is the Construction Manual. It professes to be for the person who's interested but knows next to nothing. (It was written for me!) It's pretty good but they suffer from 'they don't remember what they didn't know'. (And I've found a couple of minor mistakes in scanning the notes.) Again, I know this forum will prove invaluable.

I must admit...I hope I can serve as an example to those others who, like me, lack experience and knowledge but have the desire to build.

As a side note...I'm also learning how to post to the forum. I think I got the picture right. Now I have to figure out how to size it. After all it's just bits of metal. The next picture will show smaller bits of metal...and the picture of that...even smaller bits. If I can make the picture smaller...the smaller bits might at least look bigger.

Let the story begin...and the (positive) criticisms and learnings...
 
I think you'll see that those Elderberry steam kits are mostly taken from Elmer's Engines.

Here's the picture from Little Machine Shop's page :

480.3135.jpg


Here's the LMS link for the other kits

The mill engine kit is definitely Elmer's design.
 
steamer: I'm in the water. I'll hang out in the wading section for a while though...it's important to have some early successes (although we tend to throw new associates into the deep end at work ;D).

ChooChooMike: The mill engine was actually the first kit I bought after my first project. I either didn't notice or it wasn't clear in the LMS description that it was the 2nd in the series with the Launch Engine first. Thanks for putting up the pic. It's the very one.

Hobbyists Like Me: I've seen several references to 'Elmers Engines' but didn't know what it meant ???. A quick google references 'Elmer Verburg' who wrote a book 'Elmer's Engines'. Amazon has this book for $390! There are also several references to downloadable plans but I didn't look to see if they're free or not.

 
Looks like a nice project zee. Please do post progress pics...it may encourage others. There is a link on this site somewhere for scanned copies of Elmer's Engines, and there are many designs from simple to more complex.

Best wishes on your launch engine project!

Bill
 
Give 'er hell Zee!
 
Thanks for the link Bill! I'd seen it before but clean forgot. It reminded me that at some point I want to try live steam. But I want to begin with a boiler ready to go. I'm not nearly prepared to build my own.

Anyone have suggestions on a simple inexpensive boiler sized to work with the Launch Engine or the Model #2A I recently built?

ChooChooMike...yeah that's the mill engine. Thanks.

All...thanks for the support.

Man I wish I could be home this weekend. Family first!

 
What about the vertical boiler offered by PM Research. Inexpensive is relative but going with a known quantity definitely has advantages from a safety standpoint and with boilers that is critical!!

Bill
 
A safe, non-toy, ready-built boiler is going to be expensive - and, if one considers the liability costs, it should be. For example, a Stuart simplistic ready-to-run

http://www.stuartmodels.com/inprod_det.cfm/section/boilers/mod_id/91

comes in at 450UKP = $690 plus shipping.

Plus there's the whole business of learning how to operate a boiler safely.

For now, I'd stick with compressed air for the home shop and spend some time trying to locate a model engineering club in your area where you might find someone who might lend you some time on his boiler (with appropriate supervision).

I think you've chosen wisely for your second engine project - forgiving bar stock and complex enough to develop some new skills yet simple enough to complete in a period that won't exhaust your enthusiasm.

Before making any chips, a good exercise would be to plan out the order in which you intend to make the parts along with notes about why part A must be made before part B. Compare your plan with what the construction book says and try to resolve any differences. Then, for each part, make a cutting schedule that details which operations are done in what order (and how the part is held for the operation) to arrive at the finished object. This need not be some huge documentations exercise - in many cases the plan can be completely mental - but it will help you immensely to have in mind a complete sequence from stock to part before you start. DAMHIKT.

And, of course, feel free to call on the expertise here to help resolve quandries. This thread promises to be a real gold mine for lurking novices so the more detail we can include, the more useful it will be.

 
zeeprogrammer said:
As you all know...I am very new to this hobby. No engine experience (bore and stroke?) and no machining experience (wobbler?) save for the last four months. . . .
Let the story begin...and the (positive) criticisms and learnings...

You'll get it, as said in earlier post, develop a plan of sorts, to which past experience helps with the sequence. Some operations become standard, others are always going to be unique to the task. I spent a lot of years in body structures for the 777 given pieces of the puzzle to install. You want what! where?. First crack at it was always a guessing game, getting the order of operations with lots of "that aint right" Second time around was always the hardest, trying to avoid the mistakes of the earlier just made the job a real PIA. Third crack and process started a life of its own. After that they would give the job to someone else and hand me another new dodad.

Your not alone in the learning process, it, as you know takes a bit of time to grow into. Whats the worse that can happen but an ever growing pile of furture "Re-purpose" material
 
When I started my first project I found that I ended up making every part at least twice (and some 3 or 4 times). This used up quite a bit if raw material. You may want to consider obtaining some cheap material to make "test parts" before attacking the real material. Blocks of plastic would make an ideal practice material....easy to machine, and cheap enough to keep trying until you get it right.

Charlie
 
As a total newcomer to model engineering, I will follow this thread with great interest - Zee please post lots of pictures so that a dunce like myself can follow what is going on ;D th_wwp

All the best with the build, A
 
FWIW, blocks & bits of UHMW plastic are available at Woodcraft stores around here for making fixtures and the like. It machines pretty well, though feeds and speeds are way off of course.
 
Bill: I looked at the PM boiler. Price is okay but I think it's because it's a kit. In any case as I'm about to tell Marv...it's too early for me.

Marv: I got ahead of myself. The boiler thought was indeed for much later. I shouldn't haven't confused things bringing it up now. Also, thanks for the good advice regarding planning. As for a 'gold mine' for others like me...that is a major hope. By the way...I was at the Deutches Museum last week. (I spent many hours there as a kid when I lived in Munich. Who knows...that may be where the bug bit me.) I walked into the gift shop and staring back at me was a huge poster of your avatar :eek:. My first thought was "it's Marv". Kind of eerie.

Foozer: I'll have to remember to keep the pile separate and take a picture when the project is done. That should be a hoot.

Charlie: The shame would be to get it right on the plastic and then still make it wrong in the metal. I can bet I would. I'm thinking of going ahead and buying extra raw stock anyway. Even if I end up not using it on this project (yeah...right) I wouldn't mind building up a little inventory...I have virtually nothing right now but some aluminum. And for the small amounts I intend to get/use/destroy, the price differential doesn't seem big enough. But to help 'those that follow', I hope to keep track of expenses and post that too.

Alasdair: I'll do my best. But you know what they say...the blind leading the blind?

Shred: Got your post while replying. Found it online. Looks interesting - my first thought was it might provide a way of adding color to a model?

Thanks for everyone's support. It'll be a slow start...especially if I keep writing missives.
 
Ah, the Deutsches Museum - heaven for the likes of us. When I was consulting for ERNO, I used to get business trips to Friedrichshafen occasionally. Usually managed a quick run up to Muenchen for a visit to the museum and a few liters of beer before heading back to Bremen.

Albert makes the perfect avatar for me. He was a physicist. So am I (although hardly of his caliber). He had an attitude and a twisted sense of humor. So do I. He had no faith in mankind. Neither do I. He distrusted and detested authority. Me? Well, we won't go there...

But, more important, Albert said, "If only I had known, I would have become a watchmaker." which has always led me to believe that, behind that goofy, slightly bewildered face lay the mind of a budding model engineer.

I don't like the idea of making practice parts in plastic. It's too easy to "not worry about it" and fail to develop the focus and concentration one needs when working with the real material. Since that's unteachable (though not unlearnable), one needs lots of practice to hone one's mind for the day you have to tap one more 0-80 hole in a part that you have forty hours of work in. As you pointed out the material is cheap compared to the effort involved.

Metalworking, especially at the model engine level, is far more about training the mind than it is about training the hand. Ultimately, you'll learn as much about your own mentality as you'll learn about making whatever you're constructing.
 
Well said Marv, but I still have to smile at zee's comment about seeing the picture in the museum. I think most here would have the same reaction we are so used to seeing it now :big:

Bill
 
Albert makes the perfect avatar for me. He was a physicist. So am I (although hardly of his caliber).

Got to say Marv, thanks to your avatar my 2 1/2 year old son knows the name Albert Einstein and how to poke his tongue out in the same way. :big: :bow: :bow:
Phil
 
So I ordered some backup material...

Some info for the newbies like me...

The Launch Engine costs about $60. You get the raw stock, screws, nuts, pins, construction manual, and drawing set.

The Mill Engine costs about $80. More raw stock than the Launch Engine, screws, nuts, pins, construction manual, and drawing set.

I ordered enough raw stock to build at least 1 more of each engine. (I'm lying. I bought it not to build more but to replace the...uh...practice pieces. Yeah that's it...practice pieces.) Some material enough to build several. I bought in lengths of 12" and sometimes 6" for the more expensive bits. The total was $100 including shipping. So for the extra money in the kits...you get the material without guessing what you need and some decent manuals. (Although some drawings may be available for free...the construction manuals may be useful to the newbie like me.) However, I have not included additional screws, nuts, etc. (What can I possibly do to a nut? Well...lose it for one.) I also didn't bother with buying pieces that can be worked down to smaller sizes if needed. That is, I tried to buy exactly what was on the packing slip. So, yes, it's over the top but I was interested in building up some inventory for the rainy day.

I have little experience in purchasing metal and haven't done much looking around. But if anyone is interested...

OnLineMetal Steel 1018 CRS 1" diameter was $7.12. $3.24 from SpeedyMetal.
OnLineMetal Brass 360 HO2 1/4" square was $3.12. $2.21 from SpeedyMetal.

Guess who I bought from. But I haven't done enough to speak to service and the above is a poor (i.e. small) sample. I have no idea if the same holds true across the board. You can buy in inches so if a piece doesn't work out...it's pretty cheap to replace it.

CRS = cold rolled steel
HO2 = half hard

A book I've found very helpful to me is 'The Home Machinist's Handbook' by Doug Briney. My first projects came from there...the machinist's jacks, mallet, and machinist clamps that are on my welcome thread.

The forum? Priceless.

Now for the warning, disclaimer, excuses...Do not take any information I provide as correct. Same holds for any approach I take in making bits of metal smaller. I'm learning so assume there's a better way. Wait for the feedback from the more experienced members on the forum. (I say all that as if I'm actually going to post my progress. Ha.)
 
Back
Top