Open Column Launch Engine from Kit

Home Model Engine Machinist Forum

Help Support Home Model Engine Machinist Forum:

This site may earn a commission from merchant affiliate links, including eBay, Amazon, and others.
Carl,
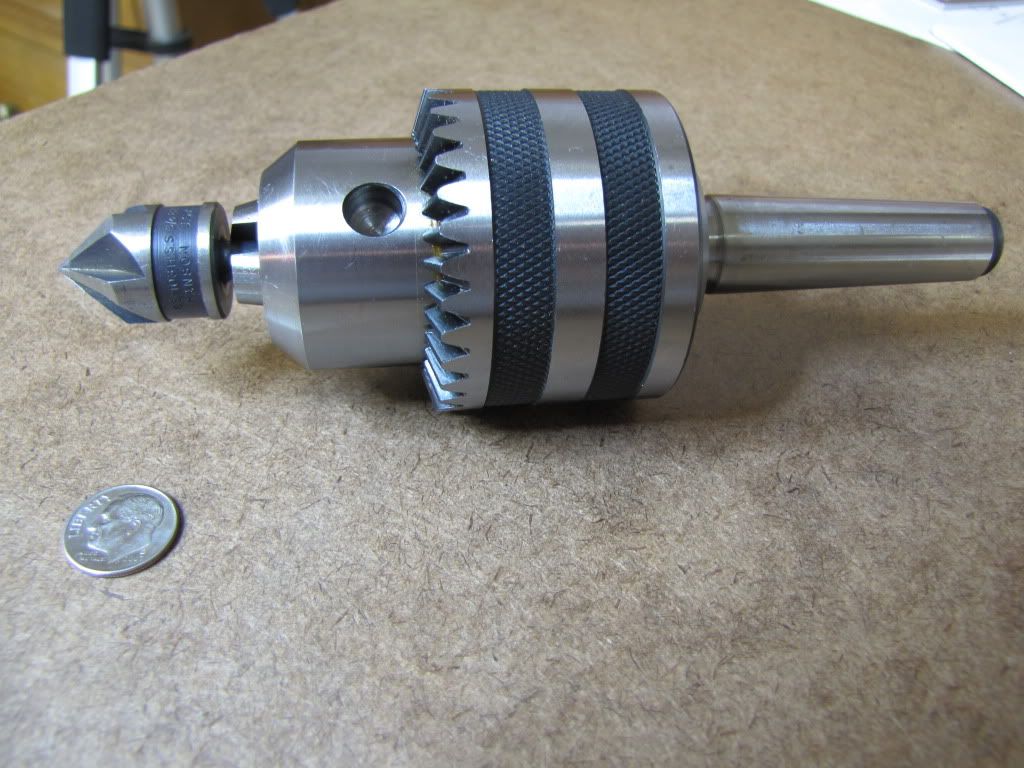
Another thing that can help on small shafts is a half center which can be made from a dead center by grinding part of it away:

IMG_0322.jpg


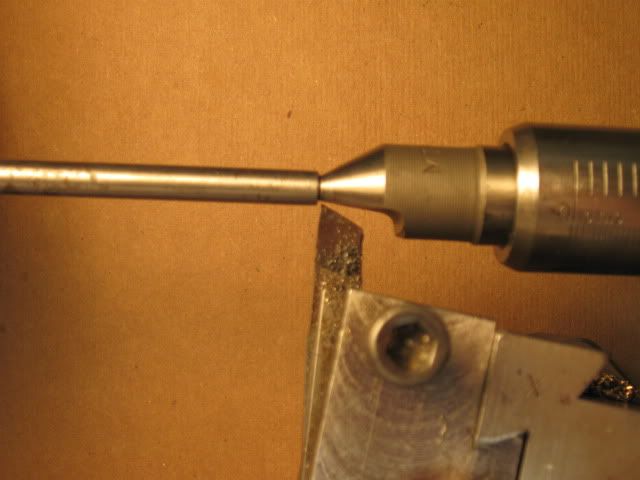
It gives more room for the tool but of course must be carefully adjusted and lubricated like any other dead center used in the tailstock.
Dave
 
zeeprogrammer said:
Marv: ...I walked into the gift shop and staring back at me was a huge poster of your avatar :eek:. My first thought was "it's Marv". Kind of eerie.

Had a good scare today. Went on facebook. My daughter had taken a '6 Impossible Questions' quiz. There you were again. Made me jump. Almost wanted to look behind me. ;D
 
Half-dead centers (I call them zombie centers) are one of those tools you'll need only a few times in your career but, when you do, there really aren't many good substitutes.

If you're one of those who haven't yet bought a live center, consider the type with interchangeable points, e.g.,

http://www.use-enco.com/CGI/INSRIT?PMAKA=251-3020&PMPXNO=2984208&PARTPG=INLMK3

I have one of these and the smallest point in the set of points has come into use many times although I still have my zombie and use it too.

Another advantage of the type with interchangeable points is the fact that it's easy to make special purpose points such as pushers and big pipe centers for it.
 
mklotz said:
Half-dead centers (I call them zombie centers)...
:big:

I do have a live center. Didn't know their were different types other than 'carbide tipped'.

Well that's something else I need to do more of...peruse tool catalogs (why don't I have a stack of them or a computer near my throne? :))

Thanks Marv.
 
Catalogues are a wonderful way to develop your analytical skills and increase your knowledge base.

By definition, anything offered in a metalworking catalogue is used in a lot of machine shops (else it wouldn't be worth offering it for sale) so it must be useful and probably worth knowing about even if your personal work doesn't immediately require it. Think of it as loading your mind with material that can inspire you when you need to solve some thorny problem of your own.

When you encounter a tool with which you're unfamiliar, don't gloss over it but rather try to imagine what it's used for, how it's employed and why it's superior to other ways of accomplishing the same task. Try to think of some task you've done or need to do that would be simplified by application of this tool (or a version of it that you build yourself).

Inevitably, some tools will presume the availability of resources you lack such as very powerful or special purpose machinery. Don't let that stop you. Try to think of ways you could make something that would perform a similar function with the tooling you have available.

Also, don't limit yourself to machine tool catalogues. Gunsmithing (Brownells), jewelry-making (Rio Grande), woodworking (many) and model-making (MicroMark) catalogues are rich idea sources.
 
As I'm sure you know Marv, the risk with catalogs of any kind, is the development of tool envy. :) But it's just so much fun!

So I tried my hand at grinding a tool bit for my fly cutter. The downside? There were several...I'll get to some of them momentarily. The upside? I searched the forum...I'm not the only one with egg on their face.

I had trouble figuring out what shape was needed. (1st downside.) I ended up trying to copy what is a right-handed roughing lathe bit. That's correct...right-handed. (2nd downside - and I even mentioned in an earlier post that the spindle went clock wise). I didn't have time to go back...I have to get ready for a business trip. (You guys can make a tool in the time in takes to read this post...me?...I only count in hours.)

So I put a left-handed bit in the fly cutter and had a go on a piece of scrap aluminum.

I was surprised and impressed (upside) Until I ran my finger across it (downside). A little more experimenting. Slowing the feed rate made a huge difference (upside). The part was short so I kept moving the table so a cut would be made on the return trip of the cutter (downside). I'm apparently out of tram. And...I think I was using too high a speed from what I see in the forum.

Anyway...I'm out of time here.

But before I go...

Grinding tool bits is something I'd like to learn but maybe not right now. Any suggestions for a purchased cutter for my fly cutters? Was using the left-handed lathe cutter okay?

For other newbies...googling can help...but don't forget about the search bar on the forum. Lot's of good stuff here. (Not mine maybe...but there's a a bunch of very good people here.)


zeeprogrammer said:
As I'm sure you know Marv, the risk with catalogs of any kind, is the development of tool envy. :) But it's just so much fun!

So I tried my hand at grinding a tool bit for my fly cutter.

Grinding tool bits was my first, I guess, major hurdle. Bought of bunch of 1/4 and 5/16 inch blanks, went to town on the grinder. I can grind them every which way but what the diagrams show. The post with the Sherline info is a good one. Its clear and concise, just takes practice. Once I get a bit ground so that it cuts good, Boy-O-Boy that's my baby, the best cutter I have is the ugliest looking thing one could lay eyes upon, but leaves a nice smooth finish.

Fly cutter, getting that radius edge smooth by hand grinding, now that's an adventure. Its just a new skill and soon enough the hands will do what the brain ask of em.
 
Hey thanks Foozer.

Funny you mention the Sherline post. That's what I had next to me while I tried my hand at it.

Your point is a good one. If you don't try, you have nothing. If you try...maybe it's good...maybe it's not so good. But it's better than nothing.

Funny how I can give that advice to my kids..but don't listen to it myself. My biggest problem is overcoming the notion that there's a right way and a wrong way.
There's many right ways.

Best regards.
 
If you want to practice lathe bit grinding, get a stick of ~1/4" square 1018 and practice with that. It's cheaper than HSS, the right dimensions and easier to grind. In a couple of hours, you'll have a good feel for how to hold things to generate the various angles. Once you're comfortable with the manipulations, graduate to the good stuff.

On a marginally related note, I've read that one shouldn't cool the HSS tool by dipping it in water (though most everyone does it). The thought is that doing so can cause micro-cracks that can eventually lead to tool failure.

Usually I grind several tools at the same time. When one gets too hot to hold comfortably, I lay it on a big chunk of aluminum that acts as a heat sink to suck the heat out of the tool and start grinding on another tool. Another variation of this is to make a heat sink tool bit holder out of a block of aluminum and use that to hold the tool while grinding.

I've also read that allowing the HSS to discolor from the heat is no big deal. (HSS is formulated to hold its properties at high temperature.) While grinding a carbon steel knife blade to the point where it discolors would be a big no-no, doing so with HSS is said to be OK. I don't know if this is true but I do have several tools with tips discolored from grinding and they seem to work fine.

Perhaps some of the members who know more than I on this subject would like to comment on what I've written. If I'm completely wrong, I'll be happy to delete this post so future readers aren't led astray.
 
mklotz said:
On a marginally related note, I've read that one shouldn't cool the HSS tool by dipping it in water (though most everyone does it). The thought is that doing so can cause micro-cracks that can eventually lead to tool failure.

I'd read of this too, for a while I tried quenching in soluble oil and water, (coolant). There was no discernible difference. So back to good old water.

Before I use a single point tool or a HSS drill bit after grinding, I usually stone them with a small flat stone. If there are any micro cracks, perhaps this removes them. ??? ???

Best Regards
Bob
 
Kermit,

Thanks for that link. Since I read RCM regularly, that's probably where I picked up the ideas I wrote about.

It's nice to see that I wasn't completely off center in what I wrote.
 
Back from my business trip! I get to machine this weekend!

Thanks Kermit, Bob, and Marv.

Before my trip I went ahead and used a cheapie left-handed cutter (that came with the lathe) in the fly cutter and machined the brass piece that is going to produce the pillow block and bearing block.

This weekend I hope to saw the brass in two and finish the two parts. My thinking (right or wrong) is that the parts will work fine.

If I have time...I need to think about a way to tram the mill. I've seen several good methods and tools on the forum.

I can't help myself...on a side note...at the Houston airport I had another Marv sighting. That's 3 now in the space of a month. The time before that was years and years ago. Not thinking about machining when I'm working is getting pretty difficult.


I wanted to capture this safety boo-boo so others can avoid it...

http://www.homemodelenginemachinist.com/index.php?topic=5178.0

It made me realize just how things can shoot off and possibly hit someone.
If someone wants to watch...no matter from what distance...make sure they have more than adequate protection. I don't even want to scare them. From now on...if any one wants to watch me...there's going to be a thick piece of plastic, taller and wider than them, between them and the work. I'm okay with 'adequate' protection for myself...but when it comes to a loved one...


uh...I don't mean to imply I don't love me...but that's between me, myself, and I.
 
The pillow and bearing blocks are supposed to be 0.94" high, cut from a single piece of brass.

The single piece of brass I got in the kit was 1.88". The ends had to be squared and the part cut in two. Right. So squaring and cutting must not shorten the piece. I can do that. Right.

So I squared and cut and discovered that, no, I can't do that. Not without shortening the piece. Rats.

Now I have two pieces, each 0.878 long. Each off by 0.062". Foo.

For one of the pieces...no problem. There's a hole 0.53 from the bottom, diameter 0.219. Top of hole is nearly 0.2 away from top of block.

The other piece...hole is 0.53 from bottom, diameter is .4375. I would've had 0.1913 from top...now I have 0.1293. Problem is...the hose coupling thread is 0.16. So the hose coupling won't thread in all the way.

Possible solutions:

1) If 0.12 is enough...shorten the hose coupling thread.
2) Knock off a bit from the bottom of both blocks. That would require the piston rod to be a bit longer. Could shorten the columns. Might change the stroke.
3) Get another piece of brass (see earlier post...I was prepared for this) and do it again.

I'm thinking (sure you are)...for a small (simple?) engine like this...go for '1'. Can test without shortening the coupling thread. If it works...shorten it. If it don't...go for '3' and consider this practice. Avoid '2'...too many changes (and I'm an old dog).

I find it useful to know the thought process of the knowledgeable ones...so I recorded this. Not that I'm knowledgeable. It's also useful to know the thought process of the less-than-knowledgeable. Hope it's not boring.
 
Carl,
Could you make a shim piece to go under each pillow block and make it look like it is part of the design?
Dave
 
DavesWimshurst said:
Could you make a shim piece to go under each pillow block and make it look like it is part of the design?

Dave...very good idea. Thank you. Wish I'd read your post, or thought of it, before I went and started drilling.
:rant:
Still...so far I've only drilled the mounting holes...not the crankshaft hole. It's probably not too late. Do I want to? Do I need to? If I try to fit the footprint I'll probably bugger it. Better to make it slightly larger, like a step. If the shorter thread for the coupling is not enough I guess I'd have to. Otherwise...why go through the trouble?
Thanks again. Very very useful tip whether now or a future build.
 
Finished the bearing (pillow block) woohoo1

Previous posts/replies talked about using an edge finder and the cranks' dials rather than eyeballing the center drill to the target. Some instructions I had found referred to zeroing out the crank dial. I didn't think my equipment had that capability. But of course it does. :Doh:
In any case...I dyed and scribed the part as a check...used the edge finder...and lo and behold...came right to it. (The picture may not show it due to parallax...but I was 'right on'.) I took the distance to move, added 0.1 for the edge finder, and divided by .0625. That gave the revs and a fraction. Then I multiplied the fraction by .0625 and that gave me the additional thous to move. Zeroed the crank dial and cranked away. Be sure to move the crank in the same direction...up to the edge for the edge finder and then on to the target. Did one axis, locked it down and then did the other.

IMG_0138.jpg


Drilled and reamed the bearing hole. (Uh oh...the reamer didn't do anything. [Edit: I should have drilled 1/64 smaller and then reamed to size. Thanks Marv]) And drilled and tapped the two mounting holes. Polished with fine emery and some scotchbrite followed by brasso. I can't say I'm happy with the finish. It's okay but I've seen some really nice stuff on the forum.

IMG_0139.jpg


The other brass part with dye is the bearing - port block. That's next.

I don't know what you call the thingy [Edit: Countersink. Thanks Marv]...I had it lying around for years...but I use it to knock off burrs on drilled holes and to put a small chamfer on them. I put it in the chuck that's used on the lathe's tail stock. Then, by hand, just give a few twists trying to keep it perpendicular. Works well enough.

IMG_0141.jpg
 
Drilled and reamed the bearing hole. (Uh oh...the reamer didn't do anything.)

What size was the drill? The drill should be slightly smaller than the reamer. The drill's function is only to remove the bulk of the material, leaving a few thou for the reamer to remove.
For holes <=0.5", I normally drill 1/64" undersize, then ream.

That "thingy" the name of which you do not know is called a countersink. Its intended use is to countersink a hole so a flat head screw seats flush. It's perfectly acceptable to use it for deburring (I do too) although you may want to make a more comfortable handle for it.
 

Latest posts

Back
Top