Nemett Jaguar--Canadian style

Home Model Engine Machinist Forum

Help Support Home Model Engine Machinist Forum:

This site may earn a commission from merchant affiliate links, including eBay, Amazon, and others.
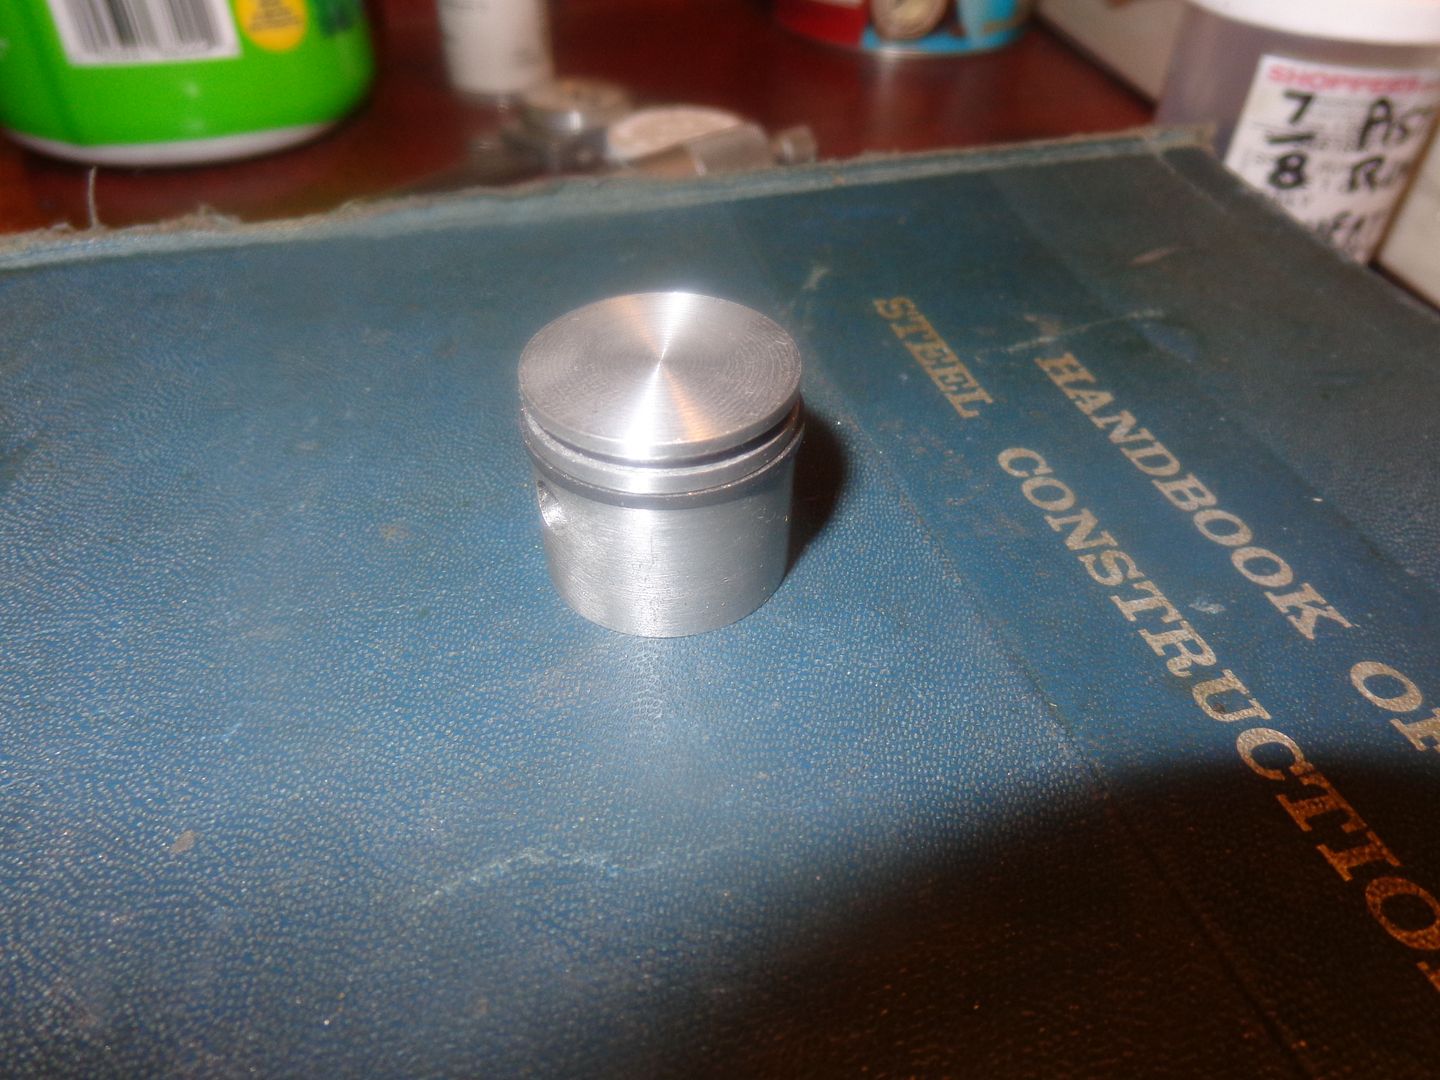
Let's go back in time to where I first made cast iron piston rings. I ran them in for two hours, installed on the piston, and couldn't seem to get any compression. I was in a hurry to get the engine running, and needed to prove to myself that the no compression issue wasn't something other than the rings. I modified the piston to accept Viton o-rings, and moved on to a point where the engine was running. I have gradually improved the engine, until now it runs well and has so much compression I can barely turn it over by hand. Yesterday I pulled those two original rings out of their storage container, and had a good look at them with a magnifying glass. One ring had 3/4 of the surface worn from full contact with the cylinder wall, and one quarter which was still black from the heat treating process, so obviously not sealing at all in that area. The other ring however, had a nice even wear pattern all the way around the ring, with no black showing at all. To me, that says that it should have given me compression at the time. This morning I made a new aluminum piston, with the correct depth and width of ring grooves to suit the batch of 12 rings I originally made, and fitted the one good heat treated ring onto the piston. I have two heat treated rings left from the first batch of "good" heat treated rings, and I will install one of them in the other ring groove tomorrow. If I can find a piece of cast iron long enough in all my cut-offs tomorrow, I may make up a dummy cylinder and use the same 7/8" reamer as I used when I made my original cylinder. That should give me something to "play with" until I can judge if these rings are going to seal at all. If they do, its a very simple matter to pull the cylinder off the engine and swap pistons.
 
I'm sure you'll have success Brian. So far I've managed to make 2 good sets of C.I. rings from 2 attempts, and you skills are far ahead of mine.

I've never tried running the engine in prior to attempting to start it and never lapped the bore either as my experience in full sized engines makes me wary of glazed or polished bores. On initial install both of my engines were way down on compression, although they did have a bit. Once the other issues were sorted out and the engine began to fire, the compression increased very quickly. Still being fairly inexperienced at this, I don't know if I have optimum compression compared to an oring, but I certainly get enough for the engines to run consistently.

Good luck and I'll be watching with interest.
 
Hi, I'm begginer in machining, but your works look very good.
Sorry for my not good english, have a nice day.
Regards, Alessandro
 
This mornings ring experiment was another FAIL!! I made up a dummy cylinder from cast iron, same bore, stroke, and interior finish as the cylinder on the engine. I tried my new piston and cast iron rings in the dummy cylinder, and it had SOME compression, but nothing compared to what you would get from a viton o-ring. A bit of light oil made it a bit better but not much. I decided to try it in the engine, so pulled the old piston and Viton ring out and put the new piston with cast iron rings in. Initially, it did have some very weak compression, and at high drill speeds I could get the engine to fire and run along with the drill, but not on its own. I tried about a hundred different needle valve settings, but nope, no way the engine was going to take off and run on its own. I even tried straight automotive gasoline with no oil added and that didn't improve things in any way. Eventually, even the initial weak compression I had felt faded away to nothing. I'm not sure what to do next.---Maybe take up needlepoint!!!
 
An update. I couldn't get any compression with my first attempt today with cast iron rings. I pulled the cylinder off, which by now had a mirror like polish on it from running with the Viton ring, and honed it with my 3 stone brake cylinder hone, enough to "unpolish" it, then reassembled the engine again with the cast iron rings. This time I did have compression. Not very much, mind you, but enough that the engine would fire.---and thats all it would do. I musta screwed around for 3 hours trying to get it to run, and as the day wore on, I got progressively longer periods of running. This, I assume, was a result of the new cast iron rings very gradually "seating" in the cylinder. After 3 hours I said "enough is enough" and decided to try something else. I pulled out the sparkplug, made up a very small aluminum pulley for my big old bale elevator motor, and hooked things up with an o-ring drive. I gave a few squirts of oil down the sparkplug hole, topped off the crankcase oil, and plugged in the electric motor. It's setting on my test bench out in my main garage, wailing away at about 1800 RPM. I'm going to let it run like that for 3 hours and then give it one more try. If it has by then developed enough compression to run with the cast iron rings, I will be a happy camper. If it hasn't, I will put the piston with the Viton ring back in it and leave it alone. It does run good with the Viton ring, and the fan does keep it cool enough to run for extended periods of time.

 
Fingers and toes crossed. You’ve got a good running engine already but the cast rings would be another feather in your cap.Thm:
 
Brian

Neat idea. I had a frustrating experience trying to get both of mine to start. I had no idea what to expect, so tweaked carb, ignition, valves, rings until it eventually started. Somebody had asked how much compression i had and I eventually worked on that.

There's a message here for all the other builders, get the compression sorted before you try to start it otherwise you'll be wasting your time. Expecting the rings and valves to seal and bed in enough to get the thing to start just doesn't work.

Pete
 
  • Like
Reactions: gus
Doubletop--I have read accounts of many other model engine builders who don't even try to start their engines until they have ran them in this way for 8 to 12 hours.---Brian
 
After 4 hours or "running in" to get the rings to seat, a couple of very minor tweaks to the timing, and some straight hi-test automobile gas, we are up and running with cast iron rings!!! This is a first for me, and I am thrilled!!! At first the engine would run with the cast iron rings, but didn't develop enough power to turn the fan. I kept tweaking the needle jet and the ignition timing (which are really the only two things that there are to tweak) until finally the engine began to run more powerfully and began to get hot. I put the belt back on the fan and finally the engine was able to run with the fan and keep running. I am now getting good sustained runs, and as the rings wear in and seat more, the engine seems to be running better and better.

[ame]https://www.youtube.com/watch?v=3iqqoDeG6vM&feature=youtu.be[/ame]
 
Last edited:
Congratulations!
And another feather in your cap.
I’ve read a couple of posts that say how with cast rings they can take some time to run in.
Great build.
 
-I thought about running the rings in dry. I was afraid to in case I scored the cast iron cylinder wall. My thoughts were that running the rings in with oil in the cylinder (sparkplug removed of course) would do the same thing, just take a lot longer. Now that I have the engine running, I am using straight unmixed gas in the engine. The lubrication is splash oiling from the sump. Running with straight gasoline will get rid of a lot of the oil film in the cylinder, and the rings should seat more in a relatively oil free environment. That little fan sucks up a lot of the engines power, preventing it from getting into a higher rev range than what you see in the last video posted. Right now the ratio between pulleys is 2:1 so the fan is being driven at twice the engine speed. The engine is running cool as a cucumber so I am going to try a 1" pulley on the fan, changing the ratio to 1.5:1, so the fan will run about 1 1/2 times faster than the engine and take some of the load off it to allow it to rev a bit higher.
 
Been using rings bought from USA vendor for the Webster and Rupnow Engines. True ,they have to be run in and seated/sealed well. Indication would be non-sustained run but after a few more spinning sessions,the spinning gets sustained.Pehaps this was why the H&M with Rupnow engine did not come on well till piston rings seated in.
Now waiting for engraving cutter to arrive from UK to engrave the RT graduations and from there
cam cutting can begin.RT table lapped and worm wheel and worm meshed well though a bit tight but crankable and eventually will slacken a wee bitty.
Now dreaming about my own Nemett-Jaguar running next year. After Lynx would doing upgrading/repairs on the machine tools. About time to replace spindle bearings of the 14 year old US$100 Bench Drill Press which is now part of Gus.:)
 
Hi Gus. This has not been an easy engine to build. No, let me correct myself. The engine was as easy to build as any comparable closed crankcase four cycle engine would have been, I suppose. The difficult thing for me has been getting it to run the way I like my engines to run. I prefer my engines to operate somewhat slowly, not unlike steam engines. This engine is cammed to rev higher than I am accustomed to, and it really doesn't like to idle at "tick-over" speed. My dual opposed piston engine will idle very slowly, but I had to resort to quite a large diameter flywheel to make that possible. This engine has only a 3" diameter flywheel, and although it might idle well in a twin cylinder configuration where there is a power pulse on every 360 degrees of rotation, as Malcolm Stride originally designed it, there are some issues with the idling RPM in it's single cylinder configuration, where you only get one power pulse on every second 360 degree rotation. I have learned a lot from building this engine, and as my video's show, it does run. I think if someone really wants to build this engine, that they should build it as a twin cylinder.
 
Congrats Brian. As I said, I never had any doubt you'd get C.I. rings mastered. I would be interested to know, once it's completely run in, how compression compares between the Viton and C.I. rings.
 
Brian

I've certainly learned something from your experience as you've precisely described mine, with both engines. So much so I now have "make new piston with viton rings" on my todo list if only to try it out and confirm for myself that compression is the problem with poor running. Not carb or ignition.

Thanks again

Pete
 
Alright!!!--This thread is officially finished. the engine runs, it runs reasonably well, and it runs with cast iron rings. The fan does keep the cylinder and head cool, after running 3 tanks of gas thru back to back at 20 minutes per tank. I never did solve the blow back thru the carburetor issue, and I think that is purely a factor of too much valve overlap at top dead center for this engine in a single cylinder configuration. I have found that yes, the Loctite does hold the cams to the cam shaft without slipping or coming unstuck, which is a really good thing to know. this is the first engine I have built which uses a jockey gear between the crankshaft gear and the camshaft gear, and that works fine. The ability to determine whether there is enough crankcase oil in the sump to keep the big end of the con rod lubricated by splash lubrication is a very "iffy" sort of thing. You have no access to it to put a drop of oil on it, and there really is no good way to check the oil level, that I have found. If you don't run water cooled cylinders nor a propeller, you will definitely have to fabricate some type of belt driven fan as I did, or this engine will run way too hot. I don't think I will try any more engines with cast iron rings. There is far too much screwing around involved, and even after 6 hours of continuous running, the engine had nowhere's near the compression it did with a Viton o-ring. It is a very pretty little engine, and I have used up May, June, and a damn good chunk of July to get to this point. Thank you so much to all of you who have followed this thread, I know it has gotten very long winded.----Brian
 
Last edited:
During my engine selection to find an engine that would suitably run the buzz saw under a full load, I tried a number of different engines out of my "stable". I couldn't get this engine to start, so I set it aside. Yesterday, I got it back up on my test bench, and tried every trick I know to make it run. Heck, I couldn't even get it to fire. And yet, it had a ferocious spark when the plug was laying out on the cylinder head, the spark seemed to be occurring at the right time, and the engine had lots of compression and new fuel. After trying everything in my "bag of tricks to get engines running"---which is considerable, I decided that I would have to tear it completely down and do a part by part inspection of what was going on. This morning I thought, "Well, there is only one thing left to try before I tear everything down."---(which I really didn't want to do!) I changed out the sparkplug for a spare plug that I have been saving. The engine started immediately and ran like a trooper!!! I have never seen a miniature sparkplug go bad like that before---fires like crazy under no compression load, but doesn't fire under compression. I have heard about it, and probably at some time in my hot-rodding past have even experienced it and forgotten about it.--At any rate, I am certainly glad I didn't have to tear the engine apart.---Brian
 
The engine still occasionally coughs back through the carburetor when running at full throttle, and I still see a bit of mist coming out of the carburetor intake, which should never happen. As much as I like the look of the swoopy exhaust pipe turning 180 degrees and discharging back towards the opposite side of the engine, I wonder if that creates enough back pressure at higher RPM to interfere with the smooth flow of gasses during the exhaust stroke. The exhaust valve and intake valve are both open at the same time for a short duration at the end of the exhaust stroke, the theory being that the already flowing exhaust gas will actually pull the incoming gas (vapour) and get it moving in the intake system to overcome the inertia which tends to make the intake vapour column remain at rest (as in not flow) until the piston has already began it's descent in the cylinder during the intake stroke. There may just be enough resistance to free flow in that 180 degree bend that it is preventing this "scavenging effect" from happening. I might just have to fab up a straight pipe to see what effect that has.
 
Last edited:
The engine still occasionally coughs back through the carburetor when running at full throttle,

Hi Brian
I'm under the impression your engine is trying to burn already burn gas
that's been thrown in the air like running an EGR valve at idle:eek:
make it longer it will change the charge time speed and increace the engine torque band

cheers

Luc
 

Latest posts

Back
Top