My little corner of the Universe - Phase 1

Home Model Engine Machinist Forum

Help Support Home Model Engine Machinist Forum:

This site may earn a commission from merchant affiliate links, including eBay, Amazon, and others.

CrewCab

Well-Known Member
Joined
Apr 21, 2008
Messages
1,175
Reaction score
8
Well, it had to happen now or ........ I'd probably never get round to it ::) .......... I've been "planning" to do this for the last 5 years at least........ so here we go ;D

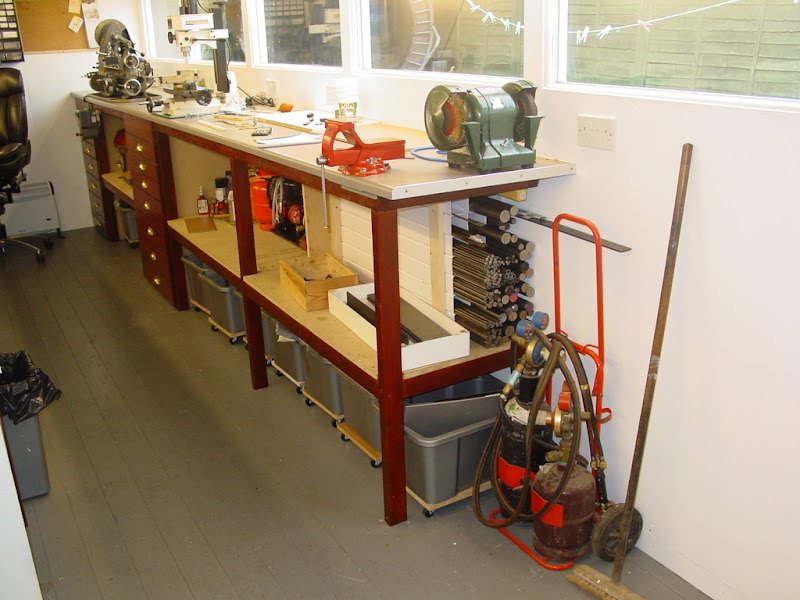
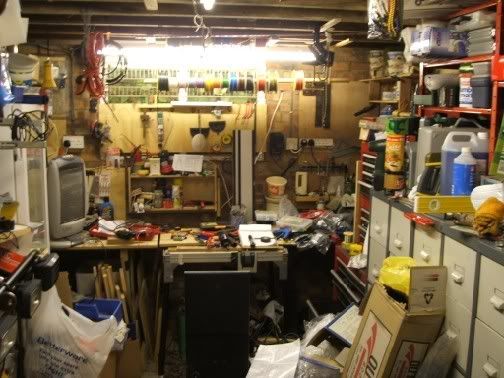
My hideaway .......... yesterday
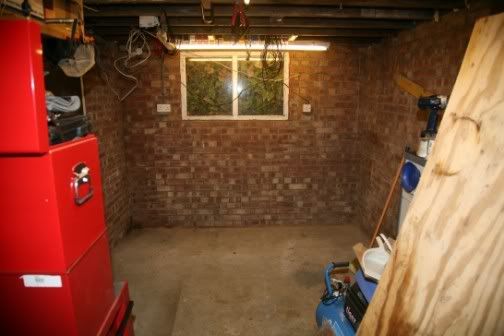
2005_11180023.jpg


and as of tonight .................. :eek: ??? ::)

IMG_5225.jpg


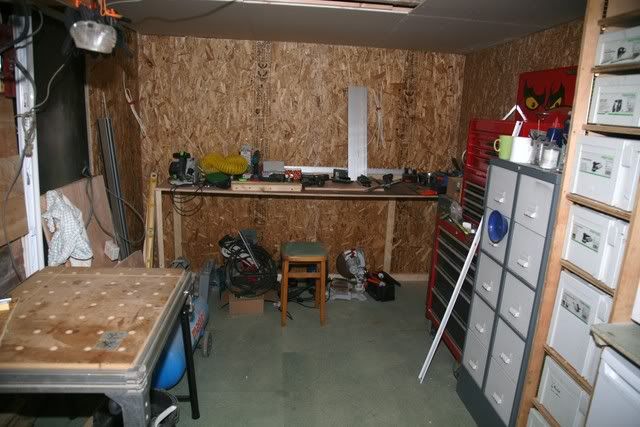
So my little space is about to undergo a "slight" transformation ........ it's 9ft wide by 12ft long, however I have to share that space with a Fridge and a Freezer plus lots of other bits .......... just don't ask ... :wall: .... After moving everything, if I open the garage door things fall out on me, so they will have to go back in the workshop ???

Anyway it's part of the original detached single garage, now connected to the house via the utility area, the good news is the downstairs loo (one of the most useful things I ever built) is just outside the workshop entrance door ....... ::)

Anyway, the Van is stacked with board, timber and insulation so this little bit of space is getting a new insulated floor, insulated ceiling and timber boarded walls ......... "insulated" .......... can you tell I'm fed up of cold weather :D

After I get the shell sorted I'm planning to build benches and shelving all the way around, electrics and the minor amount of plumbing are all going to be surface mounted so if I decide to stick a screw in somewhere I don't have to worry, if I end up with anything particularly heavy I can cut out a section of timber floor and put in a concrete pad, shelving is going to be generally plywood but hopefully I'll make that adjustable with a few extra router grooves .............. however .........

Useful suggestions at this stage, to add to this tiny "blank canvas" are more than welcome as this opportunity is unlikely to present itself again in my lifetime 8)

Silly suggestions I can come up with myself, humorous ones are most welcome ;D :D ;D

what the heck, silly ones are more than welcome anyway ::)

Thank you in anticipation chaps ::)

Dave


Think how many sockets you'll need then multiply by at least one and a half to two, this'll give you some scope to move things around if the first layout doesn't work and also task lighting, battery chargers and a little growth. I have a double socket in the ceiling in the centre so I can use a workmate in the middle with the power cord not coming across the floor making a trip hazard. Wire it all in through the protected half of the split load distribution panel or have a separate RCD protected panel for the workshop.

Cladding the walls will aid reflected light if you paint but put up a couple more flourescent lights, you don't want it to be dingy.

I'd put the bench with a vice near the window to utilise the natural light for hand work.

I've seen a suggestion elsewhere for a sheet of plastic behind the lathe like a shower curtain to prevent you getting the stripe up the wall caused by the chuck flinging coolant.

When you get your machinery, give some thought to the 'work envelope' and how much space you need around it to say move the mill table full range and get your hand on the wheel or get a bar through the headstock of the lathe. Also consider the 'maintenance envelope', can you get the grease gun on a particular nipple with it backed up to the wall and can you open the hatch to change belts.

Make the benches to suit you so you're not unduly stooping or stretching, have the vice with the top of the jaw at around elbow height (makes hacksawing easier I find).

Enough for now, hope that's some food for thought, no really silly ideas yet.

Al
 
To expand on Al's suggestion, I put a double socket every four feet around the walls (eleven in all, from their own supply box in the workshop). This might seem like overkill, but when your benches are full of junk, you can always move to a slightly less cluttered area to run your small power tools. Unless you have piped heating out there, a small infra red heater is a boon in the winter, using the nearest socket, you can keep it close to you, warming you up from the inside, without the expense of heating the whole shop. A cheap roller blind on the window will help to keep the place snug during the cold winter months, and also stop prying eyes.

As for lighting, get as much florescent in there as possible, it throws less shadows, and once it has warmed up, it should be like working in daylight. I put angle poise lamps on the walls for more close up lighting, and if positioned correctly in the first place, can be swung between machines.

Paint the walls in a very light colour, this will make the place a lot easier to work in because it will reflect the light and you shouldn't end up with dark corners, and as Al suggested, hang a splashback to protect the paintwork. Use bluetac and lightweight plastic sheeting, so it can be replaced when it gets filthy. I have even seen cling film and bacofoil used for the purpose, but get the better half's permission first, otherwise you might end up with no dinner.

Unlike mine, you should end up with a place for everything, and everything in its place.

John
 
Put some sockets on the front of the bench so you don't have to have trailing leads to the back knocking stuff off the bench as you drag the power tools about.
Very handy for drills and grinders.

.
 
Good suggestions so far! One thing - if you only have a small amount of space, really think about what you are going to use the space under the workbenches for. I'd fit lots of draws, and a mix of open shelving for storing stock etc. Also if you can build some portable benching on casters that can be wheeled around. Axminster sell casters that you can attach to a frame which lift up so the bench drops down onto it's legs.

Also think about different work areas, a clean area for marking out and a dirty area for grinding and sharpening etc.
 
A "New" workshop works on the law of diminishing returns. No matter how much room you thought you had when fitting it out, it has disappeared when you start to build. Regards Ian.
 
Dave
Everyone has been giving you some good advice. I'll add a bit as well. One of the nicest things I did in my own shop was to use strip type electrical outlets along the edges of my counter tops and work bench. These are available from Lowes or Home Depot and have plug ins every few inches along a narrow metal enclosure which runs the length of the counter. I have a plug outlet available anywhere I am working. Since I almost never have more than one machine under power at any given moment, I've never had any problems with the loads. I'm also planning to add air connections in the same manner.

Peg board is a nice addition, although these days the routed board looks like it might be a nice plus as well. Great aid in keeping things organized and readily at hand.

Under the counter mounting of my tool boxes has proven to be a move I have never regretted. I'm already looking at doing some more of this with the boxes that have accumulated since I enclosed the original pair.

Steve
 
Storage... I think somewhere I found the plans for a moving pegboard. Very simple and it adds to your pegboard room. I think it was in Make Magazine. The boards (there were 4) set up almost like pages in a book.

The only other idea I can think of that no-one else has covered would be ventilation of some sort. Is that a garage door to get in? Maybe a fan in the window?

Eric
 
Thanks guys 8) lots of useful tips so far, I do intend fitting lots of sockets but I like the idea of some at the front of the bench and one in the ceiling as well ;)

John, yes good idea about light coloured walls ............. just means I have to paint them :( .............. I must confess decorating is one thing I just don't enjoy ??? ............... but for the greater good and all that I 'spose I'll have to ......phone a friend :D ;D :D

Ventilation is a good point, in it's original state that was never a problem, but a fan seems a wise move.

I'm looking into the strip type socket outlets, but I haven't found a readily available source as yet, as for the fold out pegboard shelves I do recall seeing something like that a long time ago, that could well be worth thinking about for storing small items, certainly would save space and keep things organised .......... something which I need to work on.

Anyway, got a few hours in today so about half the floor is down, watch this space ;D

Dave
 
CrewCab said:
I'm looking into the strip type socket outlets, but I haven't found a readily available source as yet,
Dave

Ikea has some 6 way strips at the moment at £4.99 each.
Got 3 last week for the new CNC cabinets.

.
 
firebird posted some photos of his shop awhile back, one thing I noticed was the roll out storage tubs under his benches:

DSC06224.jpg


I thought it was a good way to make use of that space.

Scott
 
One problem in small workshops is lack of bench top space. It's amazing how quickly the work area gets covered in tools specific to one job. Soon you find yourself knee deep in stuff and it ends up in a mess!

I made some wooden trays, with an edging around three sides and a piece across the bottom of the front edge so it locates it on the worktop. If you make three or four of these and have some kind of rack under the worktop for these, you can then put them away and have a clear worktop again. Handy if you have done some painting or something then need to put the parts aside and work on another job.

I made mine about 600mm x 600mm and it's very useful to be able to quickly get shot of the stuff on your bench when you want to do something else.
 
The perimeter trunking you've shown may be for industrial use, have a look at your local friendly double glazing/ conservatory supplier ( :big: ) could be that the trunking that is available for fitting out conservatories could be cheaper. Also have a look at the plastic extrusion used by the same people for cills, raw material is supplied in 5 or 6Mtr lengths. Regards Ian.
 
Well after a long weekend (had a day off today ;D ) ............. progress has been made, not as much as I'd hoped for but at least its still progress, floor is 95% done, ceiling about 50% and walls about 75% ........... Oh well, unfortunately work will interfere with further progress until tomorrow evening :( ....C'est la vie ........... It's starting to fill up already though ::)

IMG_5233a.jpg


Dave
 
I spy a festool multi function table and circular saw?
I take it your in the woodworking trade?
 
General building trade really Matt, but I tend to stick to joinery ;D
 
Just as I thought I'd decided where everything was going it's all change time again ................... due to a bit of luck and dropping on a second hand 9 X 20 lathe complete with a stand at a reasonable price ;D

515e_1.jpg


Oh well at least that's the "which lathe" question answered :D

Dave
 
Dave

Bought it off ebay you are supposed to wait until the bidding ends lol
Mike
 
mike4517 said:
you are supposed to wait until the bidding ends ;D

Why ........ nobody else seems to :eek: ;D ;)

Anyway ............ seems in good condition, tried it when I picked it up, runs smoothly and quietly, everything seems to move smoothly and it's well oiled. Chap I bought it off seems very genuine and I have the original delivery note from Chester 8)

Blimey though .......... it's a heavy little beggar ??? .......... on my own this weekend, (only the dogs to help :big: ) so getting it out of the van and into the workshop was real fun ........... anyway it's in there now

IMG_5234504x441.jpg


The only problem I've found so far (which I was told about) is the paint on the tray is flaking off, in fact that's an understatement, it's having trouble hanging on ::)

I'm (hoping) to level up the stand and fix it in place tomorrow so I might as well repaint the tray now ............. but ............. anybody know what size hole I need for a coolant drain, might as well cut the hole before I repaint it.

atb Guys

Dave
 
Back
Top