My Diamond Tool Holder

Home Model Engine Machinist Forum

Help Support Home Model Engine Machinist Forum:

This site may earn a commission from merchant affiliate links, including eBay, Amazon, and others.

Cedge

Well-Known Member
Joined
Jul 12, 2007
Messages
1,730
Reaction score
29
A while back, long before joining this board, I used the clues provided by John Moran of www.gadgetbuilder.com to make a Diamond tool holder... or what is also known as a Tangential tool holder. His design worked quite , but my version of his design had a small "flaw" that eventually caused the tool to fail. Once it failed there was no stopping the cutting bit from escaping the holder. That is not to cast aspersions on John.... the design definitely worked, was a fun project and gave me insight into the how and why of the tool's workings. I still thank him for sharing the information he's offered.

Since then, I've been studying the designs from a couple of online suppliers who offer these tools, but at the $100.00 plus pricing, I became determined to build another one, based on these commercial designs, along with what John's tool had already taught me.

The project was a little tricky in that the tool is held by two compound angle cuts which are cut into existing 45° surfaces. I recently purchased a "Kurt Clone" vise with the swivel base. This made getting the cuts made for an interesting and educational exercise. The long and short of it was that the vise was a good investment and the swivel is a definite keeper, even if it lives in the cabinet when it isn't needed.

Below are photos of the newest tool in my arsenal of metal eaters.

Steve


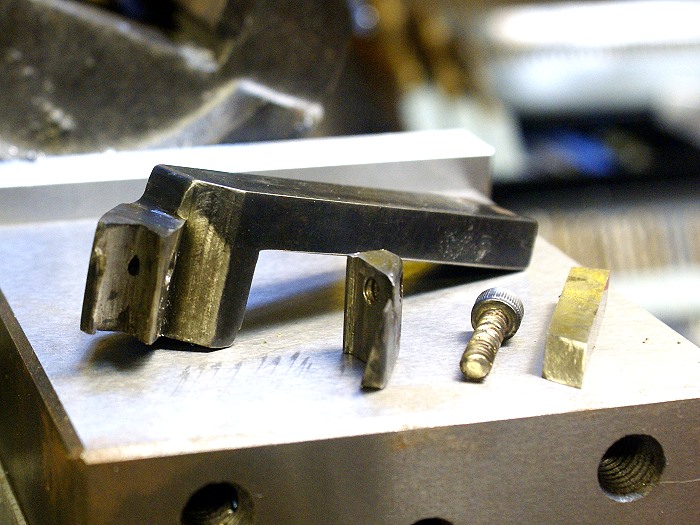
The Diamond Tool holder in roughed in phase, prior to test cutting.

diamond-toolholder.jpg


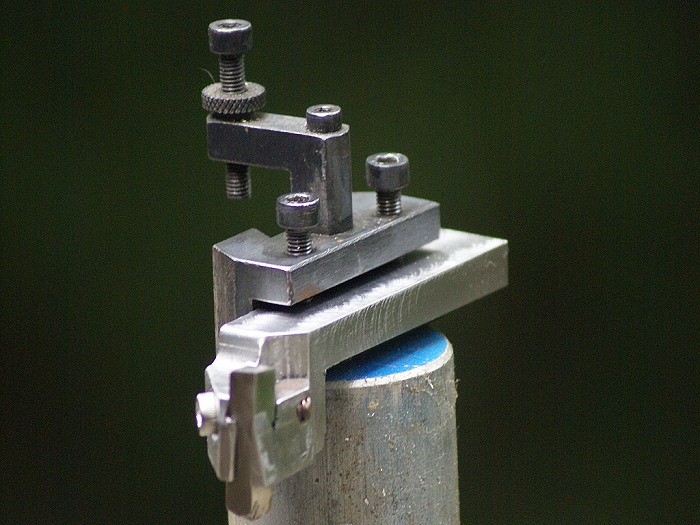
Side view of the tool showing the signature "diamond" cutting point

diamond-toolholder1.jpg


Here the tool has just made two passes on brass, producing a finished cut. Brass tended to be the least happy with the previous tool due to the steep angle of the rake. I opened the placement from 12° on the old version to 15° on this one in hopes of achieving a more brass friendly tool. The first cut going toward the chuck was a 1/16 depth of cut (1/8 total cut on diameter) and went quite smoothly. The return cut going toward the tail stock produces a beautifully smooth finish cut, passing the brass tests successfully. Notice how this tool can easily cut right up next to the jaws of the chuck

diamond-toolholder2.jpg


Here, again, you can see the signature "Diamond" of the Tangential tool. The tool holder has been polished up a bit and gun blued to give it a durable and attractive finish.

diamond-toolholder3.jpg


A bit more visual detail of the Tangential tool, mounted in a quick change tool holder. This tool will be one of the tools I grab first when turning or facing. Both operations can be done without having to reposition the tool angle and both operations easily make deep cuts and produce finish cuts on most metals using the same position.

diamond-toolholder4.jpg


Here are sample cuts from the the testing I did with mild steel, 6061 aluminum and an unknown brass. The deep cuts that you see were made by taking one or two heavy cuts going toward the chuck and a single finish pass toward the tail stock.
diamond-toolholder5.jpg


that seems like a very usefull tool, i like it :)
 
Steve, Glad it came out so well. Really nice surface finishes too. Mabey one day I won't be busy and can make one myself.
Tim
 
Steve,
Nice build. I've been thinking of trying John Moran's version tool holder, as well. I was concerned about the ability of the holder to hold on to the tool bit. It seems like it would have a tendency to slide downward. Did you solve this problem with your design?

Did you use ordinary square HSS? At one time I'd seen diamond shaped HSS sold for just this purpose.
 
Ksouer
The tool bit is just your typical 1/4 square HHS, ground on an angle to produce the diamond. I had already made up a grinding jig for the bit for the first tool. The tool is actually designed to allow the bit to slip down if it happens to dig into the work piece, but the tension of the clamp is sufficient to hold it in place until that occurs. In my first attempt, the bit was held by a simple screw and washer clamping device that worked fairly well, but tended to get in the way of facing operations if I cut too deep. As time went by, this simple clamp began to getin the way. It finally failed, bending the retainer on the front of the tool, making bit slippage a constant problem.

This new one uses a longer bit exposure which makes for better clearances and the little clamp is also much more substantial. It took a bit of fine tuning to get the clamp locking the bit properly, but once the right combination of clearances was achieved, it all worked as planned.

Tim
Next time I'm over for a visit , I'll have to let you try this one on your lathe. It's a pretty slick little trick.

Steve
 
A little more complicated than required
3Final-version.jpg

but a good job.
some other stuff on the subject at my page including a threading version.which did
work but wouldnt get close to a shoulder.
...lew...
 
Lew
Agreed, but the idea was to give the swivel base on the vise a chance to prove it was a keeper, as much as for being a tool build...(grin). The Bay-com tool had intrigued me for some time, so I decided to work closely to their design in order to play with the complex angle cuts. Half the fun was in deciphering the compound angles and getting them right.

New vise..... $120.00
Tool material $.1.00
Tool cost savings....$130.00
Coming up with my own successful variation.... priceless...LOL

Steve
 
Lew,
That's an interesting design. Nice and clean. I like it.

But I'm curious. How did you get that square inside corner at the top of the keeper?

Or is that just an illusion?
 
ksouers said:
Lew,
But I'm curious. How did you get that square inside corner at the top of the keeper?
Or is that just an illusion?
It's an illusion. The cut is angled so it runs out at the top . "peice of cake" to make.
And it realy did quite well both facing and turning.
...lew...
 
Kvom...
The first thing you'll find when you begin researching this tool is a claim of almost outrageous ability to make deep rough turning cuts in most materials. The second is the claim that without any making any change to the tool position, you can make a return cut that produces a finish grade surface. To top those claims, the writers also claim that , again, without making any changes to the tool position, one can make a finish grade facing cut. I was more than a little dubious that one tool could do the things being claimed, so I decided to find out for myself.

The first thing I learned was the tool is somewhat of a mystery in and of itself. References to Diamond tools can be found in a number of very old machinist resources, but few ever show one. The same anecdotal claims usually accompany these references but for some reason the tool faded away without ever really coming into heavy popular use. One member on this board says he used one many years ago but they fell out of use as carbide insert tools came on the scene. I can't dispute this theory,but whatever the facts, the tool became an obscure footnote for all intents and purposes.

Bay- Com and one other company resurrected the tool and offers them for sale at rather high prices.

A bit of research turned up a couple of web sites and a Yahoo group where build information could be found. I built one and after one pass on the lathe, knew that this tool was something special. You can take a deep roughing cut going left and a finish cut going right. Stop at the end of the work piece and it will cut a facing cut as slick as glass without ever readjusting the tool angle. The long and short of it... the tool performed up to the anecdotal claims.

I'm amazed that it ever managed to slip into obscurity, especially after having used mine. That is why I built this replacement tool. When you're running a 7x14 lathe, you grab any advantage you can get....(grin)

The Tangential Tool cuts with the very tip of the nearly vertical cutting tool. The forces are transfered downward rather than acting as a lever the way they do with normal tool mounting. This acts to reduce chatter and allows for better depths of cut. The stability of the cutter and the near flat angle of attack that moving to the right lets it produce an amazingly smooth cut, erasing the ragged surface the rough cut made with its high attack angle, going left.

Hoping I didn't muddy the waters.


Steve
 
I misinformed you on that Steve, I didn't actually use one, I was working with an instructor on my apprenticeship in the RAF, mid 60's, and he was using one.

There are a lot of tools like this that have dropped out of favour, all because they have found different ways to do things.

My favourite one is the crappy sketch at the bottom. These used to be commercially produced, and I was grossly outbid when one came up on eBay a while back.

All they are is a disc, with a hole in the centre (not like my sketch)and the outer edge machined to whatever angle you require for single point outside threading, very easy to make and harden. They can easily be set to the correct top rake of the material you are cutting, and to resharpen, it is just a matter of grinding across the top face of the cutout. Again these fell out of favour when preground carbide tools came onto the market.
Must make myself one, eventually.
I wouldn't recommend one for plunge thread cutting, but for the offset method, with its lower cutting forces, it would be ideal.

John

threading tool.jpg
 
We have a few of those at school but it was too difficult for the kids to set up so have switched to a form ground standard
lathe bit. Ground on a fixture to insure the 60 deg angle. With that approach the point can be ground to get closer to a
shoulder than the "circular" type. With a surface grinder and the fixture it's not a problem to re-sharpen the bits.
They are intresting though.
...lew...
 
Did you make a fixture to grind the tool bit or ground "by eye" ?
 
Bmyers
I already had the grinding fixture that was made with my first tool. It holds the cutter at a fixed angle to allow easy grinding to a 30° angle. I'll take a few more photos tomorrow, showing the fixture and the disassembled tool for those who would like a peek inside.

I tried "eyeball" grinding the bit, but the results varied wildly. The fixture is pretty much a must have, to get things right.

Boggler...
Sorry... I looked back at your message and I indeed misread your statement. I must have assumed that at your advanced age it was highly possible you'd been around when they were still in vogue....(innocent grin). My bad...LOL

Steve
 
Cedge said:
...
A bit of research turned up a couple of web sites and a Yahoo group where build information could be found....

Hey Steve... You got those links?

Eric
 
Eric
The few that I've found are shown below:

Commercial Offerings:
Bay-Com

Eccentric Engineering

User Sites:
John "Gadgetbuilder" Moran

Also See Lew's photo earlier in this thread.

Yahoo Group: 7x12 Mini-Lathe (Photos section) ***reguires joing the group***
http://ph.groups.yahoo.com/group/7x12minilathe/photos/browse/b00b


There might be more on Google, but these are the sources I studied. Lew's comments about mine being overly complex are quite valid. Had I not wanted to experiment, the tool could have been much simplified, as these resources will show.

Steve
 
Very cool. Thanks Steve. This just got added to my 'short' list. Right after my QCTP and my chuck adapter for my RT.

Eric
 
Here is the internal view I promised.

Steve

diamond-toolholdera.jpg
 
I finished building a diamond tool holder similar to the design Lew posted on his web sight. It works fairly well, I get a better finish on facing than turning but I will work that out. The one problem I seem to be having is breaking off the tip of the bit. I am grinding to a 30° angle across the face of the diamond. Any suggestions ?

DSCN1571.jpg
 

Latest posts

Back
Top