


mklotz
Well-Known Member
More random odds and ends from my shop. I hope they provide some inspiration for someone.
Every shop probably has baby food jars (or the equivalent) full of small parts. You have to dump it out to find what you want. Then you need to put it all back in the jar.
It's easy to build a sorting tray from wood scraps.

Dump the jar in the tray, find what you want, then tilt the tray to funnel everything back into the container.
After making this, of course, HF started selling them...

This is an old boat modeler's trick. If you want to trace the outline of an irregular 3D object onto a two dimensional surface (e.g., making tool cutouts in a drawer liner), this is the tool of choice...


It's just a block of wood with a hole drilled through at an angle. The hole admits a pencil and holds it so its point is beneath the apex of the angle cut into the wood. In use, the apex is slid along the object being traced and its outline is projected onto the paper.

At the top is a gage I made for checking wood chisel angles. It has angle "pockets" of 15,20,25 and 30 degrees. Made of aluminum to avoid dulling the freshly sharpened chisel edge, it's used by sliding the chisel tip into the appropriate slot and holding it up to the light to check the angle.
Below are two chunks of key stock with common angles cut on the end - 15,30,45 and 60 degrees. Handy for checking tools like dovetail cutters, etc.. They don't replace a protractor but they're easier to use in many cases.
If you make small models, here's a tool that you'll love. It's called an insert vise and, as you can see, is quite tiny. I find it easier to mount small parts in this on my bench and then plop the whole thing into the milling vise. It's also handy to hold a part in the 4jaw on the lathe.


A tiny hand puller I made to use when repairing dial indicators and the like...

Commercial tap guides like the one shown at the top are pricey but it's easy to make your own. Mine has an adjustable height sleeve, windows for observing the tap and a V-groove for working on round stock. Sleeves can be made for other size tap wrenches.


Although I do it, I don't like to use the edge of my calipers for marking out. When I do a lot of it (which I don't much now), I use this. The sliding bar can be set to length with the calipers and locked with the thrumbscrew. Then the end of the bar is used to guide the scribe to make the mark.

Detail of the clamping mechanism...

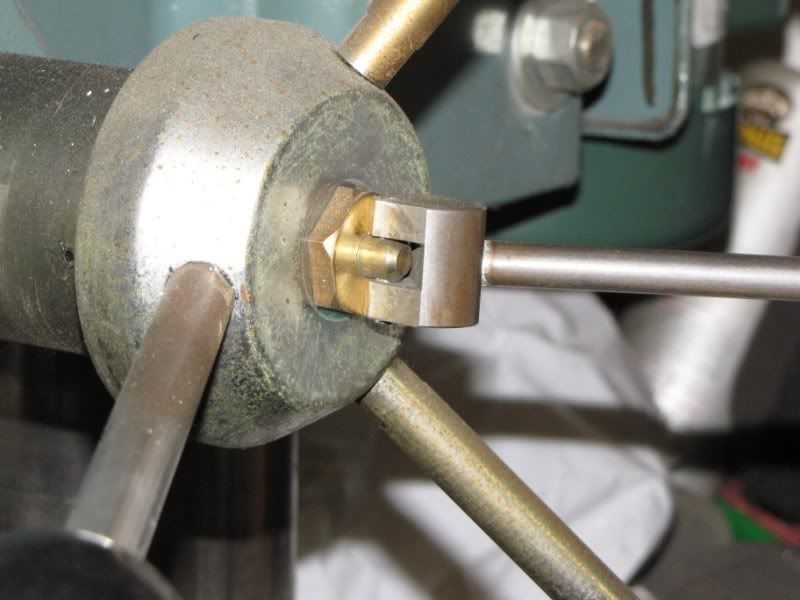
Now that you've all built those ball cutters, here's something useful to make with them.

It's a wiggler used to align work in the 4jaw. The steel holder is held in the toolholder and the brass ball seats in the conical hole in the holder. The short end of the rod goes in the mark to be centered. As you rotate the chuck (by hand) the other end of the rod traces out a magnified circle around the tailstock center. When that circle reduces to zero diameter, you've got your part centered. Too fiddly for me - I use a pump center as described in a recent thread.
And, finally, my mill/drill had a slippery plastic knob one tightened to engage the fine downfeed. PIA, especially with oily hands. I replaced it with a toggle clamp with a nice long handle. Next to the DIs on all three axes, the best improvement to that tool I've made.
Every shop probably has baby food jars (or the equivalent) full of small parts. You have to dump it out to find what you want. Then you need to put it all back in the jar.
It's easy to build a sorting tray from wood scraps.
Dump the jar in the tray, find what you want, then tilt the tray to funnel everything back into the container.
After making this, of course, HF started selling them...
This is an old boat modeler's trick. If you want to trace the outline of an irregular 3D object onto a two dimensional surface (e.g., making tool cutouts in a drawer liner), this is the tool of choice...
It's just a block of wood with a hole drilled through at an angle. The hole admits a pencil and holds it so its point is beneath the apex of the angle cut into the wood. In use, the apex is slid along the object being traced and its outline is projected onto the paper.
At the top is a gage I made for checking wood chisel angles. It has angle "pockets" of 15,20,25 and 30 degrees. Made of aluminum to avoid dulling the freshly sharpened chisel edge, it's used by sliding the chisel tip into the appropriate slot and holding it up to the light to check the angle.
Below are two chunks of key stock with common angles cut on the end - 15,30,45 and 60 degrees. Handy for checking tools like dovetail cutters, etc.. They don't replace a protractor but they're easier to use in many cases.
If you make small models, here's a tool that you'll love. It's called an insert vise and, as you can see, is quite tiny. I find it easier to mount small parts in this on my bench and then plop the whole thing into the milling vise. It's also handy to hold a part in the 4jaw on the lathe.
A tiny hand puller I made to use when repairing dial indicators and the like...
Commercial tap guides like the one shown at the top are pricey but it's easy to make your own. Mine has an adjustable height sleeve, windows for observing the tap and a V-groove for working on round stock. Sleeves can be made for other size tap wrenches.
Although I do it, I don't like to use the edge of my calipers for marking out. When I do a lot of it (which I don't much now), I use this. The sliding bar can be set to length with the calipers and locked with the thrumbscrew. Then the end of the bar is used to guide the scribe to make the mark.
Detail of the clamping mechanism...
Now that you've all built those ball cutters, here's something useful to make with them.
It's a wiggler used to align work in the 4jaw. The steel holder is held in the toolholder and the brass ball seats in the conical hole in the holder. The short end of the rod goes in the mark to be centered. As you rotate the chuck (by hand) the other end of the rod traces out a magnified circle around the tailstock center. When that circle reduces to zero diameter, you've got your part centered. Too fiddly for me - I use a pump center as described in a recent thread.
And, finally, my mill/drill had a slippery plastic knob one tightened to engage the fine downfeed. PIA, especially with oily hands. I replaced it with a toggle clamp with a nice long handle. Next to the DIs on all three axes, the best improvement to that tool I've made.
")

