Model Sawmill Dreaming---

Home Model Engine Machinist Forum

Help Support Home Model Engine Machinist Forum:

This site may earn a commission from merchant affiliate links, including eBay, Amazon, and others.
As my friend Shania once said, "This don't impress me much!!! When you get down to the scale I'm working at, there are a very limited number of ways to hold onto a 1" diameter log and still have enough log left to saw. I am going to try this, knowing that it may work just fine, then again, it may not work worth a poop. Its not costing money anyways, just a bit of time. I haven't got much done this past week, because of the stomach flue from Hell and a couple of days of real work, however, we will forge on boldly.---By the way, I made a mistake in the previous post. Those "pins" that hold the log in place will be 1/16" diameter, not 1/32" as originally posted.
LOGGUIDE.jpg
 
So this morning, I took my chainsaw and went down to the long swamp and cut down a "Barkless Beech". They only grow around Barrie. I skidded it up out of the swamp with my team of trained field mice until I could hook onto it with the winch cable of my Steam Donkey, and winched it up to the mill. I didn't have any 3/16" aluminum plate to make the log holder from, but I did have a nice chunk of brass left over from another job. Everything fits quite well, and the log seems to be quite solid in its holder.
LOGONCARRIAGE002.jpg

LOGONCARRIAGE003.jpg
 
Last edited:
Looking very good, can't wait to see the sawdust fly!

A bit off topic, but I've looked at this thread so often, Google has started serving me ads for portable sawmills from just $3997...
 
Since I seem to be going the "Whole Mile" in terms of posting engineering drawings for this project, I thought I might as well post up the ratchet wheel and its handle. This morning I did a "final fitment" on all the components and then took the carriage off, cleaned it up and sanded it, and applied a coat of stain. It looks quite fancy!!
RATCHETWHEEL.jpg

HANDLEFORRATCHETWHEEL.jpg
 
Hi Brian

Almost finished now, Can't wait to see the sawdust.

You must have needed a 3 mouse team to haul that monster log up, and I might know what your next project could be, miniature chainsaw to match. You've gotta keep the sawmill "fed" (and your "shire mice").:)

Regards Mark
 
Are you taking orders for tiny lumber?
I could use some.

Very nice, you did a great job!
 
I'm down to the point where I have only 2 small parts left to make. Since I don't have unlimited room to stop the carriage by lifting the pawl away from the ratchet wheel at the end of a cut, I decided something automatic would be best. The blue bent rod is silver soldered to the pawl. The purple block is screwed to the side of the carriage frame. When the carriage has reached the point at which the log is fully sawed through, the purple block will lift the pawl away from the ratchet wheel and the carriage won't feed any farther.
PAWLLIFTER_zps02fab8d9.jpg
 
By the end of today we will be ready to rock and roll!!! Of course this means that I either have to A--Use my variable speed drill as a power unit, or B-Try and figure out just why my Atkinson engine quit right in the middle of a video the last time I used it.
FINISHEDSAWMILL-1001_zpsffd099e2.jpg

PAWLLIFTERBRKT_zps1edce6c1.jpg
 
Wow Brian, that is a spectacular piece of workmanship
& model engineering. I love the simplicity of all the mechanisms.
I really hope you get the Atkinson running, that will be one COOL
little video.

Just awesome...

John
 
Well kids, its done like dinner!!! Today I added on an automatic pawl disengaging mechanism to stop the carriage after the log has passed completely thru the saw, and made up some knurled head pins to hold the log in the log holder and to position the log holder on the carriage for cutting succesive board thicknesses. In this view the carriage has fully reached its end of travel, and the pawl disengagement mechanism has stopped the carriage. The next post SHOULD be a video of the mill in operation. I have no idea right now how rapidly I can advance the carriage into the log (it is an adjustable feed), so I don't know how long the video will be.---Brian
SAWMILLALLDONE001_zps9e0c0918.jpg
 
Well, we're not quite there yet, but the results are encouraging. In the video you will hear me miss speak and say "lever" when I meant to say "trigger" when I was talking about the electric drill. I have to add a second pawl, but other than that things seem to be working the way I intended.
 
My idea of adding a second pawl worked like a charm!! The ratchet wheel doesn't back up at all now during the power feed. Only problem is, now the carriage feed is too aggresive, even on its lowest "one tooth advance" setting. The saw wants to cut, but my single 0-ring drive belt begins to slip. I will make a two groove pulley for the drill and try with twin drive belts next. I actually did see on one of the sets of plans I have looked at on youtube, that they have added a gear between the pawl and the main ratchet wheel to slow the ratchet wheel advance down by 50%.
SECONDPAWL001_zps4ee7dd5a.jpg
 
Great video Brian. The scale and speed seem perfect. Regarding the slippage, would chain and sprockets be the answer?
 
Herbiev--I'm kind of at a loss right now, not sure which direction I'm going next. The only way I can slow down the rate of carriage travel is by adding a small gear between the pawl and the 4" diameter ratchet gear which would drive the carriage at half its current rate of travel per blade stroke.---Or, as you said, a more positive drive that won't slip. Before I do anything, I'm going to try sawing a piece of 1" balsa. If that works, I'll consider the job done without making any modifications.
 
Nice work Brian. If you have access to a wood cutting bandsaw blades, a section of one might cut easier, They'd be a little thiner, hence less drag, and the larger teeth and hook angle give more room for the cuttings.

Greg
 
Awesome Job Brian,

I have been following along since the beginning and I find your design skill and problem solving is truly top notch. Thank you for sharing the drawings of all your conceived contraptions with us. I am sure they will get built many times over.

Kel
 
Thanks Guys!!! Its nice to know people have a look and take interest in the "contraptions". Of course, I like it a lot better when everything works right first time out, but Hey---We'll get there!!!---Brian
 
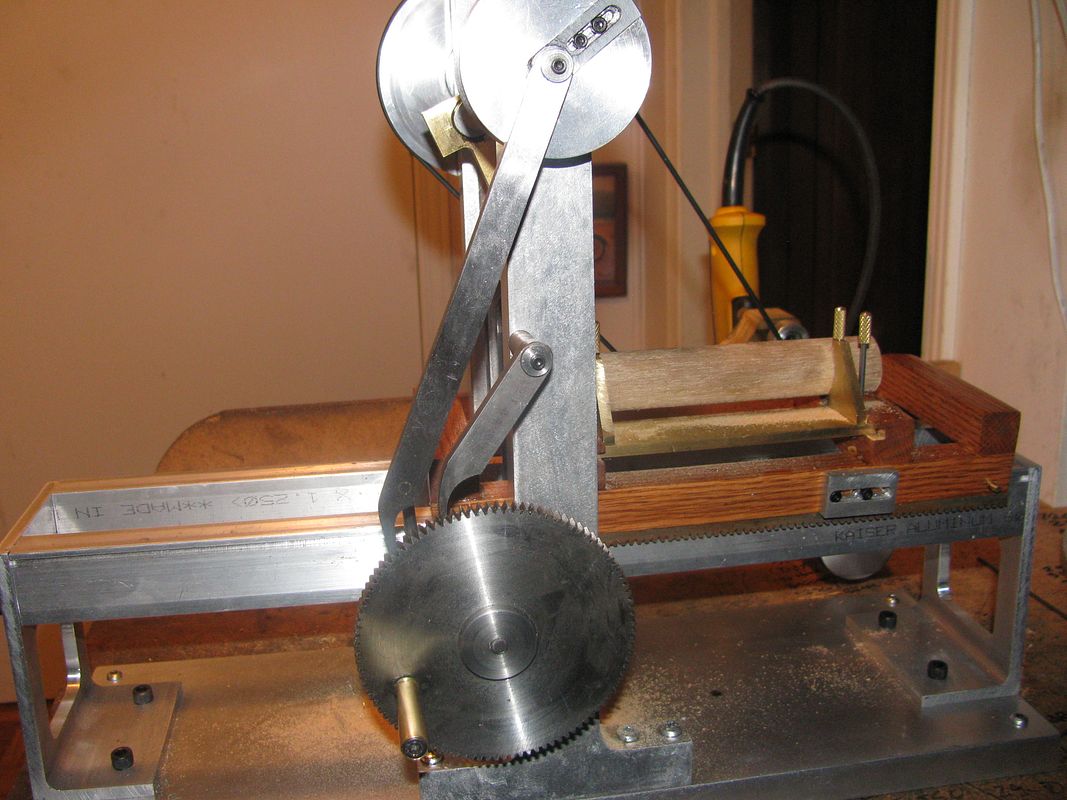
Brian, as a noob, I have been fascinated by this project of yours, and it was interesting to see it finally running.

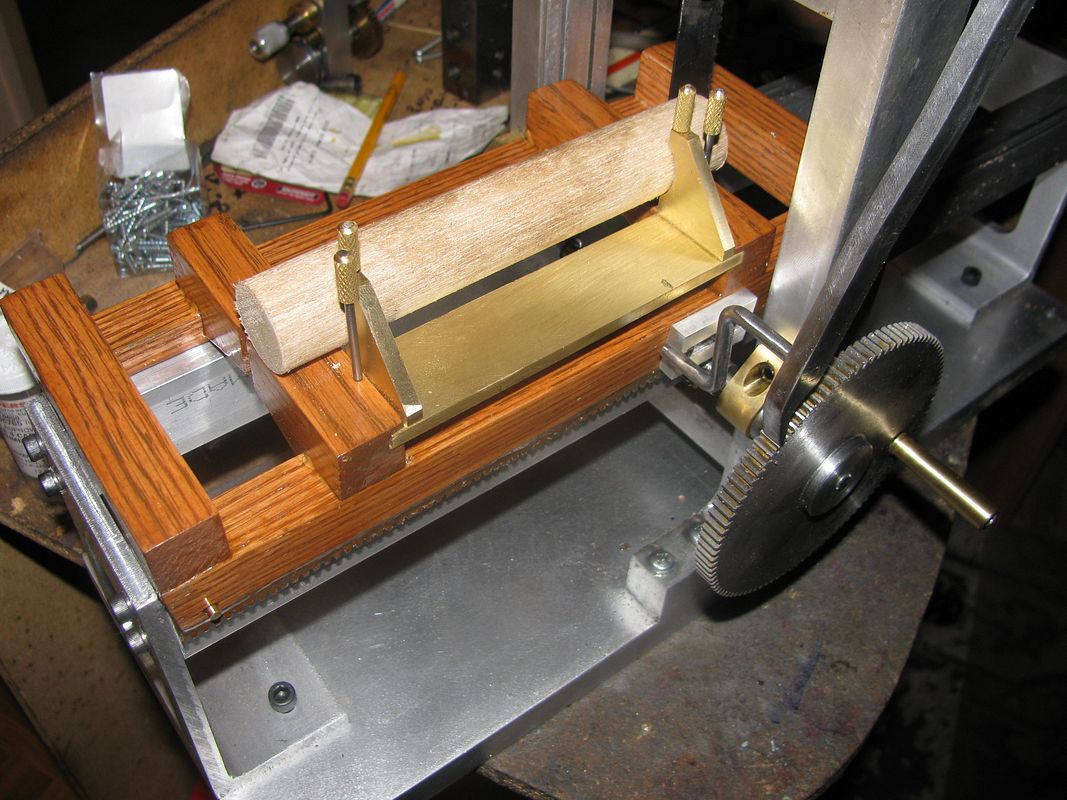
I must say I wondered how your pawl system was going to work initially and now I see you added a second smaller dog.

A similar drive existed on a uniquely Australian invention found in almost any shearing shed in the country; the Warrego woolpress which I used quite a lot in my younger days before hydraulic rams took over. You can see the drive wheel in this picture and the 1 man power lever that drove it! I think it was the only two drive pawl system I have seen and used until now.

tmevhr_13br_m.jpg


The wool press consisted of a top box and a bottom box hinged on one side so they could stand side by side and a winch pole at the back let you wind a handle to winch the top box over.

1s5ll7d_13bq_m.jpg


So you started with both boxes side by side, lined the bottom box with a hessian wool bale, fill both boxes with wool, tramped it down with your feet to warm up before the main event. Then winch the top box over, attach the steel cables to the plate at the top of the tower and grabbing the handle pump away with a nice click clack sound from the pawls (dogs we called them) until the bale was formed. As the bale got down a bit, the click clacks got slower as the operator moved up the handle from a one handed action to two handed using every last inch of the lever. If the wool presser had been overly ambitious, he'd be calling on a mate to get the last few clicks down! Once down, you drive some pins through to hold the wool down and then fasten the bale with sharp hooked wire bale fasteners before removing the pins and opening the front door to let the freshly formed bale spring out. Maximum weight was 450 lb and there were handling penalties applied to overweight bales when they got to market.

I figured I was pretty safe showing you this without giving you an idea for a new model because it lacked an engine to drive it :)
 
Back
Top