Making a QCTP (Quick change tool post)

Home Model Engine Machinist Forum

Help Support Home Model Engine Machinist Forum:

This site may earn a commission from merchant affiliate links, including eBay, Amazon, and others.
Phil,

This is going to be one very nice QCTP. :bow: :bow:

Best Regards
Bob
Thanks Bob,
That's quite a complement coming from a man as skilled as yourself.
Best Regards
Phil
 
Nipped out to the shed for half an hour while mum and baby are asleep.
Tapped the two holes in the leaver base and shortened a bit of rod that was already threaded with M8 on the end. I changed the specs for the leaver from 5mm to 8mm to suit the bit of rod available.

IMG_0681.jpg


IMG_0682.jpg


IMG_0683.jpg


IMG_0684.jpg


That will be all until Thursday (pay day ;D ) when I buy the 4140 2" round bar for the wedge and 3" x 1 1/2" flat bar for the tool holders (not that I would call that flat :big:).

What are your thoughts on the number of tool holder I should make? scratch.gif

I was planning on making 5. A boring bar holder, a parting off holder and 3 general tool holders. Any others anyone can think off that would be handy?
Better to make them now and cut the dovetails in one go.

Cheers
Phil
 
Very fine piece of work Phil,great looking tool :bow:
Rob

Forgot to say make lots of holders ;D
 
Phil,

You will quickly find that there is no such thing as enough tool holders
I would add to the list a small boring bar holder as I always seem to have on of my plain ones tied up with a small boring bar in it.
If funds can allow I would also add a couple more plains as it's easier to set them up now and do them all at once.

Dave
 
Cheers Rob,
The dovetails will be the defining moment, I've never done them b4. I'll give anything a go though.

Thanks for the tip Dave,
It's $45AU for the steel to make 5. Not a big ask to make a few more at the same time.

On another note. The 20mm dovetail cutter I purchased was spec'd to cut a 10mm depth of cut, but when it arrived the DoC is only 7.8mm
cutter.jpg


What do you guys think about two passes to get 10mm DoC? The shank is probably recessed enough to allow that although getting a smooth finish might be a problem.
Is it wiser to reduce the dovetail depth or do the 10mm and have a vertical flat at the top of the dovetail recess (talking about the tool post body here like below).
Dovetail.jpg

The clearance on the tool holder might be an issue but I have a plan. ( Just smile and wave boys, just smile and wave ;D wEc1 )

Here's the idea
dovetail2.jpg


The first dovetail is cut as close and deep as possible with the limited depth of cut. The second dovetail has been cleaned up by running a small end mill in on an angle.

We'll see how it goes.

Cheers
Phil

 
Hey Phil your post looks great as far as other tool holders you might make one for a knurling tool if you use one very often. Giving you my two cents worth about your plan of attack on milling the dovetail's can't see why it wouldn't work but that's just a opinion of a thirty eight year machinist but there is only one way to find out is to try it again good work Cliff.
 
Phil,
Leaving a little off the sharp corners of the dovetails would make the tool holders less vulnerable to damage from bumping into other tools, maybe truncating the corners of both the post and holders will work.
Your tool post looks like a really solid design. :bow:

You can never have too many tool holders:

IMG_0145.jpg


The two in the back for the knurling tool and the milling spindle are built into the accessory. The dovetail for the knurling tool is of aluminum since it doesn't have to relocate accurately. I also used aluminum for a test indicator holder.


Dave
 
Cliff said:
Hey Phil your post looks great as far as other tool holders you might make one for a knurling tool if you use one very often. Giving you my two cents worth about your plan of attack on milling the dovetail's can't see why it wouldn't work but that's just a opinion of a thirty eight year machinist but there is only one way to find out is to try it again good work Cliff.

Thanks Cliff,
I haven't done knurling B4, but I think I'll get some wheels and make a scissor type.

DavesWimshurst said:
You can never have too many tool holders:

IMG_0145.jpg

Hi Dave,
Now I've got a serious case of tool post envy. woohoo1

After a good nights sleep and another think, I think I will truncate the corners a bit and also reduce the dovetail depth on both the holder and body. I could always buy the next cutter size up, but that would be more waiting :'( and the cutter would be cutting on both sides in the first few passes.

The TI and knurling holders are a must do.

Thanks again guys
Phil
 
Phil,
I had recently bought an atlas shaper and was looking for an excuse to use it! :big:
Dave
 
Phil,

I agree with Dave's comments, truncating the tip is good practice anyway

Dave

Like the second image down in post #24

 
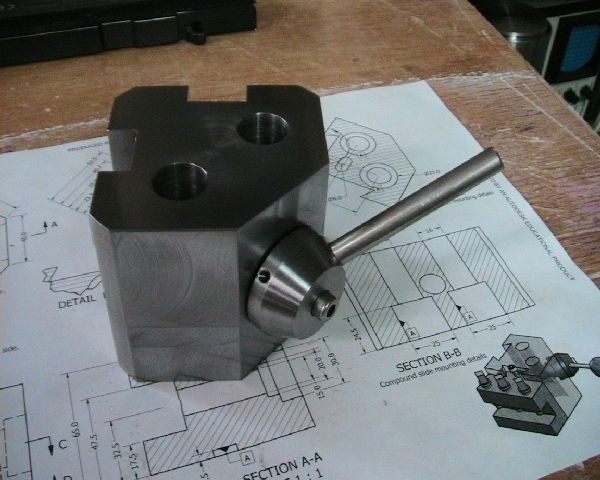
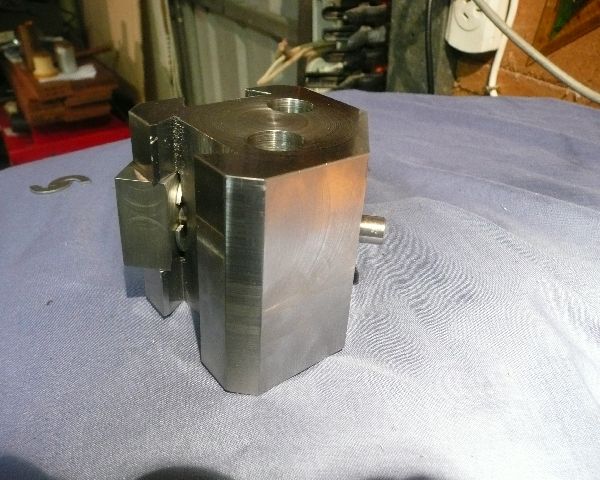
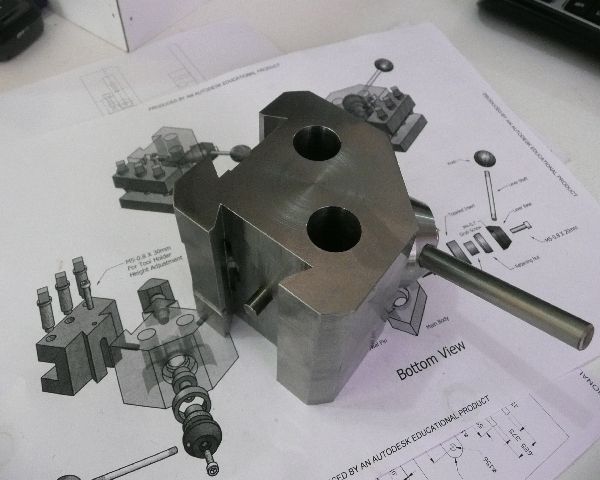
Well the QCTP body is complete. woohoo1

There were a few :Doh: moments as well as :wall: but it's done. Now it's just the tool holders to make when the metal arrives.

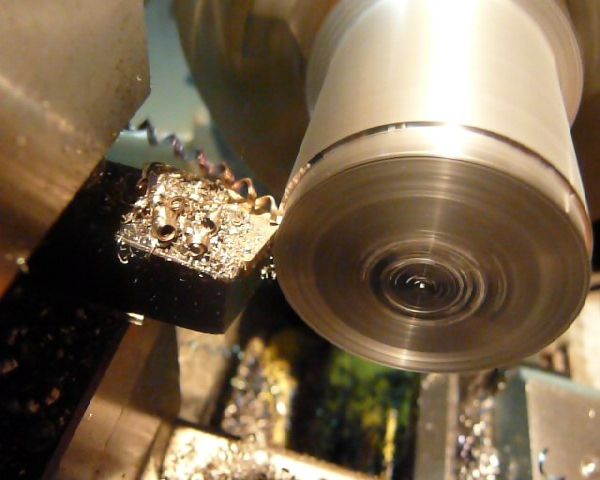
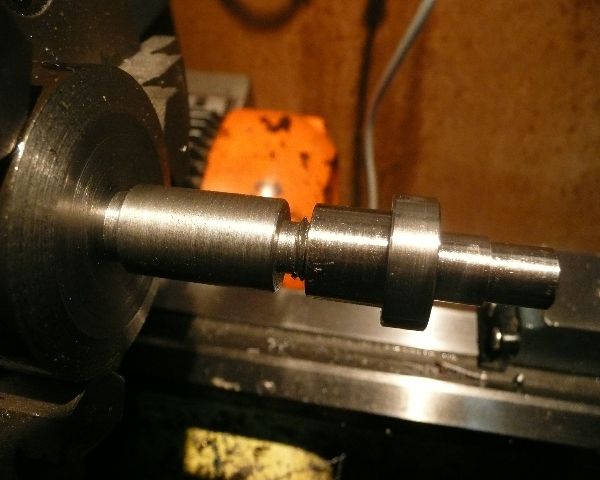
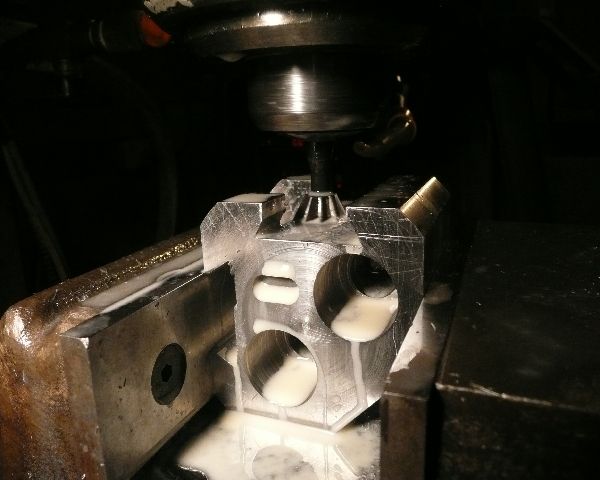
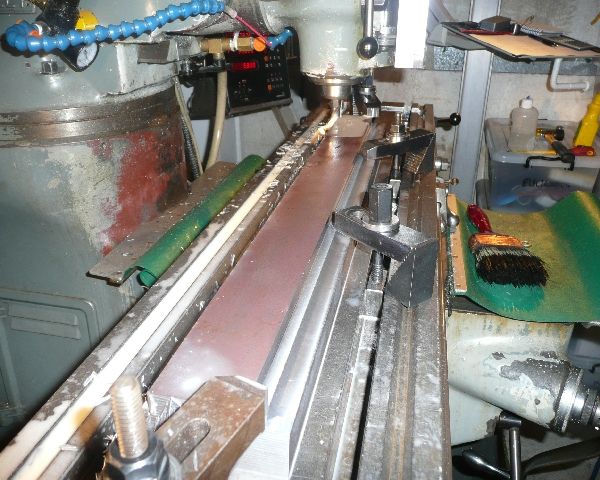
The series continues with the making of the wedge. I started with a piece of 50mm (2") 4140 round bar and started whittling. The bar needs to be at least 42mm diameter to have enough material for the wedge.

P1060003.jpg

Hot chips anyone? (fries)

P1060005.jpg

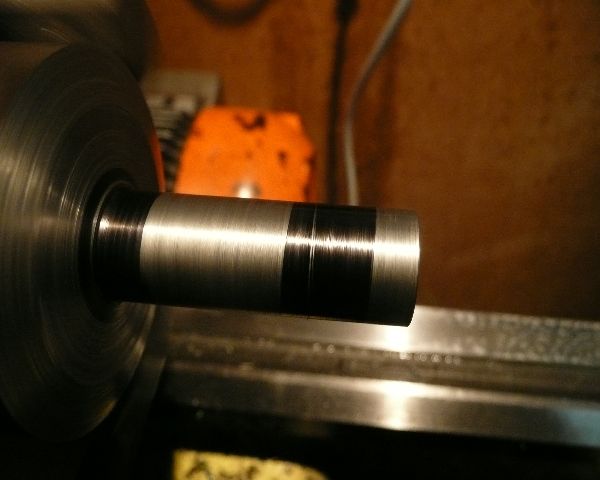
With the diameter down to 15mm and leaving me standing in a heap of swarf :big: I marked out using an art-line pen and verniers.

P1060007.jpg

P1060008.jpg

P1060009.jpg

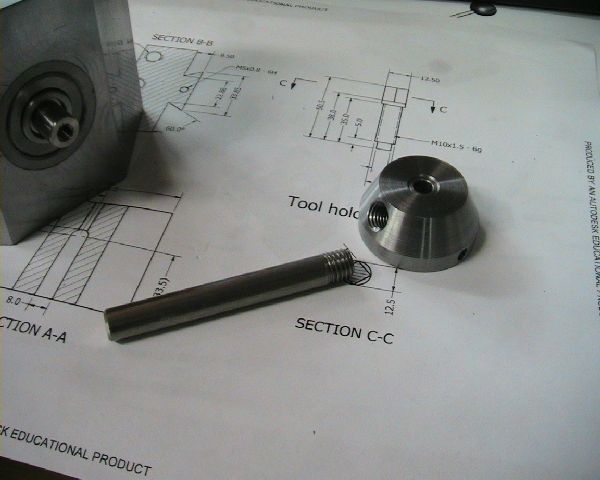
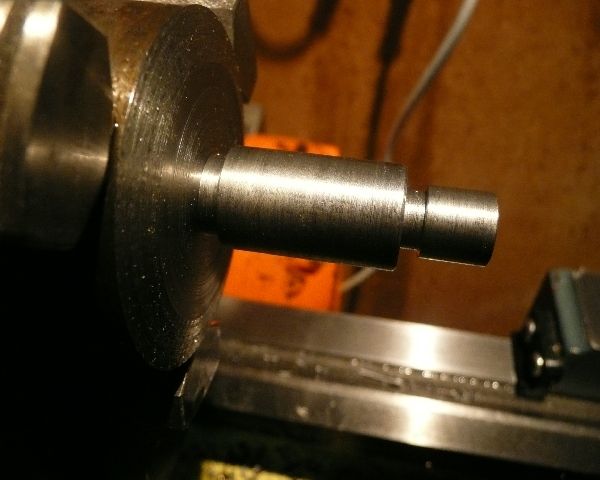
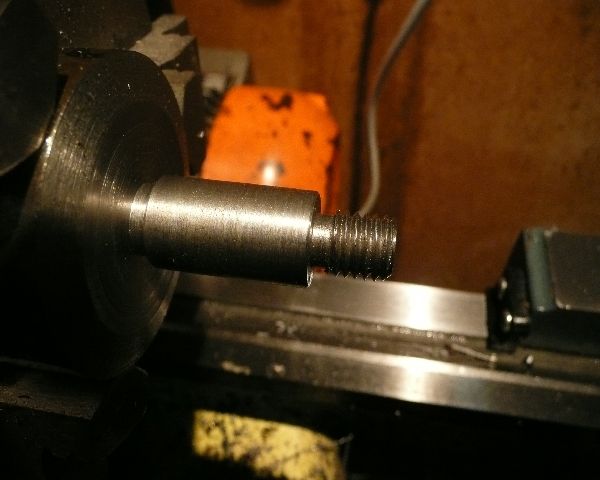
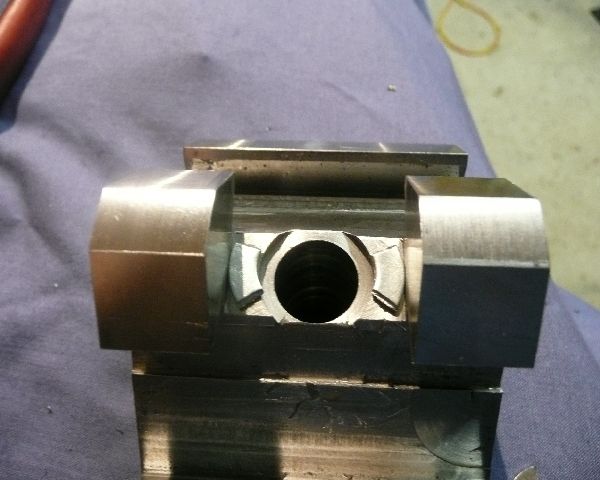
M10 x 1.5mm thread single point cut and tested for fit. (still haven't got the hang of that)

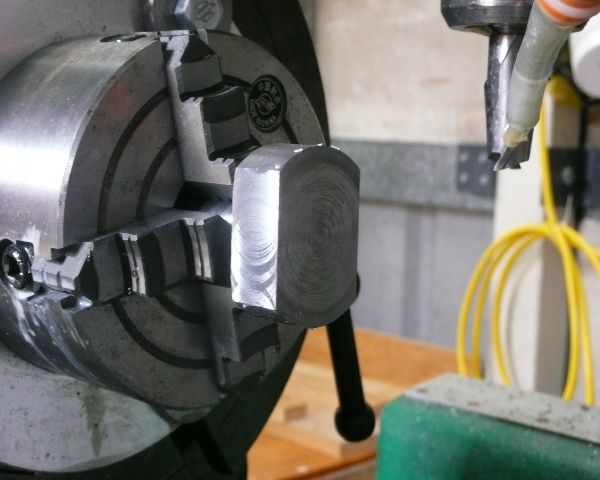
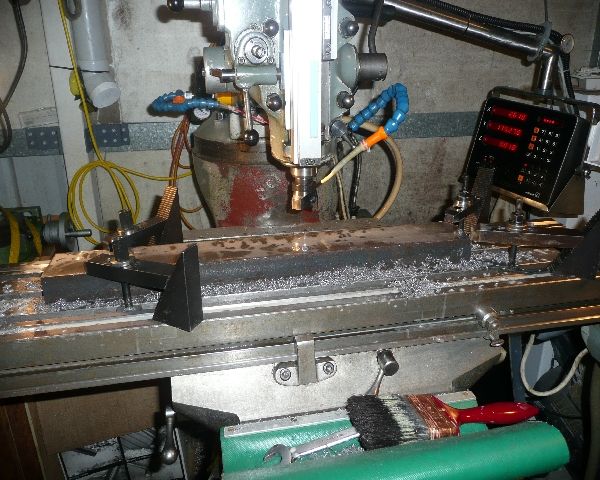
Now off to the rotary table mounted on the mill to square up the wedge end.
P1060010.jpg

P1060011.jpg


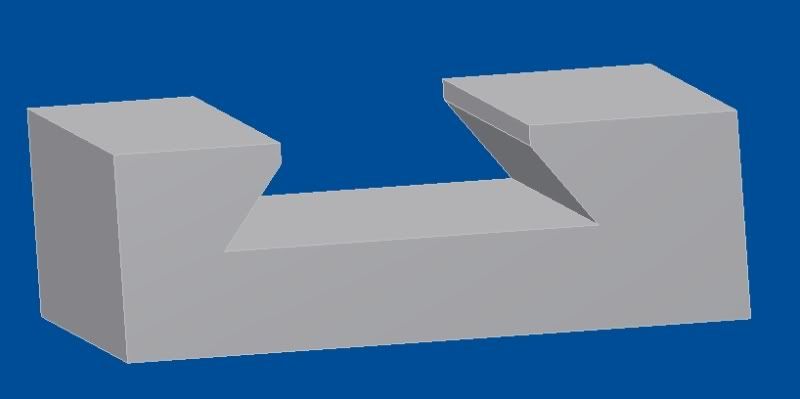
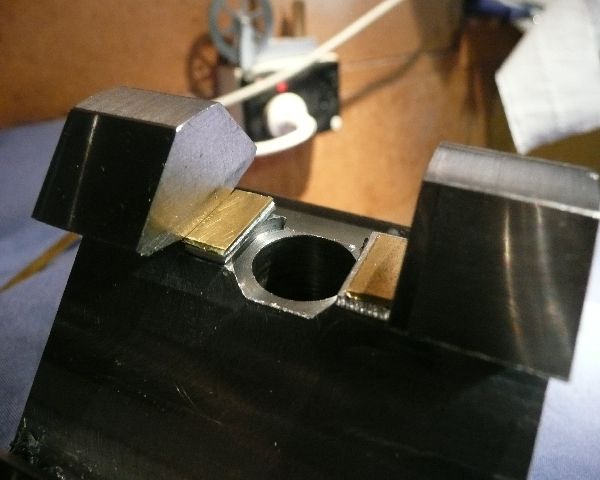
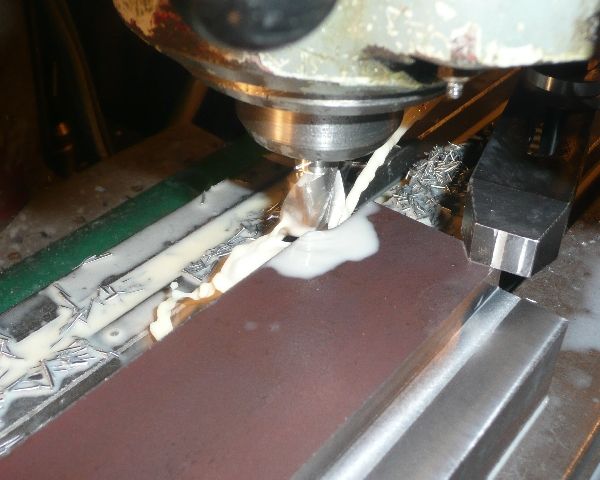
Time to cut the dovetails. I started by increasing the slot width to 26mm to allow for the chamfered ends on the top of the dove tail.
P1060012.jpg


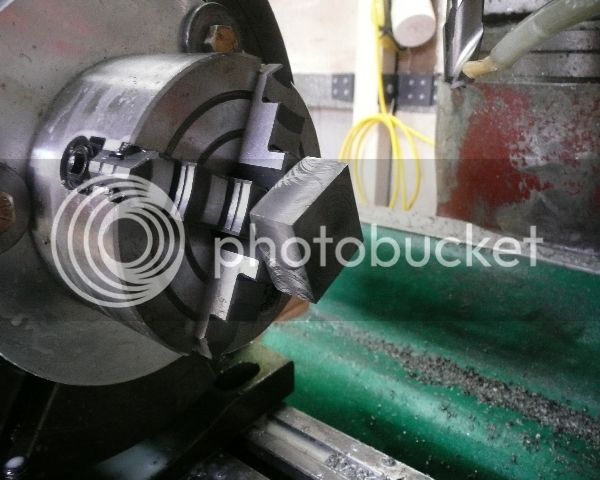
Cut the dovetail sides an equal distance for centre with the base width to 35mm using the DRO as a reference.
P1060014.jpg


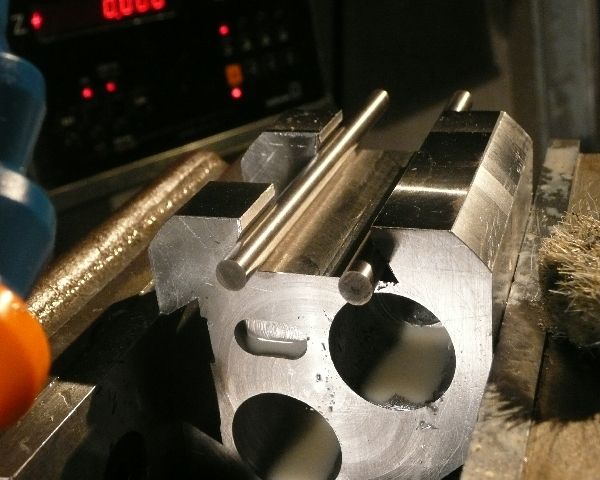
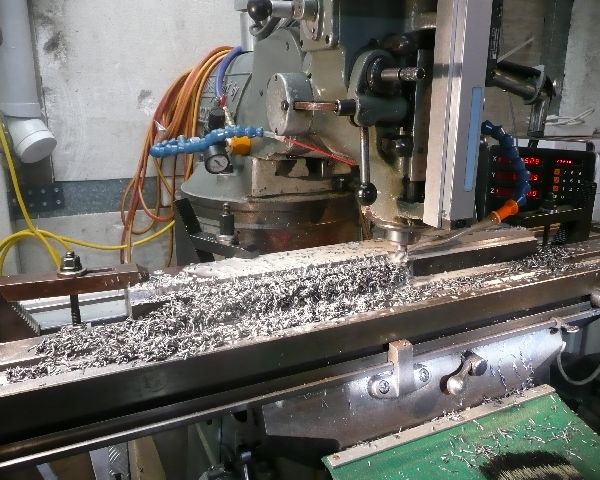
I then recorded the dovetail final dimensions using the rod method so I can match the holder dovetails to the body.
P1060015.jpg


OK now starts the section on what NOT to do. :wall:

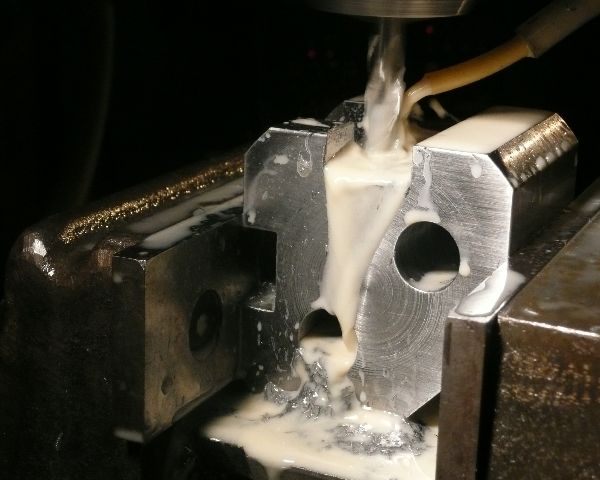
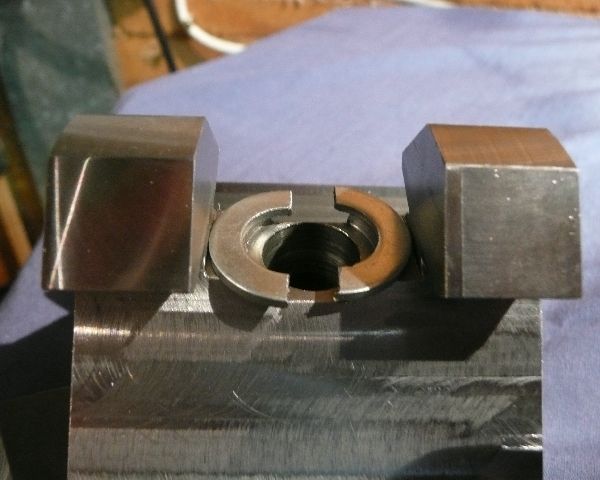
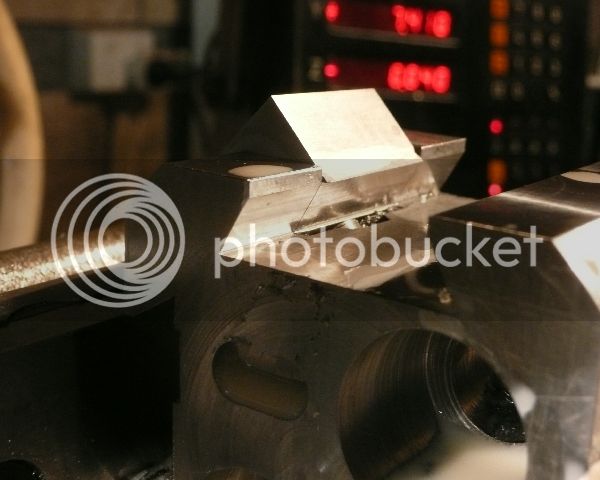
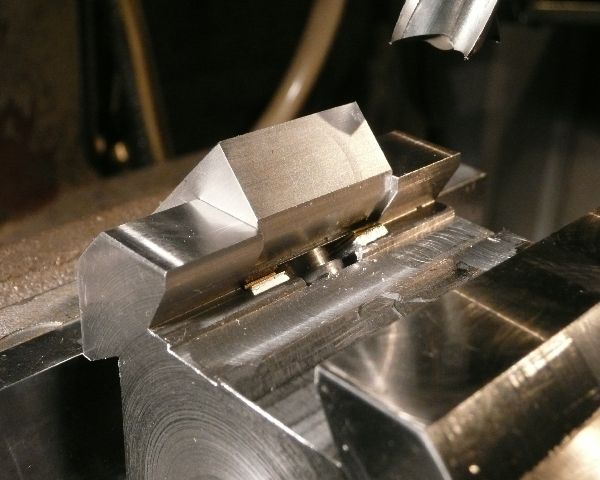
To get the right size and profile on the wedge, it needs to be spaced out a bit in the holder. I decided to use a washer as the packing but not having one with a 15mm hole I cut one in half and used that.
P1060019.jpg

P1060021.jpg

P1060022.jpg

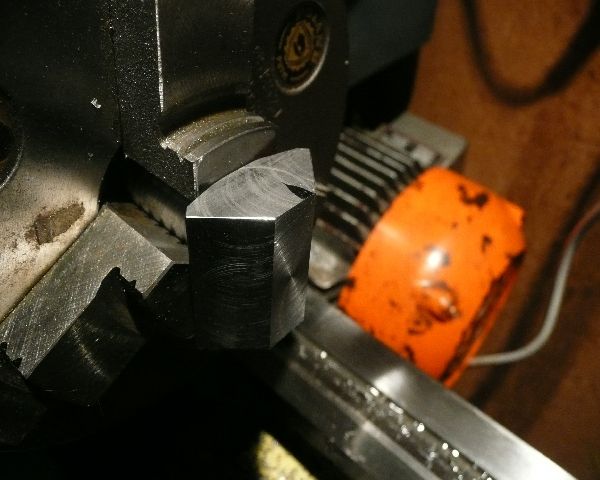
The wedge was secured in place with the centre nut (make sure it's tight)

Those with a keen eye will see the cause of the impending doom. ::)

P1060026.jpg

The reason for the pants packing moment. The overhang of the packing into the cutter path.
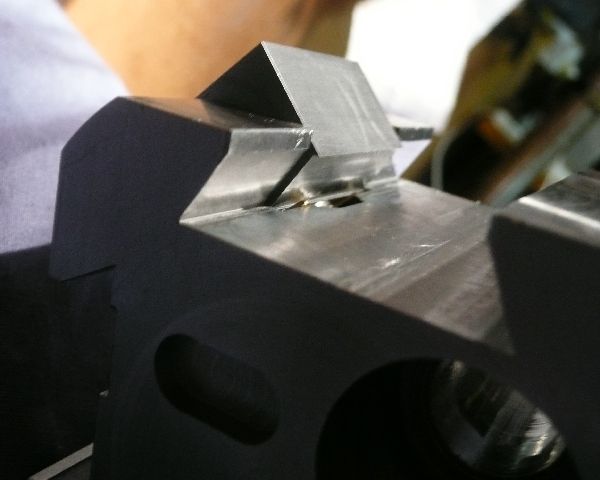
On the second pass, the washer rotated and wedged in between the body and cutter :fan:. (second pass was a climb cut
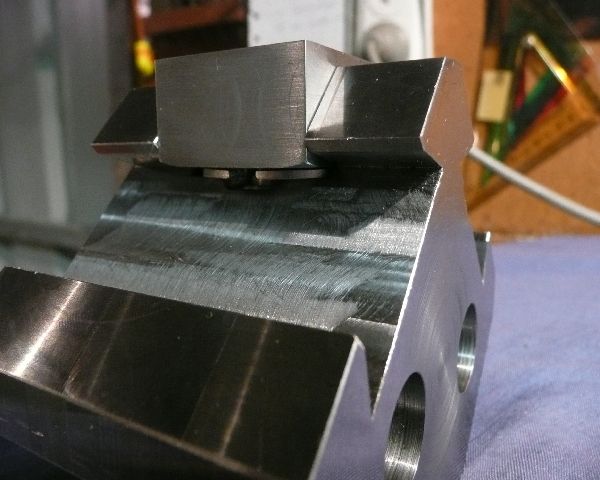
 :Doh:)
Then the drive belt slipped preventing more damage.

The remedy was to shorten the packing
P1060023.jpg

P1060027.jpg

Problem solved ;D

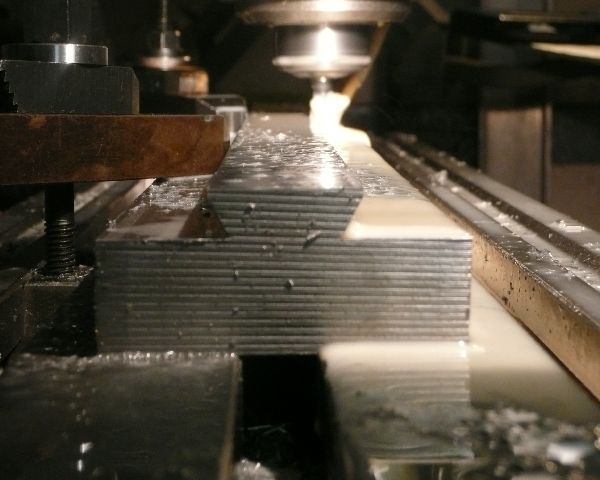
With the dovetails cut into the wedge, the packing was reduced to put the chamfer on the wedge.
(sorry, don't have a pic of the finished cut. You can see the result two images down.)
P1060030.jpg


Then the packing was increased to cut the excess metal off the wedge and follow the profile of the body.
P1060032.jpg

P1060033.jpg


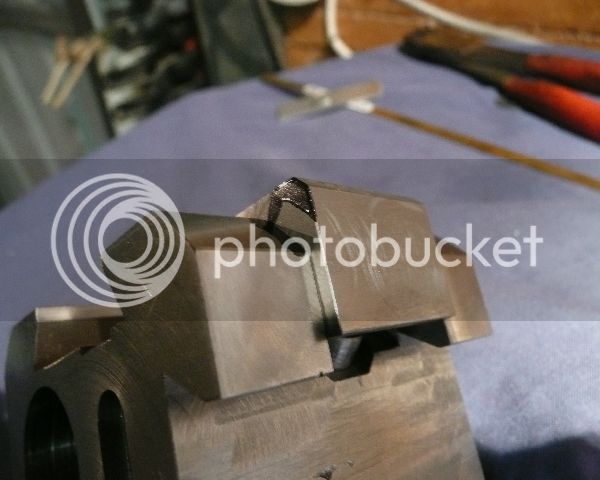
With the profile matched, I marked the nose of the wedge for the metal to be removed.
P1060034.jpg

Just marked it with an art-line pen.
P1060035.jpg


Back to the lathe
P1060036.jpg

Faced off the excess
P1060037.jpg


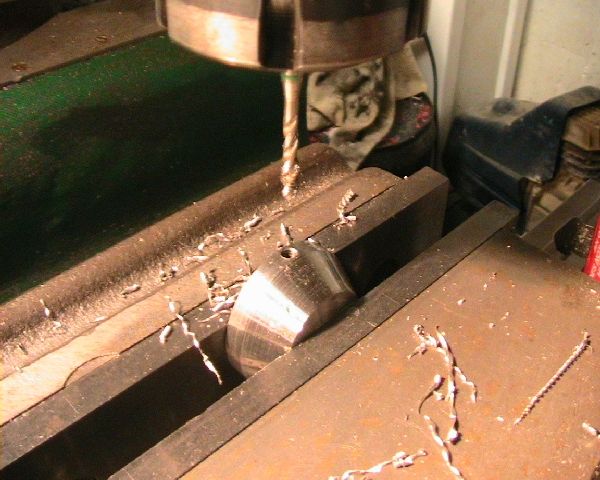
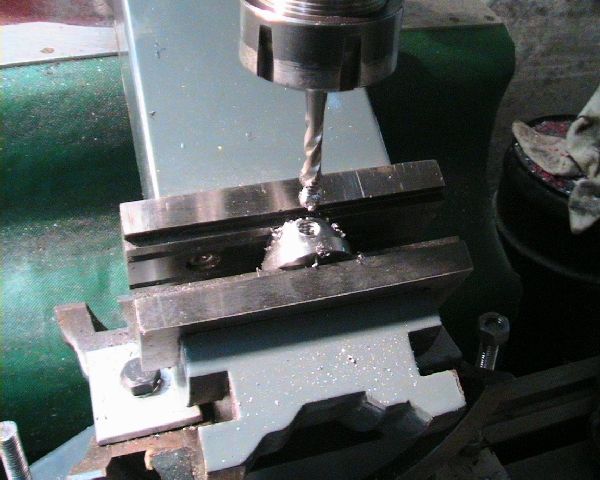
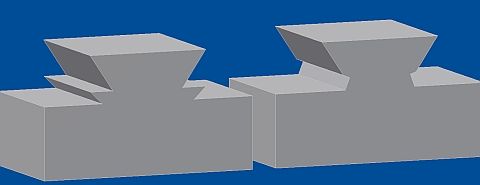
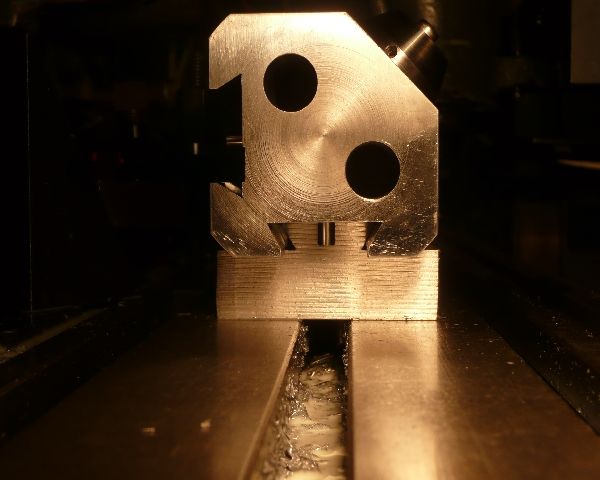
The last operation was to drill the peg holes and insert some 15mm long 6mm pegs for the tool holder height setting.
P1060043.jpg


Note that the wedge is smaller then the body. When unlocked (extended position) the wedge side must not protrude past the body sides or the holder won't slip on to the body. The wedge dovetail is also recessed in from the body dovetail for the same reason. That was the reason for all the packing sizes used.
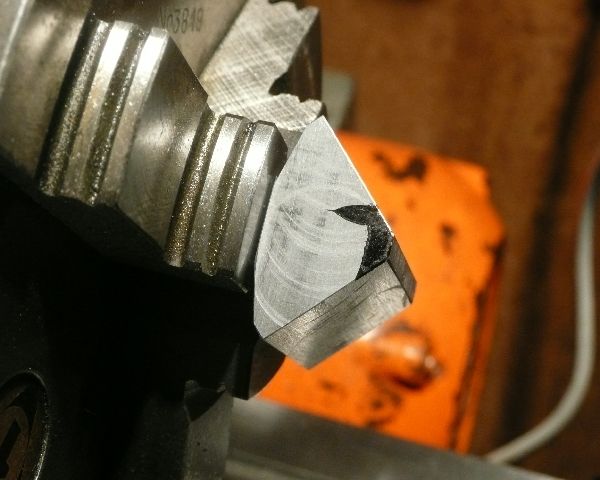
Another :Doh: moment was when an end mill extended in the holder and I didn't notice until I had finished one pass and the coolant had cleared :Doh:. The cause was that after starting a cut, I backed out using the high speed traverse. The tool gripped on the way out. There was no damage to the tool or work piece but I didn't notice the tool extension :wall:
You might see it in the bottom of one of the dovetails.

Oh well, That's it until next week.
Cheers
Phil


Off now to the Perth metal workers meeting. see ya
http://www.homemodelenginemachinist.com/index.php?topic=4831.0
 
Yup , looks very familiar! Nice Work Phil!

:bow:

Dave
 
steamer said:
Yup , looks very familiar! Nice Work Phil!

:bow:

Dave

Thanks Dave,

Certainly learnt a bit about 4140 and work holding on this one.
Thanks again for the tip on machining the wedge in situation, it worked really well and was easy to visualise the cuts needed.

Cheers
Phil
 
Your welcome...anytime

I did mine basically that way, but I did all the machining with the shim in,,,,both dovetails and the corner bit of it in two setups....then pulled the shim.

4100 series steel is a bear to machine. But I too made my wedge from it and with all the abuse it takes at the thread, you'll be glad you did. Now ...fun with tool holders!

I think I stated before, cut the dovetail first in a long strip of stock, then part them off.....I cut them individually :Doh:, but that was a LOT of work, and far from the most efficient way to go about it

Then machine the height adjusting screw holes and slots.....don't forget the pins on the post!

At this point, Again, I would press the tool post into service here as a holding fixture for the now individual tool holders while you machine the tool slots and clamp screws. I can't think of a more rigid or repeatable setup....and of course hindsight is 20/20 right.... ::) I didn't do it this way, but I should have! :Doh:

Put a knee on the mill and bolt the post to it horizontally and have at it. It should all go pretty fast.

Pictures please! ;D


Dave

 
I'm back at last, ;D
The 75 x 38 x 600 mm flat bar arrived tonight woohoo1 so I made a start. Not much but a start none the less.

The 4140 flat bar is not so flat after all.
It was slightly concave down the centre of its length and had a small twist from end to end.
Not worries, I clamped it down to the mill table by the corners and ran a 50mm face mill over it. when I got to the clamps I just moved them in a bit so the cutter could get to the corners as well.

The 600mm bar clamped to the mill. The right end has the corners yet to be faced and the left end is done
P1060055.jpg

Flipped it over and it sits on the table nice and flat.

Next on the agenda is to mill the dovetails

steamer said:
I would press the tool post into service here as a holding fixture for the now individual tool holders while you machine the tool slots and clamp screws.
Dave

Great advice Dave, WILCO

Cheers
Phil
 
G'day all,
Got a full day in the shop and stuff all to show for it. Don't get me wrong, It was a good day with no problems just slow progress.

Today I got into milling the flat bar down to the width of the dovetails, A total of 20mm off each side 9mm deep.
I used a 20mm HSS two flute cutter, (just what I had to hand) and with the help of Marv's feed and speed programs came up with the figures.
RPM 150
Feed 15mm/min
Well even with a 25% depth of cut (5mm) it's still 4 passes at 40 minutes a pass, plus a finish pass. :wall:

There is still more of the same to come tomorrow. :wall: :wall:

And now for the progress pics.

Pass #3 , how do the pack that much swarf in to the bar in the first place. Must be done the same way the get the smoke into the electronic components. :big: :big:
P1060063.jpg


First side done, starting on the second. few! I would hate to do this without a power feed. Rof}
P1060066.jpg


A 5mm doc and 9mm deep, just doesn't seem to worry the old girl.
P1060067.jpg


Cheers
Phil
 
good lord man, your building a whole heap of holders! :big: and a bunch of chips too!

Keep at it...I wish my mill table was that long, I can only cut 16"

Dave
 
woohoo1 Finished the dovetail on the tool holder blank. I must say I'm glad to see the end of that.

The 20mm HSS cutters would only last 4 - 5mm passes before they were too dull to keep using, that meant a trip to the tool and cutter grinder at work.
2.4 meters of cut between each resharpen.
I think I've actually learnt how to use the grinder now. ;D

Here is the last cut in progress.
The markings on the end are from the steel suppliers band-saw. The piece is 75mm (3") wide, that must be one heck of a big saw.
P1070006.jpg


Before I tore down the set-up, I measured the dovetail with some 1/4" HSS tool rods and then did a test fit.
All OK, even though I had made the dovetails a little under size. ;D
P1070007.jpg


When I installed it on the lathe, I discovered an issue. :Doh:
P1070009.jpg


I must have misread the drawing because the tool holder seems a tad too tall.
Maybe the dimension was 60mm high not 600mm. stickpoke Rof}


Just joking, I'll take the blank to work tomorrow and cut it up on the cut-off saw into 11 tool holders of 55mm height.
Then it's time to finish them off.

Night all,
Phil
 
Back
Top