Making a Boiler for a 3 1/2" Gauge Locomotive

Home Model Engine Machinist Forum

Help Support Home Model Engine Machinist Forum:

This site may earn a commission from merchant affiliate links, including eBay, Amazon, and others.
LBSC did not use bushes on his/her boilers they where just screwed into the copper and soft solder run round to seal, as we now have to use bushes problems occur.

he/she did not lag the boilers at all , which causes problems with the smoke box dia , no room for lagging , I have mentioned before that the Doris drawings are also flawed with the longitudinal stays lower than the fire box crown.


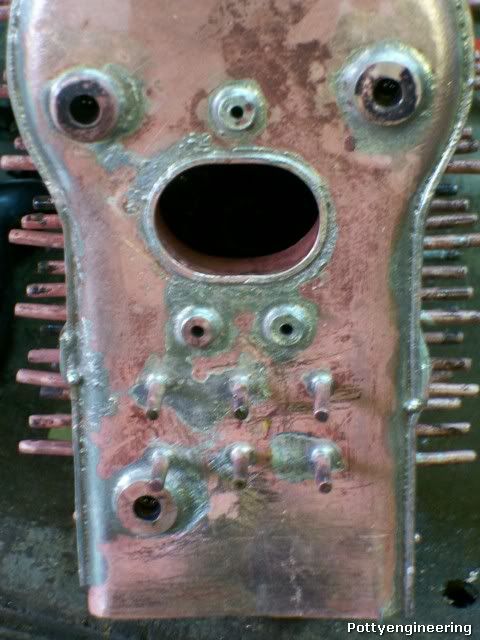
If you are doing another back head plate lower the clacks below the fire box door and you will gain more room


as to Martin Evans he was no better than LBSC his drawings are full on errors parts that foul ect , the fitting he as quoted will be his standard ones


As a side note I wonder how many of the designs were actually built by the designers given the amount that they produced and the length of time it takes to complete the builds, I believe that they only built the mock up for the "new" bits for each one
I quote from one source " this part may be tricky to machine " read impossible

The nearest boiler part that had me stumped for a while was on Didcot ( 14xx) a 1 inch long bush with a 3/16 hole through it , but then machine a 'O' ring grove half way down the hole ( it is possible and it did not leak ) it was for the regulator shaft

Keep up the good work/problem solving Stew


Stuart


Thanks Stuart/Peter/Fcheslop

Peter thats not a bad idea I'm going to draw the back head up in cad and try out different options, and that will be one.

PS visited John today thats a neat hoist you left him.

Fcheslop:- Curlys engine is still knocking about I've posted a help ? on the ME site to see what it turns up you never know the owner of Curlys engine may answer my SOS.

Denis:- Thats no problem I'll add more details on the fittings when I get to them, I'm not to happy with the water gauge I had problems getting a tight thread the die was cutting small, I've got to grind a bit off the OD of the split die to allow it to spring open a bit more, with the adjusting screw in the die holder. The clacks are OK so I'll probably finish them off next week I'll tell how to seat the ball and adjust the lift.

Stuart

Your observation on drawing errors regardless of designer is spot on I think you must treat them with suspition and treat them only as a guide. I've got a copy of Martin Evans book "Manuel of Model Locomotive Construction" and the water gauge for Mabel is exactly the same as the one in his book, I think he must have just taken it from his drawing file and said this is it, and not given any thought about it fitting.

Cheers

Stew


I've got a copy of Martin Evans book "Manuel of Model Locomotive Construction" and the water gauge for Mabel is exactly the same as the one in his book, I think he must have just taken it from his drawing file and said this is it, and not given any thought about it fitting. - Stew
Stew,
I've never studied his designs this closely or comparatively but one of the recurring criticisms I've heard of Martin Evans was that his designs contained recurring components cobbled from previous designs, valve gears are an example, and then not changed in order to better apply to the new design.
Cheers,
Harry
 
GWRdriver said:
.....................his designs contained recurring components cobbled from previous designs............

Don't we all do it, and anyway isn't it a case of if it ain't broke don't fix it.? I was having trouble getting a safety valve to work so dug out all the information I could get from the books on hand LSBC, Martin Evans, a sketch from Bogs etc. I came to the conclusion there were only minor evolutionary changes from LSBC's 1920's designs to modern versions. I had started to tabulate the dimensions to see what was common and noticed trends. It was only when I got a copy of the Kozo Hiraoka article on safety valves in Live Steam and Outdoor Railroading Vol41 Issue 1 that confirmed there is a direct relationship in all the dimensions. So not much scope for variation and you can see why these guys would stick to what worked. Go to all the fitting suppliers, there's not much between all their products either, no doubt LSBC or Martin Evans copies. If you see Bogs Paddleduck engine it contains components from the French reciprocating Marine engine and Bogs makes no bones that he's copied the bits, even the Regner offerings have a striking resemblance to the French design.

I suppose the point is ensuring that the bits you use are fit for purpose, and probably a case of make the boiler fit the parts and not the parts fit the boiler.

Live Steam and Outdoor Railroading Vol40 Issue 6, Vol41 Issue 1 and Issue 2 are a must have from Village Press in the US. They have articles by Kozo Hiraoka that are truly excellent (Safety of Copper Boilers, Safety Valves, Tube Joints, O rings for live Steam, Small Hex Head Screws)
 
T'were me Stew, I'd relocate the clacks into the boiler barrel, up toward the front, and just blank those two holes off.
 
how about again small elbows to separate but then have in lin clacks.?

peter
 
It was only when I got a copy of the Kozo Hiraoka article on safety valves in Live Steam and Outdoor Railroading . . . that confirmed there is a direct relationship in all the dimensions.
Kozo is rather a latecomer. Among the good articles on making true "pop" safeties is a comprehensive article by Gordon Smith which appered in Engineering in MIniature Feb-Mar-Apr/2001. This is not everyone's cup of tea but articles published some years ago in Model Engineer by Roy Amsbury and Basil Palmer detail the building of working fittings in fine scale.
 
doubletop said:
Live Steam and Outdoor Railroading Vol40 Issue 6, Vol41 Issue 1 and Issue 2 are a must have from Village Press in the US. They have articles by Kozo Hiraoka that are truly excellent (Safety of Copper Boilers, Safety Valves, Tube Joints, O rings for live Steam, Small Hex Head Screws)

Yes those articles by Kozo are very handy and they are all included in "Building the New Shay"

GWRdriver said:
Kozo is rather a latecomer.

Interesting statment Kozo's first loco design was in Live Steam from 1974-1977.

Dan
 
Over the last couple of days I've made the Turret or Manifold to none steam people.

But first to finish off the clacks, the balls need setting down to do this take a new 3/16 stainless ball bearing put it on the seating, and with a brass drift give it a sharp biff with a light hammer, throw the ball away as you've distorted it, replace it with a new one. Now make the cap first measure the depth to the ball and calculate the length of thread required to allow the ball to lift 1/32 ".

Here we are one done No two measured for the cap.

100_4056.jpg


Now for the turret this is made from phos bronze I've bin using calphos which is a leaded bronze that machine very nicely. The body of the turret is made from a length of 3/8" dia material:- drill 1/8 27mm deep and drill and tap 3/16 * 40 ME 5mm deep the body uses a 1/8 steal ball valve for the whistle so the bottom of the 1/8 hole needs to be square and accurately depthed, so I made a flat bottom drill and set it to depth to the chuck face against a steel washer, and just kissed the bottom to bring it to the correct depth.

100_4021.jpg


3/32 hole drilled right through the bottom for the plunger.

Keeping the job on the bar transfer to the mill in spin indexer, and drill the cross holes 3.5mm to locate the fitting for soldering.

100_4025.jpg


Back onto the lathe part off to length flip it round and drill and tap the back end 3/16 * 40 ME

The fitting as there were 4 to make 1/4 * 40 turn up a length of bar enough to make all four and thread it with a die.

100_4032.jpg


100_4033.jpg


The turn up a 2mm long boss for a tight fit on 3.5mm hole drilled in the body part off

100_4034.jpg


repeat repeat repeat.

Then flip them round in a collet:- face centre drill and drill a 3mm hole part way through.

100_4041.jpg


Turn up the other 5/16 fitting

Here they are assembled to the body.

100_4043.jpg


And fluxed with a little nugget of silver solder waiting for some heat.

100_4046.jpg


Again sneak up on it with the heat the flux will go white then black then it will melt more direct heat until the solder melts, pickle for 1/2 hr.

Then set up in the mill and with the aid of the 3mm pilot holes drill through into the body. If you stick a bit of wire down the hole you'll feel/see the drill start to tickle it when it breaks through.

100_4050.jpg


Set the ball down on the seating as for the clacks.

100_4052.jpg


Then make the whistle lever thing sorry this is the only pic I took.

100_4057.jpg


And her we are turret finished.

100_4060.jpg


With the bits made I can now see the best way to fit them on the back head, I think I'm going to black the bush up on the left next to the water gauge and move the boiler feed clack to the top right hand side.

Like this

100_4063.jpg


Cheers

Stew
 
sbwhart said:
If you stick a bit of wire down the hole you'll feel/see the drill start to tickle it when it breaks through.

100_4050.jpg

What a GREAT tip !!

It's really PITA shining a flashlight down a similar hole and trying to see when the drill bit is breaking through and not have it come out the other side :p

Thanks !!

Mike
 
Cheers Mike


Well I slowed things down a bit after the problem I had with the position of water gauge and clack bushes being 1/4" too high, I wanted to give the problem some thought before I jumped in. Just to recap I decided to hinge the door from the bottom, blank one of the bushes off and move one of the clacks to the side of the boiler, on Monday I opened up the hole for the fire door and drilled the holes for the 6 front stays, I was now in a position to solder the back head in the boiler but first I tried the fit of the longitudinal stays, they wouldn't fit they fouled on the fire box, the penny finally dropped the error wasn't with the drawing but with me.

:'( :'( :'( :'( :'( :'( :'( :'( :'( :'(

I'd only gone and positioned the fire box 1/4" too high.

Nothing for it but to make a new backhead with the holes for the longitudinal stays 1/4 higher.

Here's the old backhead with the new one cut out ready for bashing round the former.

100_4084.jpg


I spent Tuesday making the new backhead, sorry no pics

Today another master class from John soldering the back head into the boiler:- her we have it

100_4085.jpg


100_4088.jpg


100_4092.jpg


And the top boiler bushes for the turret and water gauge.

100_4086.jpg


I'll take it along to the inspector this weekend for him to have one final look before I close everything up next week with the final soldering session, fingers crossed.

Stew
 
don't forget to put on the small square strips on the sides for it to sit on the frames

glad you have fitted the bushes for the door fixings


Stuart
 
This is a great looking boiler. Sorry to see the other backhead, but this one is a great looker too. Larry1
 
What Stew didn't mention was that as this is getting towards the end of the build, we had to use some usually no no things to get the job done.

Like putting the flames directly onto the solder and flux side of things, and hence the rather large spread of solder over the surface. But other than that, I think we were both suprised at how well it turned out, especially as the wind was cooling everything down, and so took a lot longer to get up to working temperature.

Not much to do now Stew, and it will be ready for pressure testing.


John
 
;D Alls well that ends well Stew. At least you could recover, and your boiler's coming along really well :bow: - I'm rather envious!

Bogs, I was wondering how some bits could go together without doing the direct flame - ;D - thanks for the "how not to 'duit' unless absolutely necessary" bit.

I'm holding both thumbs for the boiler inspection Stew - I want to wish you good luck, but I'm sure its not "luck" that will make the boiler pass - just a lot of hard and careful work Thm:

Kind regards, Arnold
 
Arnold,

I don't want to take anything away from Stew at all, he has worked wonders making this boiler, especially as he had never built one before.

I am only there as an adviser and helper, just showing Stew a few techniques that are needed at times like this, and I am sure, the next one he builds will be under his own steam and guidance.

BTW, what you are seeing now, with the solder all over the place is only cosmetic. The boiler will look great when it has it's spikes cropped and a good brushing off with a brass wheel.

John
 
Best of luck Stew.
Very interesting build.
I'm learning much for the day I build a boiler.
 
John, thank you, I know and fully appreciate that ;D - maybe my wording was a bit "wrong"; I have to work at that.
Stew's doing a GREAT job and I didn't mean to detract from that at all. You just offered a "golden howto tidbit" on what is sometimes needed, and I took a personal note as a student myself.

;D From my very limited experience of making a much simpler boiler, Stew's doing a much better job than I did - much less solder all over the place than I had ;D - like I said : GREAT job Stew Thm:

Kind regards, Arnold
 
Thanks for your comments lads much apreciated.

Got the last bit of soldering done this morning with John.

First up the foundation ring which is made from 1/4" square copper rod, just cut and file to fit, to stop the bits falling into the boiler when evering expands on heating we simply drilled 1/16 through the outside and into the ring and put some copper rivets into the holes, you don't hammer the rivets over just place them in so they act as pegs. Everything was given a short pickle and clean and a good fluxing and rods of solder placed over the joints with a double dose at the corners, and some flux on the solder, the fire box was filled with thermalite block to keep the heat on the foundation ring. I had a pic of this but deleted it by mistake :doh: . Then with two butane torches we applied the heat it took quite a while for it to get up to temperature then as the solder melted we added more solder to fill the joints, when it looked OK let everything cool a bit then a quench in water and a pickle, this is the results.

100_4164.jpg


100_4167.jpg


Next we did the two bushes on the side of the boiler for the feed clacks, sorry no pics.

And the last soldering job for the boiler was the boiler tube plate, similar procedure as before this is the set up before soldering, rings of solder arround the flue tubes and arround the outside of the plate.

100_4160.jpg


Two torches again with more solder added as melting temerature was reached.

We had to reheat and resolder two of the flue tubes as the solder had failed to flow into the joint.

This is the final result.

100_4162.jpg


Well hopfully that all the soldering done, I've got to make some blanking plugs and fit the longitudinal stays before I do a pressure test, that will be in a couple of weeks as I'm still waiting for a calibrated pressure gauge.

Fingers crossed for the pressure test.

Stew


Stew,

Looks like your boiler is coming along well.

I have a new found respect for the effort and skill required to build a boiler.

Good luck on your pressure test.

Regards,

SAM
 
Back
Top