Making a Boiler for a 3 1/2" Gauge Locomotive

Home Model Engine Machinist Forum

Help Support Home Model Engine Machinist Forum:

This site may earn a commission from merchant affiliate links, including eBay, Amazon, and others.
Agreed. I make a few (2 or 3) "nicks" in each hole also, sometimes with a rat-tail, sometimes with a triangular, depends on what I have in my hand at the time. Helps the solder get to where it needs to go. I use the same chamfering and nicking in a number of places, heads, mudring, firehole ring, anywhere I must be sure of good solder penetration.
 
Wow guys some great information their.

I'm going to use dry acid salts from Chronos http://www.chronos.ltd.uk/cgi-local...=Dry_Acid_Pickling_Salts.html#aACD100#aACD100

I was wondering about getting some thermal blocks but didn't know where to get them from never thought of B&Q

I have chamfered the holes but I didn't know about nicking the edge this makes sense.

Thanks for pointing me in the correct direction.

Stew
 
that stuff from chronos is nasty stuff

just get some citric acid powder from you local home brew place bigger jugs sell it for 3 quid for 500 gram http://www.biggerjugs.co.uk/


had some of that chronos stuff in a open container sent all the steel rusty not so with citric acid

here are some pics of my class 4 tank 5 inch gauge boiler
PICT1533.jpg

PICT1530.jpg

PICT1529.jpg


found out how to post a pic ;D

 
Hi Stew,
Yes, boilers are very tricky things and have to conform to the local pressure vessel codes. I have built simple boilers back in my distant youth but as the boiler is really the heart of any engine (not just the bits that go round!) my preference is to have someone build it for you and get them to give you all the paperwork that goes with it! I have had a copper boiler built in the UK, could not find anyone with the skills required in Canada to build one!. The usual way over here is to weld up a steel boiler. Corrosion is then a major problem Glad to see you bought the kit from Reeves. At least you wont have to flange the plates. Your success will depend a lot on your skill with brazing and silver soldering, and that goes back to your skill with the torch. What are you going to use for gases. Oxyacetylene is perhaps the best but storing the gases becomes a problem (unless you have a nice outside workshop) The biggest factors I have found is to make sure the parts are clean and free from grease and oxides BEFORE you coat with flux;' and make sure you get a good fit, the brazing operation will be mush easier if you don't have to fill up holes! Then make sure you can get enough heat into the parts you are brazing. This means that the torch is big enough and that you have placed sufficient insulation (fire bricks) around the part.
Good luck with your boiler - what locomotive are you building?
Regards,

Bill (Ontario)
 
Ho I wish I new about the citric acid 12 months ago thats when I bought the acid crystals, as I've got them I'll use them, but for any future builds I'll go the citric acid way it makes a lot of sense a lot safer and environmentally friendly.

Great looking boiler Lordedmond if only my boiler will look half as good.

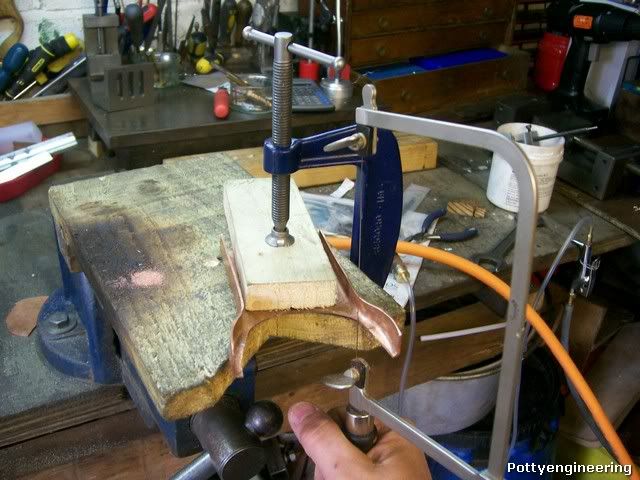
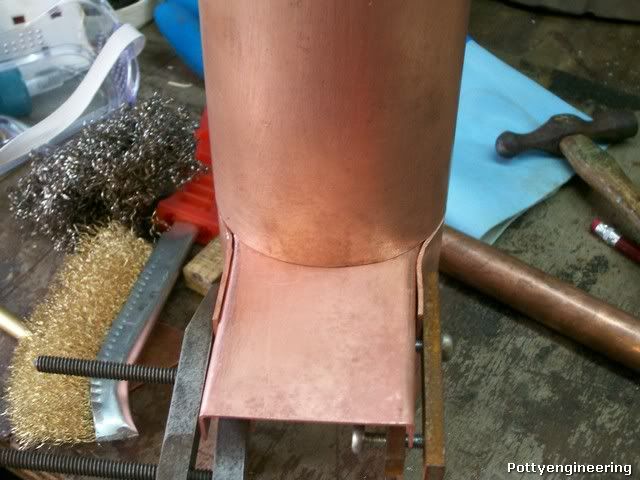
Bill thanks for your good wishes:- I'll be using silver solder and propane gas, guys at the club have built boilers of similar size using propane. It will be for a 3 1/2" 2-4-0 locomotive to the Mabel design by LBSC.

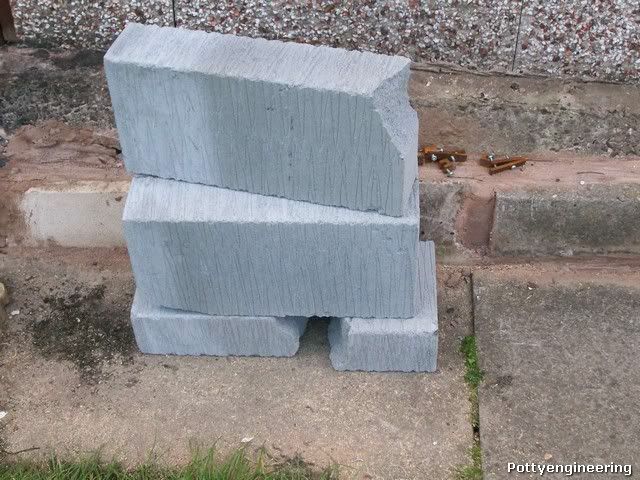
Went on the hunt to B&Q (great big hardware store) for some Thermalite blocks and picked up four half price 50p each as they were damaged, but for my use as a hearth that won't matter.

100_3743.jpg


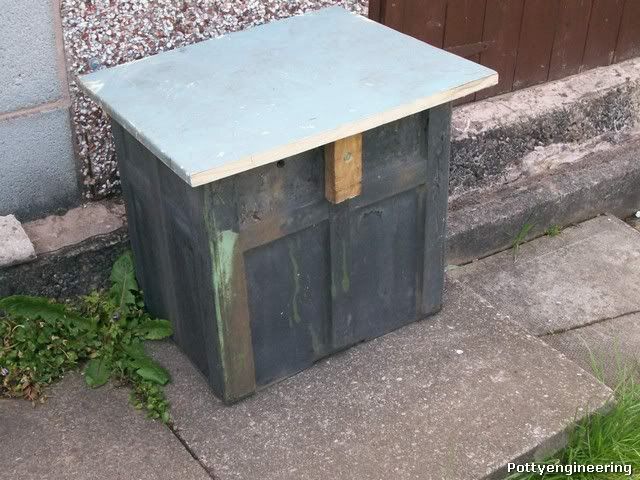
This afternoon I've made a lid for the tank

100_3741.jpg


Still got to put a lock on it just to keep the contents safe away from animals and children

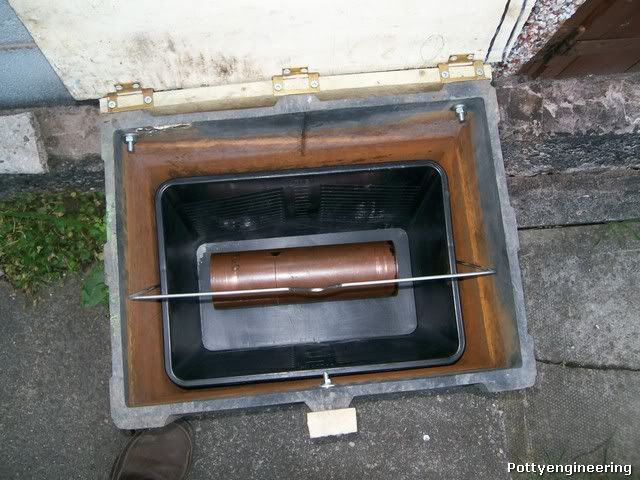
I spotted an oblong bucket at B&Q for keeping paint in for roller application looked just the right size to fit in the tank and take the boiler.

100_3742.jpg


The acid will be in the bucket and the tank will act as a second skin containing accidental leaks and splashes.

Thanks to you all again for your support and interest

Stew
 
Stew

And there's no need to send off for citric acid. Just go to Tesco/Asda/Sainsburys, or what ever, and get it from the baking section.

Following the lead from somebody on the forum, its so innocuous you can store all your parts in the pickle ready for use. Fish them out rinse off under the tap, do the next job an throw them back in again.

Pete
 
I'm having seconds thoughts about the acid salts I think I'll go the citric acid route.

Lordemond:- Is that a second boiler I can see in the background of your boiler test pic it looks the same type is it ?. Also noticed the pressure at 200 psi, was this an official boiler test as the gauge looks to have a calibration label on it, in the UK the test is twice working pressure usually 160 psi:- just an interested observation.

Thanks for your interest and advice chaps

Stew
 
yes there is a second boiler in the pic I do not know what it is for but it much smaller . to give you an idea of the size of the thing its front tube plate is 5 inches dia and the boiler is 22 inches long and very heavy


as to the test pressure initial test for a new boiler is twice the working pressure, as the boiler is for 100 psi the test is 200psi subsequent test are at 1 1/2 time WP

Yes it is a certificated test by the manufacture of the boiler and he has issued a test certificate of that test ,which has you know our boiler inspectors in the UK accept as the primary test


As I told you in PM I do not make my boilers any more, I have done so in the past , but I cannot lug the big ones around due to my bad hips and ankle ( I now need wheels myself )

The boiler was made for me by Paul at http://www.ptmachining.co.uk/ only a customer no other involvement with the firm

BTW that £ 2.3 K of work you see before you


If these pics are considered a hijack of you thread I will remove them


Stuart
 
Stuart

Thanks for the information, no problem with the pics at all, they add to the general discussion and information thanks for posting them.

Just one more ? the lugs sticking out of the side of the boiler I guess are for fixing the boiler to the frame, on the drawing for my boiler I can't see any provision for fixing it to the frame ???, I'll have to read the words and music through again to see if I can get a clue.


Thanks again

Stew
 
The lugs are not to fasten the boiler to the frame but are to fasten the side tanks to the boiler

see pic from mag
Screen%20shot%202010-05-13%20at%2015.48.35.png


The boiler will stand on two feet at the rear to give the required expansion but fixed at the smoke box end

Now you have mentioned it LBSC was a bit caviler with his fixings ;D

look at your drawings I will bet they show two angle brackets screwed to the outer wrapper one the straight sides , not a good idea . Instead before you stick it together try and work out were the boiler supports need to be at the rear and fix some pieces of 3/16 square copper with SS were the boiler will rest between the frames instead of screwing on some angle ,screws into the water space not a good idea

Here is a sketch
IMG_0001.jpg
 
Stuart

Thank you very much for that boiler fixing info, it looks a very neat method, I'm a lot clearer now.

Old Curly was undoubtedly a very cleaver guy when it came to model locos, I suppose his plans and instruction are a reflection of the time, I've come across one or two thing that to me are ambiguous and not clear at all, but I suppose I can't complain too much he was well in his eighties when he drew the plans up and wrote the build article in ME, which is not bad going.

Cheers

Stew
 
Have you read the book about his life, his USA driving has Curly down as female

a bit more info regarding LBSC designs , note I have built "doris" and a good performer it is we have pulled a combined load of 40 stone ,but a push off was required but thereafter we ran round the track no problem but I was full on with the regulator. Back on the info LBSC did not fit cleading or crinolines to his loco's so the space for lagging and cleading is at a premium at the front end


Hope you have a leak free build , a quick water test can be done by using the mains water pressure normally 80psi so no pumps required

 
lordedmond said:
Have you read the book about his life, his USA driving has Curly down as female

Back on the info LBSC did not fit cleading or crinolines to his loco's so the space for lagging and cleading is at a premium at the front end

Mains water pressure normally 80psi so no pumps required

Stuart

Yes I've read his book, he certainly was a strange Guy.

I'm glad you mentioned the cladding as that is another thing I can't for the life of me work out how to do it.

Mains water thats an interesting tip.

Thanks

Stew
 
Mains water pressure can vary widely.

where I live 30-35 psi is the max found.


Kermit
 
Kermit

yes I am aware that water pressure may vary but it is still useful for a quick test of a new boiler , it beats mucking about with pumps ,
 
lordedmond said:
... it beats mucking about with pumps ,


agreed. I offered the distinction in the interest of safety. Not wishing anyone to assume their boiler was 'tested' to a pressure of 90 psi by the water mains method.

I routinely hydrostatically test welded pipe as well as rubber hose for hydraulic uses. A common test pressure being 1500 psi. Pump pump pump, pump pump pump.


Wears me out just thinking about it, ;D
Kermit
 
Thanks for your input and insight Chaps

Well yesterday was a case of best laid skeams and all that. I'd more or less got the afternoon free to get on with the boiler, but my daughter turned up with 2 month old grandson, now if theirs anything better than a grandson for keeping a grandad out of his shop please tell me :big: ;D:- so only manages to get a little done.

Cutting out the rad on the throat tube plate using jewelers saw and home made sawing table.

100_3744.jpg


Throat plate having first fitting to boiler tube.

100_3745.jpg


I annealed the boiler tube using a rough hearth pieced together with the thermalite blocks and the biggest burner I've got for my torch just to try it out, the blocks worked well but the burner scared the crap out of me talk about a roaring flame, not too easy to control, I've got two torches so using the next size burner down with both torches will give me more control when it comes to soldering.

As you can see from the pic the acid bath worked will, I ended up using the acid salts only needed to make up 3 liters to cover boiler and adding about two tablespoons of salts gave me a Ph between 2 and 3 (if I'm reading the indicator paper correct)

Cheers

Stew


Thanks John

It look like I'll be doing the first soldering some time next week, need to make a joggling tool first and cobble together a hearth.

Stew
 
Stew, that's coming along nicely!

Kind regards, Arnold
 

Latest posts

Back
Top