Machining 3D resin printed parts

Home Model Engine Machinist Forum

Help Support Home Model Engine Machinist Forum:

This site may earn a commission from merchant affiliate links, including eBay, Amazon, and others.

Basil

Well-Known Member
HMEM Supporting Member
Joined
Mar 18, 2017
Messages
231
Reaction score
351
Location
Dorset UK
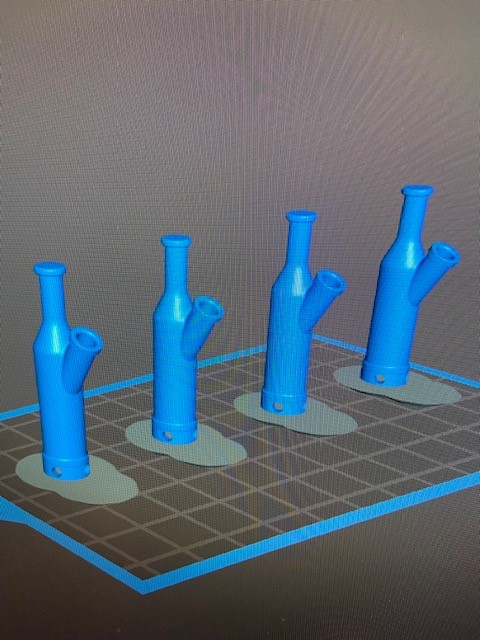
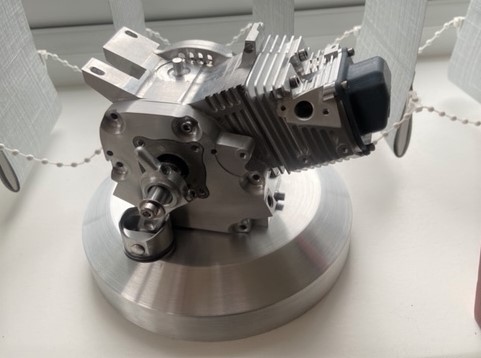
I've been using my Resin printer for quite a while now. I must say I much prefer to print without supports if possible and straight on the build plate. A recent part I printed was a valve cover for the little Honda GX I'm building. I drew it up in Fusion 360 and shelled the inside. I am using Siraya tech Blu with some black Elegoo resin mixed in. This mixture seems to still have good strength without breaking the bank for Siraya tech Black.
A problem that I find arises is venting an internal structure. Yes you can put holes in the part but holes that I don't want. I found if not well vented the trapped air tends to displace some resin and incorporates a void in the part.
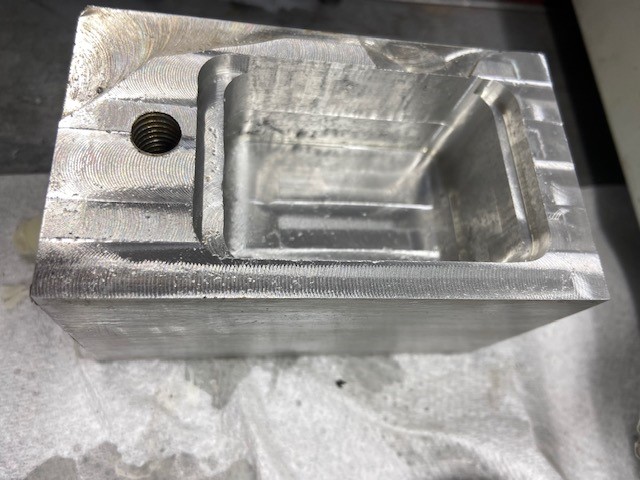
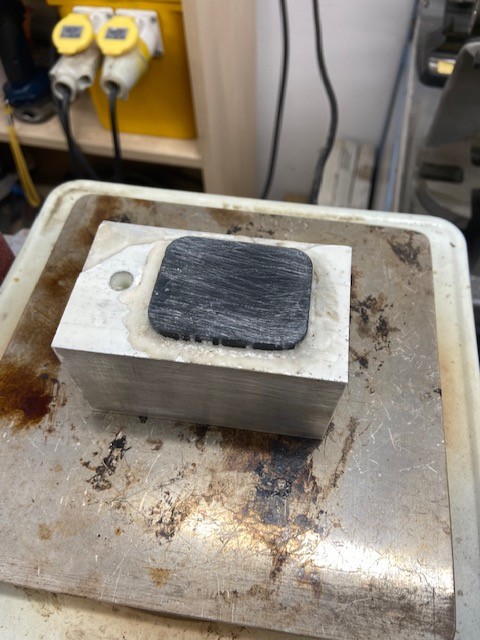
What I have started doing now is printing the part solid then jigging the item up and machining out the internal detail. That worked very well on the valve cover but my latest item, the air box has too much draft to hold onto it easily. After a little thought and Google search. I decided to use this wax method. Funny you can never find candles in the house when you want them! Scented !!:mad:. Not a smell I'm used to in my shop but it definitely pongs of them now. I must say though it worked a charm. Thought it was worth sharing. 👍
 

Attachments

  • 9B2AB1F7-6A31-4EC9-AA79-B50413D4097E.jpg
    9B2AB1F7-6A31-4EC9-AA79-B50413D4097E.jpg
    59.9 KB · Views: 148
  • Air box honda 2.6 v4 (2).jpg
    Air box honda 2.6 v4 (2).jpg
    42 KB · Views: 144
  • IMG_8349.jpg
    IMG_8349.jpg
    85 KB · Views: 138
  • IMG_8362.jpg
    IMG_8362.jpg
    105.4 KB · Views: 147
  • IMG_8352.jpg
    IMG_8352.jpg
    114.4 KB · Views: 143
  • IMG_8353.jpg
    IMG_8353.jpg
    96.4 KB · Views: 142
  • IMG_8361.jpg
    IMG_8361.jpg
    124.9 KB · Views: 138
  • IMG_8365.jpg
    IMG_8365.jpg
    93 KB · Views: 134
  • IMG_8373.jpg
    IMG_8373.jpg
    91.1 KB · Views: 127
  • IMG_8374.jpg
    IMG_8374.jpg
    98.4 KB · Views: 123
Last edited:
Yes, I thought about hot glue and maybe some thin plywood but it just seemed hack. The wax fixturing worked superb. The Elegoo and Siraya resins both machine very well and do not chunk or gum up the bit. I do make sure the parts get a really good dose of post curing.
The bit in the picture is a 2 flute 3mm Ball end mill which I run at +20K and 600mm feed rate. I was taking light cuts @ 0.5mm. I was concerned about heat maybe loosening the part in the wax but had no issues.
Onto the next part. I extended the base on these plug caps and vented with four holes. 5mm and 2.5mm internal passages. Printing now. We'll see how they come out. Just a further note, I do run the Siraya Tech at plus 25C. 👍
 

Attachments

  • IMG_8380.jpg
    IMG_8380.jpg
    114 KB · Views: 109
  • IMG_8381.jpg
    IMG_8381.jpg
    105.6 KB · Views: 109
  • IMG_8382.jpg
    IMG_8382.jpg
    97.2 KB · Views: 108
Last edited:
Have you machined any (Fused, FDM ) PLA? I tried but no luck so far. I have the same problem drilling. It usually sticks to the bit and becomes a blob of a mess. Hand drilling, (no motor) works. By the way, nice job!
 
Drilling almost - so it seems - any plastic says to me 'low speed', or it will melt and gum 'things' up. I have made a couple of low-speed (about 150rpm) drills and these are my 'go to' for plastics. Smaller drill sizes are especially susceptible. The motors for the drills are the common or garden variety off the 'net, 12VDC. Often they have a 1/4" spindle off the gearbox and there are small key type chucks, which will slip right on and secure with a supplied setscrew. Cheap as chips and twice as cheerful.
 
Have you machined any (Fused, FDM ) PLA? I tried but no luck so far. I have the same problem drilling. It usually sticks to the bit and becomes a blob of a mess. Hand drilling, (no motor) works. By the way, nice job!
Sorry I have no experience with FDM printers to date. As already mentioned I imagine any kind of heat generated during machining would end up with a poor result. The cured resin has kind of the opposite problem, the prints are brittle and care needs taken not to crack the part.
 
Drilling almost - so it seems - any plastic says to me 'low speed

Yes PLA in particular will tend to gum up and stick if it gets hot but at modest speed it can be machined reasonably well.

It does tap really well and I regularly tap M3 threads in it (or even smaller) The secret is to design and print the tapping holes slightly below the thread core dia.
about 0.1 to 0.2mm smaller works well (4 to 8 thou' in old school)

When they are tapped, the tap will cut it's own sized hole in the soft material thus removing the layer ridges and producing lovely clean threads.

I don't know about other materials but I find this technique works great on PLA.

Although I personally hate them, self tapping screws will also make really good threads in this type of material, if you have your holes sized right.

Best Regards Mark
 
The parts that I 3D printed for my dust collector were all PLA. Mostly I used through holes but for any locations that I wanted threads I either printed in a pocket for a captive nut, or I used thread inserts for 3D printed parts, the kind you use a soldering iron to install.

I got a cheap wood-burning set, from Harbor Freight, that gets used for nothing but installing these inserts. It only takes a few seconds to insert one, it's much faster than tapping the hole. And you don't have problems with the threads if you have to assemble/dis-assemble the parts multiple times. I think CNC Kitchen even did a video testing which style of insert had the most holding power.

I don't know if/how these inserts would work with resin printed parts though.

Don
 
Mostly I used through holes but for any locations that I wanted threads I either printed in a pocket for a captive nut, or I used thread inserts for 3D printed parts, the kind you use a soldering iron to install.

Yes thread inserts or captive nuts are other perfectly viable alternatives with the advantages you describe, Indeed I use them myself on some occasions. One of the many advantages of 3d printing is the ability to create odd shaped (e.g. hexagonal) holes making captive nuts a doddle.

Some 3d printers have a print pause function which enables captive nuts to be "printed on place" and completely enclosed.

This technique might be difficult if not impossible with resin printers due to their different method of operation, however their high resolution means that some threads could actually be printed as part of the component.

Such is the versatility of 3d printing that there are a multitude of different ways of holding components together.

Best Regards Mark
 
As a new owner of an Ender 3 V2, I am very interested in pausing and placing all manner of metallic items in my prints. I’m new to the whole game, use Cura Slicer, and just getting acquainted with the software.

Does anyone know if there’s a patch or code to cause the print to pause at a certain slice to do what you’ve been discussing? In particular, I wish to print a heavier flywheel for an LTD Stirling I’m building, and figure a narrow cast ring of lead would do very nicely.

Thanks in advance, I’m having a ball with my printer so far having printed several gears, Myford Boy’s LTD Stirling, QCTP tool holders, etc., etc., etc.

John W
 
John W.
I can't point you to the right website, but I have seen videos on youtube where the print is paused for the insertion of an insert, and of course, to change the filament. I think the pause can be done by the controls, but a software pause would be more accurate. Try asking CHEP on youtube.
 
John W.
I can't point you to the right website, but I have seen videos on youtube where the print is paused for the insertion of an insert, and of course, to change the filament. I think the pause can be done by the controls, but a software pause would be more accurate. Try asking CHEP on youtube.
Excellent advice, I forgot completely about CHEP! My sons pointed me to him when they gave me my printer, I use his bed leveling program already, and it’s a great tool.

Thanks again!
John W
 
Back
Top