lost wax casting

Home Model Engine Machinist Forum

Help Support Home Model Engine Machinist Forum:

This site may earn a commission from merchant affiliate links, including eBay, Amazon, and others.

Tony B

Member
Joined
Dec 16, 2011
Messages
16
Reaction score
0
Hello All
I have just joined this forum, and found this section, I make, well try to make model parts, and have just ventured into making brass parts, these have been a great learning curve, and I have been enjoying it, however, I have a few parts that I have mastered that I would like to be made into brass parts, basically to hard for me to make the with sheet stock and shapes
Has or does anyone here do lost wax casting? or brass casting via another method? because I seem to have a hundred questions, having said that I am no stranger to casting,
in fact I resin cast and do this with pressure and vacuum, but I am a foundry virgin, so can some one point me in the right direction

 
wow Tony I can see you are eager and full of questions,
If there are parts you want to machine but are having trouble figuring out how to to it ask us, show us a picture or a drawing of what you are tying to make. tool holding and setups can get complicated
Brass is one of the easiest metals to machine. Brass is readily silver soldered so you can build up pieces to get what you need.

Has or does anyone here do lost wax casting?

Yes, I hope they will chime in here .


or brass casting via another method? .
From my reading casting bronze is a little easier and safer than brass.
because I seem to have a hundred questions,
Lets take a couple at a time.

I am no stranger to casting,
in fact I resin cast and do this with pressure and vacuum
We would love to see how you do this . I machine engines from acrylic and would love to be able to cast some from acrylic. maybe you can teach me/us something.

Lost wax casting has the advantage of precision and smooth finish it is used for jewelry and can be used for model engine parts .

steps :
1: make metal pattern
2 Make rubber mold from pattern
3 mold wax patterns
4 embed wax patterns in investment.
5 melt out wax
6 cure fire investment mold
7 melt metal
8 pour molten metal in hot investment mold
9 allow to cool
10 remove investment mold
finish part.
Sand casting is a more common more economical method.
steps :
1 Make pattern typically from wood can be metal
2 pack casting sand around patten in two part mold.
3 remove patten/close mold
4 melt metal
5 pour metal
6 let part cool
7 remove part from sand mold
8 finish part.

Most home casters start with aluminum casting to get the steps down . bronze takes more heat and is less forgiving to mistakes.

I think many of your hundred questions will be answers by browsing and reading. But do not be afraid to ask

I see this is your first post here are a couple of threads that should help you here.
Basic forum rules
http://www.homemodelenginemachinist.com/index.php?topic=9782.0
Getting started in model building
http://www.homemodelenginemachinist.com/index.php?topic=9413.0
Selecting a first engine to build
http://www.homemodelenginemachinist.com/index.php?topic=16003.0
Please post an intro in the welcome area when you get a chance that will help us help you.
Tin


Tony,
I have been casting lost wax for a while now so ask away.

There are several ways to use wax patterns. The investment process can be done with a centrifugal casting machine or vacuum. Ceramic shell molding can also be used.

I make small parts and I use a hand held crucible and melt the metal with an OA torch.

If you are making a single part the simple way is to make a wax pattern and cast it. I often do this or start with wax to make a metal pattern for a rubber mold. I have a wax pressure pot to inject wax into the mold for parts I need in numbers.

The book I learned this from is Jewelry Casting by Murray Bovin.

The investment has to be vacuumed to remove any air bubbles in the mix. There is a 10-12 minute set time so everything has to be ready at the start. Commercial investment comes with a working time/step chart so I just hang that on the table on a clip board and follow the instructions.

The other thing you need is a burnout oven. A programmable timer is a very handy option as the flask temperature need to be ramped up and down. This can be done manually and that is how I started but for large flasks using a 12 hour burn out time can get tedious.

The metal I use is silicon bronze. It is a little harder to machine than brass but it can be remelted several times with out much change in the alloy content.

Here is my source of metal and interesting reading on casting alloy choices.
http://www.budgetcastingsupply.com/Metals.php

Dan
 
Tony B

Welcome to HMEM Tony. If you follow Tin's tips I am sure that you will find most of the information that you need. If you need anything else just ask as there is always someone around to answer a question or at least give an opinion. Good luck with your casting, I will be watching for your posts. :bow: :bow:

Cheers :)

Don

 
I'm in agreement with Dan. He sounds like the real deal when it comes to casting.
I personally create abs plastic models with a 3-D printing machine, using a precise cad drawing of the parts. I create the cad drawings from 2-D drawings. This insures perfect 3-D prints of the models. I then make RTV molds of these parts for the wax models, then I subcontract a silicon bronze ceramic casting company to mold multiple parts. I'm using a California casting company that only charges what the silicon bronze costs for the casting charges. This is too reasonable for me to take on myself. The parts are perfect, as well, with very little work left to finish. I'm using this method for a series of scale model steam engines next year. I'm fortunate enough to have studied and applied lost wax casting when I was a young lad and also have friends in the art of lost wax casting willing to help me in my endeavors.

Here is a video on lost wax casting and info on 3-D printing.

http://m.youtube.com/index?desktop_uri=/&gl=US#/watch?v=uPgEIM-NbhQ


http://www.explainingthefuture.com/3dprinting.html


Thanks to everyone for the welcome and the answers

Tin, will post in the welcome section asap, What section would you like me to post the resin casting in? and thanks for your answers and hints will look into them all

Dan, Thanks for all the info, will dig deeper and do my research and see if it is easier to contract this out instead of getting involved in the messy stuff

Don Thanks for your wisdom

giovanni, I actually rapid proto type some parts as well, and have used 3D printing for some of my model parts, I use Auto desk Inventor2011, I enjoy this programme, as my neighbour teaches it at TAFE (Technical and further Education ) so when I have problems he comes over for a Beer, I use to get him to do the drawings, but he got me to do a course, and now he just helps when needed, the great thing with inventor is that you can get it to design the moulds for you, and then have CNC cut them, now that is cool


Thanks to all, and do hope to get to know all of you better than just as teachers
Thanks
Tony

 
What section would you like me to post the resin casting in?
Hmm I can see by our selected titles the casting section mentions metals.
You can post it where you see best . you asked so here is my point of view.
The break room always works when a topic fits nowhere else.
Tips and tricks certainly an open subject.
Home casting projects not an exact fit but I think the sub fora most closely related to the subject you will be posting.
sometimes a post can go in any of several places sometimes it seem the break room is the only option.
Looking forward to your posts.
Tin
 
Wont be long now and you'll have a complete workshop, eh Tony.

regards greenie
 
Tony,
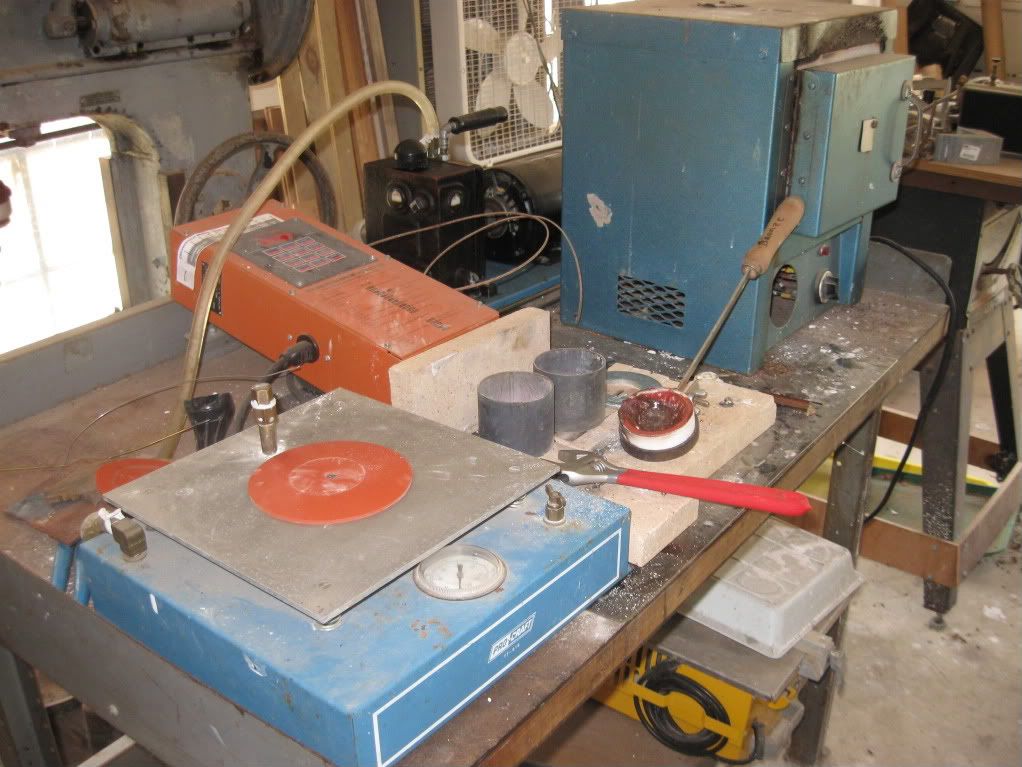
Here is a photo of my casting bench.
IMG_2214-2.jpg


The burnout oven is the blue box and the programable control is the orange box. The vacuum table is the short blue box and it is set for casting with a red silicon gasket for the bottom of the flasks. A full gasket and a bell jar is used for the investment mix. The flasks are the stainless steel tubes on the fire brick. Soup cans will work for several cycles. The hand held crucible is also on the fire brick. The vacuum pump is the black thing with the hose in the back.

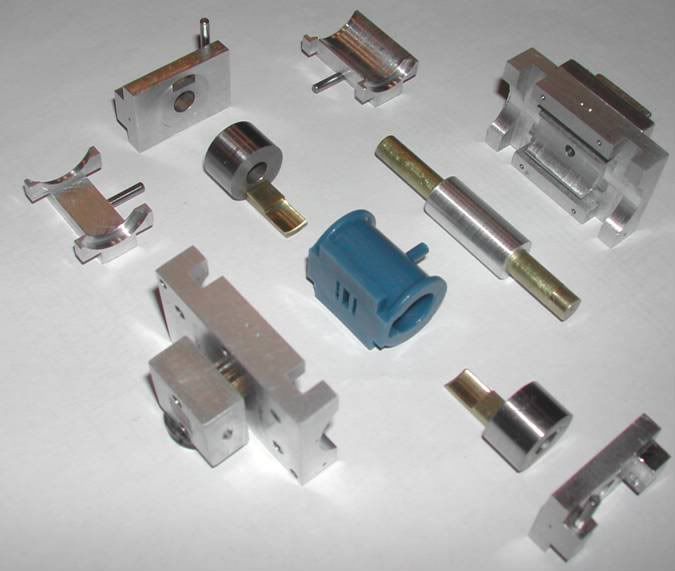
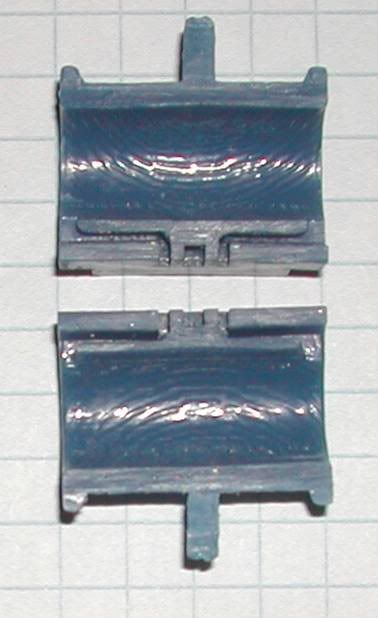
Metal molds can be made for complex items. Here is a mold for a small steam cylinder and a shot of one of the test waxes cut in half to show the cast in steam passages.
MoldExploded-2.jpg

CylXsection-1.jpg


Dan
 
Tony,
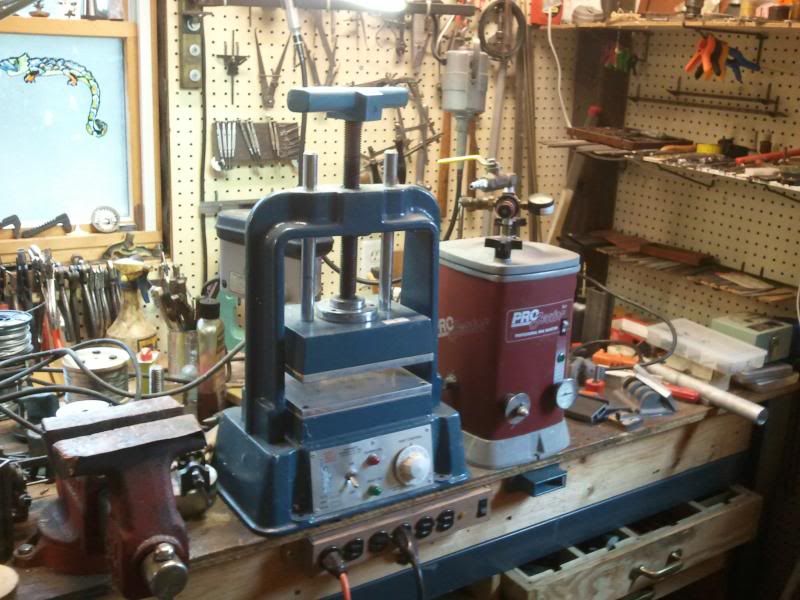
Here is the rubber mold vulcanizer and the wax injector both are common items for making jewelry. Which is a similar process.

2011-12-19114123.jpg


Dan
 
Tony,
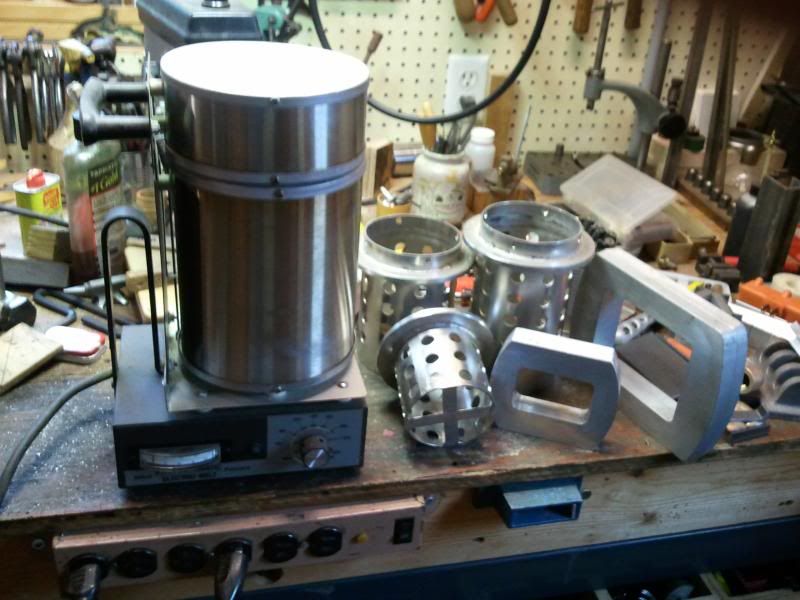
I have plans to expand my casting operation and here is a photo of a small electric crucible and production flasks. The production flasks seal on the rim and they fit into a vacuum chamber. They wanted way too much money for a vacuum chamber so I will make my own.

This type of flask is completely filled with with a wax tree of parts and the vacuum pulls in all directions. Vacuum casting is really a simple method of pressure casting where you use atmospheric pressure to fill the molds.

The rectangular aluminium frames are rubber mold frames that work with the vulcinicer.
2011-12-19125423.jpg


Dan

 
greenie said:
Wont be long now and you'll have a complete workshop, eh Tony.

regards greenie

Greenie, well the department of war and finance is away so I get what I want ;D
and yes I do have a list.....


Dan,
That is a lot of equipment needed, for lost wax I may just forget that idea for awhile and contract it, I now can see why it is expensive to cast in brass
Thanks for posting your stuff, helps me really see what is happening
 
Back
Top