Knurling Secrets

Home Model Engine Machinist Forum

Help Support Home Model Engine Machinist Forum:

This site may earn a commission from merchant affiliate links, including eBay, Amazon, and others.

ksouers

Well-Known Member
Joined
May 24, 2008
Messages
1,347
Reaction score
8
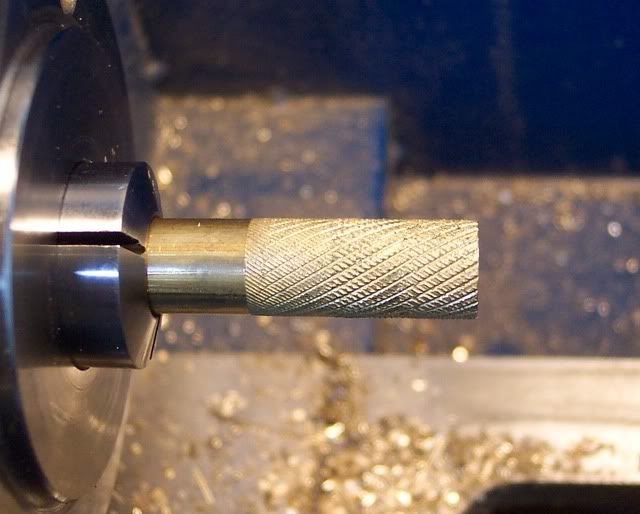
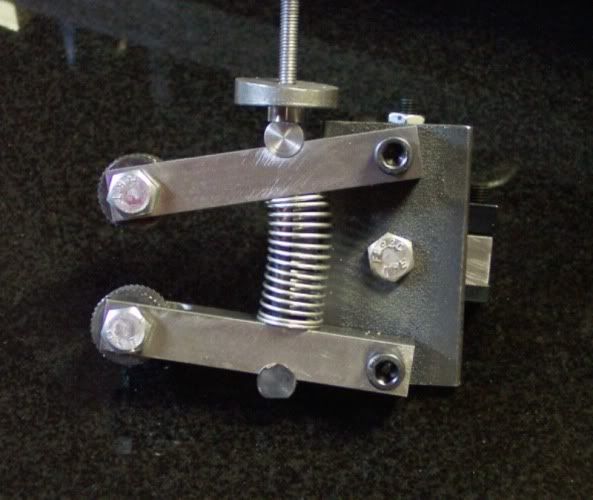
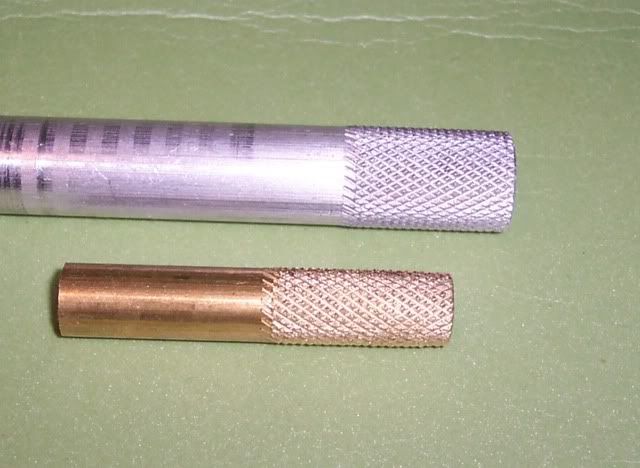
Some months ago I made a clamp type knurling tool. Since then I've attempted to knurl several thumbwheels. Some turned out OK. Others, well, pretty much a disaster. I still haven't figured out how best to get a nice even knurl. It seems on larger diameters it does fairly well, but small diameters come out quite ugly. The top wheel cuts deeper than the other, and the bottom wheel looks like it cuts at a different pitch although when you look at the wheels they are the same.

I've tried setting the tool holder at different heights and using different pressures, from light to heavy. Nothing seems to work. I use lots of oil at a slow speed and increase pressure slowly letting the deformation settle a bit.

So, you knurling experts -- is there any advice you can give to help solve this dilemma?

On the left is light pressure with the tool set high, in the middle is the tool set low with high pressure, on the right is the tool set on axis with high pressure.
knurl_1.jpg


Thanks,
Kevin
 
Kevin,

I have found that for success with knurling the Knurl needs to be set a a slight angle to the work. For a two wheel knurl it needs to be set at centre height, i.e. the centre between the two wheels needs to be in line with the lathe axis.
The slight angle of the tool post means that at the start the wheels are set to just touch the work and as the saddle moves to the left the angle gives evenly distributed increasing pressure and a better knurl results.

Hope this helps.

Best Regards
Bob.
 
Kevin,

I have never used a scissor type knurl tool, but have done quite a bit using the cross slide to add pressure.

What I do is support with a tailstock at a slow speed, put some pressure on with the tool overhanging the end slightly. Using coolant and with an old tooth brush behind to brush the shavings away (carefull the bristles don't get caught in the knurl) move slowly under feed right to left and back gradually increasing pressure as the pattern forms until I get nice diamonds with sharp crests.

If I don't want a long knurled portion I reduce the diameter either side or chamfer to get the end to look tidy.

Hope this makes sense and helps, sorry no pic to demonstrate.

Al
 
When my knurls come out looking like that, it's because the knurl is not centered on the diameter of the work.
 
Kevin,

I have a commercial clamp-type knurling tool and it seems to work fine, I wonder what the design differences would be? Does yours swivel on the shank or is it fixed?

I do think that the circumference of the workpiece is somewhat dependent on the pitch of the knurling wheels (there seems to be a fair amount of tolerance there though).

Are your wheels square-edged, or chamfered?

I usually get mine set up on a piece of scrap, and I don't change my setup, (it's on a quick change toolholder) I just change to the knurling tool and feed it across my piece at full DOC using the same setting on the cross-feed. Feed it back off the part and it's done.

That leads me to another question, are you starting your knurl by tightening the tool while on the part, or starting off the edge. I get the wheels to just touch the part, move off the part, tighten the wheels a bit, then feed over the part and back off the part. If they need tightened a bit, stop feeding and adjust while on the part.

I also didn't have any luck using power feed.

Just throwing some ideas out, let us know the details of your setup so we can make a comparison.

Kevin
 
joeby said:
Kevin,

I do think that the circumference of the workpiece is somewhat dependent on the pitch of the knurling wheels (there seems to be a fair amount of tolerance there though).


Kevin

I read somewhere that you should try different diameters until the cut is perfect. If you think of a knurl as a "gear cutter" the amount of "teeth" without overlapping each other is dependant on the circumference, so maybe one could calculate the right size, depending on each knurl.

Helder
 
Use a very slow RPM, lots of heavy cutting oil and slow X feed. The spiral in your photo indicates to me that the X feed is way too fast.
It also looks like there are 3 1/2 seperate "bands" along the length where the tool tried to right itself. Were you cutting away from the headstock? If not, the pivot on the part that attached the knurler to the tool post is too loose.

Recently I have read a lot of theories on stock diameter being "calculated". My belief is that it's a bunch of Hooey. KNurling tools always follow their own tracks.-Mike
 
Kevin

I don't have experience with the scissor type of knurling tool either. Set up the knurling tool so the center between the two knurling wheels are on the same plane as the spindle center line. Put the lathe in neutral. The spindle now rotates freely by hand. Be very careful. Start out with a little cross feed pressure and rotate the spindle back and forth while you are looking at the knurling. When the pattern looks good slowly put more cross feed pressure on the work piece while rotating the spindle back and forth by hand until you get some depth. This provides a very positive connection for the work piece and knurling wheels. This helps the knurling wheels stay in time with the work piece. Kinda like a two gears messing. Put lathe in low gear and turn it on. Now you can apply more cross feed until the knurling gets to the desired depth. I hope this makes sense and helps.


Evan
 
Thanks for all the suggestions. I've tried them all, still no joy.

Dan, thanks for the link. Lots of information there. I've often wondered if there was an "ideal" diameter.

Here is a picture of the tool.
The bolt in the center holds the backing plate rigid in a quick-change tool holder. The plate doesn't move but of course the arms move freely. The wheels have a small chamfer.
tn_knurler.jpg


My main issue is that the top wheel cuts deeper than the bottom, and the bottom wheel seems to cut with a different pitch even though they are the same.

In the picture of the samples I made there are three bands. There was no side feed at all, just a straight pressure downward. The partial band on the far left is from the tool "walking" a bit when I first clamped down on it.

Should I loosen up the plate so it can wobble a bit? The arms have a tiny bit of side movement but I don't know how to get rid of that without making them so tight they won't swing. Guess I'll just have to keep fiddling with it till it improves.


Thanks,
Kevin
 
I haven't done much knurling, so take these ideas with a (big) grain of salt. :big:

Observation:
Scissors type should mean equal pressure from each knurl...correct?
So each knurl should cut (approximately) the same.

Try flipping the bottom knurl over and see what happens.
Maybe the bottom knurl was damaged somehow (or dulled) and isn't cutting properly.

Try a set of knurls that are known to be new and unused.

Harvey's Machine Shop Trade Secrets describes the relationship between the knurls and the diameter of the workpiece starting on page 189. Darn good book. Lots of great hints and tips.

Andrew
 
Despite the fact that I have a program on my page for calculating the optimal diameter for knurling, I'm now somewhat of the opinion that it doesn't matter.

Keep the lathe speed low - I often use back gear. Apply lots and lots of lubricant. (Knurling is a metal displacement operation but, especially in brass, it tends to break loose chips of metal that can interfere with the process. Lubricant helps to float these out of the way.)

Mash the knurls into the work. Keep increasing pressure until they begin to track and form a proper, even knurl pattern. Once the pattern is developed, move the carriage slowly by hand to cover the width of the knurl.

If all this fails - it almost never does for me - and you still have a ratty pattern, turn down the workpiece to remove say twenty thousandths from the diameter and try again.

Another hint: When you've set up to knurl and things are going right, knurl an extra length of material and throw it in the "future projects" bin. Next time you need a knurled thumb screw, etc., pull it out and you're good to go without needing to set up for knurling again.

Properly formed knurl diamonds are little pyramids with sharp points. While visually attractive, they're hell on fingers if they need to be used frequently. After making such perfect knurls, do yourself a favor and give the knurls a stroke or two with a file to dull those points.
 
The scissor type knurling tool should eliminate having to keep the wheels in line vertically, unless the center pivot bolt that holds the knurling tool to the shank is too tight. It should pivot enough to correct itself (within reason). The wheels, therefore, should have the same amount of pressure on each. If one is damaged, as already stated, it could cause a problem; but it appears that the one cutting shallow on your part isn't tracking properly, and actually turning faster than the other.

Your knurling tool, having looked at the photo a little more, doesn't appear to have been designed to pivot on the center bolt, correct?

Kevin
 
I haven't heard anyone mention whether they go back and forth over the pattern. I was taught and subsequently have always fed the carriage both ways as I increase pressure on the rolls. I have never had any problems with this and always get nice sharp knurls. I have done it with both scissor and push knurls. Have you tried knurling both directions?
 
I was taught ot brush away the crud with a stainless steel , sized brush tooth brush clean the knurls if you clean the part the bristles can get sucked in. Yes lots of lube to wash away the chips.
Marv I like your do an extra piece or two idea.
tin
 
By golly, I got it!

First, I noticed that there had been an inordinate accumulation of junk on the bottom wheel so I cleaned it up really well with a stainless steel brush and WD-40.

Also, I had been using a somewhat heavy lubricating oil. This time I used WD-40 and A LOT of it. I also used more pressure than I had been comfortable with previously.

I think the lower wheel has a tendency to collect more debris and got compacted so it wouldn't cut as deep. The switch to a lighter oil helped to flush stuff away rather than let it build up.

Marv, you jumped the gun on me. What started this whole thing was an intent to knurl up several inches of stock for later use. Now I can get on with that project.

Thanks to everybody for their suggestions. Each one was important and very helpful.

The brass looks worse than it is, I'm blaming the flash. Each cut is now nice and crisp and of equal depth.
knurl_2.jpg
 
Some good tips, above. Here's my theory and technique. for push-type knurls, I've done mostly on heavy industrial lathes. I set the tool on center. I also set it about a 5 degree angle to the right, so the left edge of the wheels contact the work first. I start the lathe -low RPM- then mash the tool into the work, don't baby it. get it to depth within a couple of turns. Then power feed right to left, about .020/rev. Yes I use oil or flood coolant to flush out swarf too. I try to get the knurl deep enough on the first pass. The angle of the tool lets the leading edge do all the work, and the tool pressure is concentrated and deforms the metal only once. I start at the end of the work(tailstock) if possible, or if the ends must be 'plain', then I'll start in middle, work left, then reset the tool angle the other way and work to the right. This gets a good definition at the edge of the knurl.

I have a scissors type at home, similar to Kevin's, it works OK for me, but going to and fro, multi passes on aluminum, the wheels load up and mash the good knurls previously cut. Aluminum and brass seems to be important to get it done on first pass. Also, no option to angle this type of tool. And it sometimes it looks as if the top and bottom rollers are not directly in line ???.

I don't always get it right on the first try, but that's my theory, hope I didn't rain on anybody's parade.
P.S. I tried to use 'workhardening', but that's three more paragraphs :big:.

DB
 
I'm glad you got it working. Back a ways you commented the two knurls were the
same, I was going to suggest you actually count the "teeth" on them. We had a
"pair" at school that, one had one more tooth than the other. Fun and games on
that. :)
...lew...
 
Kevin,

Congratulations :bow:

know more hurly burly with the knurly.

Best Regards
Bob
 
Thanks Bob. Now I only hope I can repeat the success ::)


Kevin
 
Back
Top