


Vacuum / Injection moulding of polyurethane parts home workshop style.
Polyurethane comes in grades from marshmallow to wood in hardness and is useful stuff for moulding all sorts of parts.
I have been meaning to do a post on this for some time but nothing came up but I had to make some seals for one of my industrial customers, so Ill show you the process.
Some bits that I have made :-
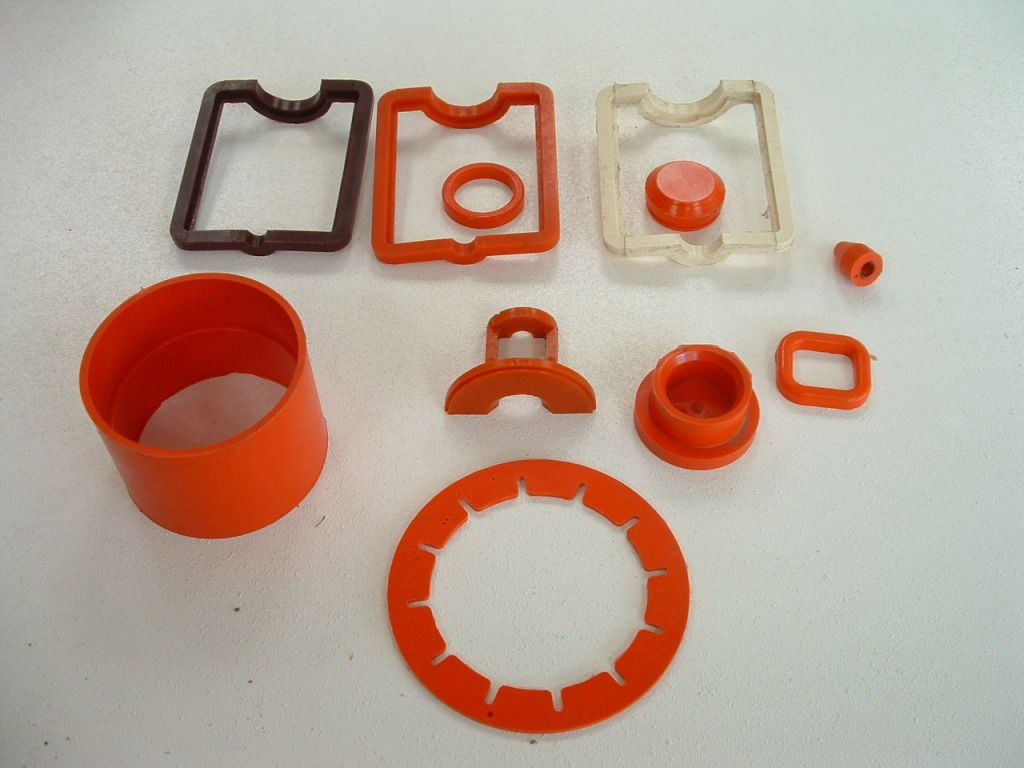
Polyurethane can be gravity cast into open moulds (degas mixture in a vacuum pot before pouring) or injection moulded into a closed cavity mould.
I am going to demonstrate a closed cavity mould.
Firstly the usual safety precautions polyuerethanes contain unreacted isocyanates prolonged skin contact should be avoided. Observe safety instructions supplied with product.
Cured and uncured polyurethane can be removed with Methelene Chloride volatile but not flammable decomposition products if burnt can be nasty. Minor / brief accidental skin contact O.K. but longer will produce burns.
Despite the warnings it is not too hazardous just dont get the stuff in your eyes methelene chloride in your eyes is excruciating.
The process consists of using two pressure vessels, an upper vessel to hold the resin for degassing prior to injecting it into the mould held in the lower vessel.
My upper vessel is a discarded industrial water filter and my lower vessel is a discarded truck oil filter (pretty low tech). The lower vessel only needs to handle vacuum (in this case I just drop the lid on it does have hold downs but these are never required), the upper vessel needs to handle vacuum and pressure in this case it is O ring sealed and has a locking collar You dont need to use the collar under vacuum but youd damn well better remember to fit it before applying pressure or you are going to end up with one helluva mess (guess how I know this ?).
For a vacuum, I originally used the suction side of my compressor but this was not very effective only getting down to about 0.9 of full vacuum. I then used a discarded fridge compressor (a big one) that got down to about 0.95 and was a big improvement but eventually I scored a 5 lpm Edwards vacuum pump which can pull a pretty mean vacuum.
You need vacuum to degas the resins, mould etc followed by pressure (from the compressor) to push the resin into the mould cavity.
When degassing the resin any aeration bubbles from mixing as well as dissolved gasses will expand dramatically rising rapidly to the surface of the mix during degassing.
Note: During degassing the mixture will froth up to about 3 times the depth of the original mixture so be sure you have enough headroom in your upper vessel.
This frothing can be diminished by cycling the vacuum releasing it at intervals before reaching full vacuum however polyurethane resins go off fairly quickly and you dont have time to muck about.
Any residual bubbles will be squashed by the application of pressure (example a 5mm diameter bubble at 1mBar will become a 0.3mm bubble at 5 Bar. First prize is to eliminate bubbles best done by a good vacuum you may note in this application the mould has riser sprues to allow any residual bubbles to migrate up into you can see the vestiges of bubbles in the top of two of the riser sprues later.
Part being made this post :-
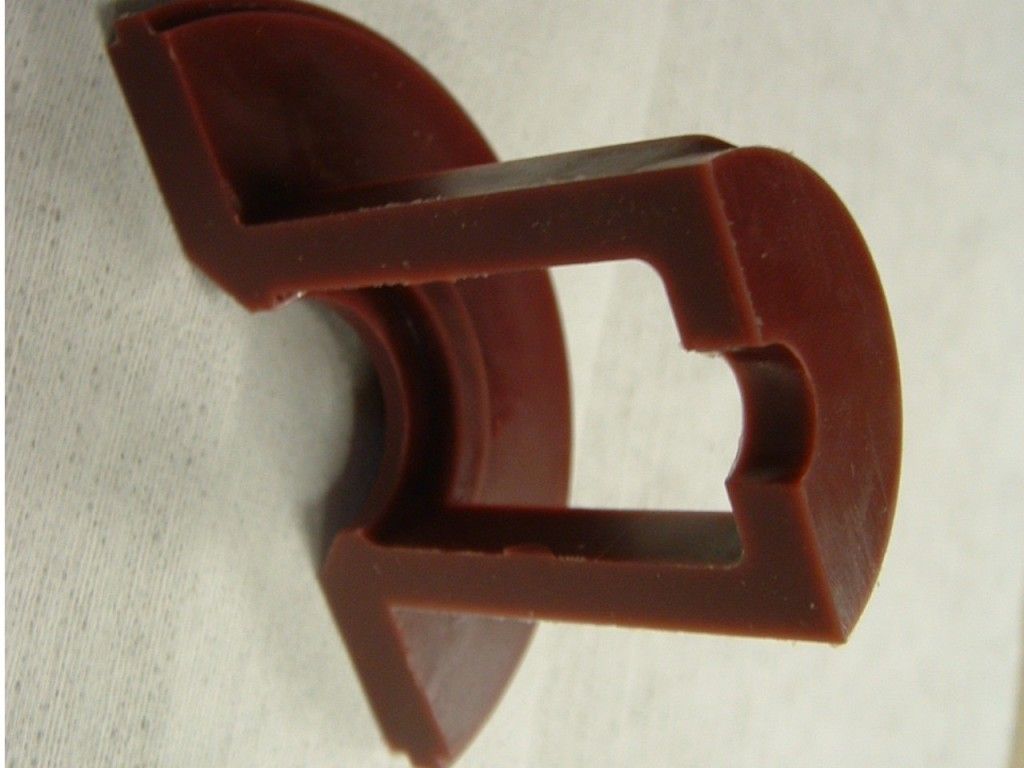
This is the finished part, riser sprues & flashing removed. Its a custom seal for Nitrogen pressurizing shockabsorbers (I designed the filling machine).
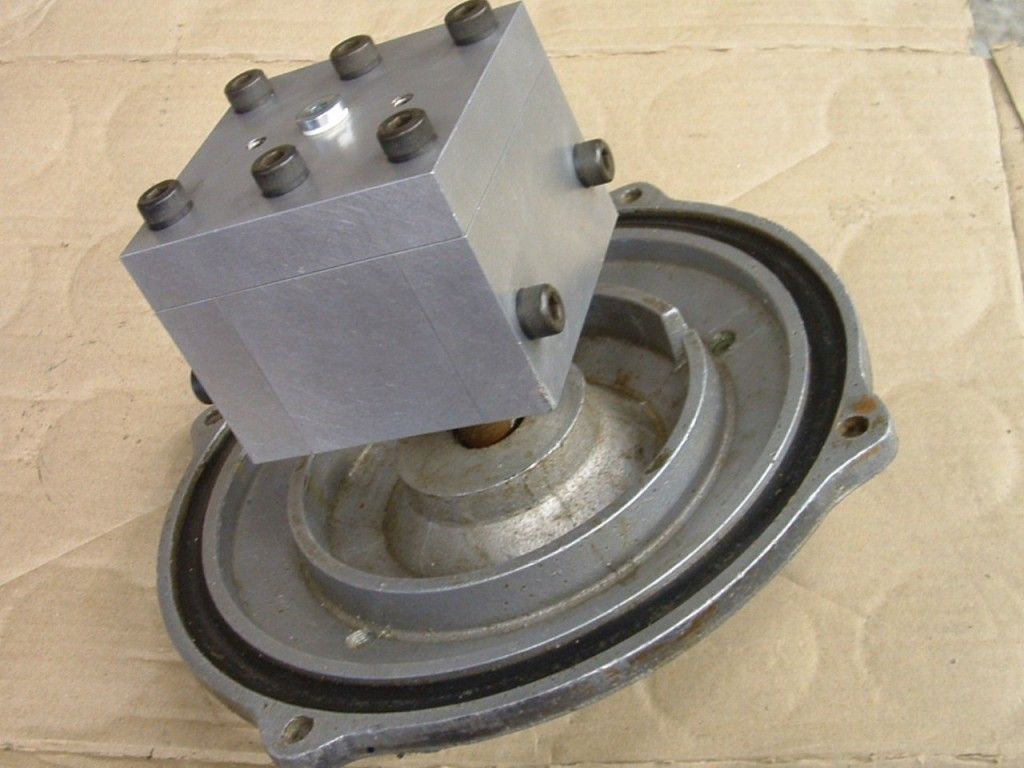
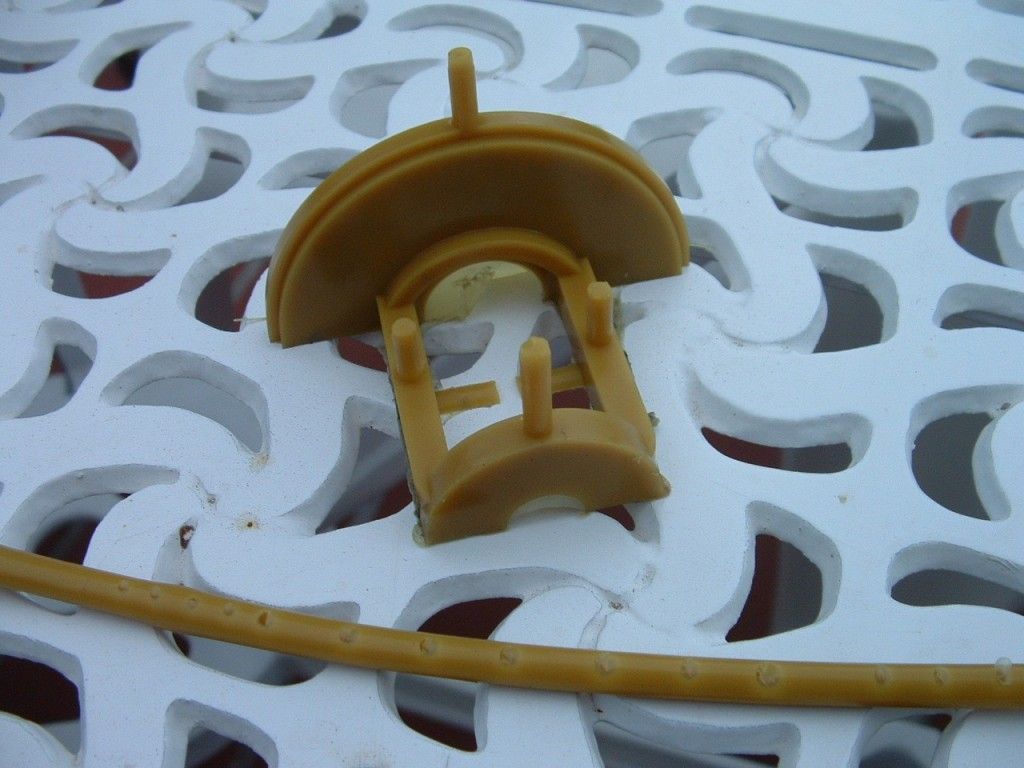
Being made in this mould :-
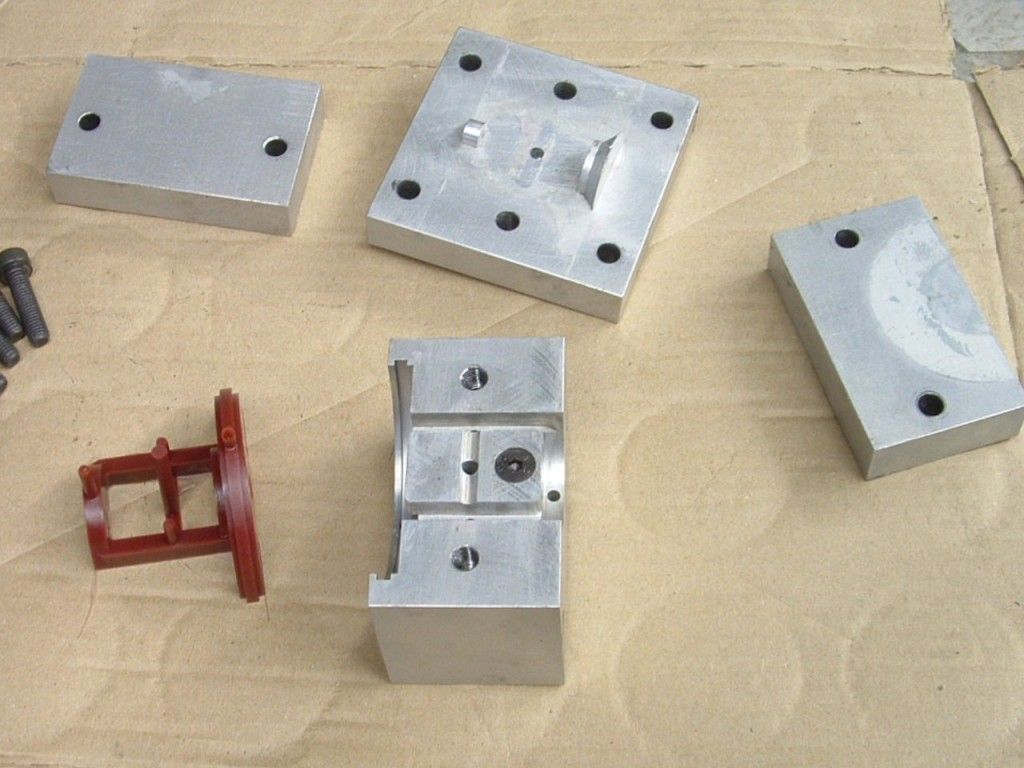
The mould is screwed on to a spigot (1/8 BSP fitting) through the lid of the lower vacuum vessel this in turn is connected to the upper vessel via 6mm bore Festo PU pipe and standard Festo fittings.
The mould, upper vessel and connecting pipe are coated with release agent I use a brush for the mould surfaces and slosh some around in the upper vessel and drain it out via the pipe.
Most release agents are silicone based this can create havoc with spray painting (fish eyes) so keep well away from spray painting areas or make sure you get a non-silicone release agent.
I then connect my vacuum pump to both vessels for about 10 minutes this pulls a vacuum in both vessels and the mould, this degasses any residual solvents in the release agent.
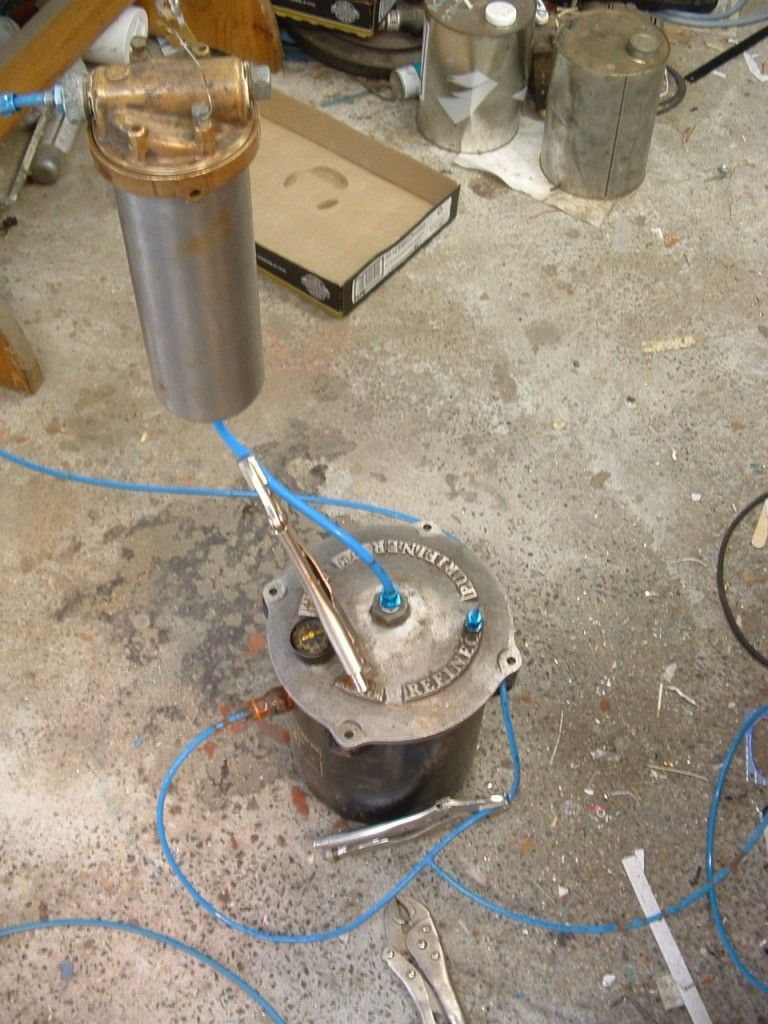
The pipe between the vessels is then pinched closed with vice grips and the vacuum closed off at the lower vessel (no point in losing the vacuum you have already built up).
The photo above shows the rig after initial vacuuming with the pipe and vaccum line pinched closed. The additional set of grips is to close the pipe to the lower vessel (the leg of the T immediately above the grips) which I had not done yet but must still do so.
The upper vessel is suspended on a cable from my roof.
Release the vacuum in the upper vessel and open it.
Mix 2 part resins (accelerator if required) and pigment to suit mix it in a disposable paper cup using a tongue depressor as a stirrer. (all this stuff generally available from the resin supplier) mix enough resin for the component and the residue in the upper vessel (I generally add about 90g which is a lot of waste for a 30g part but what the heck).
You may have noticed the mould has an out hole which is plugged sometimes I stack moulds and do two or three parts at a time.
Weigh the residue after your first cast and reduce the amount if you can.
Beware of short changing yourself if you come up short, when you are using the compressed air to push the resin into the mould and you push air into the mould, the shows over and you can start again.
If you do screw up, never make the mistake of opening a wet mould you will face an unholy mess wait three or four hours for the gunk to cure before attempting to strip it down.
Note: Unlike epoxies & polyesters, Polyurethane resins are NOT tolerant to mixing ratio errors so use a digital scale and be precise.
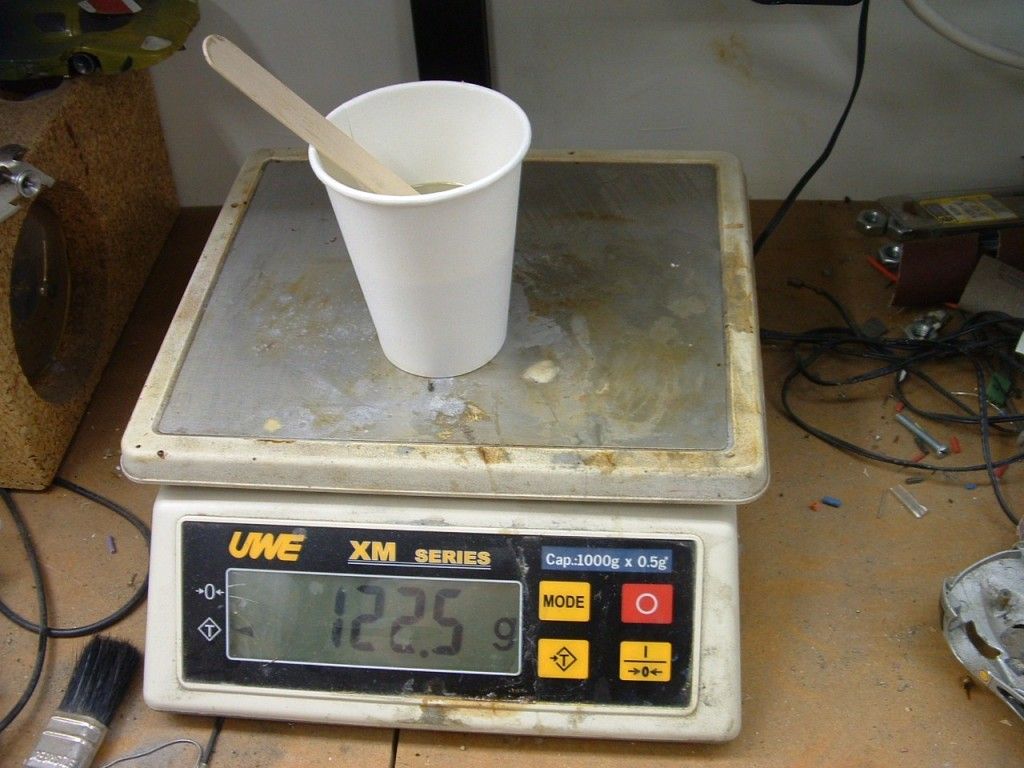
Mix thoroughly adding pigment helps in that when you reach colour consistency then it is properly mixed same caution applies polyurethanes are intolerant of mixing errors.
Next pour mixture into upper vessel.
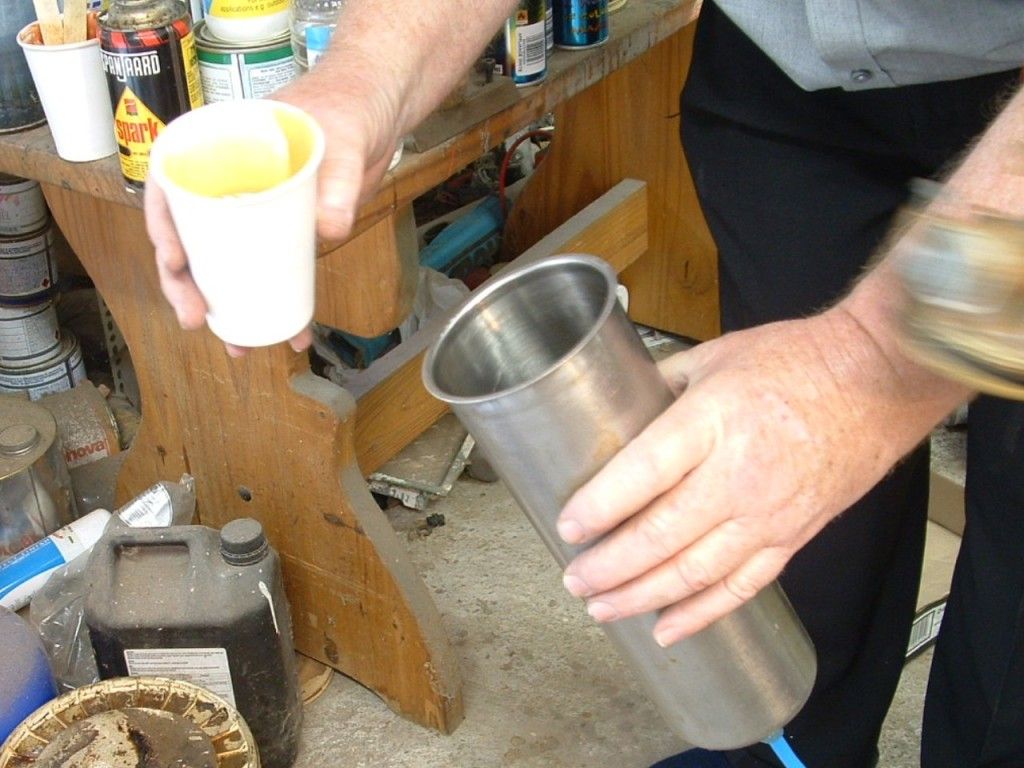
Note top end above my left hand penduluming on its cable (blurr).
Reattatch and apply vacuum to degas.
Reclose the vacuum line and remove from upper vessel to let the atmosphere in slowly if you just simply pull the pipe off the rush of air into the vessel may stir up the mix and entrain air once again.
Remove the clamp from the pipe between the upper and lower vessels. Atmospheric pressure is now pushing the resin into the vacuumed mould.
Attach a closed compressed air line to the upper vessel and apply (as much pressure as your compressor will produce) pressure again apply it slowly to avoid aeration of the mixture and potentially causing the mixture to rathole air down into the mould.
Keep an eye on the consistency of the residue in the paper cup if it starts to thicken you are running out of time and might need to get a move on.
Other than that pace yourself it works best if done slowly but you cant take too long.

Rig with pressure to upper vessel, intermediate pipe open and vacuum to lower vessel (pipe previously connected to upper vessel was pinched off and removed before opening the vessel)
Pinch off the pressure line (so you can reclaim your airline) to leave pressure on the upper vessel. Pinch off the vacuum line to maintain the vacuum in the lower vessel turn off the vacuum pump & disconnect (it has happened to me once that the vacuum pulled the compressor fluid out of the {stopped} pump and into the lower vessel so now I disconnect as part of the routine.)
Wait generally 3-4 hours so I normally leave it overnight.
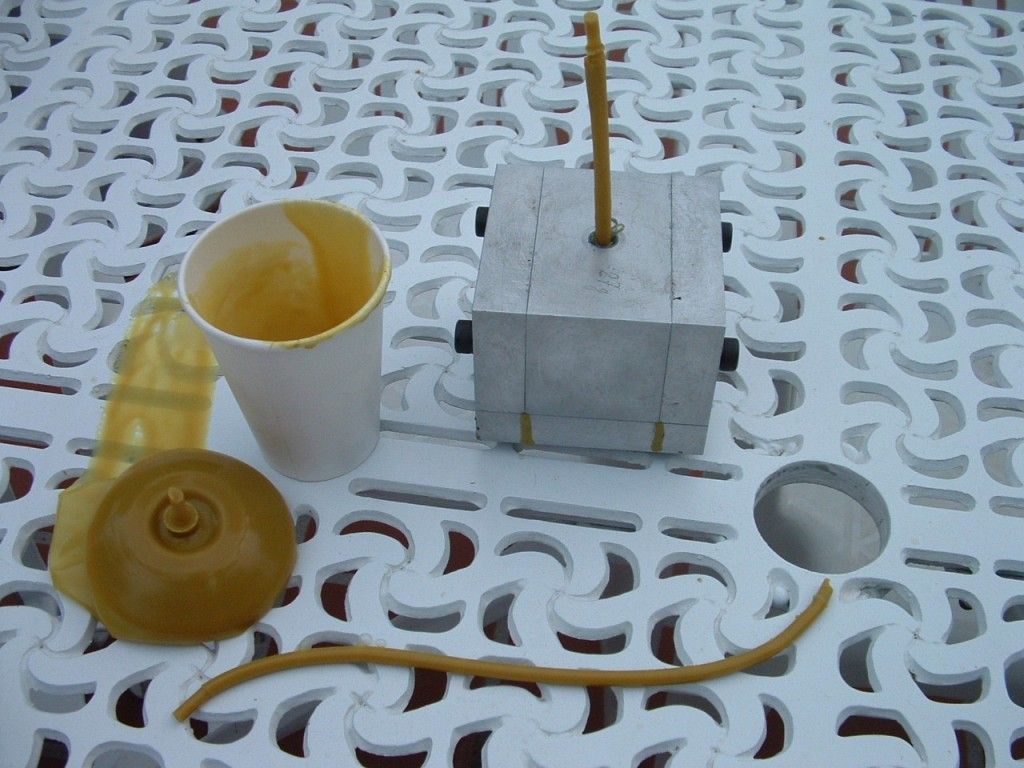
Heres the mould removed you can see the weeping it does not seal entirely (this is not injection mould standards here flycut aluminium).
Also showing the sprues and scrap material from the upper vessel and connecting tube.
Heres the part removed from the mould warts and all there are two very tiny bubbles in the tips of the two tallest risers but note the bubbles in the leader scrap I came perilously close to blowing air into the mould probably because I got all out of sync taking photos screwed up my usual routine I let the air in way too fast and it ratholed sometimes you get lucky, sometimes you dont.
.
That said a checklist might not be a bad idea.
Some Additional Tips & Tricks
The resins can go off really fast in hot weather if this becomes a problem, chill pre-weighed quantities in a fridge before mixing.
If your mould leaks slightly, try pre-heating the mould to 50-60 C° - the resin trying to sneak through the leak cures rapidly to seal the mould.
In very cold weather is it advisable to pre-heat the mould to 50-60 C° anyway.
If your mould leaks like a sieve, in addition to heating, remove the pressure and vacuum as soon as you are confident that the mould is filled (not best practice but it works kinda halfway between injection and gravity casting).
Mould leaks can also be cured by cleaning one surface of the leaky joint and adding epoxy resin with release agent on the mating face, assemble the mould gap will be exactly filled by the epoxy.
Gravity cast parts can be cast in silicone rubber moulds thrown from sample parts.
Closed moulds can also be cast off sample parts using hard polyurethanes obviously cast in two gos set part in modeling clay to split line cast one side remove clay and repeat for the other side drill and tap clearance etc for securing bolts, sprues etc. This will only work for parts with a suitable draw angle otherwise use silicone moulds see next.
Injection moulding is also possible with silicone moulds cast about a part in a suitable vessel vis :-
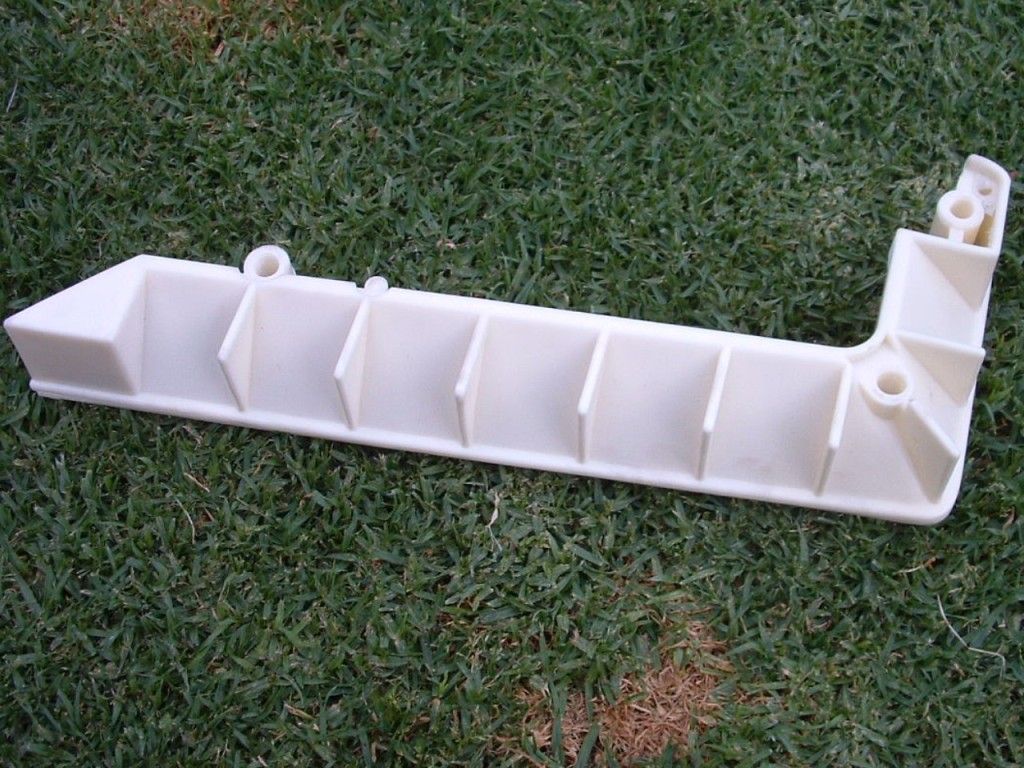
This is a louver door segment on an Ami E-120 jukebox (1953) that I restored. Its the biggest part I have made its made of rigid polyurethane.
This is the mould :-
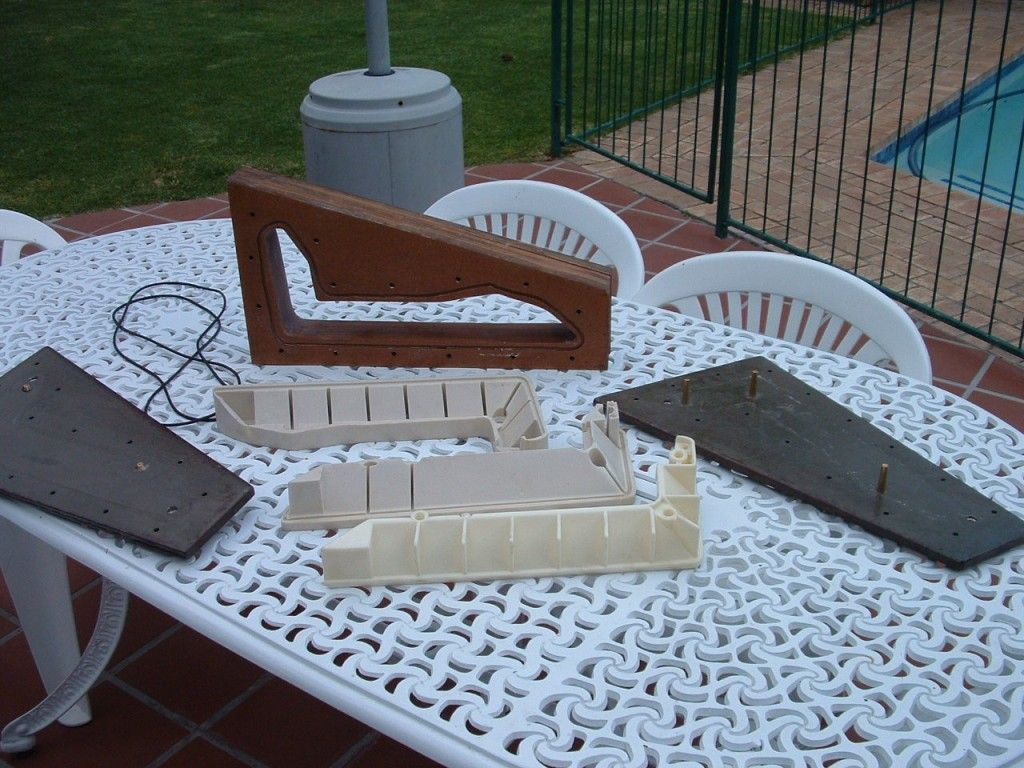
An MDF cavity with draw angle (liberally laquered to seal), steel plates, O rings etc. Silcone was first cast around sample part in the cavity. Silicone cut to split line with a scalpel (plan ahead) and subsequent parts cast in rigid clear (pigmented to white translucent) polyurethane.
There are about 20 M6 readybolt tiebars holding this together.
Rigid polyurethanes can also be mixed with Aluminium powder 1:2 - when cured it can be machined, drilled. Tapped etc. it even takes a polish and looks like aluminium Ill do a post on this some other time as this is waaaayyyy too long already.
Regards,
Ken
Polyurethane comes in grades from marshmallow to wood in hardness and is useful stuff for moulding all sorts of parts.
I have been meaning to do a post on this for some time but nothing came up but I had to make some seals for one of my industrial customers, so Ill show you the process.
Some bits that I have made :-
Polyurethane can be gravity cast into open moulds (degas mixture in a vacuum pot before pouring) or injection moulded into a closed cavity mould.
I am going to demonstrate a closed cavity mould.
Firstly the usual safety precautions polyuerethanes contain unreacted isocyanates prolonged skin contact should be avoided. Observe safety instructions supplied with product.
Cured and uncured polyurethane can be removed with Methelene Chloride volatile but not flammable decomposition products if burnt can be nasty. Minor / brief accidental skin contact O.K. but longer will produce burns.
Despite the warnings it is not too hazardous just dont get the stuff in your eyes methelene chloride in your eyes is excruciating.
The process consists of using two pressure vessels, an upper vessel to hold the resin for degassing prior to injecting it into the mould held in the lower vessel.
My upper vessel is a discarded industrial water filter and my lower vessel is a discarded truck oil filter (pretty low tech). The lower vessel only needs to handle vacuum (in this case I just drop the lid on it does have hold downs but these are never required), the upper vessel needs to handle vacuum and pressure in this case it is O ring sealed and has a locking collar You dont need to use the collar under vacuum but youd damn well better remember to fit it before applying pressure or you are going to end up with one helluva mess (guess how I know this ?).
For a vacuum, I originally used the suction side of my compressor but this was not very effective only getting down to about 0.9 of full vacuum. I then used a discarded fridge compressor (a big one) that got down to about 0.95 and was a big improvement but eventually I scored a 5 lpm Edwards vacuum pump which can pull a pretty mean vacuum.
You need vacuum to degas the resins, mould etc followed by pressure (from the compressor) to push the resin into the mould cavity.
When degassing the resin any aeration bubbles from mixing as well as dissolved gasses will expand dramatically rising rapidly to the surface of the mix during degassing.
Note: During degassing the mixture will froth up to about 3 times the depth of the original mixture so be sure you have enough headroom in your upper vessel.
This frothing can be diminished by cycling the vacuum releasing it at intervals before reaching full vacuum however polyurethane resins go off fairly quickly and you dont have time to muck about.
Any residual bubbles will be squashed by the application of pressure (example a 5mm diameter bubble at 1mBar will become a 0.3mm bubble at 5 Bar. First prize is to eliminate bubbles best done by a good vacuum you may note in this application the mould has riser sprues to allow any residual bubbles to migrate up into you can see the vestiges of bubbles in the top of two of the riser sprues later.
Part being made this post :-
This is the finished part, riser sprues & flashing removed. Its a custom seal for Nitrogen pressurizing shockabsorbers (I designed the filling machine).
Being made in this mould :-
The mould is screwed on to a spigot (1/8 BSP fitting) through the lid of the lower vacuum vessel this in turn is connected to the upper vessel via 6mm bore Festo PU pipe and standard Festo fittings.
The mould, upper vessel and connecting pipe are coated with release agent I use a brush for the mould surfaces and slosh some around in the upper vessel and drain it out via the pipe.
Most release agents are silicone based this can create havoc with spray painting (fish eyes) so keep well away from spray painting areas or make sure you get a non-silicone release agent.
I then connect my vacuum pump to both vessels for about 10 minutes this pulls a vacuum in both vessels and the mould, this degasses any residual solvents in the release agent.
The pipe between the vessels is then pinched closed with vice grips and the vacuum closed off at the lower vessel (no point in losing the vacuum you have already built up).
The photo above shows the rig after initial vacuuming with the pipe and vaccum line pinched closed. The additional set of grips is to close the pipe to the lower vessel (the leg of the T immediately above the grips) which I had not done yet but must still do so.
The upper vessel is suspended on a cable from my roof.
Release the vacuum in the upper vessel and open it.
Mix 2 part resins (accelerator if required) and pigment to suit mix it in a disposable paper cup using a tongue depressor as a stirrer. (all this stuff generally available from the resin supplier) mix enough resin for the component and the residue in the upper vessel (I generally add about 90g which is a lot of waste for a 30g part but what the heck).
You may have noticed the mould has an out hole which is plugged sometimes I stack moulds and do two or three parts at a time.
Weigh the residue after your first cast and reduce the amount if you can.
Beware of short changing yourself if you come up short, when you are using the compressed air to push the resin into the mould and you push air into the mould, the shows over and you can start again.
If you do screw up, never make the mistake of opening a wet mould you will face an unholy mess wait three or four hours for the gunk to cure before attempting to strip it down.
Note: Unlike epoxies & polyesters, Polyurethane resins are NOT tolerant to mixing ratio errors so use a digital scale and be precise.
Mix thoroughly adding pigment helps in that when you reach colour consistency then it is properly mixed same caution applies polyurethanes are intolerant of mixing errors.
Next pour mixture into upper vessel.
Note top end above my left hand penduluming on its cable (blurr).
Reattatch and apply vacuum to degas.
Reclose the vacuum line and remove from upper vessel to let the atmosphere in slowly if you just simply pull the pipe off the rush of air into the vessel may stir up the mix and entrain air once again.
Remove the clamp from the pipe between the upper and lower vessels. Atmospheric pressure is now pushing the resin into the vacuumed mould.
Attach a closed compressed air line to the upper vessel and apply (as much pressure as your compressor will produce) pressure again apply it slowly to avoid aeration of the mixture and potentially causing the mixture to rathole air down into the mould.
Keep an eye on the consistency of the residue in the paper cup if it starts to thicken you are running out of time and might need to get a move on.
Other than that pace yourself it works best if done slowly but you cant take too long.
Rig with pressure to upper vessel, intermediate pipe open and vacuum to lower vessel (pipe previously connected to upper vessel was pinched off and removed before opening the vessel)
Pinch off the pressure line (so you can reclaim your airline) to leave pressure on the upper vessel. Pinch off the vacuum line to maintain the vacuum in the lower vessel turn off the vacuum pump & disconnect (it has happened to me once that the vacuum pulled the compressor fluid out of the {stopped} pump and into the lower vessel so now I disconnect as part of the routine.)
Wait generally 3-4 hours so I normally leave it overnight.
Heres the mould removed you can see the weeping it does not seal entirely (this is not injection mould standards here flycut aluminium).
Also showing the sprues and scrap material from the upper vessel and connecting tube.
Heres the part removed from the mould warts and all there are two very tiny bubbles in the tips of the two tallest risers but note the bubbles in the leader scrap I came perilously close to blowing air into the mould probably because I got all out of sync taking photos screwed up my usual routine I let the air in way too fast and it ratholed sometimes you get lucky, sometimes you dont.
.
That said a checklist might not be a bad idea.
Some Additional Tips & Tricks
The resins can go off really fast in hot weather if this becomes a problem, chill pre-weighed quantities in a fridge before mixing.
If your mould leaks slightly, try pre-heating the mould to 50-60 C° - the resin trying to sneak through the leak cures rapidly to seal the mould.
In very cold weather is it advisable to pre-heat the mould to 50-60 C° anyway.
If your mould leaks like a sieve, in addition to heating, remove the pressure and vacuum as soon as you are confident that the mould is filled (not best practice but it works kinda halfway between injection and gravity casting).
Mould leaks can also be cured by cleaning one surface of the leaky joint and adding epoxy resin with release agent on the mating face, assemble the mould gap will be exactly filled by the epoxy.
Gravity cast parts can be cast in silicone rubber moulds thrown from sample parts.
Closed moulds can also be cast off sample parts using hard polyurethanes obviously cast in two gos set part in modeling clay to split line cast one side remove clay and repeat for the other side drill and tap clearance etc for securing bolts, sprues etc. This will only work for parts with a suitable draw angle otherwise use silicone moulds see next.
Injection moulding is also possible with silicone moulds cast about a part in a suitable vessel vis :-
This is a louver door segment on an Ami E-120 jukebox (1953) that I restored. Its the biggest part I have made its made of rigid polyurethane.
This is the mould :-
An MDF cavity with draw angle (liberally laquered to seal), steel plates, O rings etc. Silcone was first cast around sample part in the cavity. Silicone cut to split line with a scalpel (plan ahead) and subsequent parts cast in rigid clear (pigmented to white translucent) polyurethane.
There are about 20 M6 readybolt tiebars holding this together.
Rigid polyurethanes can also be mixed with Aluminium powder 1:2 - when cured it can be machined, drilled. Tapped etc. it even takes a polish and looks like aluminium Ill do a post on this some other time as this is waaaayyyy too long already.
Regards,
Ken
")