Goin' Crackers.

Home Model Engine Machinist Forum

Help Support Home Model Engine Machinist Forum:

This site may earn a commission from merchant affiliate links, including eBay, Amazon, and others.
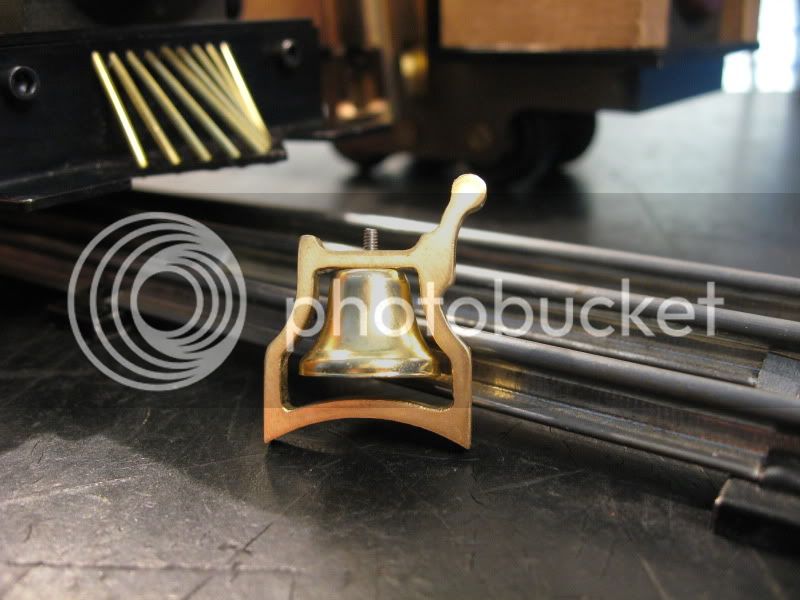
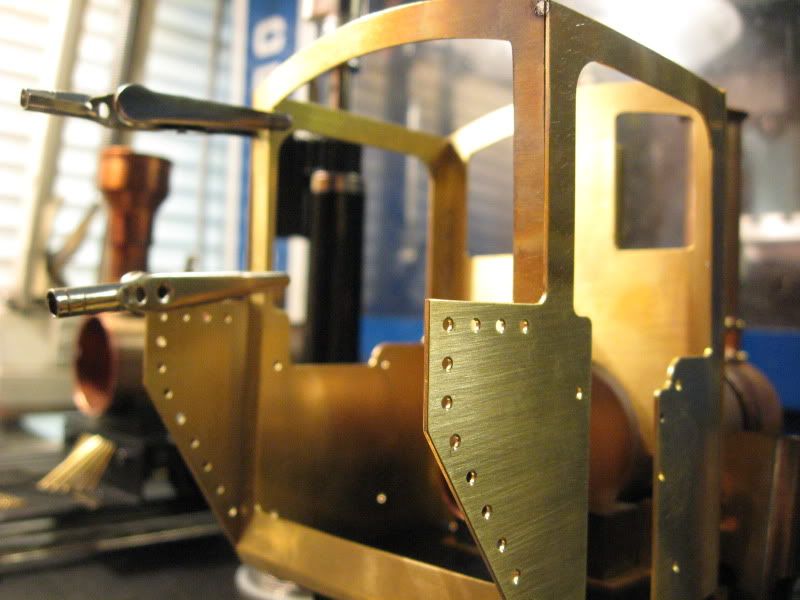
Thanks! I'm enjoying building these. Zeep motivated me into making these two parts this weekend.
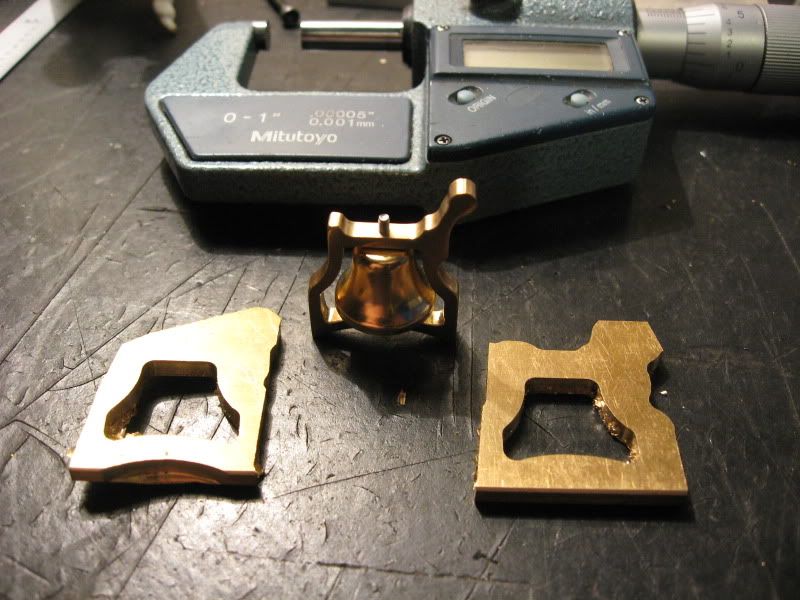
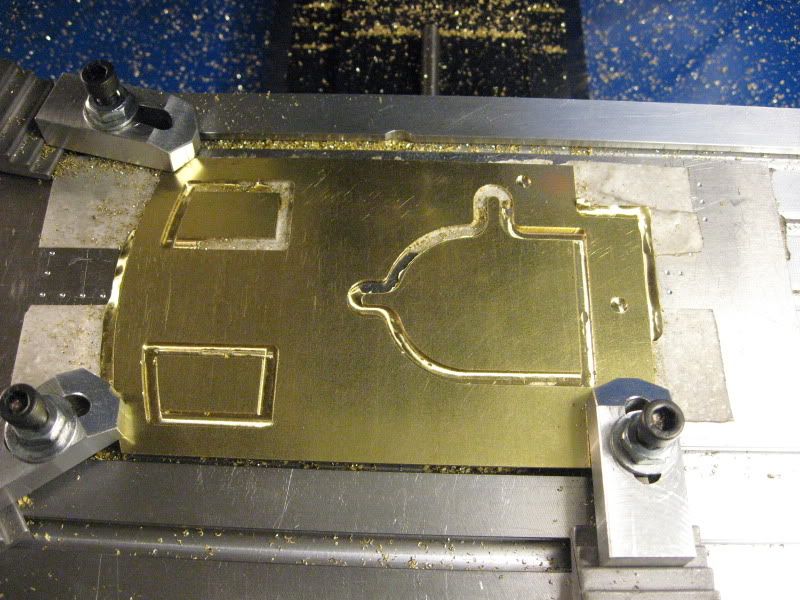
Oh yeah, that part was lightly scrubbed with a 3M or 'scotchbrite' pad.


Deanofid said:
What did you use to hold it to the fixture plate? Super glue?
Yes, these two parts are the only time I've ever used superglue to hold a part. Usually it's doublesided tape, clamps, or softjaws, if I can't just drop them into a vise... while glue is more expensive than tape, it seems to work well.

 
Out standing Vernon, very interesting post, i see your doing a great job of putting your own stamp on the build :bow: :bow: :bow:

Regards Rob
 
Vernon said:
Yes, these two parts are the only time I've ever used superglue to hold a part. Usually it's doublesided tape, clamps, or softjaws, if I can't just drop them into a vise... while glue is more expensive than tape, it seems to work well.

It's great stuff for thin parts. I use it all the time for holding thin gear blanks to a face plate when turning them to size.

Dean
 
Thanks, everyone! You guys make this even more fun. ;D


Deanofid said:
It's great stuff for thin parts. I use it all the time for holding thin gear blanks to a face plate when turning them to size.
Yeah, I'm going to be using it a LOT more often, both at home and work.
 
Ok, I finished the hinge, and now I only need to make the latch and handles. While Zeep was pushing me to make parts, I decided to cut out a mount for a miniature bell that I bought at a craft store.

Who says you can't un-ring a bell? Since the bell is made of brass-plated steel, it looks better than it sounds. So, I made the mount all in once piece, with a dummy arm, and removed the clapper from the bell. The arm will be drilled for a miniature pull-cord, which will still fail to produce sound from this mute bell. ;D

I'll cut down the thread, or add a decorative nut, on the bolt holding the bell.
Ding003.jpg


I also threw together another video, with some footage of both the hinge and bell bracket construction.
[ame]http://www.youtube.com/watch?v=BrxcutWAj2Q[/ame]


Also, this one's for Zeep and his "Failure Percentage" calculations; The first time I made the bell bracket, I was taking roughing cuts that were too much for the doublesided tape, and popped both parts off of the 'fixture', ruining them both. So, the bell bracket has a 66% failure rate. ;D
oops_oops_yay022.jpg
 
Over the top coolness 8) Vernon. What a novel idea to make a bell bracket. Truly a "ringer" (yeah I know, *groan*) of a detail. :big:

BC1
Jim
 
Excellent vid Vernon...nice backdrop with the cowcatcher and the ending was genius with the locos in the background. Beautiful.

Oh! And nice parts too. :big:
 
bearcar1 said:
Truly a "ringer" of a detail. :big:
Oh that was terrible. ;D


Well, I've started cutting brass. Not just any brass, but the .031" sheet brass I ordered for the bodywork. This has been fun so far, although I'm going cross-eyed from staring at drawings.
Possibly I've overdone it with the nails-as-rivetheads, but they'll be a lot more subdued when they're painted over.

Two sides and a small tank.
BrassStarted001.jpg


Bending the start of the steps.
BrassStarted003.jpg


A nailhead rivet.
BrassStarted014.jpg

 
Well, I've moved back to Loco #2, following Zeep's suggestion about the dreaded "Project Shift". If I finish the one for my dad first, I might get bored and not finish my own. So, I'll finish my own first. :D

In my last post, I was showing off a few of the brass parts for the cab. I'm REALLY having fun making these, and it looks like I'll be working out all of the construction bugs on my own Cracker before moving to my dad's.

I still need to make the other sides of the water tanks, and the coal bunker/ fuel tank. This stuff is fun to work with.

SpectaclePlate006.jpg


progress016.jpg


[ame]http://www.youtube.com/watch?v=uaJKyTJZp7c[/ame]
 
Very nice Vernon.

And thanks. I'm glad to know I contributed to changing someone's direction. :big:

Nice video too. When I see all the holes being made...CNC looks enticing.

Looking forward to seeing more on the sheetmetal work. I know that's in my future and I have a lot of learning to do.

It's odd to me seeing those windows 'floating'. Double stick tape eh?

Was the metal already 'brushed'? What, if any, prep work did you have to do before milling?
 
zeeprogrammer said:
Very nice Vernon.
And thanks. I'm glad to know I contributed to changing someone's direction. :big:
Nice video too. When I see all the holes being made...CNC looks enticing.
Looking forward to seeing more on the sheetmetal work. I know that's in my future and I have a lot of learning to do.
It's odd to me seeing those windows 'floating'. Double stick tape eh?
Was the metal already 'brushed'? What, if any, prep work did you have to do before milling?

Thanks! Yeah, you had a good idea with that.
CNC hole-drilling, it almost seems like cheating. Almost.
You'll see more sheetmetal work, I need to finish the water tanks soon.
This sheet metal is a lot of fun, after hours of drawing, tape it down and go.

I've got the basic cab parts soldered together, it's quite solid.
 
Good going Vernon; - Now get it done; I need tips! :big:
 
Those pics almost makes me want to pull on my coveralls and gloves and step into the cab for a short steam around the loop. Those are going to be a set of fine looking locos when you are finished, and I am certain that your Dad is going to be thrilled beyond words.

BC1
Jim
 
Vernon,
This is really looking good. Keep the pictures coming please.
Dennis
 
Great stuff Vernon !! Thm:

How about some pictures of your CNC rig ? Looks like a Sherline mill ? What software are you running, Mach3 ?

Thanks!
Mike
 
What's it going to be Vernon?

"Move along folks."
"Nothing to see here."
"Go about your business."

or....

"WATCH THIS SPACE!"
"COMING ATTRACTIONS!"

stickpoke
 

Latest posts

Back
Top