Fly Cutter questions

Home Model Engine Machinist Forum

Help Support Home Model Engine Machinist Forum:

This site may earn a commission from merchant affiliate links, including eBay, Amazon, and others.

Cogsy

Well-Known Member
Joined
Jul 30, 2012
Messages
2,945
Reaction score
897
Location
Perth, Western Australia
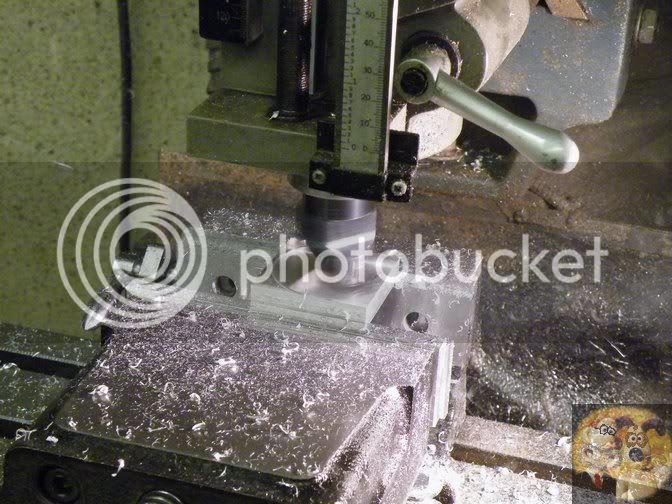
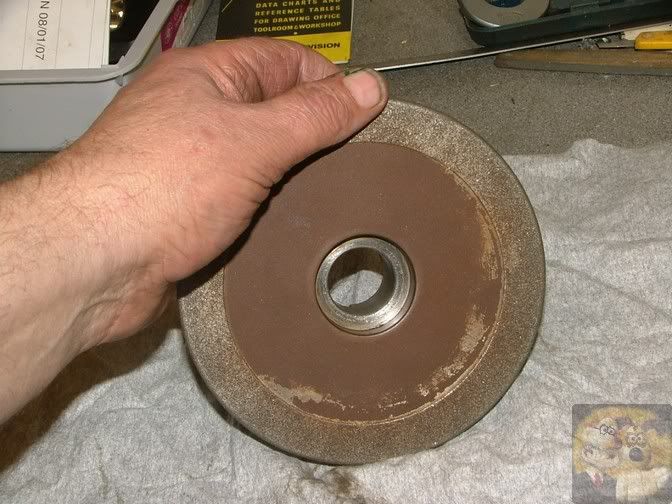
I have a need of making a reasonably large piece of aluminium fairly flat and smooth, so I decided to finally make myself a flycutter out of some horrible tool steel I have laying around (49 minutes to manually hacksaw through the 2" bar!). I think it turned out pretty good.

Fly1_zps333bq1he.jpg


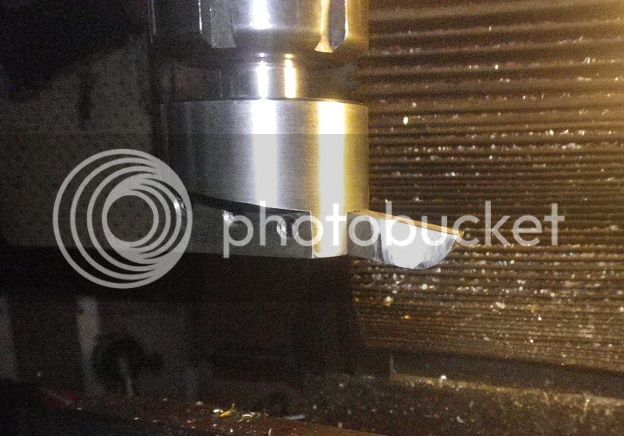
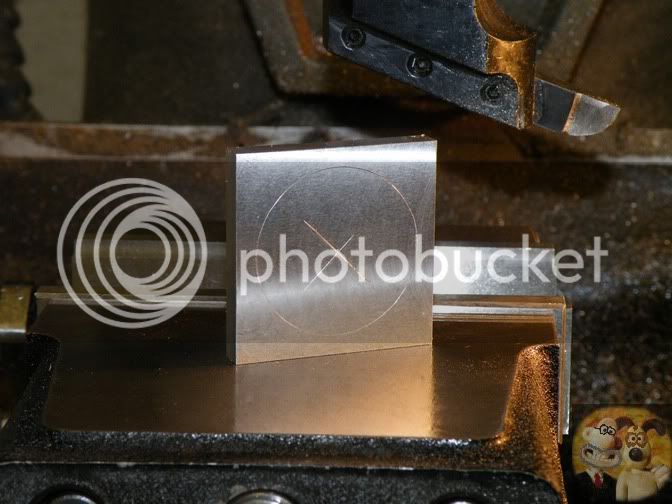
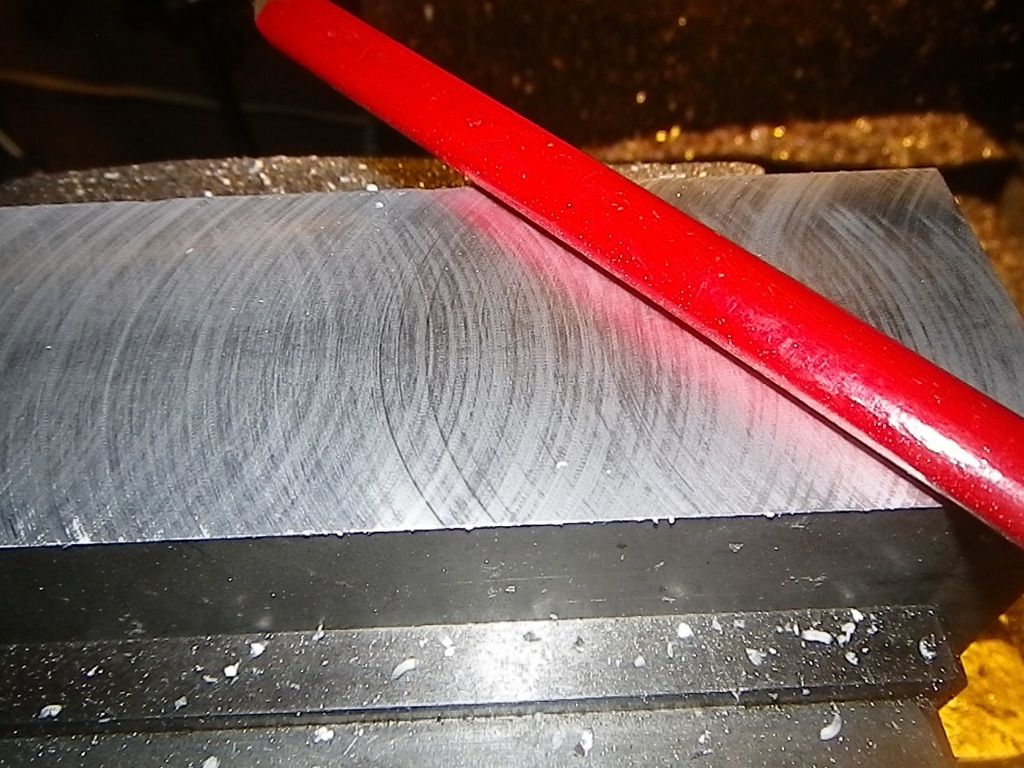
I tested it on some ali from the scrap bin and the photo below shows about the best finish I can get. Is this what I should expect or can I get a better finish from changing speed or depth of cut or tool geometry or something? I tried 1, 2 & 3 thou cuts at speeds from 500 - 950 ish rpm. It does feel smoother than it looks but I've heard talk of near 'mirror' finishes with flycutters, so I'm wondering how much better I can get it.

Fly2_zpsmuh16x6u.jpg
 
Hi Al,

Your mill is well trammed ! You can tell by the even marking on the finish. If you upset the tram slightly and us a fairly fine feed, that will reduce the marking. Also a little more relief on the tool will help as well.

I've added a picture of the tool tip that I use on aluminum though it works well on steel it tends to loose its edge if you try to go too fast.

2nd_Tool-03.JPG

2nd_Tool-02.JPG

Initial_Grind-02.JPG

I must point out that the fly cutter that I use has the toolbit mounted vertically. See

<http://www.homemodelenginemachinist.com/showthread.php?t=6399&page=3>

Unfortunately I don't have any pictures of work done by this tool.
 
I've also seen mentioned that some people get a mirror finish. Did you try squirting a bit of WD40 or similar on the surface when cutting? If the cutter body is 2" dia, it looks like the tool sweep is about 4", if it was me, I would be running it about 1200rpm, but then again I'm a bit of a speed demon.

You must have worked up quiet a sweat cutting through that bar, deserved a beer at the end.

Paul.
 
Cogsy
I keep hammering on about reading the advice of the old 'masters' and note that in the past, the late Tom Walshaw as Tubal Cain wrote of such problems and the solutions. Again, people like Conrad Hoffman- who is far more recent is describing the age old techniques of tool grinding and sort of bringing them into the 21st Century. Of Course John Baron is pretty well on target about off setting the column and Swifty is saying the right thing about a 'paraffin- type' cutting fluid like WD40 which tries to reduce the picking up of a tool edge with a minute build up of aluminium.

One of the troubles which the newcomer/inexperienced or whatever suffers from is the so called expert who really hasn't the first clue about what is needed to remove a minute amount of metal and suggests a great big and totally unnecessary tool to do it. If you want to remove a say, 10thous of metal a couple of thous deep you don't need an implement the size of a young shovel. What you really need is something like a scraper which is needed to remove a slight hump on an almost flat surface.

Am I right? Well think that grinding uses a tiny succession of cutting tools, they may not be tool steel but they are , nevertheless, 46 or even 400 pieces of sharp grit that will pass through a mesh of a ONE square inch.

Someone, I don't know whom and frankly don't care has suggested what their favourite tool is. Mine is a very old and now buckled Jeweller's loup which clips onto my bifocals. There is not a lot wrong with my eyesight after dud cataracts were replaced but that loup etc is what I examine the cutting edge of my tools. When I am still a bit more fussy, I get out my surgeon's binoculars or my microscope to examine the saw edge of my lathe and whatever tools.

Perhaps your tool has coarser teeth than you would wish.

My approach, others might differ

Norman
 
Last edited:
I'll add a bit of process to what Norman posted. I learned a long time ago
that to get a good finish with a tool bit the edge must be razor sharp. I
hone mine with a fine india stone, top and end, to get the finest, cleanest,
edge possible. The top is important not only as it's one half of the edge but
a really slick surface is required for the chip to slide off and not stick.
Material stuck to the top of the edge makes a rough edge, something you
are trying not to have. And that's where the proper lube comes into play.
I prevents the metal from sticking to the edge.

When grinding, make the grinding lines go the direction the metal is going
on its way past the cutter, not across the chip path. That with honing and
lube works well.
The other thing is that there is a limit to how fine a cut can be made with
a given material/tool/speed/feed/etc. Sometimes the best finish is obtained
by having more load on the tool rather than less, especially if there is
some "looseness" in the machine/tool/setup. Having enough load will
stabilize the cut for a better finish.
Also, a shearing cut will generally produce a much better finish than a plowing cut.

Pete
 
I've been a machinist for over 30 years in job shops and I gotta say that there is no one tool that is best for all materials or conditions. After clearance, one of the most important adjustments to your tool is the radius on the cutting edge. The material is also a major factor. A fly cutter that works well on a piece of aluminum plate won't give a good finish on a cast piece. As far as tilting the column goes my jig mill at work will give cross hatch with an 8" fly cutter all the way from the bottom to the top. and that's 8 feet.
More important in my opinion is that you learn to "read the chips" and go from there.
 
I'm not a machinist, but my best results come from keeping the tool from projecting too far, and the small radius on the cutter as the point of contact
 
I am using a lubricant by the name of Relton A - 9 Aluminum cutting fluid with great success in the milling of aluminum and for aluminum lathe work. This particular lubricant helps greatly in producing a very good surface but primarily prevents build up of aluminum on the cutting edge of the tool(s).

A small amount of the lubricant applied to the tool and surface by brush or spray works very well and goes a long way. Not much required to apply - no flooding required with this lubricant. One drawback of this product is its cost but a small pint size can lasts a long time for me.

Peter J.
 
Cogsy,

As far as I am concerned, you have a good shape on that tool, it just looks to be blunt.

Take the front face and gently rub it on an oilstone until the edge is like a razor and it is perfectly flat all over. Your curved edge needs to be a very good curve with no small flats on the cutting area, again, a little work on an oilstone can bring out a nice curve. I usually, for aluminium, give it somewhere between 10 to 15 degrees back rake, for steel, anywhere between 5 &10 degrees. These usually work for me.

This video shows mine cutting about 80 thou deep (2mm) into some ali, and it is leaving behind a mirror finish, WD40 just sprayed onto the surface of job is used for lubrication.

[ame]https://www.youtube.com/watch?v=FipAdIUr5OE[/ame]

I have played about with profile tools, and they give just as good results, but because of the smaller radius I only cut down to 40 thou (1mm)

I get mine from here. Copy and paste into your browser as the link doesn't seem to work from this page.

http://www.rdgtools.co.uk/cgi-bin/sh000001.pl?WD=indexable%20turning%20tool%2006%20rcmt&PN=16mm-SHANK-INDEXABLE-TURNING-TOOL--RCMT-09---4576735.html#SID=565

The advantage of these is that when the cutting face becomes dull, you just turn the insert slighty to get a new face to the work. I find, that if careful, I can get about a dozen new faces before the tip needs changing. These do come in smaller shank sizes, and larger units, I have one that uses 9mm diameter inserts ground perfectly for aluminium.

John
 
Last edited:
Could it be the alloy? Do you get good results with other cutters e.g. end mills? Some AL allows don't cut very well without special angles, fluids, etc.
 
Thanks for all the helpful advice. I will try and make my tool sharp and do another pass or two at a higher RPM with some WD40 and see how that turns out. I have to admit I don't really want to de-tram my mill so I'll probably live with a less than optimal finish so I don't have to change the tram.

Is depth of cut critical at all? Overall thickness of the plate isn't critical so it's not like I'm trying to hit a dimension so I can take any cut depth I want really.
 
Your tram is spot on Cogsy, so don't worry about that.

Depth of cut is determined by how the tool is ground, if you use a quarter round as you have, then it should be able to cut a lot deeper than one that is like a lathe tool, and by how sharp it is, how rigid your machine is plus speed of feed. I always use a very slow speed otherwise you get the effects of like cutting a thread across the face of the work, which is what I think is one of your problems, slow the feed down a bit, you are not in a race to get things finished.

With regards to speed, as you most probably gathered, that vid was slowed down dramatically as I was trying to explain how a cutter 'shaves' the work with that one, but for non ferrous, I tend to be up around the high hundreds and for steel, around 400 to 500, but that is how I do it with my machinery.

No one can tell you exactly what to do, we can only make suggestions, but once you get your technique and grinding sorted, you should find everything falls into place nicely and you will get good results all the time, except when you come across a bit of weird material.

John
 
Last edited:
I agree with the reference that John has made about 'cutting a thread' but would add that the shape of your cutting tool and the speed of feed should be trying to remove the so called thread which you have created earlier. Leave the cut depth as it is but marginally move the cutting part of your tool to remove the crest of the so called thread.

One thing that worries me somewhat is whether you are able to fine hone your tool. Many of us are quite happy to get excellent results from 'hand honing' but this comes with long experience( and a lot of mistakes -well I have made them, too) What you should be doing is getting/making a sort of grinder which has a steady on it and this avoids these all too possible flats and rounded edges.

Digressing somewhat, there was about 100 or so of us sitting last night for one of those four times in a century occasion affair. Anyway, a youngish sort of chap came over at my table and thanked me for my e-mail as he is actually building a lathe. So I offered him the long term loan of one of my tool and cutter grinders as my life( whatever is left at 85) and this will greatly speed up and add accuracy to his quest. I keep getting his offer of a couple of alpacas to remove the ridges created in my lawns. They breed too much- or so he says.

Ah, the joys of a second childhood! Think about a way to steady your honing

NOrman
 
Hi Al,

Your mill is well trammed ! You can tell by the even marking on the finish. If you upset the tram slightly and us a fairly fine feed, that will reduce the marking. Also a little more relief on the tool will help as well.

I've added a picture of the tool tip that I use on aluminum though it works well on steel it tends to loose its edge if you try to go too fast.

View attachment 80125

View attachment 80126

View attachment 80127

I must point out that the fly cutter that I use has the toolbit mounted vertically. See

<http://www.homemodelenginemachinist.com/showthread.php?t=6399&page=3>

Unfortunately I don't have any pictures of work done by this tool.

Just to add some further information to this thread. The pictures of the toolbit I posted above. The toolbit is 1/4" HSS (Goliath Cobalt 60. Must be 70 years old). I used the rounded end today to show the sort of finish that can be achieved on aluminum using WD40 as a lubricant.

14-12-2015a.jpg

This is the work piece before I machined it.

14-12-2015c.jpg

A picture of the work piece after machining.

14-12-2015b.jpg

A close up of the finish.

The test piece was only 12 mm wide and 60 mm long. The depth of cut 10 thou and around 500 rpm with a feed rate of something like 75 mm per minute. So quite slow. If you look carefully you can see marks from the saw cuts, when the piece was sawn off.
 
Here is a pic of a piece of very gummy ali after having it's face cleaned up by the cutter in the background.

DM51.jpg


Notice that the cutter has gone straight down the middle of the piece, that is the only way to get a good surface finish and accurate measurement because it keeps the cutting forces equal along the length of the piece part. If it is offset, you are liable to get a tapered cut surface from one side to the other.

DM50.jpg


Another piece of ali, this time a block squared up perfectly and parallel all over to within 0.0002", all done by fly cutting.
You can easily get the same finish with brass, bronze, cast iron and most free cutting steels.

MAGBUILD23.jpg


Except for my first choice of a 16mm tungsten multi flute cutter, the flycutter comes a very good second and is used all the time.

John
 
Hello John,

I do, like you, tend to use a fly cutter for many operations and agree that tool deflection can be an issue especially on deep or heavy cuts. The largest source of deflection is, I believe the shaft of the tool, which is why on my flycutter it is mounted on the largest diameter shaft that my collet chuck will accommodate, 20 mm in this case. I also found that the thick disc handled interrupted cuts better. Probably due to the extra weight, particularly on a light machine such as mine.
 
A huge thank you to you guys for all the info. I'm hoping to get back into the shed tomorrow so I can try some suggestions out.
 
Baron,

I wasn't criticising your work at all, as can be seen from your pictures, I already knew that you were using the large disc/straight down cutter and they really do keep things very rigid. I was referring to the normal type shown, the one Cogsy and I use. It is handier for me to change cutter sizes and shapes, but they do suffer slightly if you use them offset, like you can.

In fact I do use something similar to yours but for a different reason. That is a diamond impregnated grinding wheel that I use to easily reshape and finish already hardened gauge plate pieces on my mill that were too large to hold on my previous surface grinder. It is so rigid in use I can get a real mirror finish and super accurate measurement by using it. Perfect for resharpening things like guillotine and power planer blades.

rufcut1.jpg


millgrind2.jpg


Cogsy,

Don't give up if you start to get not too good results, it is all to do with getting the grinding and sharpening right. Once you achieve that, you will be singing all the way down the road.

Good luck.

John
 
Last edited:

Latest posts

Back
Top