First Project, First Boo Boo

Home Model Engine Machinist Forum

Help Support Home Model Engine Machinist Forum:

This site may earn a commission from merchant affiliate links, including eBay, Amazon, and others.

LarryS

New Member
Joined
Jan 23, 2010
Messages
4
Reaction score
0
I started to work on the EZ Engine as my first project. I did the layout work for the frame and start cutting, drilling, and tapping threads. The second thread and I broke a tap! I tried to remove the broken tap but to no avail. I had to start on a new frame. The photo below shows the first frame piece with the red arrows pointing to the broken tap. The new part is ready to tap but with this one I drilled for 50% threads and hope for better results. Tomorrow is a holiday for me so I hope to get the threads tapped and I will use lots of tapping oil and go very slow. At the moment the Daytona 500 is getting back under way after a delay to fix a pot-hole.

Larry


P2140162.JPG
 
Larry,
Search for the thread on removing broken taps using the mineral Alum which is available in the spice section of the grocery store. Let the part soak a couple of days in a saturated solution and the tap will be gone.

Then you can make 2 easy engines.
 
Going to a 50% thread in aluminum helps. Go slow. Reverse often. Use plenty of cutting fluid. If it starts feeling tight, back it out and clean the tap off and go back in. Using a guide to keep the tap at a right angle helps. Going in a little crooked can cause it to bind up in the hole.

I do my threads pretty early in the process so if a tap breaks I don't have too much invested.
 
1) Get good tap wrenches. For T-type wrenches, do not bother with a ratchet unless you are working in limited access space (and then be extremely careful).

2) Use a tap guide (the spring-loaded thingies that chuck up in your spindle) or (better) a tapping head to guide your work. There are also hand guides that keep your tap going straight. It is bending that breaks your taps, not torsion.

3) Use the appropriate tapping fluid. WD-40, Simple Green, or mineral oil work well in aluminum. I also like Tapmatic Gold as a general purpose tapping fluid for most common metals. [Titanium is a world of its own.]

4) Keep your taps sharp. Inspect the cutting edges regularly with a 3X (minimum) magnifying glass. Stone as require to keep a good sharp edge.

5) Use spiral pointed taps whenever possible on through holes.

If you go to http://www.scribd.com/Lew Merrick, you will find a paper I have published on choosing the correct size of tap (pilot) drill for your application. You will also find a document on strength values for standard Unified National screw threads.
 
To reiterate what Lew said:

1. Use Good name-brand taps. You most likely will not find them at the hardware store. Order from MSC, Travers, McMaster-Carr, etc. Good taps are expensive. The first time you use one, you will understand why.

2. I use a Walton piloted spindle tap wrench.
http://www.waltontools.com/products/spndltap.htm . The real ones are expensive, but based on my experience the import copies are junk.

3. Tapping fluid: yes.

4. Don't push your luck.

5. Blind holes are problematic. If it must be a blind hole, at least drill it more deeply than you plan to tap.
 
Just like Golf or Baseball or Bowling, there is a definant stroke to manual threading. Once you begin and it starts to twist give it a controlled steady pressure and move whatever amount you decide to use - I use a 180 twist or even more. Pick a moderate speed of rotation and try to keep the speed the same from beginning to end of the twist. Don't let the tap control you, twist that puppy however much you need and do a firm steady rotation. If it skips and sticks while turning you may need to turn it a little faster and put more horsepower in it. 8). Sometimes you may only get two 180 twists before it feels like you are in the 'too tight' zone. Listen to that metal and take the tap back out and clean and do it again. one thread at a time.

Good luck with your build,
Kermit
 
Kermit said:
there is a definant stroke to manual threading. Once you begin and it starts to twist give it a controlled steady pressure and move whatever amount you decide to use -

That's been a very interesting aspect to this hobby for me. A year ago, in my more ignorant days (still ignorant...just like to think less so) I would've been the first to say...'with flexible material like wood...sure...but metal?'

It's been an interesting surprise to me how flexible metal is...and possibly more importantly, the tools (like taps) and equipment used to work the metal.

Experience...a wonderful thing...

 
.....so what everybody is basically saying is that "tapping" is a black art and can only be accomplished by selling a part of your soul to the devil? ???

Actually, great advice here for we rookies. Thanks! I have a question though. What is the name for "Use a tap guide (the spring-loaded thingies that chuck up in your spindle) " as posted by Lew_Merrick_PE I have seen them in several build photos that have been posted here. I'd like to start searching for one. I have a feeling that I will need it in the future. If someone has a good source, I'd appreciate it. If I had the real name of it then I assume that one of the tool sources that are repeatedly mentioned here would have one.

Ed
 
I remember my very early days in this hobby.
Our nearest hobby shop is 24 miles away, but my wife happened to be working
in that city at the time. I called her cell phone and asked her to stop by Fischel's
to pick up a 2-56 tap for me on her way home. Immediately after dinner I rushed
down to my shop and broke that new tap off in the very first hole.

That resulted in her coming to the top of the steps yelling,
"HEY, There's a lady in this house!"
:hDe:

As time went on I found the feel for the taps and my success rate improved
considerably. Don't allow it to frustrate you Larry!

Rick
 
Ed, basically you are required to sacrifice a goat first...

A good US made tap giude can be had at LMS: http://lmscnc.com/1963

The other thing I use is a tapping block. Sorta like this: http://lmscnc.com/2571

Although the one I use is shop made. It helps keep the tap straight in the hole. A life saver IMHO.

If I ever get a slightly bigger mill I'll use my tap guide more often.
 
Thanks, Mike. I had to laugh though. It actually is called a "Use a tap guide (the spring-loaded thingies that chuck up in your spindle) " Who woulda thunk it?

I sold my goat. Damn the luck! :redface2:

Ed
 
You don't need to buy a spring loaded guide. All you need is a bit of rod that will fit into the back of the tap handle and held in the drill chuck of your mill or drill press. You can turn some scrap to the right diameter. I have even used the back end of a broken tap. You just need something to keep the handle lined up and reduce side forces on the tap. The spring is nice because it follows the handle as it travels downward. Do this manually by lowering the drill chuck as you tap.

Likewise on the tapping block. Use some scrap aluminum round stock about 3/8ths or 1/2 inch. Drill a hole in the center on your lathe that will just clear the tap. Hold the block flat against the work and start the tap gently.
 
Thanks everybody for the advice on tapping threads. I purchased some US made taps and a more appropriate tap handle. Tapping the 50% threads was a piece of cake. I had run the blind holes a little deaper than needed so I had no problem with them either.

Since things were going good, I started on the valve and piston housings. I had no trouble cutting them to length and getting them square. I drilled the long hole for the valve and them discovered with my set-up the reamer was too long to work with my mill. I re-did the set-up and ended up with an oblong hole for the valve.

Second boo boo with a lessoned learned. Make sure your set-up will work for all the cuts you need to make.

I'm really enjoying this project and I'm learning alot. Thanks to all those who put together the EZ Engine!!

Larry
 
LarryS said:
I drilled the long hole for the valve and them discovered with my set-up the reamer was too long to work with my mill. I re-did the set-up and ended up with an oblong hole for the valve.

Larry

I cut down one reamer to fit in tight spots. Just use a cut off wheel in the Dremel.
 
BigBore said:
.....so what everybody is basically saying is that "tapping" is a black art and can only be accomplished by selling a part of your soul to the devil? ???

Ed

Ed, I almost exclusively do holes in the #2 to #10 range. The only magic that I have found is to tap immediately after drilling without moving anything. I start the tap in the drill chuck, turning the chuck by hand while holding downward pressure (not a lot) on the tap. once the tap is in a couple of turns or so, I can unchuck (is that a word ???) and use a hand tap wrench. I will often just continue rotating the chuck by hand to tap the hole.

With multiple holes I can tap a couple of turns in each as I go and then go back to them by hand later. In that case, I've found it best to start the tap loose using just my fingers to find the "starter" threads. Then into the wrench and tap.

You asked about guides. One that can be used if tapping perpendicular to a flat surface is just a piece of some hard material - even wood will work - with a hole drilled that will just pass the tap. Use it to keep the tap straight.

The biggest problem with tapping always seems to be keeping that first few turns straight in the hole. Once past that and it's pretty easy.

Alan
 
The most common cause of tap breakage, other than blunt taps, is trying to start a hole straight by hand, then attempting to bring it up straight again when it tilts over. If you are lucky and it is a thru hole, you can have a second go from the other side and hope that by the time you have cut a full thread, your bodge job on the other end has been removed.

IMHO the best bit of tooling you can invest in for cutting with a tap is a tapping stand. They are a relatively cheap to buy, or are just as easy, with a little care, to make one yourself. If you use one correctly, and get a fingertip 'feel' for the tiny taps, your breakage rate will drop dramatically.

This is one that uses collets, but I prefer one with a small chuck, they are a little more versatile.

http://littlemachineshop.com/products/product_view.php?ProductID=2898

I also use mine for reaming tiny holes.

Plenty of a good quality tapping lube, and at the first sign of a squeak, change the tap for a sharp one, or resharpen the tap with a slip stone.


Blogs
 
Blogs knows where it's at for off-machine tapping. Here's a simple tooling project that's worth it's weight in gold for tapping on the lathe and mill:

CIMG1619s.jpg


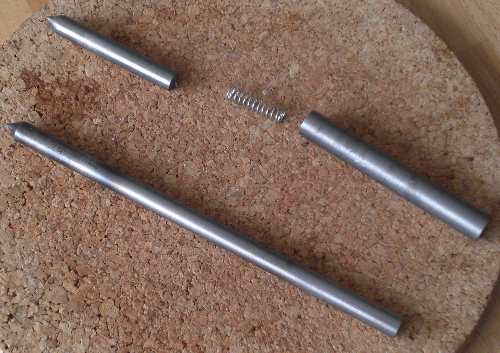
All it is is a piece of 1/2" rod drilled and reamed most of the way down for a good fit on a piece of 3/8" drill rod (makes that fun 'pop' sound when you pull out the inner rod), plus a spring and a couple bits of 3/8" drill rod with points on the ends.

The basic design is from the 'Pump Center' project from the Houston Home Shop Metal Club web site, but I skipped the retaining pin (with a good fit, vacuum holds the ends in remarkably well). Turns out I don't need a pump center all that often, but a general-purpose spring-loaded center is handy for hand-tapping work on the mill and lathe. I use the long center for the lathe and the short one when it's chucked in the mill.
 
Actually Shred, I do a lot of machine tapping as well, but on the lathe, very rarely on the mill. I have been given an auto tapping head that requires repairing, and once that is done, mill as well.

I showed this in a post I did yesterday, this is a 'largish' 3mm tap.

Bunsen46.jpg


Physical limitations sometimes prevent me tapping things by hand in the lathe, so by using this and fingertip feel, I can safely powertap down to 2mm, I have never tried smaller, but I have no doubt it would work. The holes have to be spot on in size and the taps razor sharp, and the correct lube for the material in use, but since using it, I haven't broken a tap yet, and I made this a few years ago and it gets used almost daily when I am on the lathe.

I think it is all due to the constant turning pressure and automatic centring given by the machine, which if done by hand, the pressure and speed will always vary, and even using a loaded centre, the action of turning must put some sort of side load onto the tap. All I am doing is feeling on the cross handle, just holding it back with my thumb, feeling for when it starts to go tight at the bottom of the hole, then I just let go. The machine is then used to back the tap out the same way it went in.

For some reason, visitors cringe when they see me power tapping, expecting such small taps to break, but to me now, it is just another normal energy saving and practical procedure. I am not boasting because I can do it, as far as I am concerned, everyone should be able to do it. I am just showing that sometimes illogical things do work, and work very well indeed.

Is there something wrong with using something that isn't the norm in the home shop? It works perfectly for me.


Blogs
 
Back
Top