Favorites

Home Model Engine Machinist Forum

Help Support Home Model Engine Machinist Forum:

This site may earn a commission from merchant affiliate links, including eBay, Amazon, and others.

Tin Falcon

Well-Known Member
Joined
Jul 9, 2007
Messages
7,207
Reaction score
787
O K I will bite and add to the new area. My favorite materials. 360 Brass machines nice can be soldered looks nice. good for fly wheels crank disks and just about any engine part.except for axles . 6061 Aluminum easy to find easy to machine can be welded (Yeah with a nice tig. wish I had one) good all around material. O-1 Drill rod good for axles and pins. Bronze for bushings. And last but not lease acylic plastic AKA Lucite, folks love my see through engines. Teflon makes nice low friction pistons. can also be used for bushings. Mix the materials to reduce the need for lube and reduce the chance of galling. When selecting material keep in mind the relative positions on the relative corrosion chart anode, cathode. Most folks think fly wheels have to be of steel cast iron or brass. My experience has shown aluminum and plastic work fine. Experiment have fun
Tin
 
i really like working with 12L14 Steel. Easy to machine, and gives a real nice finnish.
 
If I had to pick a favorite material to work it would be grey cast iron.
It cuts like chalk and polishes easily.
It's abrasive dust is hard on the machines and probably not the best for
lungs. To compound that I'm allergic to nickel. Cutting grey cast at work
has sent me to the emergency room for intensive eye washes a few times.
At work it's a job hazard. At home (with a 20" fan blowing across the
lathe,
) it's my favorite stock material.
 
I like 1140 stressproof it machines like dream and is still tough.

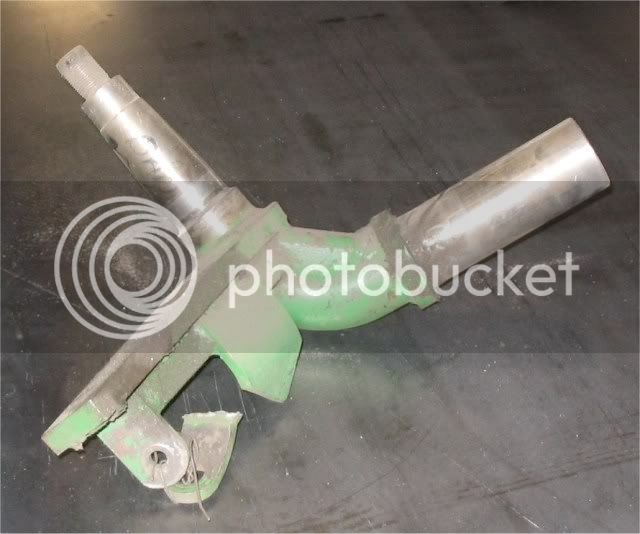
I used to machine alot of replacement rear spindles for John Deere 6602 combines out of 2.250" 1140 stressproof then I would bend them 80 degrees with 1,000F and about 25 tons. 4140 is too brittle to make a part like this.

This was a sample part with a broken weld, I did not make that one.
jdspindle.jpg
 
Hi Mems,
I see we are discussing favourite metals. Please excuse the spelling on a few words, even though we talk the same language we spell a few words differently, but who cares, we are here to cut the stuff into different shapes and sizes.
My favourite stuff is anything that is free or v-e-r-y cheap. I call almost everything just material, no fancy names or numbers, in the size of things we build, stress coefficients and hardness tests rarely are required, and if so then I buy just enough for the job. If it looks right, feels right and runs right it is good enough for me.
I have a complete setup of tipped tooling, and unless I am cutting off a heavy casting crust I always use an old battered up high speed cutter that is sharpened before use with a quick rub over with an Arkansas stone, so you don't really need all the fancy stuff to begin with, use what you've got and as experience grows, progress onto more modern approaches.
Anyway, back to the subject in hand. I love cast iron and this is how I usually get it, but please remember, you can get a round bar out of square and vice versa, so don't get worried about the shape, it is just the time involved to get it to whatever is required. This is how I do it. Use a tipped tool to get off the heavy crust then treat as normal.

Sash weight parted or cut off.

1.jpg


Then cut to size.

2.jpg


Hack out the size you want.

3.jpg


Finished product, two months later, 99% recycled materials (excluding fasteners and tubing).

finishedprototype.jpg


The sash weights are over 100 years old, so there is no worries about whether the material has enough age to it. I could get six piston blocks out of this one bar, so the cost each is pennies. Doesn't have to be sash weights, old cast iron cylinder blocks are great after being persuaded apart with a sledge hammer, just got to learn how to hold the wierd shapes while machining. Thats all the fun of making things out of whatever material you desire.

John
 
Hi Ray,
I forgot to mention, you have to see on the sash weight what end it was filled from when cast (usually the end opposite the tie on loop) and try to keep away from the last two or three inches. The reason being is that all the dross and impurities end up in this area and usually cause the problems you encountered.
You have to be really tough with these cast iron parts, engine blocks as well. tickle them and you won't get anywhere. For sash, if I can get about 1/8" into them it is just a matter of dropping them on the floor or persuade them apart with a tap from a sledge hammer.
For the outer skin I expect to put a cut of about 0.030" to get under the skin, and do it in one hit. Play with it and it will go hard as rock. Also if your lathe or miller aren't rigid enough you don't stand a chance.
A metal cutting disc on an angle grinder works well, again just get a cut in and snap it off, then that will allow you to machine the skin off from the split end. I have parted off today six pieces from sash weights for forthcoming projects and experienced no probs.

John
 
In the northeastern USA many of those old sash weights are brass.
Amazing how the value of metals has changed over the years.
When I go to the scrap yard I keep a file in my pocket to shine up
any weights I find. I came home with almost 40 pounds of brass once
that I'd paid $20 for at the scale master’s hut.

Same issues as John describes. Hack off the ends and junk them, then
make that first cut as deep and your machine has the power to take to
get under the rough stuff. Once your into the heart of it you'll find some
nice material in many cases. Occasionally you'll find air hole and
pockets of casting sand that render the whole thing useless. They weren't
trying to cast perfect metal to counterweight a window...
 
the trick with cast iron is to take a cut of a good 1/8" inch and get under the hard skin and the sand finnish.

Get a good center in the casting take a big bite and keep the feed high with C2 carbide chew it right off. cast is dirty and kind of scary when it gets big.

I worked in a foundry 2 years and my point is get the cut under the rough skin and the inside is like butter.. then you have the heart of the window sash weight and thats the good stuff.
 
I was the operator of a large vertical boring mill for many years.
Much of the work was weld repaired. They'd pile 3/8 of an inch of weld on
the fits, and just as you got to the fusion line for a finish cut the weld
would start to peel off. Start Over!

When your working scrap yard finds the castings will not be perfect.
They were never intended to be. We call it mystery metals, because you
can never really be sure of what you have, but most of it can be recycled
into an engine.

One note of caution.
I never use dark brass or copper from a scrap yard.
Years ago they used a lot of beryllium in many of those compounds.
Even on a small scale beryllium is something you don't want to have
airborne in your shop.


(3.2.1 Inhalation

Beryllium: The beryllium in this product is not known to cause acute health
effects. Inhaling particulate containing beryllium may cause a serious, chronic
lung disease called Chronic Beryllium Disease (CBD) in some individuals.
See section 3.2.5 Chronic (long-term health effects).)
 
rake 60,
Been there done that (the welding part). Sounds like the welder/welding process might have needed some attention, read preheat-post heat ect. ect. I've had the weld peel up right behind me as it cooled, and one of many
reasons when welding cast iron was due to an impure pour.

raym
 
A metal cutting disc on an angle grinder works well, again just get a cut in and snap it off, then that will allow you to machine the skin off from the split end.

Tried it today dug a couple of sash weights out of the garage. Cut a ring around the edges with the cutoff disk set on the hardee of the anvil and a good tap of the 2lb hammer and popped apart like a walnut in the nutcracker now need to machine it.
Tin
 
Back
Top