


44-henry
Well-Known Member
- Joined
- Dec 5, 2008
- Messages
- 62
- Reaction score
- 22
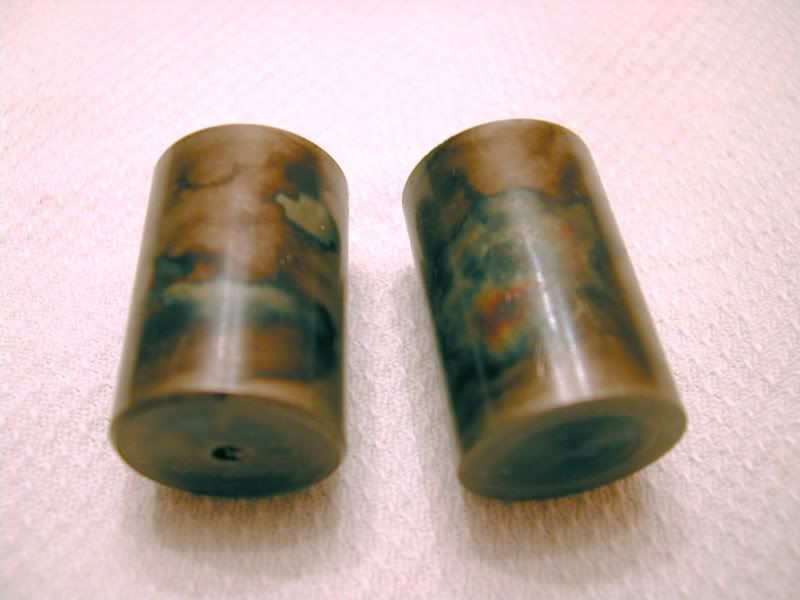
I dont know if this process has been covered here before, but here is a description of how I do it. Many of us have heard of casehardening, the process of adding carbon to the surface of low carbon steels providing a hard exterior shell around a soft inner core. This is a process that has been practiced for hundreds of years and still continues to be a valuable process for many present day manufacturing companies. Though casehardening can be accomplished in a number of ways, Kasenit is perhaps the most common and does provide, at least, a thin hardened shell on small parts. It does not, however, provide any colors and the surface is instead a dead gray color. Below are some examples of the colors produced by the bone and wood charcoal pack process described here.
[imghttp://img.photobucket.com/albums/v733/44-henry/ColorCasedCylinders.jpg]http://[/img]

Color casehardening is not all that difficult to do; however, it does require a source of high heat such as a kiln, forge, or oven and an accurate way of measuring the temperature. It is possible to get colors when using casehardening compounds containing potassium cyanide and supposedly they can be used much like Kasenite; however, the dangers associated with working with this form of cyanide has prevented me from experimenting with it and also the colors produced in this process are inferior, in my opinion, to the colors obtained by the much safer pack hardening process using wood and bone charcoals. For this reason, this is the process that I will describe.
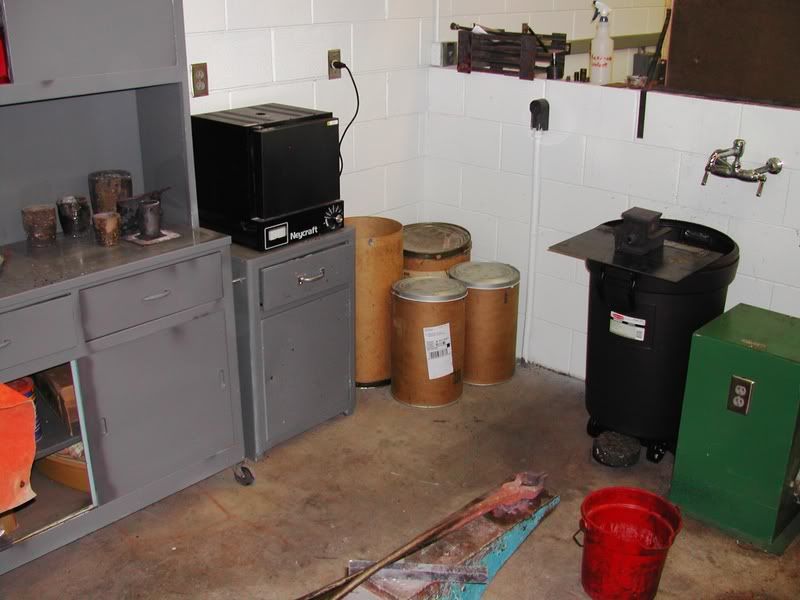
Currently I use an electric heat treat oven that was purchased from www.brownells.com which has two elements and a chamber capacity of about two square feet. The electric furnaces are more easy to control; however, they do have the disadvantage of reduced element life and using charcoals that are not chemically clean will definitely shorten the life of the elements. Some have had very good luck with gas kilns and this is something I would like to experiment with in the future. I have also used a smaller Neycraft oven that was also purchased from Brownells that works well for smaller articles and it is much less expensive. Here is a picture of the smaller furnace.
One of the secrets of good color case hardening is the type of charcoal used. Throughout history no doubt many different compounds were tried in a quest to improve the process and perhaps obtain better colors. Most early formulas mentioned in gunsmithing texts do suggest that the use of bone, wood, and leather charcoal was common. Others also mention the use of more exotic elements such as salt, fruit pits (charred), and potassium cyanide. Though I have experimented with the leather charcoal and salt, the other items (especially the cyanide) I have not tried. I suspect the fruit pits might have some promise as some pits contain trace amounts of cyanide.
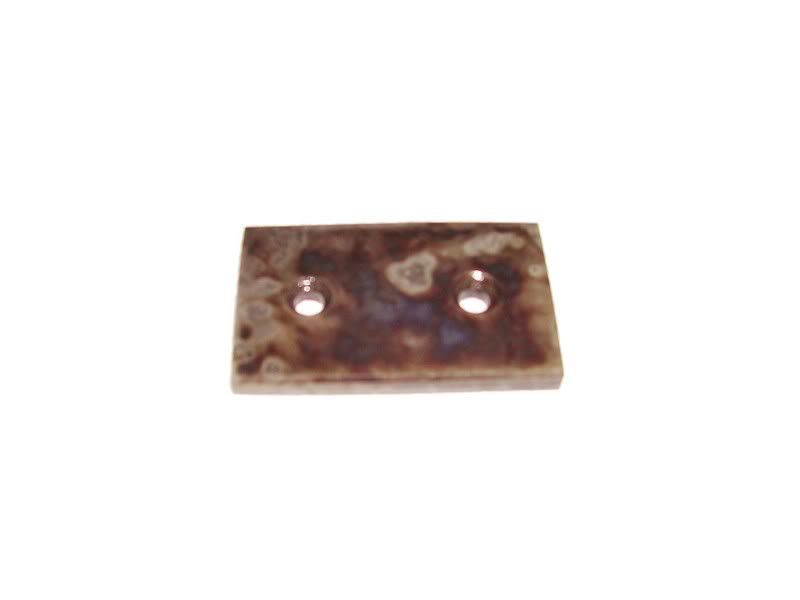
The charcoal that I have had the most success with has been obtained from www.brownells.com and is wood and bone charcoal. These two charcoal types have proved successful in creating colors that match the original colors that one sees on fine old guns such as Colt, Winchester, LC Smith, Parker, Remington, and many others. Below are some examples of the colors that can be obtained.
To be successful in this process you must understand some peculiarities about this process. Normal casehardening involves nothing more than immersing a low carbon steel object inside a carbon rich atmosphere and than heating to above critical temperature. The longer the object remains in the pack surrounded by the carbon the deeper the resulting case will be. Temperature also plays a role in this as the absorption of carbon is quickened by the higher temperature ranges. The parts can simply be taken out of the pack and quenched and the casehardening will be successful as long as the part is quenched before it cools to below critical temperature.
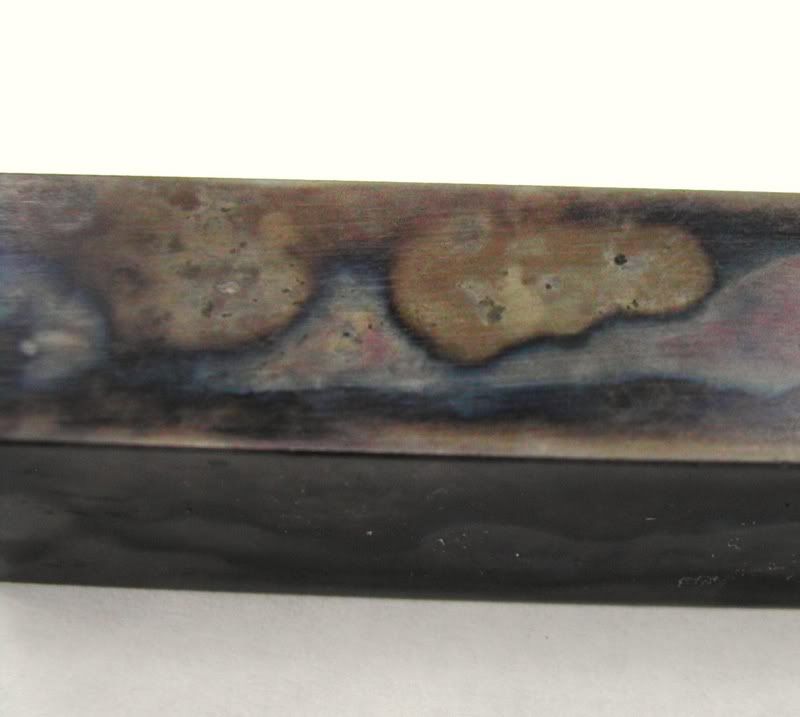
Color casehardening requires more care. In color casehardening the parts need to be immersed in the carbon material in a sealed container and the temperature is critical for if it is too high the colors will be poor and washed out. Few people know it, but it is actually possible to get very good colors under the critical range; however, if this is done you are not really casehardening, just coloring. I have found that temperatures should be close to the 1400 degree F mark. When the temperature climbs much over 1450 the colors seem to be rather poor. Just as important is the process used to quench the parts. If air contaminates the parts before they hit the quench the colors will be spoiled. For this reason it is very important to make sure that a method is devised to allow the parts to be moved directly from the crucible to the quench as quickly as possible. For this reason I have devised the following crucible seen in the photograph below.
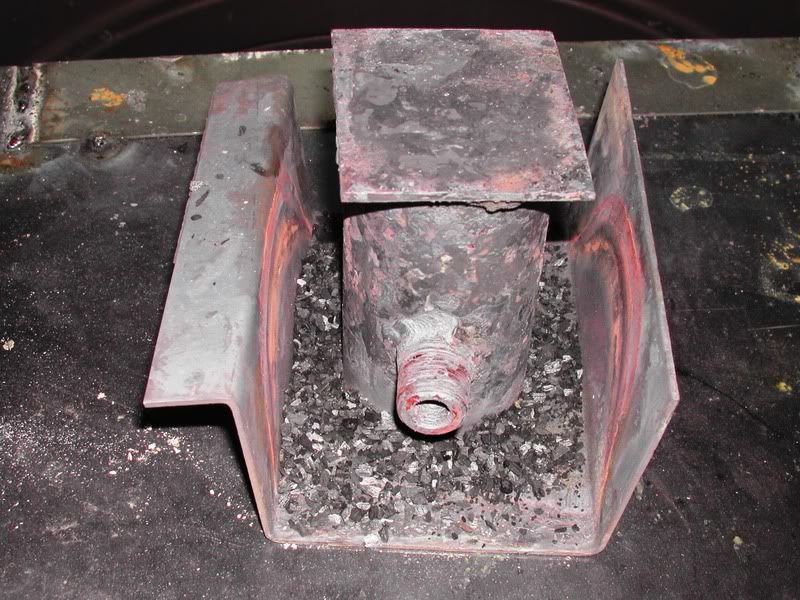
This crucible makes use of a length of 3 diameter steel pipe (stainless would be much better) with a cap welded on one end. The other end remains open. A pipe nipple is welded to the middle to allow gripping with a pair of tongs. The crucible is loaded with the polished, degreased parts, and packed with the chosen ratio of wood to bone charcoal. We have used different ratios, but most of the time I have settled on a 1:1 mix of wood to bone. It is important to keep the parts from touching the sides of the crucible by about ½. Add the charcoal in layers, tapping the crucible at regular intervals to settle the charcoal but do not tamp as this can pack the parts into the crucible so tightly that they can hang-up during the quench process. Make sure the charcoal is all the way to the top and then level of with a flat bar or stick. Next the crucible is inverted on a stainless steel carrier and any extra charcoal packed around the sides of the crucible. You can see this clearly in the above photograph.
The crucible is than placed inside the furnace
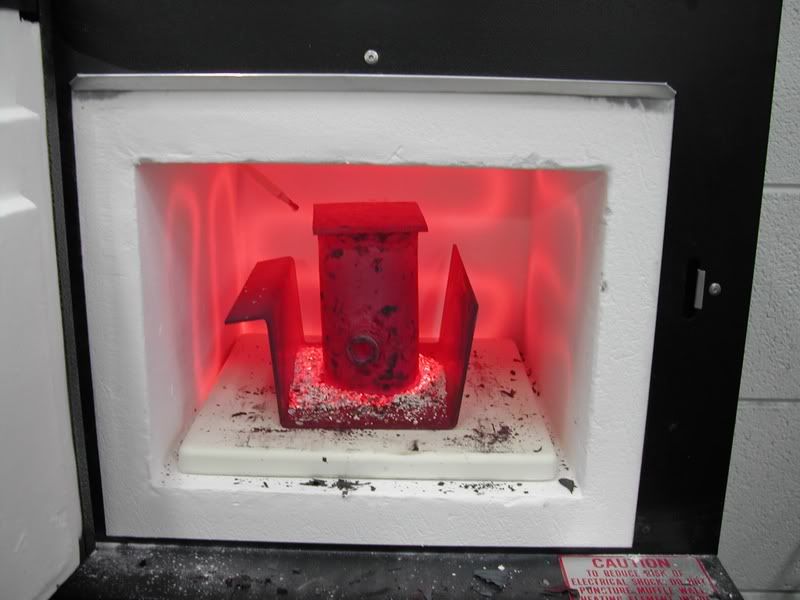 and the temperature is allowed to climb until the crucibles internal temperature reaches 1400 degrees Fahrenheit. Since the internal temperature is difficult to measure I just allow 30 minutes to 1 hour to compensate if the furnace is already pre-heated. If you start from a cold furnace I generally dont worry about it and just start the clock when the pyrometer reads 1400 F. Once the temperature is reached allow about 2 hours of cooking time.
Meanwhile you should prepare the quench. I generally just use plane water that is as cold as I can easily get it. I shoot for a water temperature of 35-40 degrees F. I generally accomplish this by putting a block of ice into the water a couple hours before I start the oven. At this time I also supply air to the tank via an airline that runs into the bottom of the 32 gallon barrel that I use for quenching. See the photograph below for a picture of an older tank that we used to use. Some texts suggest placing Potassium Nitrate into the water to increase the colors obtained. I have experimented with this and have found that it does indeed provide more blues, but more experimentation is needed in this area. Basically I think there are two main variables that are important here. Water temperature is one and oxygenation of the water is the other. I think that is far more important to run the airline into the water before the quench than it is during. At some point I will obtain an oxygen monitor to measure the oxygen content of the water as I think this could provide some interesting answers.
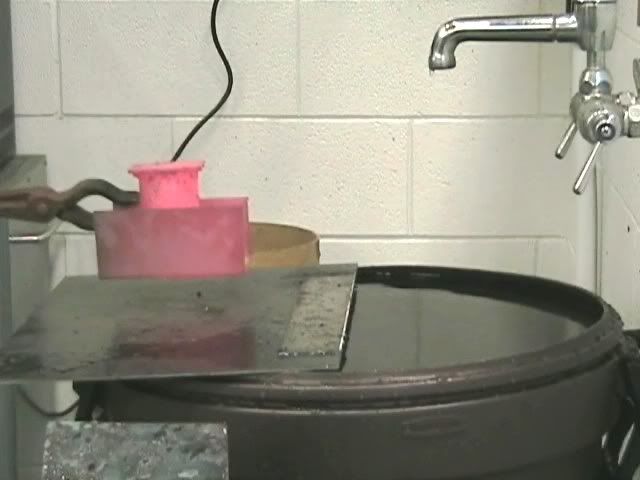
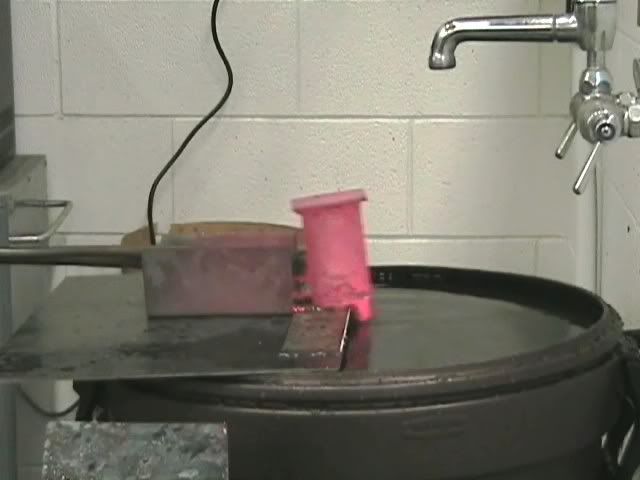
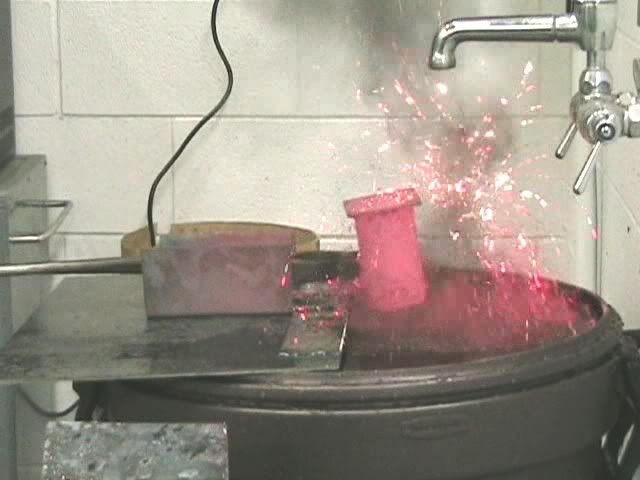
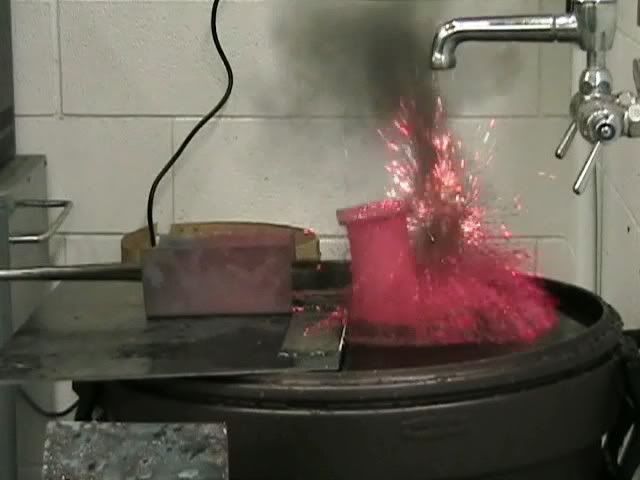
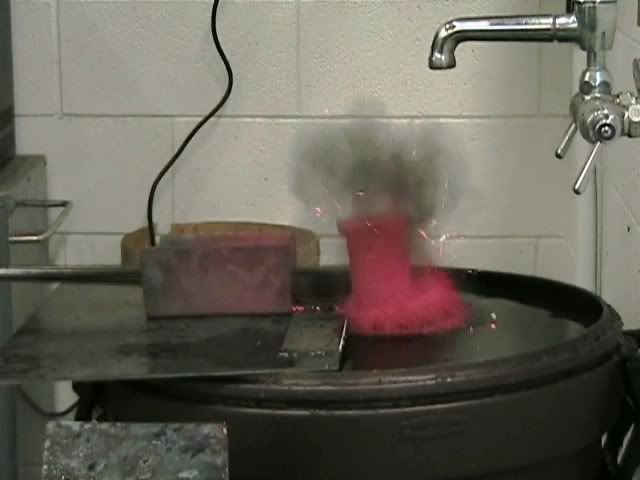
If you pay attention to the quench tank in the photo and also the video clip you will notice a lid on it. The lid has an opening in the center along with a steel lip welded to the top just before the hole. In use the carrier with the crucible in tow is removed from the furnace and placed on the steel lid. The carrier is than positioned to butt up against the steel lip. At this point the operator changes the position of the tongs to the crucible and slides the crucible over the hole in the tank. Since the water level is right at the top of the lid the drop is almost instantaneous. The following photos demonstrate the sequence of events.
Lastly here is the video clip that I took of one of my students doing this process on one of the baseplates for their steam engines.
http://smg.photobucket.com/albums/v733/44-henry/?action=view¤t=ColorCaseVideo.mp4
I think the drop distance does have some impact in the colors obtained, at least according to Dr. Oscar Gaddy who did an excellent article on the process in the Double Gun Journal some years back. In the future this is an area that I will explore further.
My observations on the process to date suggest the following:
The parts need to be clean and well polished. We clean are parts with rubbing alcohol or TSP solution that the parts are boiled in for 30 minutes (followed by boiling for 10 minutes in clean water). The parts also need to be polished to at least 320 grit. The better the polish the more brilliant the colors will be. The polishing should be done with sandpaper with a proper backing to preserve flat surfaces and prevent rounded corners and dished out holes. Buffing does not yield good results and even seems to reduce the effectiveness of the process for some reason. In any event I dont feel buffing has much of a place in fine polishing as it tends to round corners and dish out screw holes.
The longer the charcoal mixture can be kept in contact with the parts to be hardened the better the colors will be. Shields, blocking, wire wraps, etc. all seem to improve the dramatic display of colors. Note: my students often wrap the parts that they harden with several layers of thin iron wire which should also be degreased. The wire makes a huge difference in the colors that can be obtained.
Parts will warp if left unsupported. If you try casehardening a thin strip of metal you can expect it to bend if it is not supported with some form of blocking.
The colors will be improved by a post tempering operation in the oven at temperatures up to 450 degrees F. This also reduces the risk of excessive brittleness if you happen to have casehardened a high carbon piece of steel or have thin sections in your low carbon parts that might have been penetrated by carbon all the way through. Skip this step if you do not want to reduce the hardness of the surface.
Wash the parts after the quench in hot water to remove residue and then oil or lacquer to protect the colors. Note: the colors can wear off easily so some form of protection is desirable. Many feel that the colors are also UV sensitive; however, I have never seen any definitive evidence to support this.
If you have any additional questions please dont hesitate to ask. I am far from an expert in this field, but I continue to learn each time I, or my students, participate in this process. Please share your knowledge if you choose to experiment with the process as that is the only way to keep this dying art alive.
Regards,
Alex Johnson
[imghttp://img.photobucket.com/albums/v733/44-henry/ColorCasedCylinders.jpg]http://[/img]
Color casehardening is not all that difficult to do; however, it does require a source of high heat such as a kiln, forge, or oven and an accurate way of measuring the temperature. It is possible to get colors when using casehardening compounds containing potassium cyanide and supposedly they can be used much like Kasenite; however, the dangers associated with working with this form of cyanide has prevented me from experimenting with it and also the colors produced in this process are inferior, in my opinion, to the colors obtained by the much safer pack hardening process using wood and bone charcoals. For this reason, this is the process that I will describe.
Currently I use an electric heat treat oven that was purchased from www.brownells.com which has two elements and a chamber capacity of about two square feet. The electric furnaces are more easy to control; however, they do have the disadvantage of reduced element life and using charcoals that are not chemically clean will definitely shorten the life of the elements. Some have had very good luck with gas kilns and this is something I would like to experiment with in the future. I have also used a smaller Neycraft oven that was also purchased from Brownells that works well for smaller articles and it is much less expensive. Here is a picture of the smaller furnace.
One of the secrets of good color case hardening is the type of charcoal used. Throughout history no doubt many different compounds were tried in a quest to improve the process and perhaps obtain better colors. Most early formulas mentioned in gunsmithing texts do suggest that the use of bone, wood, and leather charcoal was common. Others also mention the use of more exotic elements such as salt, fruit pits (charred), and potassium cyanide. Though I have experimented with the leather charcoal and salt, the other items (especially the cyanide) I have not tried. I suspect the fruit pits might have some promise as some pits contain trace amounts of cyanide.
The charcoal that I have had the most success with has been obtained from www.brownells.com and is wood and bone charcoal. These two charcoal types have proved successful in creating colors that match the original colors that one sees on fine old guns such as Colt, Winchester, LC Smith, Parker, Remington, and many others. Below are some examples of the colors that can be obtained.
To be successful in this process you must understand some peculiarities about this process. Normal casehardening involves nothing more than immersing a low carbon steel object inside a carbon rich atmosphere and than heating to above critical temperature. The longer the object remains in the pack surrounded by the carbon the deeper the resulting case will be. Temperature also plays a role in this as the absorption of carbon is quickened by the higher temperature ranges. The parts can simply be taken out of the pack and quenched and the casehardening will be successful as long as the part is quenched before it cools to below critical temperature.
Color casehardening requires more care. In color casehardening the parts need to be immersed in the carbon material in a sealed container and the temperature is critical for if it is too high the colors will be poor and washed out. Few people know it, but it is actually possible to get very good colors under the critical range; however, if this is done you are not really casehardening, just coloring. I have found that temperatures should be close to the 1400 degree F mark. When the temperature climbs much over 1450 the colors seem to be rather poor. Just as important is the process used to quench the parts. If air contaminates the parts before they hit the quench the colors will be spoiled. For this reason it is very important to make sure that a method is devised to allow the parts to be moved directly from the crucible to the quench as quickly as possible. For this reason I have devised the following crucible seen in the photograph below.
This crucible makes use of a length of 3 diameter steel pipe (stainless would be much better) with a cap welded on one end. The other end remains open. A pipe nipple is welded to the middle to allow gripping with a pair of tongs. The crucible is loaded with the polished, degreased parts, and packed with the chosen ratio of wood to bone charcoal. We have used different ratios, but most of the time I have settled on a 1:1 mix of wood to bone. It is important to keep the parts from touching the sides of the crucible by about ½. Add the charcoal in layers, tapping the crucible at regular intervals to settle the charcoal but do not tamp as this can pack the parts into the crucible so tightly that they can hang-up during the quench process. Make sure the charcoal is all the way to the top and then level of with a flat bar or stick. Next the crucible is inverted on a stainless steel carrier and any extra charcoal packed around the sides of the crucible. You can see this clearly in the above photograph.
The crucible is than placed inside the furnace
Meanwhile you should prepare the quench. I generally just use plane water that is as cold as I can easily get it. I shoot for a water temperature of 35-40 degrees F. I generally accomplish this by putting a block of ice into the water a couple hours before I start the oven. At this time I also supply air to the tank via an airline that runs into the bottom of the 32 gallon barrel that I use for quenching. See the photograph below for a picture of an older tank that we used to use. Some texts suggest placing Potassium Nitrate into the water to increase the colors obtained. I have experimented with this and have found that it does indeed provide more blues, but more experimentation is needed in this area. Basically I think there are two main variables that are important here. Water temperature is one and oxygenation of the water is the other. I think that is far more important to run the airline into the water before the quench than it is during. At some point I will obtain an oxygen monitor to measure the oxygen content of the water as I think this could provide some interesting answers.
If you pay attention to the quench tank in the photo and also the video clip you will notice a lid on it. The lid has an opening in the center along with a steel lip welded to the top just before the hole. In use the carrier with the crucible in tow is removed from the furnace and placed on the steel lid. The carrier is than positioned to butt up against the steel lip. At this point the operator changes the position of the tongs to the crucible and slides the crucible over the hole in the tank. Since the water level is right at the top of the lid the drop is almost instantaneous. The following photos demonstrate the sequence of events.
Lastly here is the video clip that I took of one of my students doing this process on one of the baseplates for their steam engines.
http://smg.photobucket.com/albums/v733/44-henry/?action=view¤t=ColorCaseVideo.mp4
I think the drop distance does have some impact in the colors obtained, at least according to Dr. Oscar Gaddy who did an excellent article on the process in the Double Gun Journal some years back. In the future this is an area that I will explore further.
My observations on the process to date suggest the following:
The parts need to be clean and well polished. We clean are parts with rubbing alcohol or TSP solution that the parts are boiled in for 30 minutes (followed by boiling for 10 minutes in clean water). The parts also need to be polished to at least 320 grit. The better the polish the more brilliant the colors will be. The polishing should be done with sandpaper with a proper backing to preserve flat surfaces and prevent rounded corners and dished out holes. Buffing does not yield good results and even seems to reduce the effectiveness of the process for some reason. In any event I dont feel buffing has much of a place in fine polishing as it tends to round corners and dish out screw holes.
The longer the charcoal mixture can be kept in contact with the parts to be hardened the better the colors will be. Shields, blocking, wire wraps, etc. all seem to improve the dramatic display of colors. Note: my students often wrap the parts that they harden with several layers of thin iron wire which should also be degreased. The wire makes a huge difference in the colors that can be obtained.
Parts will warp if left unsupported. If you try casehardening a thin strip of metal you can expect it to bend if it is not supported with some form of blocking.
The colors will be improved by a post tempering operation in the oven at temperatures up to 450 degrees F. This also reduces the risk of excessive brittleness if you happen to have casehardened a high carbon piece of steel or have thin sections in your low carbon parts that might have been penetrated by carbon all the way through. Skip this step if you do not want to reduce the hardness of the surface.
Wash the parts after the quench in hot water to remove residue and then oil or lacquer to protect the colors. Note: the colors can wear off easily so some form of protection is desirable. Many feel that the colors are also UV sensitive; however, I have never seen any definitive evidence to support this.
If you have any additional questions please dont hesitate to ask. I am far from an expert in this field, but I continue to learn each time I, or my students, participate in this process. Please share your knowledge if you choose to experiment with the process as that is the only way to keep this dying art alive.
Regards,
Alex Johnson