


Here are some pictures of my latest kiln which was constructed using a chimney flue liner. The cost was quite reasonable and it was easy to make. I have fired it about 10 times and it works very well. I believe this design will last a very long time but if I do have to replace something I can do it in about 1 hour.
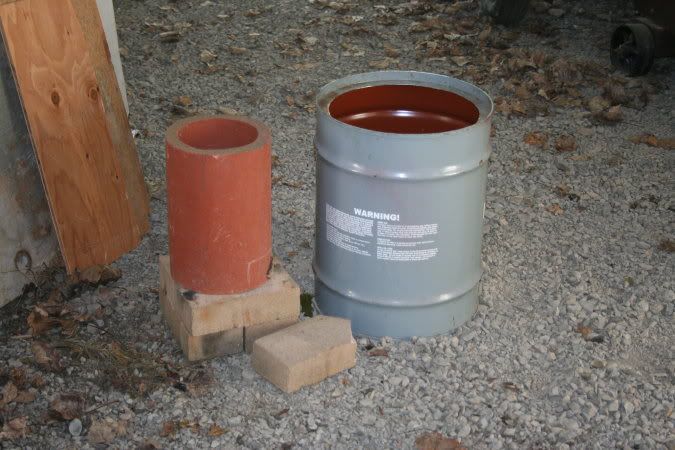
This shows the steel drum with the liner and bricks. The drum is about the same size as those used for transmission fluid. I did this to figure out where to cut the hole for the burner. I use a Reil burner. The hole is placed so that the bottom of the hole is even with the first layer of bricks.
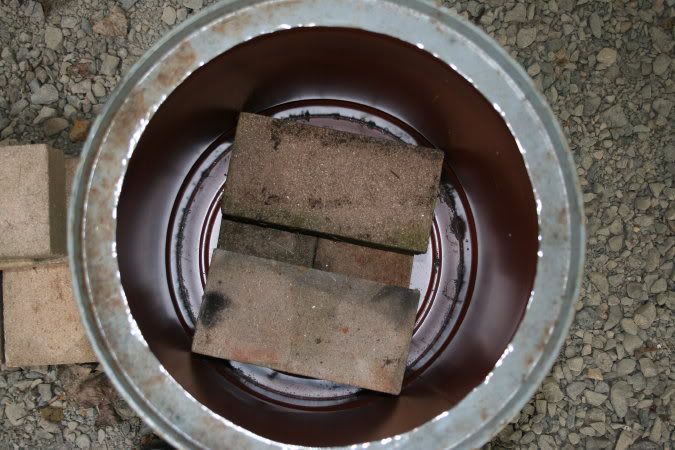
The next pictures show bricks placed in the bottom and then with the liner on top. By doing this I found that a quarter inch of sand was needed on the bottom to raise the top of the liner to match the rim of the barrel. Notice that the top was removed leaving a 1 inch rim. This was needed for support of the collar bricks. The arrangement of the brick is not as shown. There are two layers, the bottom has two or three full bricks with pieces cut to fit all around. Small gaps were then filled with sand.
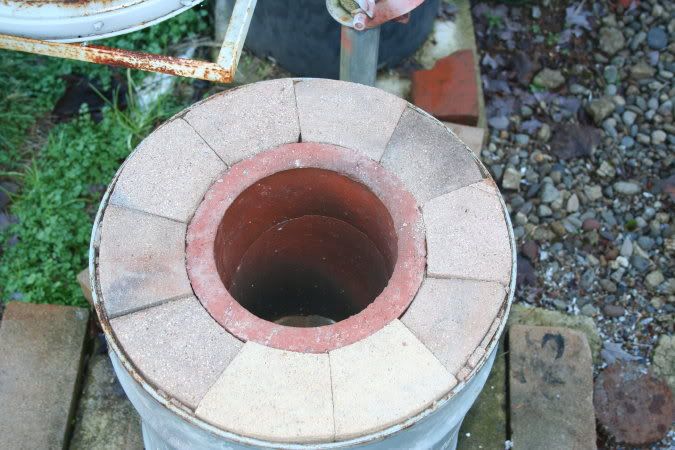
The next layer has the bricks in a circle with ends facing in and tighly fit leaving a 6 inch center hole, same size as the center of the liner. I ended up with a five or six sided circle. I also had to create a gap in there to allow for the burner inlet. My burner is one and a half inch so I placed a piece of pipe in the slot big enough to fit the burner . Spaces around the main bricks were filled with pieces of brick cut to fit and again small gaps filled with sand. This was probably the most difficult step in the project.
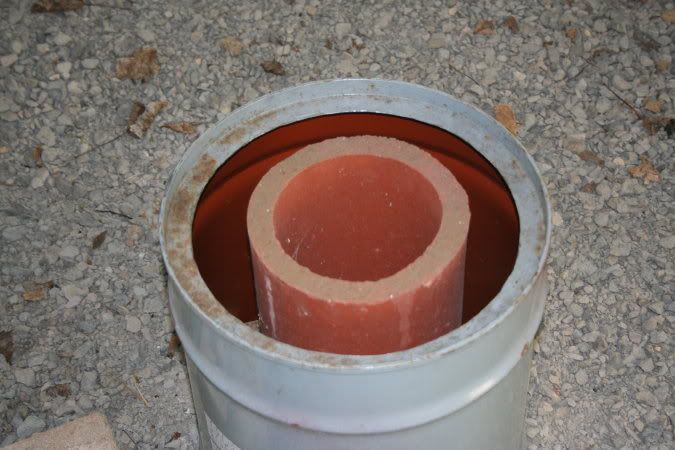
On top of the second layer of brick went the liner carefully placed to fit over the hole and centered in the barrel. I placed some brick pieces around the base of the liner to keep it in place when it is moved. Just used three. This led to a problem with the liner cracking when it expanded upon heating. Should have placed a soft piece of non flammable material between the wedges and the barrel. Now I filled up the space around the liner with perlite, all the way to the top.
The next pictures show the kiln with all the parts in place and near completion. The collar was made from brick wedges and cut to fit. They were also thinned down so they just came to the top of the barrel rim and the liner top. I tried to make the collar out of cast refractory cement but it fell apart. .
.
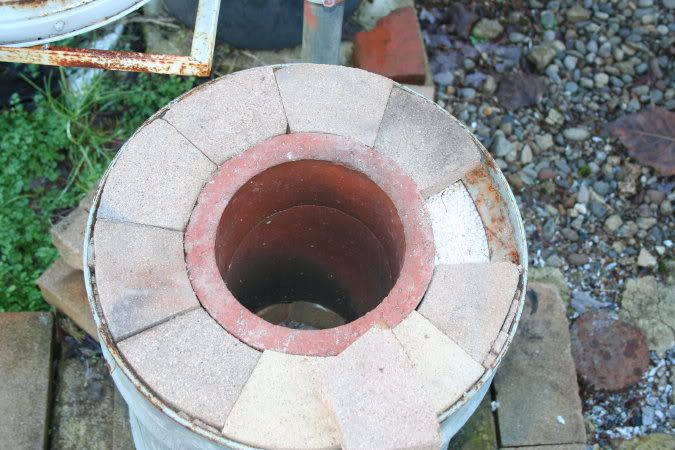
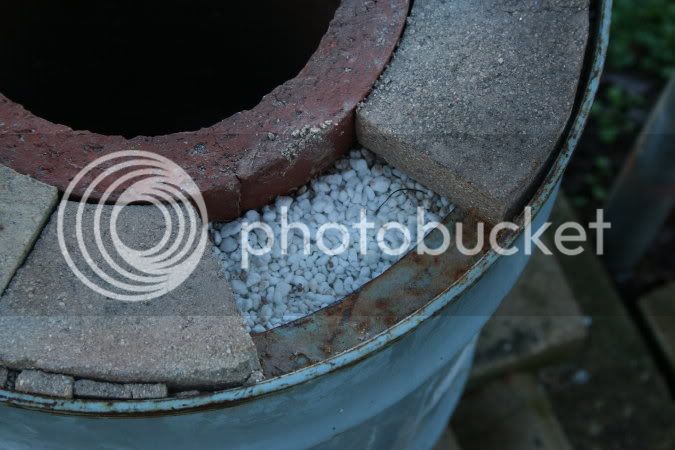
In these pictures you can see how the top fits and in the closeup the perlite filler. If you look very close you will see the fine line crack that came from wedging too tight. On the left you can see the wedge at the top. I will not worry about the cracks unless the get bad under use. Time will tell.
A final note. The bricks are all fire brick from my first kiln which was all bricks in a stack. I do not know what kind they are but they cut very well with a tile saw. I could even round them off by holding them at an angle to the blade and moving them in an arc. Some firebricks are hard as rock so do a test before buying them. The softer ones could even be cut with a hacksaw.
This shows the steel drum with the liner and bricks. The drum is about the same size as those used for transmission fluid. I did this to figure out where to cut the hole for the burner. I use a Reil burner. The hole is placed so that the bottom of the hole is even with the first layer of bricks.
The next pictures show bricks placed in the bottom and then with the liner on top. By doing this I found that a quarter inch of sand was needed on the bottom to raise the top of the liner to match the rim of the barrel. Notice that the top was removed leaving a 1 inch rim. This was needed for support of the collar bricks. The arrangement of the brick is not as shown. There are two layers, the bottom has two or three full bricks with pieces cut to fit all around. Small gaps were then filled with sand.
The next layer has the bricks in a circle with ends facing in and tighly fit leaving a 6 inch center hole, same size as the center of the liner. I ended up with a five or six sided circle. I also had to create a gap in there to allow for the burner inlet. My burner is one and a half inch so I placed a piece of pipe in the slot big enough to fit the burner . Spaces around the main bricks were filled with pieces of brick cut to fit and again small gaps filled with sand. This was probably the most difficult step in the project.
On top of the second layer of brick went the liner carefully placed to fit over the hole and centered in the barrel. I placed some brick pieces around the base of the liner to keep it in place when it is moved. Just used three. This led to a problem with the liner cracking when it expanded upon heating. Should have placed a soft piece of non flammable material between the wedges and the barrel. Now I filled up the space around the liner with perlite, all the way to the top.
The next pictures show the kiln with all the parts in place and near completion. The collar was made from brick wedges and cut to fit. They were also thinned down so they just came to the top of the barrel rim and the liner top. I tried to make the collar out of cast refractory cement but it fell apart.
.
In these pictures you can see how the top fits and in the closeup the perlite filler. If you look very close you will see the fine line crack that came from wedging too tight. On the left you can see the wedge at the top. I will not worry about the cracks unless the get bad under use. Time will tell.
A final note. The bricks are all fire brick from my first kiln which was all bricks in a stack. I do not know what kind they are but they cut very well with a tile saw. I could even round them off by holding them at an angle to the blade and moving them in an arc. Some firebricks are hard as rock so do a test before buying them. The softer ones could even be cut with a hacksaw.