
You are using an out of date browser. It may not display this or other websites correctly.
You should upgrade or use an alternative browser.
You should upgrade or use an alternative browser.
Building Rudy's Steam Tractor
- Thread starter 4156df
- Start date


Help Support Home Model Engine Machinist Forum:
This site may earn a commission from merchant affiliate
links, including eBay, Amazon, and others.
- Joined
- Feb 25, 2008
- Messages
- 464
- Reaction score
- 5
Post #50
Sorry about the long time between posts. The day after my last post I had arthroscopic surgery to repair a torn meniscus in my knee. All went well and Im getting back to the tractor on a limited basis.
I did an assessment of where I am on the tractor and discovered that Im pretty much done with machined parts! How did that happen?
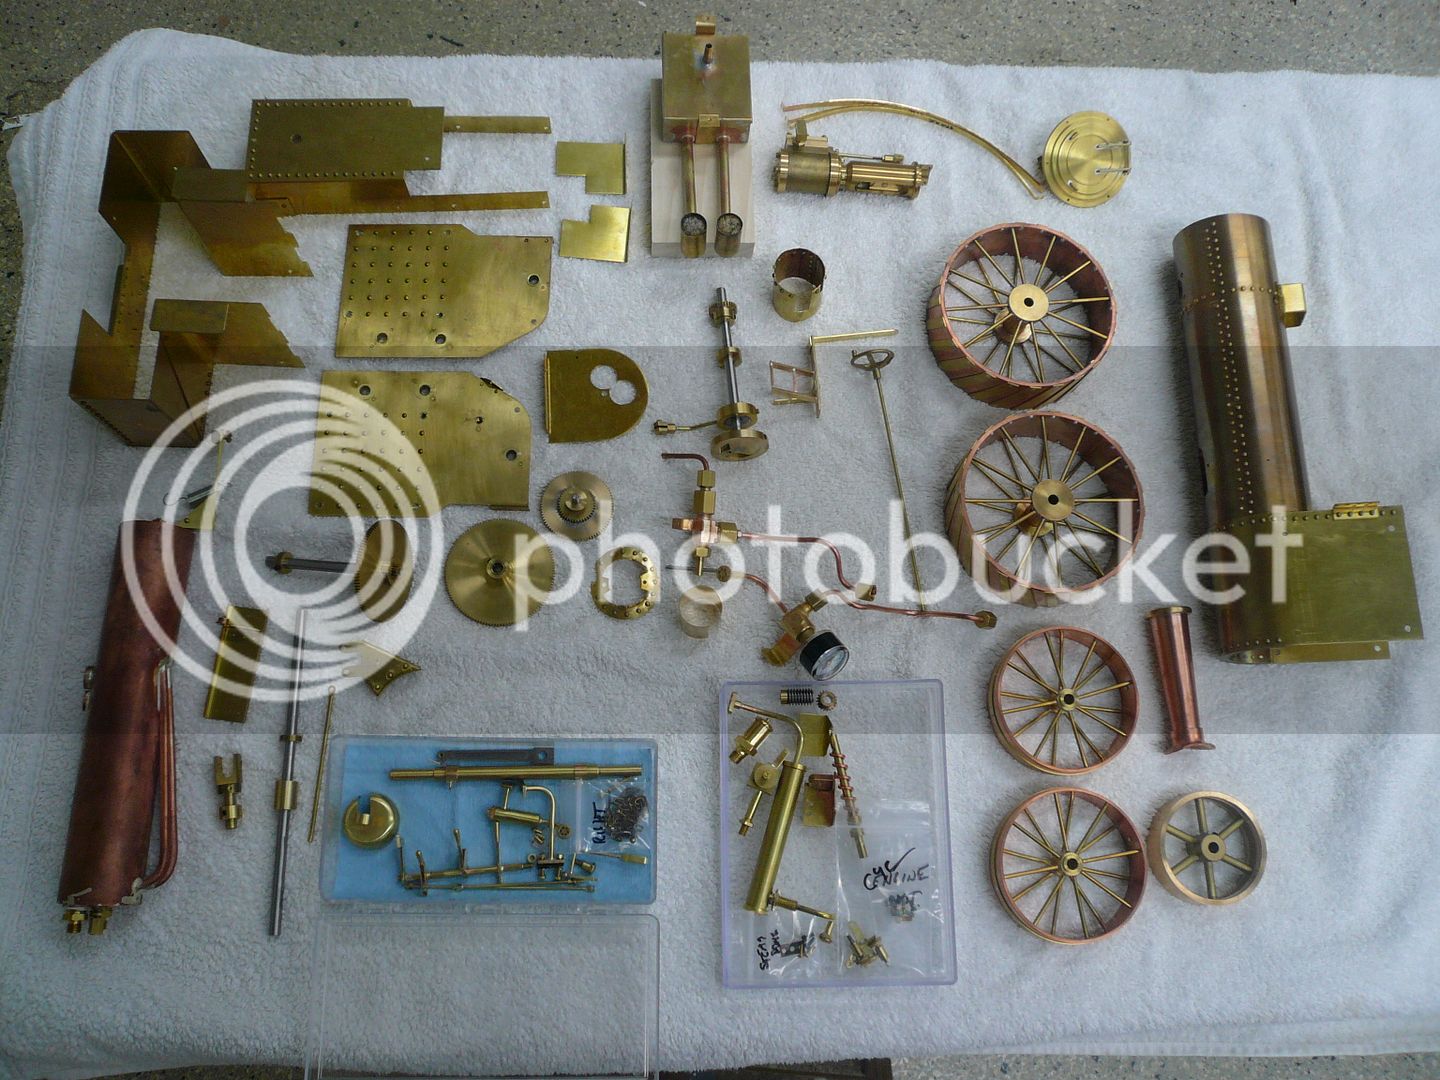
It seems like that pile of finished parts should be larger.
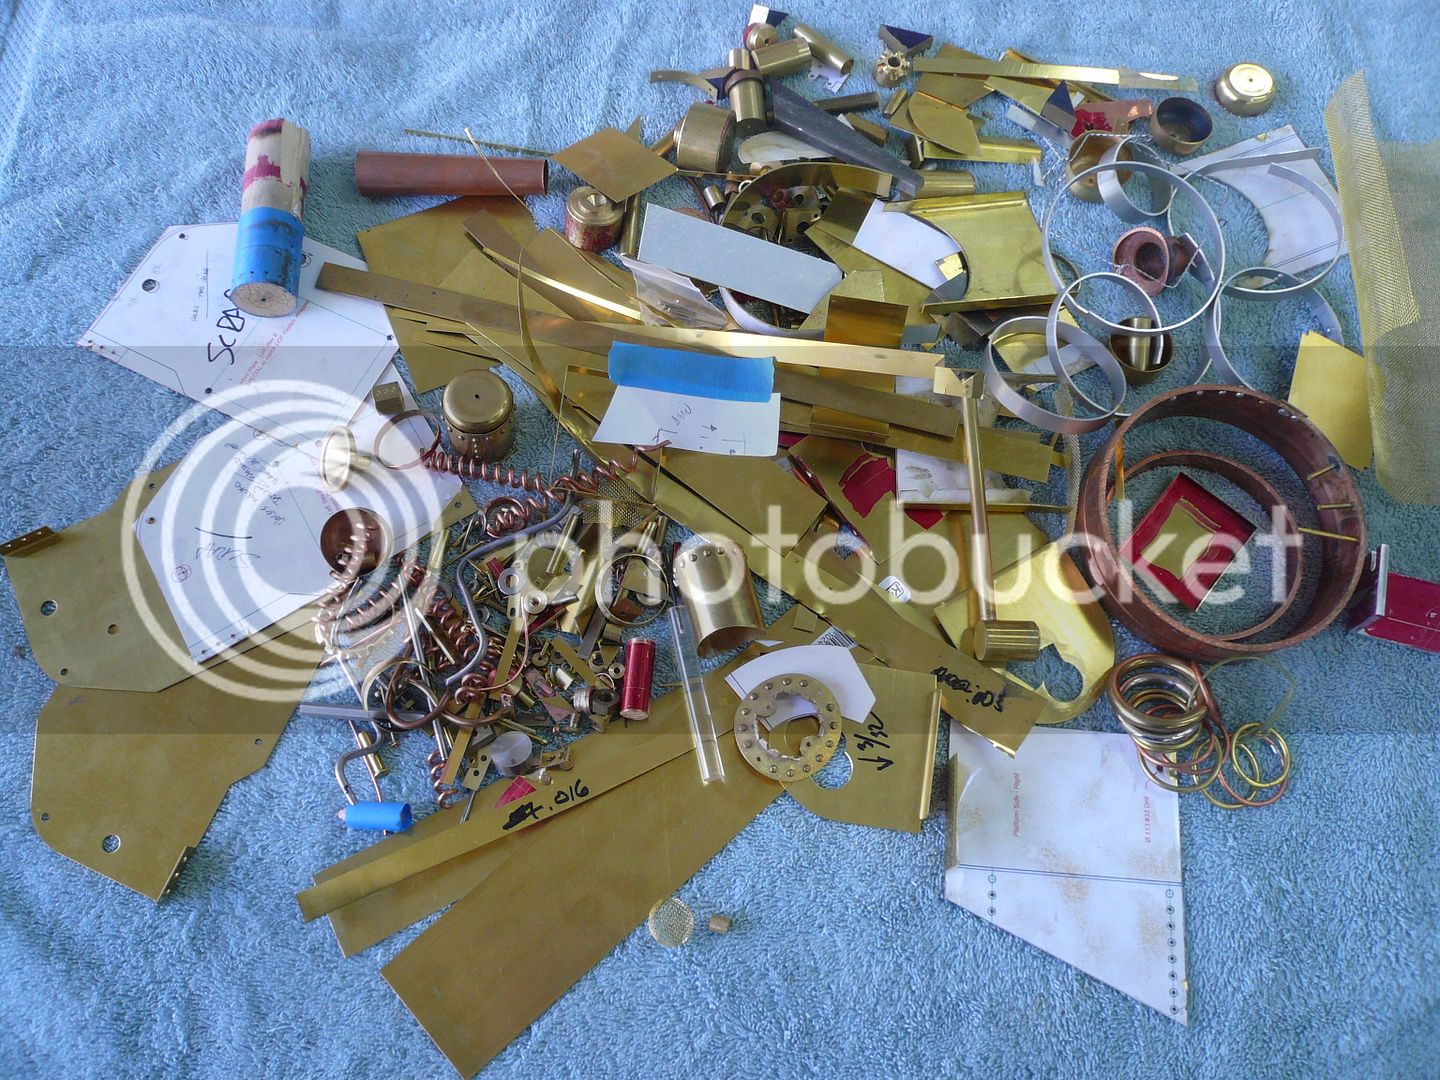
My pile of screw ups is almost as big, if not bigger.
There are still a few bits and pieces left to make, but everything that gets painted is done. Im going to begin painting and finish making any remaining bits while Im waiting for paint to cure.
Its a truism that a good finish cant fix a bad project, but a bad finish can ruin a good one. With that in mind Im going to take my time painting. Maybe even get a little anal about it. So, the next few posts wont be about machining, but painting. If thats not appropriate I hope someone (Moderator?) will let me know.
Sometime back I got a copy of Christopher Vines HOW (not) TO PAINT A LOCOMOTIVE. Its a book worth having even if youre not going for an award winning paint job. Lots of good tips and ideas.
Mr. Vine spends quite a bit of time on spray guns and paint types, most of which I hope wont apply here because I plan to use spray cans. Fortunately Dupli-Color (www.duplicolor.com) sells a self-etching primer in a spray can. Some kind of etching primer is almost a must on brass. Dupli-Color also has high heat engine enamel in quite a few colors. Also, the local auto paint store will custom mix colors (not High Heat) and put them in a spray can for $26/can. Not cheap, but not bad considering time wasted with spray gun hassles and clean up.
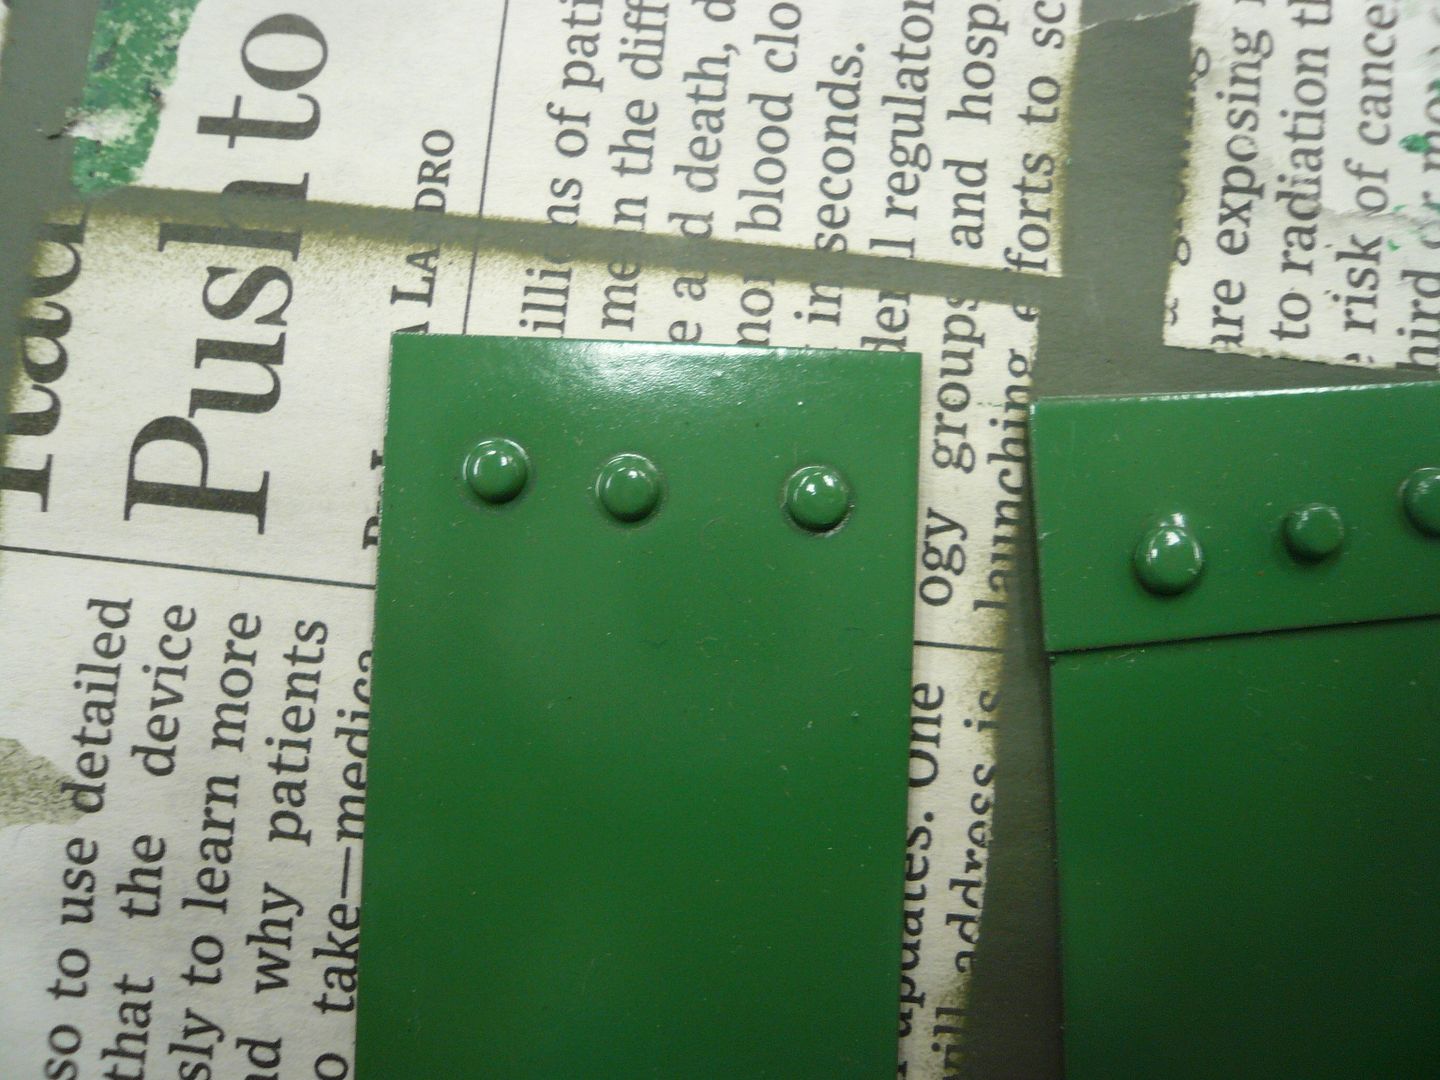
At the same time I cut out a bunch of 2 x 3 brass coupons for test panels, I made up a couple of samples to see if paint would obscure the rivets or wick under the lap joints. Looks like it wont be a problem.
These parts were processed the same as I plan to do the model. That is: 1) a run through the dishwasher with detergent (wife not home) to remove any oil, 2) a wipe down with wax & grease remover, and 3) a final wipe with a tack cloth just before painting.
Mr. Vine doesnt like the use of detergent because he says it may leave a residue. However, Dupli-Color recommends it as well as the wax & grease remover and tack cloth. I did a tape test on the above samples and paint adhesion was good, so Im going with the paint manufacturers suggestion.
If I only have one or two things to paint, I usually just hang them on a piece of wire and step out of the garage door to spray them. However, there are enough parts on the tractor that I decided to improvise a spray booth.
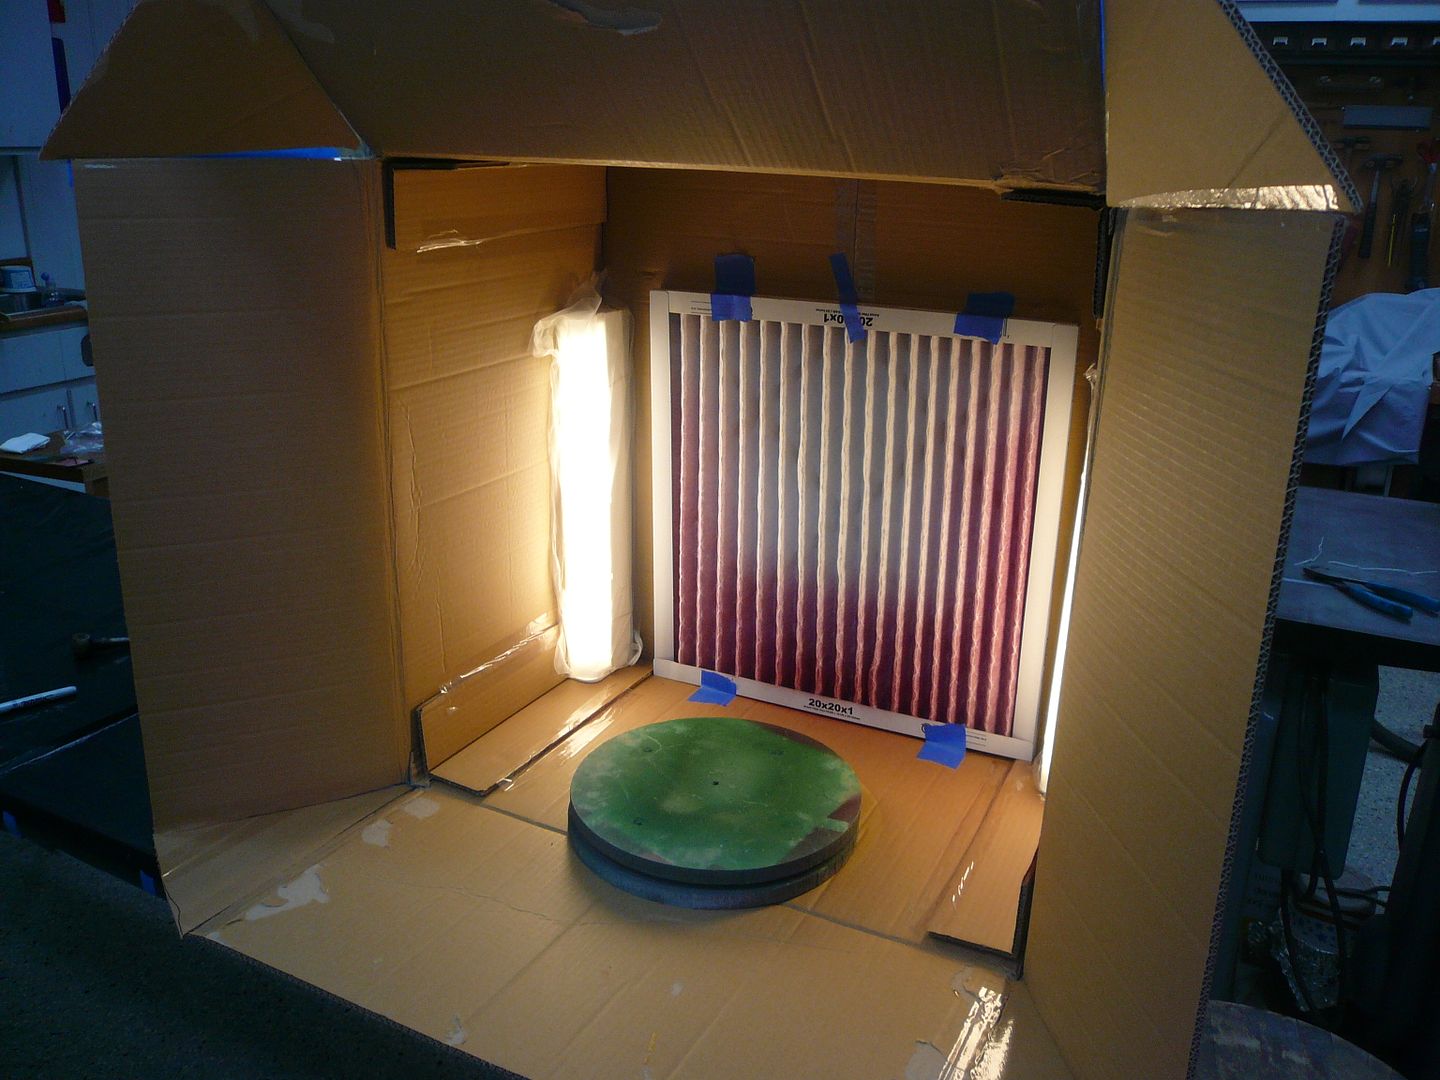
You can stop laughing now. It actually works pretty well.
Its made from a cardboard box, a window fan, two cheap under counter lights and a 20x20 furnace filter. In use the fan is set on low and the back is pointed out the door. It does an excellent job of capturing overspray and venting fumes.
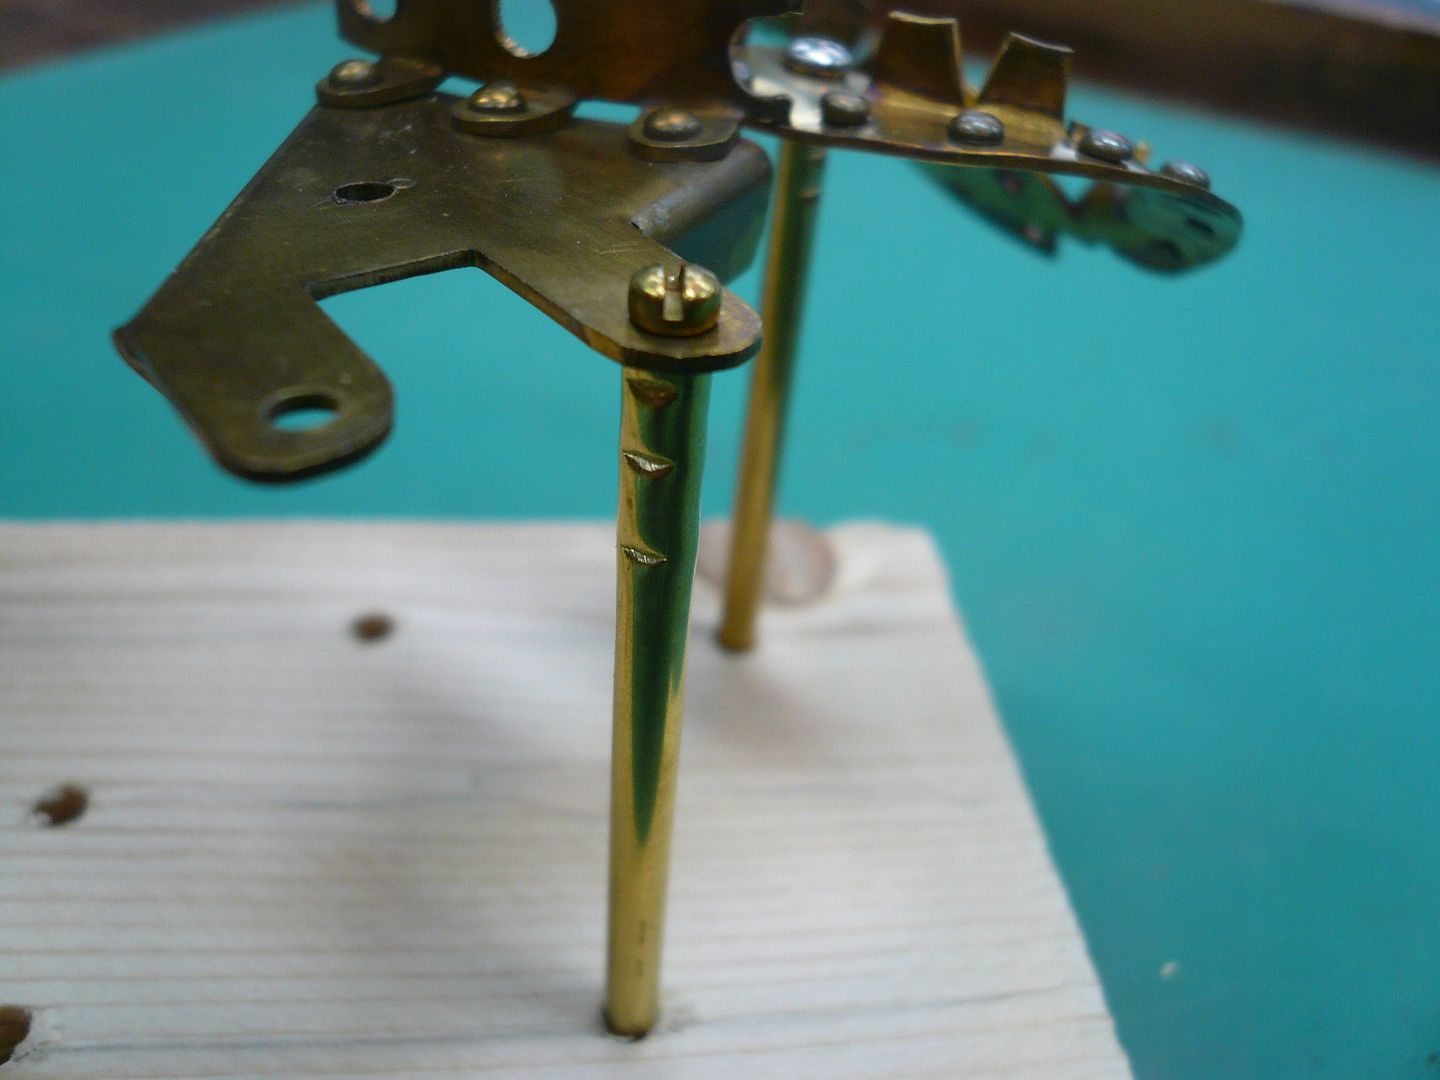
As part of the prep, I fastened all of the tractor parts to holders so they can be handled while painting. Some are taped to dowels and some have special mounting blocks. Most of the parts have some kind of mounting hole, so one method that worked really well was to use a piece of brass tube with an ID slightly larger than the mounting screw size. I put a screw through the part and into the tube and then flattened the tube in several places with a wire cutter. The tube grips the screw threads and the screw can be tightened to securely hold the part. Heres an example.
I also made up some mounting blocks with randomly space holes and hole sizes to hold the various pieces after theyre prepped and painted.
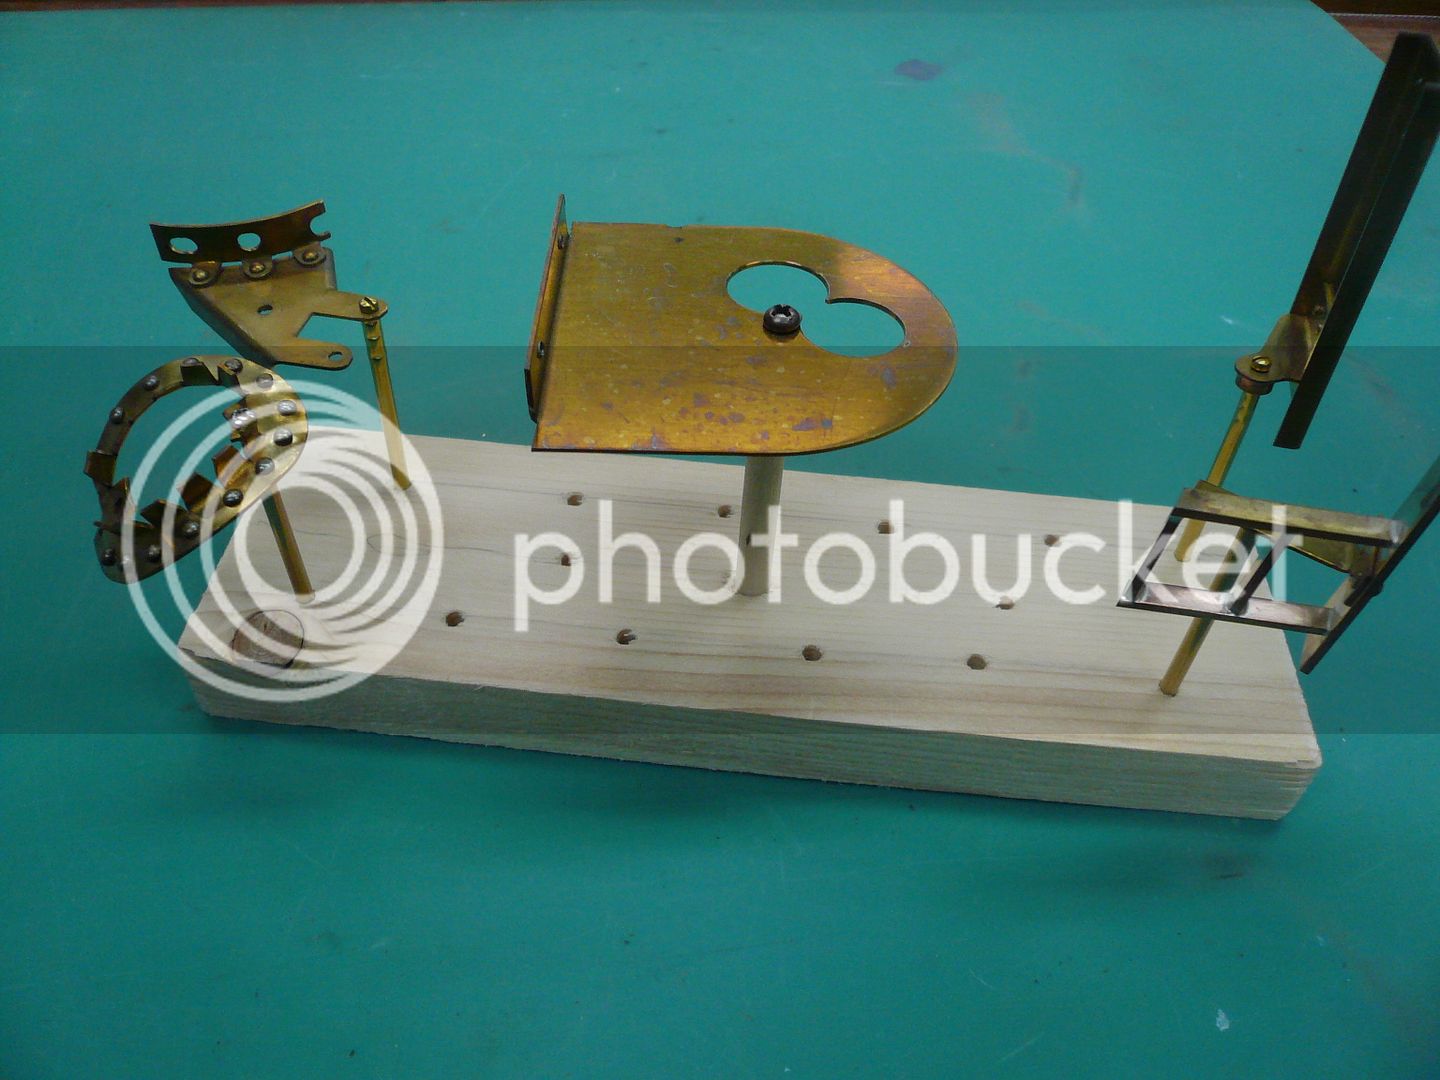
Heres everything in the drying cabinet ready for primer.
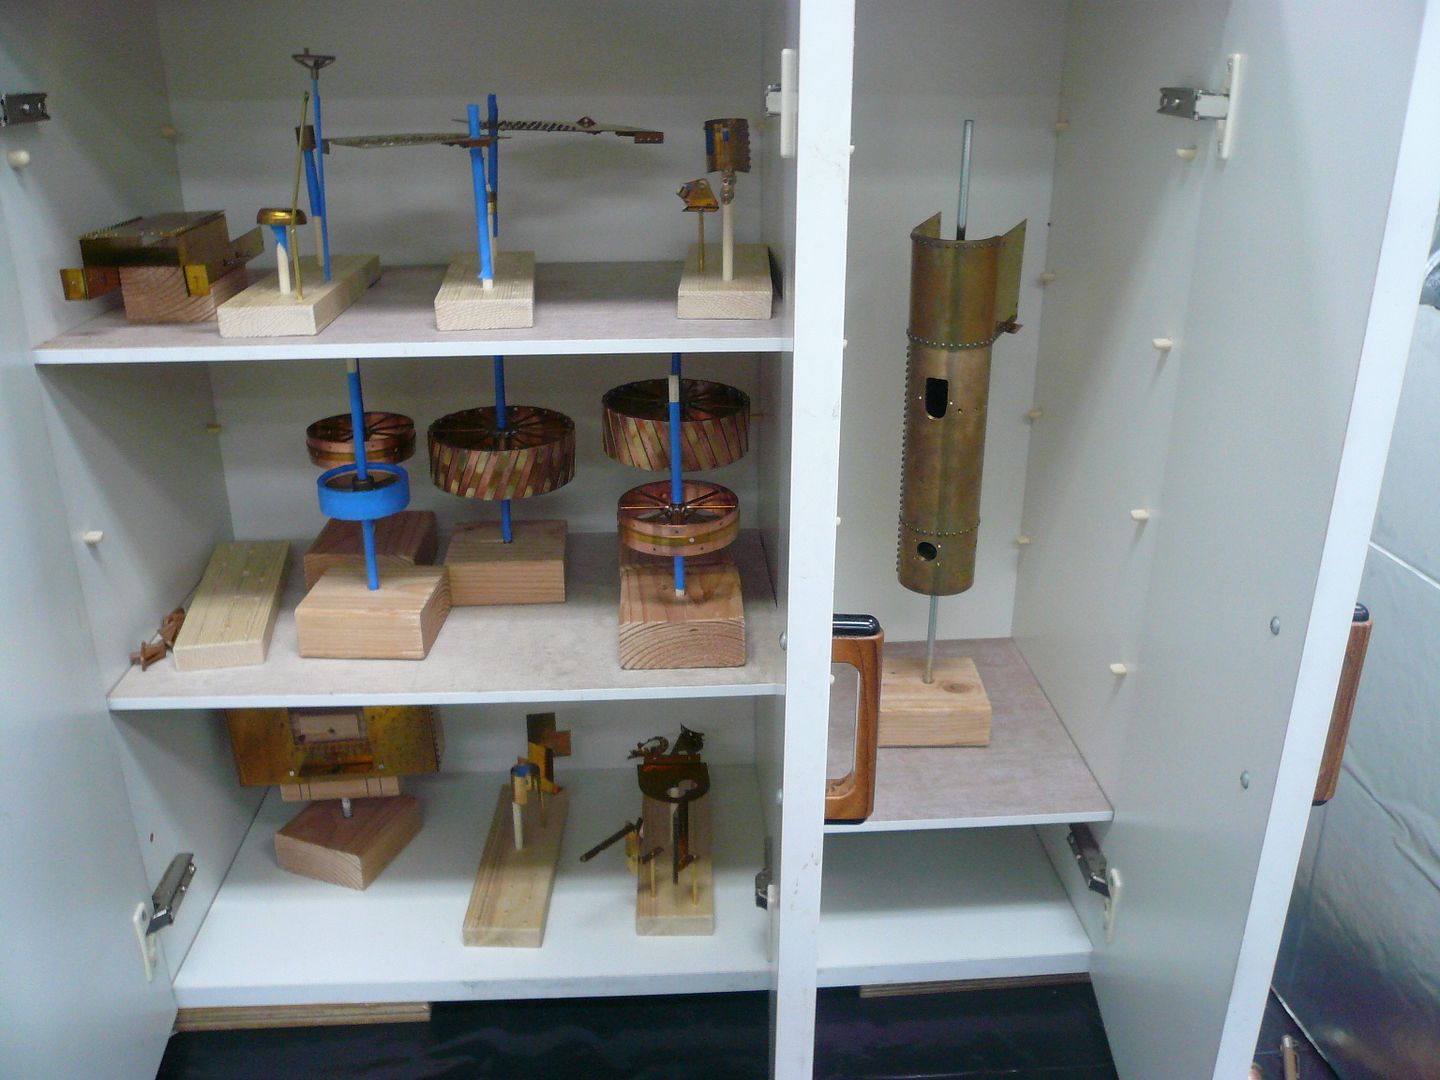
The drying cabinet is another tip from Mr. Vines book. He points out that most dust problems are the result of dust settling during the drying stage rather than during application. His answer is to put everything in a clean cabinet to cure.
My cabinet is an old kitchen cabinet I found at the swap meet, but one could easily be improvised from a cardboard box.
Thats it for today. Thanks for reading.
Regards,
Dennis
Sorry about the long time between posts. The day after my last post I had arthroscopic surgery to repair a torn meniscus in my knee. All went well and Im getting back to the tractor on a limited basis.
I did an assessment of where I am on the tractor and discovered that Im pretty much done with machined parts! How did that happen?
It seems like that pile of finished parts should be larger.
My pile of screw ups is almost as big, if not bigger.
There are still a few bits and pieces left to make, but everything that gets painted is done. Im going to begin painting and finish making any remaining bits while Im waiting for paint to cure.
Its a truism that a good finish cant fix a bad project, but a bad finish can ruin a good one. With that in mind Im going to take my time painting. Maybe even get a little anal about it. So, the next few posts wont be about machining, but painting. If thats not appropriate I hope someone (Moderator?) will let me know.
Sometime back I got a copy of Christopher Vines HOW (not) TO PAINT A LOCOMOTIVE. Its a book worth having even if youre not going for an award winning paint job. Lots of good tips and ideas.
Mr. Vine spends quite a bit of time on spray guns and paint types, most of which I hope wont apply here because I plan to use spray cans. Fortunately Dupli-Color (www.duplicolor.com) sells a self-etching primer in a spray can. Some kind of etching primer is almost a must on brass. Dupli-Color also has high heat engine enamel in quite a few colors. Also, the local auto paint store will custom mix colors (not High Heat) and put them in a spray can for $26/can. Not cheap, but not bad considering time wasted with spray gun hassles and clean up.
At the same time I cut out a bunch of 2 x 3 brass coupons for test panels, I made up a couple of samples to see if paint would obscure the rivets or wick under the lap joints. Looks like it wont be a problem.
These parts were processed the same as I plan to do the model. That is: 1) a run through the dishwasher with detergent (wife not home) to remove any oil, 2) a wipe down with wax & grease remover, and 3) a final wipe with a tack cloth just before painting.
Mr. Vine doesnt like the use of detergent because he says it may leave a residue. However, Dupli-Color recommends it as well as the wax & grease remover and tack cloth. I did a tape test on the above samples and paint adhesion was good, so Im going with the paint manufacturers suggestion.
If I only have one or two things to paint, I usually just hang them on a piece of wire and step out of the garage door to spray them. However, there are enough parts on the tractor that I decided to improvise a spray booth.
You can stop laughing now. It actually works pretty well.
Its made from a cardboard box, a window fan, two cheap under counter lights and a 20x20 furnace filter. In use the fan is set on low and the back is pointed out the door. It does an excellent job of capturing overspray and venting fumes.
As part of the prep, I fastened all of the tractor parts to holders so they can be handled while painting. Some are taped to dowels and some have special mounting blocks. Most of the parts have some kind of mounting hole, so one method that worked really well was to use a piece of brass tube with an ID slightly larger than the mounting screw size. I put a screw through the part and into the tube and then flattened the tube in several places with a wire cutter. The tube grips the screw threads and the screw can be tightened to securely hold the part. Heres an example.
I also made up some mounting blocks with randomly space holes and hole sizes to hold the various pieces after theyre prepped and painted.
Heres everything in the drying cabinet ready for primer.
The drying cabinet is another tip from Mr. Vines book. He points out that most dust problems are the result of dust settling during the drying stage rather than during application. His answer is to put everything in a clean cabinet to cure.
My cabinet is an old kitchen cabinet I found at the swap meet, but one could easily be improvised from a cardboard box.
Thats it for today. Thanks for reading.
Regards,
Dennis
- Joined
- Aug 8, 2009
- Messages
- 930
- Reaction score
- 12
I sure am learning a lot from this build! I appreciate all the extra work documenting as you go, it really helps us newbies.
-Trout
-Trout
georgeseal
Well-Known Member
- Joined
- Jul 28, 2007
- Messages
- 105
- Reaction score
- 2
Dennis,
I use a counter top oven (Wiffie wanted a new so she said old one was broke. It repaired itself between the house and the shop) I set temp about 250 F. and bake for about a hour. Then turn off oven and let cool. Paint comes out hard and dry.
Just a thought
George Seal Conyers Ga.
I use a counter top oven (Wiffie wanted a new so she said old one was broke. It repaired itself between the house and the shop) I set temp about 250 F. and bake for about a hour. Then turn off oven and let cool. Paint comes out hard and dry.
Just a thought
George Seal Conyers Ga.
Gee, Dennis, I can't believe you're almost done already. That's no joke. You made a great number
of parts, and it didn't seem to take very long. The spokes alone must be 150 pieces.. Guess I was really enjoying your thread! Still am.
Dean
of parts, and it didn't seem to take very long. The spokes alone must be 150 pieces.. Guess I was really enjoying your thread! Still am.
Dean
zeeprogrammer
Well-Known Member
- Joined
- Mar 14, 2009
- Messages
- 3,362
- Reaction score
- 13
Great post. Some neat ideas in there.
Can't wait for more pics!
Can't wait for more pics!
arnoldb
Well-Known Member
- Joined
- Apr 8, 2009
- Messages
- 1,792
- Reaction score
- 12
Dennis, that collection of parts is awesome :bow:
And a "K" to you for sharing the the pile of parts that did not make the grade - that puts in perspective on how meticulous your work is and how high your standards are :bow:
Rudi Kouhoupt's book was already on my shopping list (One of many from Rudi!), and now you "forced" another on there; I'll be ordering "HOW (not) TO PAINT A LOCOMOTIVE" as well when I can, as it has been tempting me from the Camden catalog for a while ;D
Kind regards, Arnold
- Joined
- Jun 4, 2008
- Messages
- 3,285
- Reaction score
- 630
That's a lot of parts! :bow:
Some of the scrap looks pretty useful for future projects too.
Some of the scrap looks pretty useful for future projects too.
- Joined
- Feb 25, 2008
- Messages
- 464
- Reaction score
- 5
Trout, Dean, Zee, George, Arnold & Kvom...Thank you.
My Post #51
Not a lot of shop time the last couple of weeks, however Ive made some progress with the painting.
Im going with a black, green and burgundy color scheme. The black definitely needs to be high heat, but from what other builders have told me, the green can be plain enamel. I found two greens I like in spray cans. One is a conventional enamel and the other is a high heat engine enamel. I liked the conventional enamel color a little better, but decided to test its heat resistance before putting it on the engine.
I made up two test coupons, one with the high heat enamel and its primer and the other with the conventional enamel and self etching primer. I put them in my toaster oven set at 350º F. Heres what happened.

The one on the right is the self-etch primer with conventional enamel. At about 200 degrees, the paint/primer started rolling up, leaving bare metal. Apparently the self-etch doesnt like heat at all, or it could be the enamel shrinks more than the primer and pulls it off as it contracts. Whatever, Im glad I checked.
The engine enamel (left sample) was un-affected. After an hour at 350º F, I let it cool and did a tape test. Adhesion was still good. With that, the second choice green looked a whole lot more attractive and I started painting. The green likely won't see 300 degree temps, but I figure why chance it.
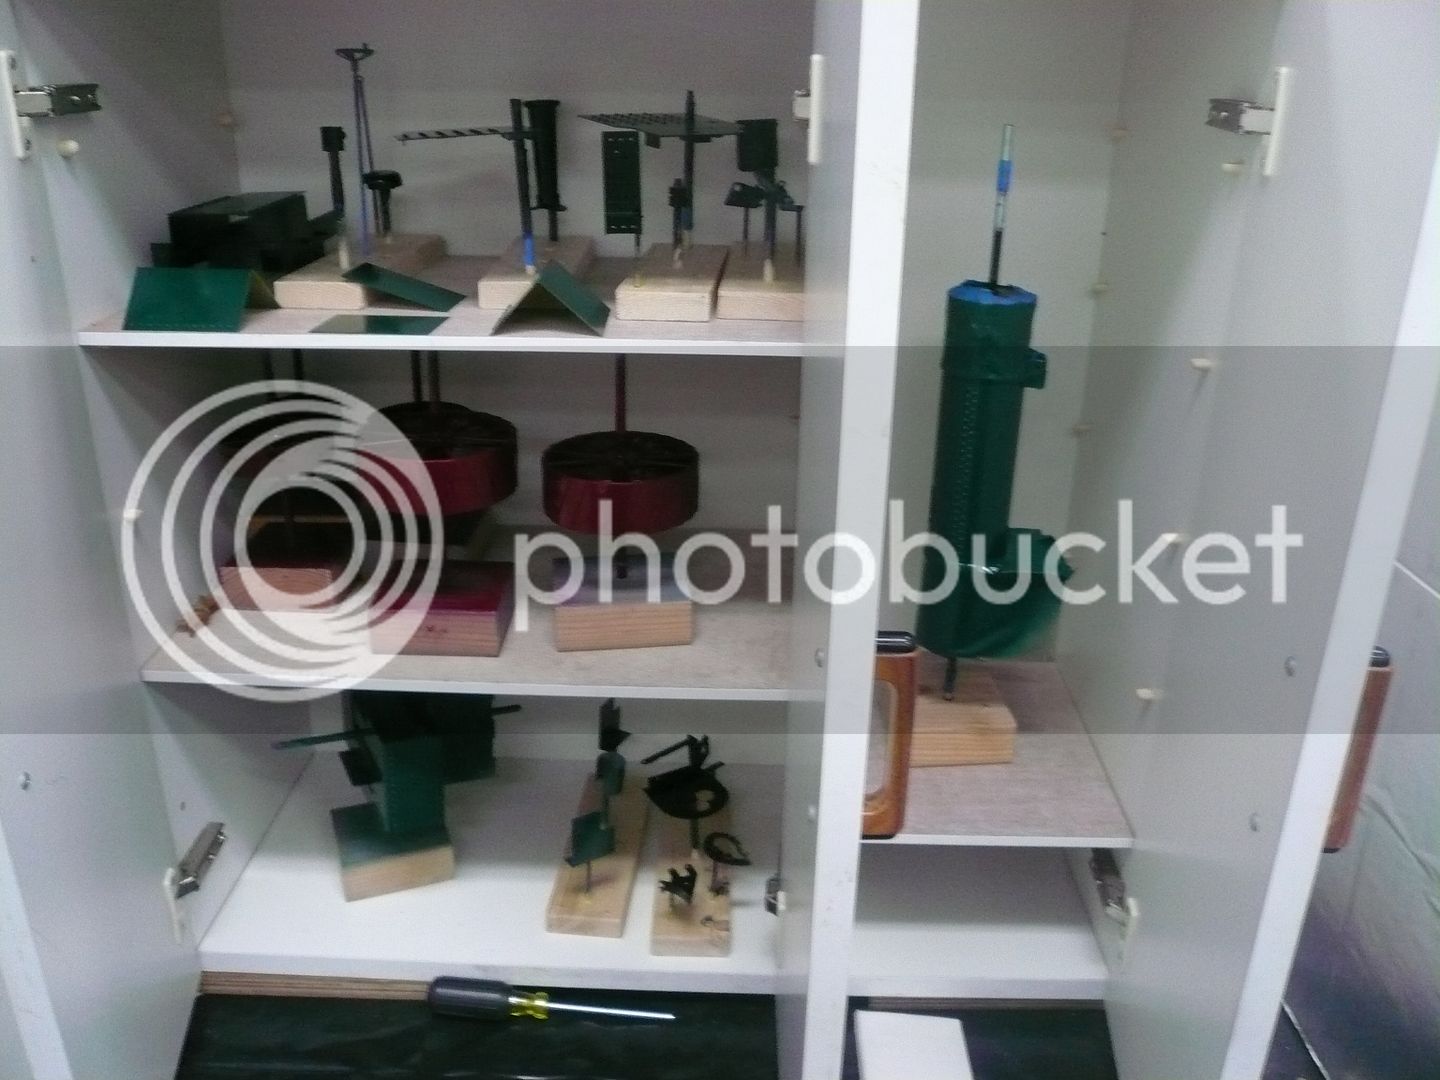
Everything is now primed and painted except for the gray on the wheel rims. I plan to let everything sit and cure for a while before starting assembly.
Note the sample coupons on the top shelf. They'll come in handy if I need to test repairs and for pinstriping.
Painting the wheels is a little tricky because its hard to get paint around all the spokes and on the inside of the rims without runs. For spraying, I made a rack that let me rotate and turn the wheel as I sprayed (the base is a turntable). Then I sprayed light coats from all directions until I had a full wet coat.
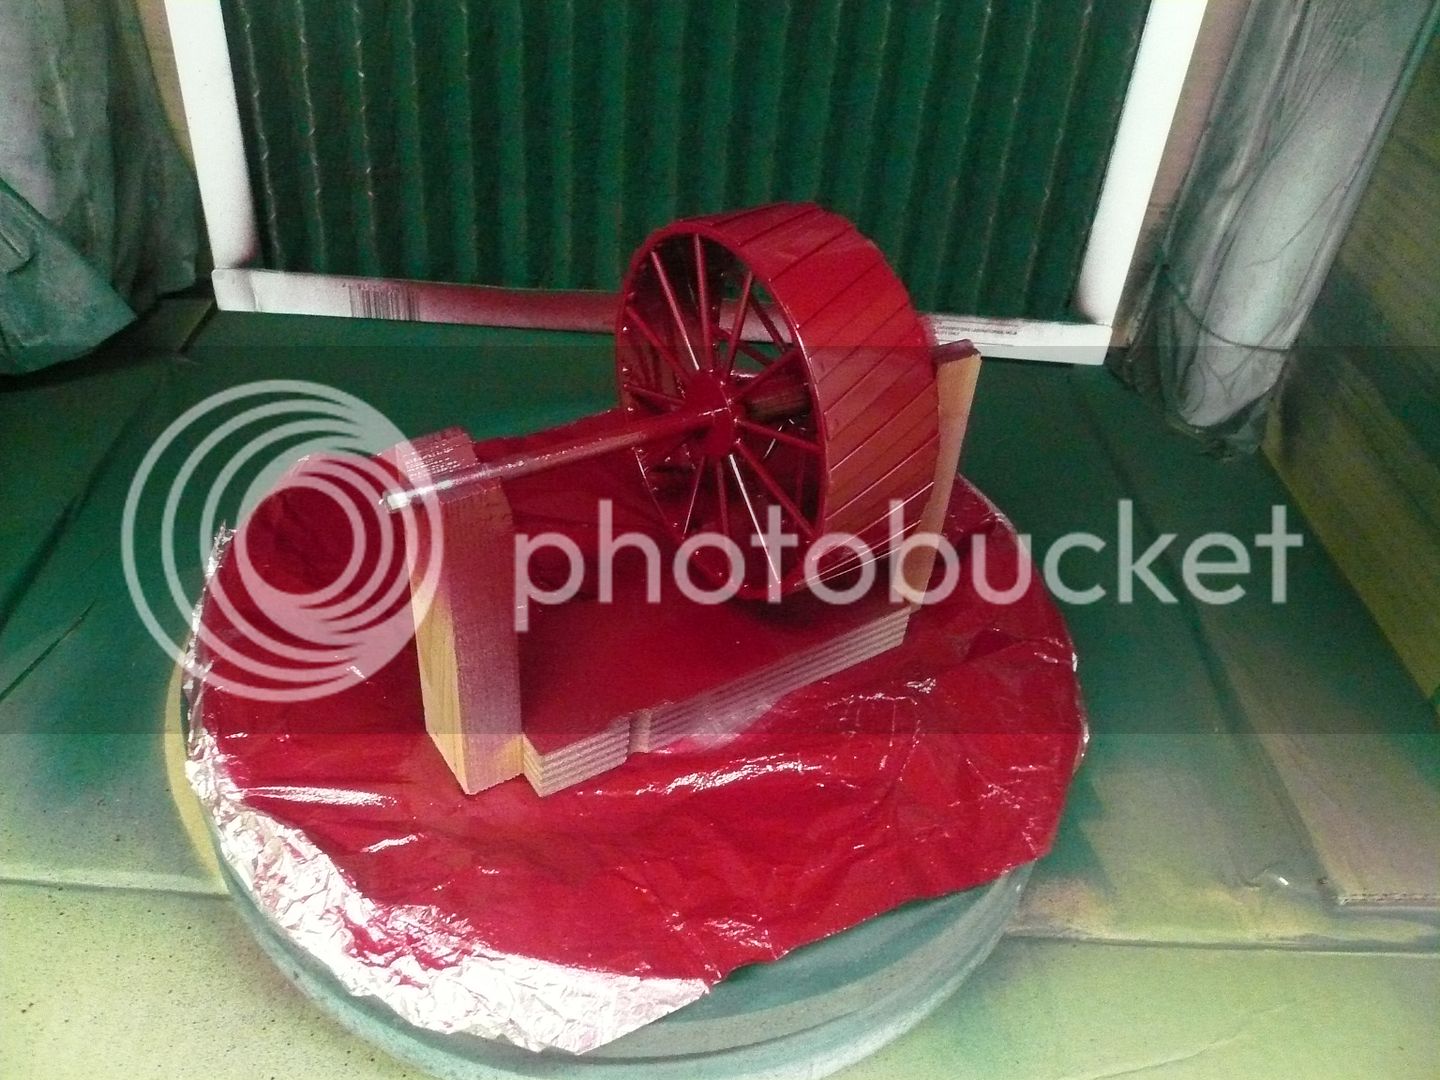
Once I had the coverage I wanted, I moved the wheel to this fixture and let it slowly rotate (about 25 rpm) for 10 minutes. At that point enough of the solvents had flashed off and the paint was stable enough not to run.
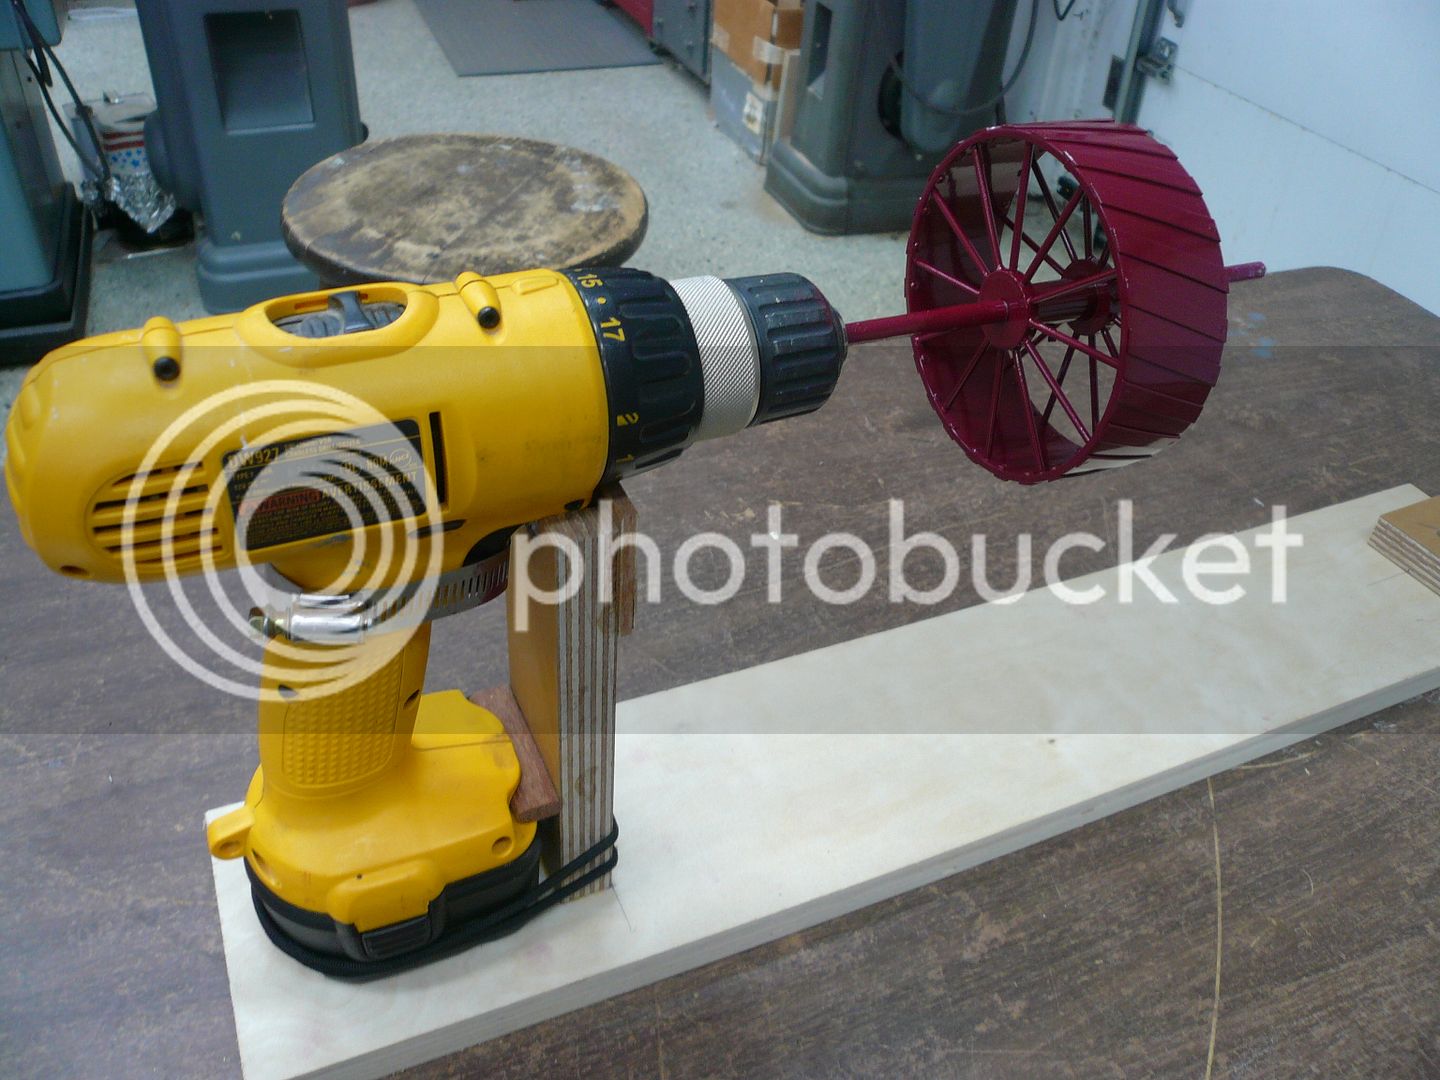
The hose clamp around the trigger is tightened to control and hold the speed. The wheels turned out great, with no runs and a nice coat of paint everywhere. (Note: The color looks different in these photos because of lighting.)
The boiler housing was painted on a similar rack.
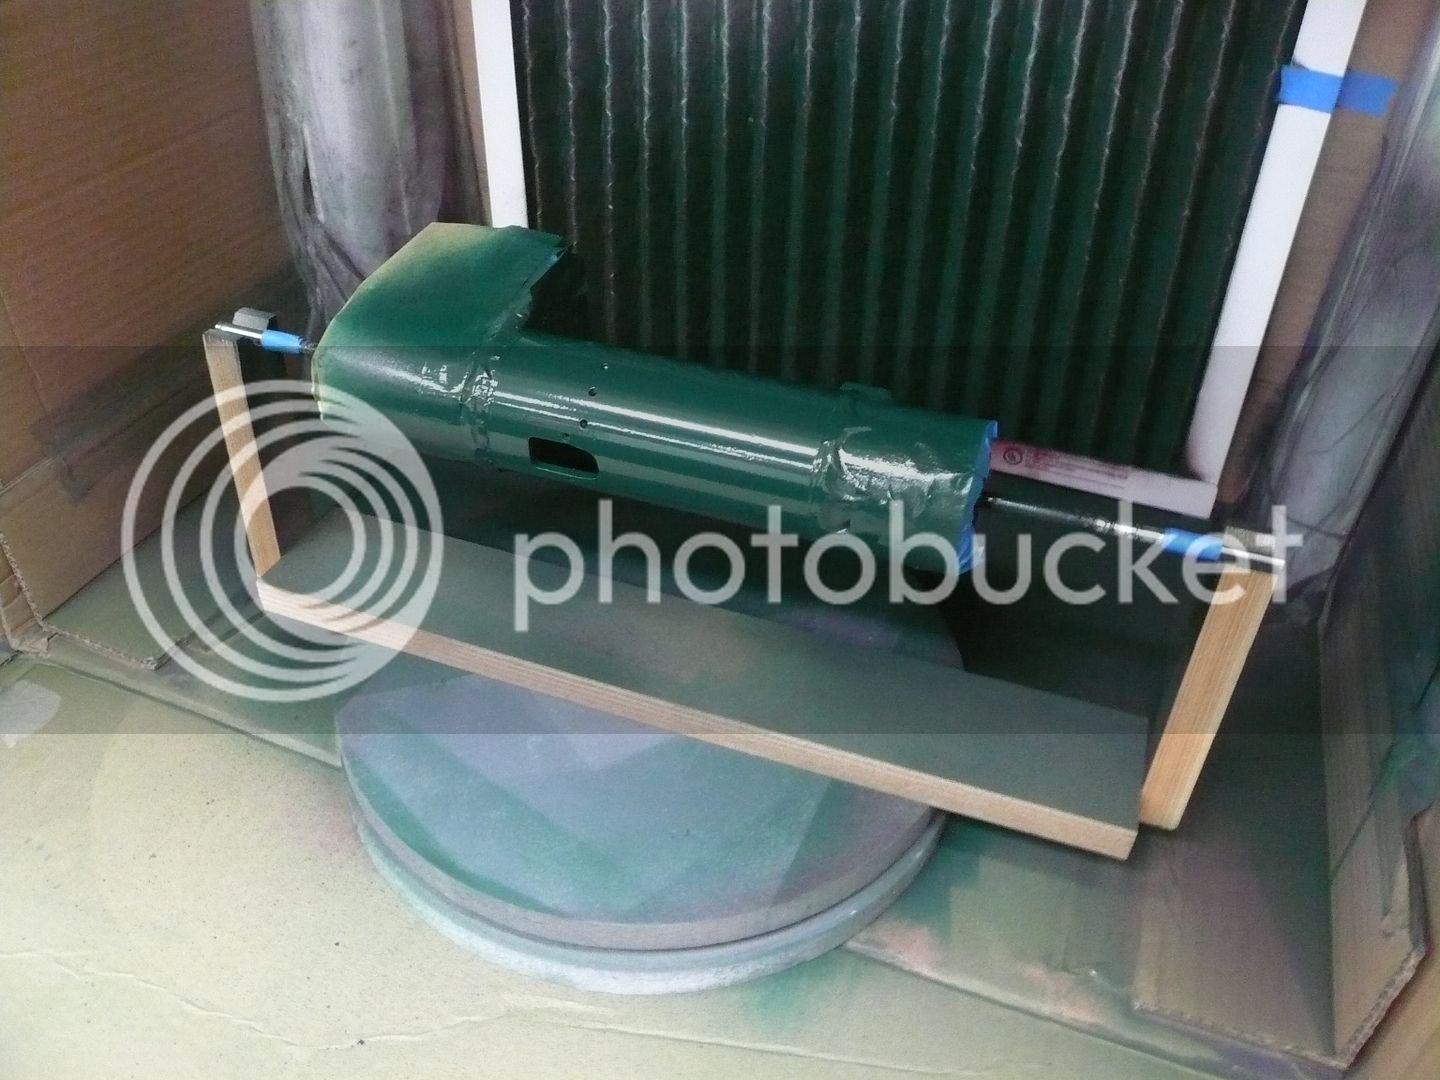
The drill fixture was designed to rotate this part too (it has an outboard support), but I decided not to use it because of the weight. After spraying, I just rotated it by hand using the same fixture it was painted on.
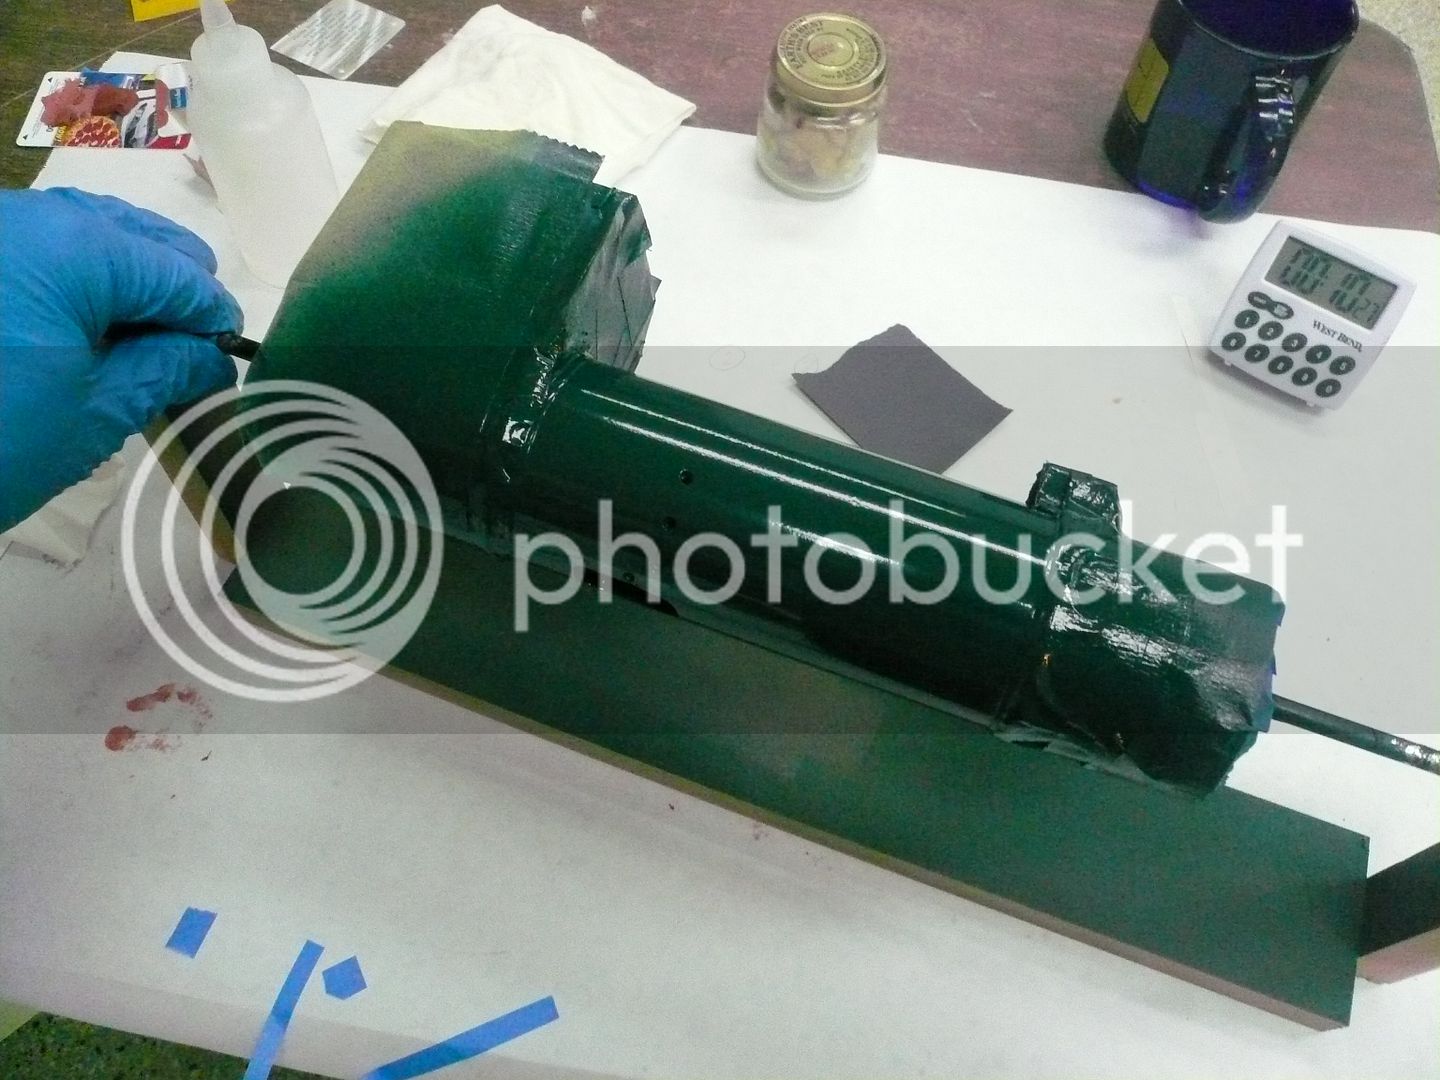
Again, no runs with a nice wet coat.
This idea of rotating the parts came from HOW (not) TO PAINT A LOCOMOTIVE. Mr. Vine rotated his parts by hand, but the drill let me prep and spray the next part while the first was drying.
I was even able to rotate the bunker assembly with the drill.
Now its a matter of letting the paint cure thoroughly so I can start assembly.
Dennis
My Post #51
Not a lot of shop time the last couple of weeks, however Ive made some progress with the painting.
Im going with a black, green and burgundy color scheme. The black definitely needs to be high heat, but from what other builders have told me, the green can be plain enamel. I found two greens I like in spray cans. One is a conventional enamel and the other is a high heat engine enamel. I liked the conventional enamel color a little better, but decided to test its heat resistance before putting it on the engine.
I made up two test coupons, one with the high heat enamel and its primer and the other with the conventional enamel and self etching primer. I put them in my toaster oven set at 350º F. Heres what happened.
The one on the right is the self-etch primer with conventional enamel. At about 200 degrees, the paint/primer started rolling up, leaving bare metal. Apparently the self-etch doesnt like heat at all, or it could be the enamel shrinks more than the primer and pulls it off as it contracts. Whatever, Im glad I checked.
The engine enamel (left sample) was un-affected. After an hour at 350º F, I let it cool and did a tape test. Adhesion was still good. With that, the second choice green looked a whole lot more attractive and I started painting. The green likely won't see 300 degree temps, but I figure why chance it.
Everything is now primed and painted except for the gray on the wheel rims. I plan to let everything sit and cure for a while before starting assembly.
Note the sample coupons on the top shelf. They'll come in handy if I need to test repairs and for pinstriping.
Painting the wheels is a little tricky because its hard to get paint around all the spokes and on the inside of the rims without runs. For spraying, I made a rack that let me rotate and turn the wheel as I sprayed (the base is a turntable). Then I sprayed light coats from all directions until I had a full wet coat.
Once I had the coverage I wanted, I moved the wheel to this fixture and let it slowly rotate (about 25 rpm) for 10 minutes. At that point enough of the solvents had flashed off and the paint was stable enough not to run.
The hose clamp around the trigger is tightened to control and hold the speed. The wheels turned out great, with no runs and a nice coat of paint everywhere. (Note: The color looks different in these photos because of lighting.)
The boiler housing was painted on a similar rack.
The drill fixture was designed to rotate this part too (it has an outboard support), but I decided not to use it because of the weight. After spraying, I just rotated it by hand using the same fixture it was painted on.
Again, no runs with a nice wet coat.
This idea of rotating the parts came from HOW (not) TO PAINT A LOCOMOTIVE. Mr. Vine rotated his parts by hand, but the drill let me prep and spray the next part while the first was drying.
I was even able to rotate the bunker assembly with the drill.
Now its a matter of letting the paint cure thoroughly so I can start assembly.
Dennis
arnoldb
Well-Known Member
- Joined
- Apr 8, 2009
- Messages
- 1,792
- Reaction score
- 12
;D That looks GREAT Dennis :bow:
I'm in "hurry up and wait" mode now; I can't wait to see your engine coming together, but it would be wrong for me to expect you to hurry up - so don't and take your time")
Kind regards, Arnold
I'm in "hurry up and wait" mode now; I can't wait to see your engine coming together, but it would be wrong for me to expect you to hurry up - so don't and take your time
Kind regards, Arnold
- Joined
- Feb 25, 2008
- Messages
- 464
- Reaction score
- 5
Dean,
Believe me, I was really tempted to leave it in brass. Painting was not an easy decision. What made me finally decide to paint was the varying tarnish rates of some of the parts (different alloys I guess). Also, the wheels and piping are copper which also tarnishes differently. Anyway, I think I've got a paint scheme that will leave enough brass visible to keep it interesting. We'll see.
Dennis
- Joined
- Feb 25, 2008
- Messages
- 464
- Reaction score
- 5
My Post #52
Draft Fan
While waiting for the paint to cure, I decided to make a draft fan. The fan is used to induce a draft when first firing up the engine.
The idea comes from Doug Lanum, who wrote this about his and his friends engine: We made small fans to put on top of the stack while building pressure. We found that the alcohol burners had flame going everywhere, so the fan keeps the fire going in the right direction. It also allows the steam pressure to build much quicker. Once pressure is built up, and the engine is running, the engine exhaust provides sufficient draft.
A picture of Dougs fan is here in Reply #54.
So you have an idea of where I'm going in this post, heres a shot of my finished fan.
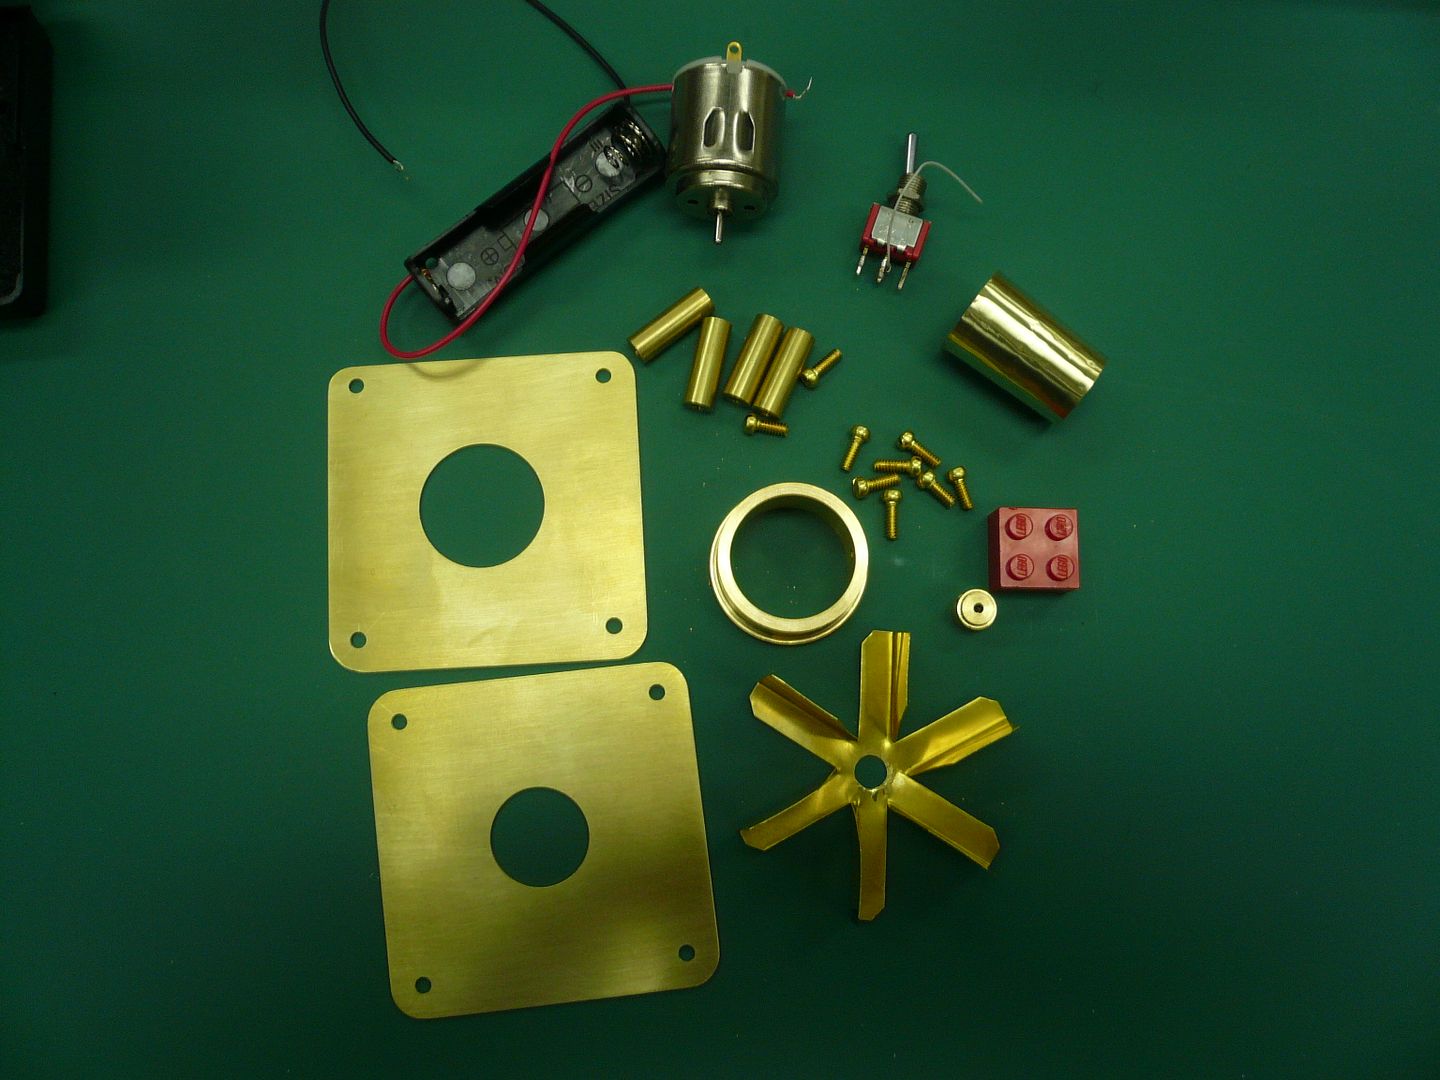
The fan just slips onto the smokestack. Its self-contained and uses a 1.5V motor from Radio Shack. The basic dimensions are 2.5 x 2.5. The length of the AA batteries pretty much set the overall dimensions.
The impeller is 0.016 brass and started with a paper pattern glued to the brass. Black lines are cut lines (except for that one black radial that shouldnt be there) and blue are bend lines.
Bends were made by hand using smooth jaw pliers.
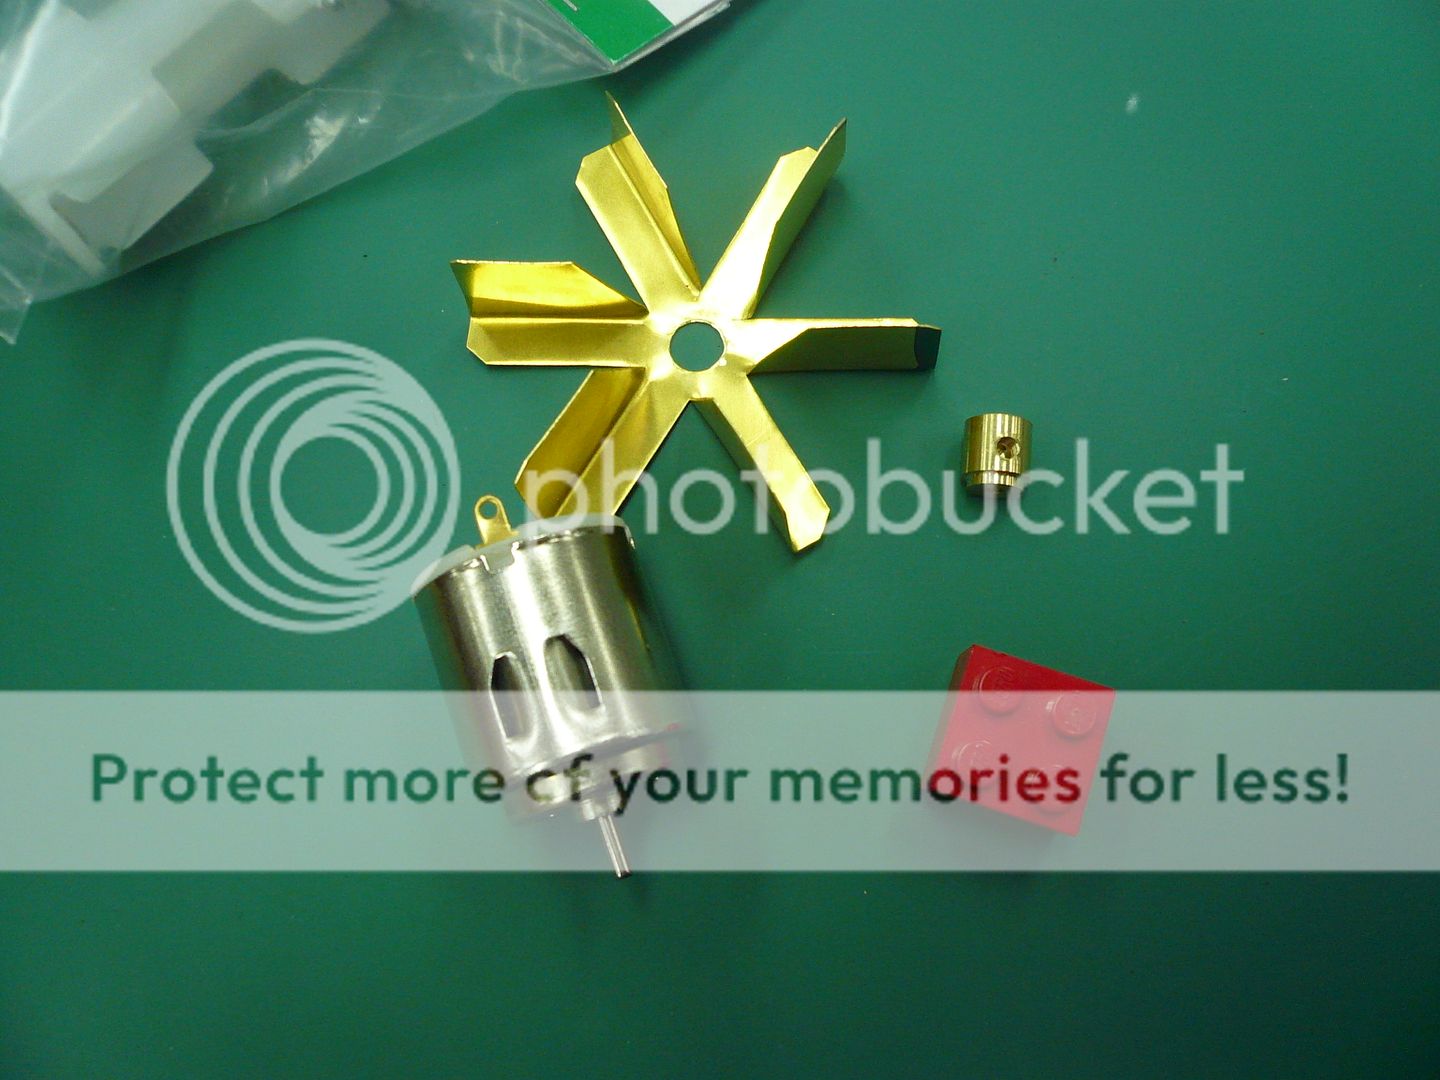
The center post (I cant think of the correct term) is soldered to the impeller and it secures the blade to the motor shaft with a set screw.
The motor is mounted in a flange bored to the OD of the motor.
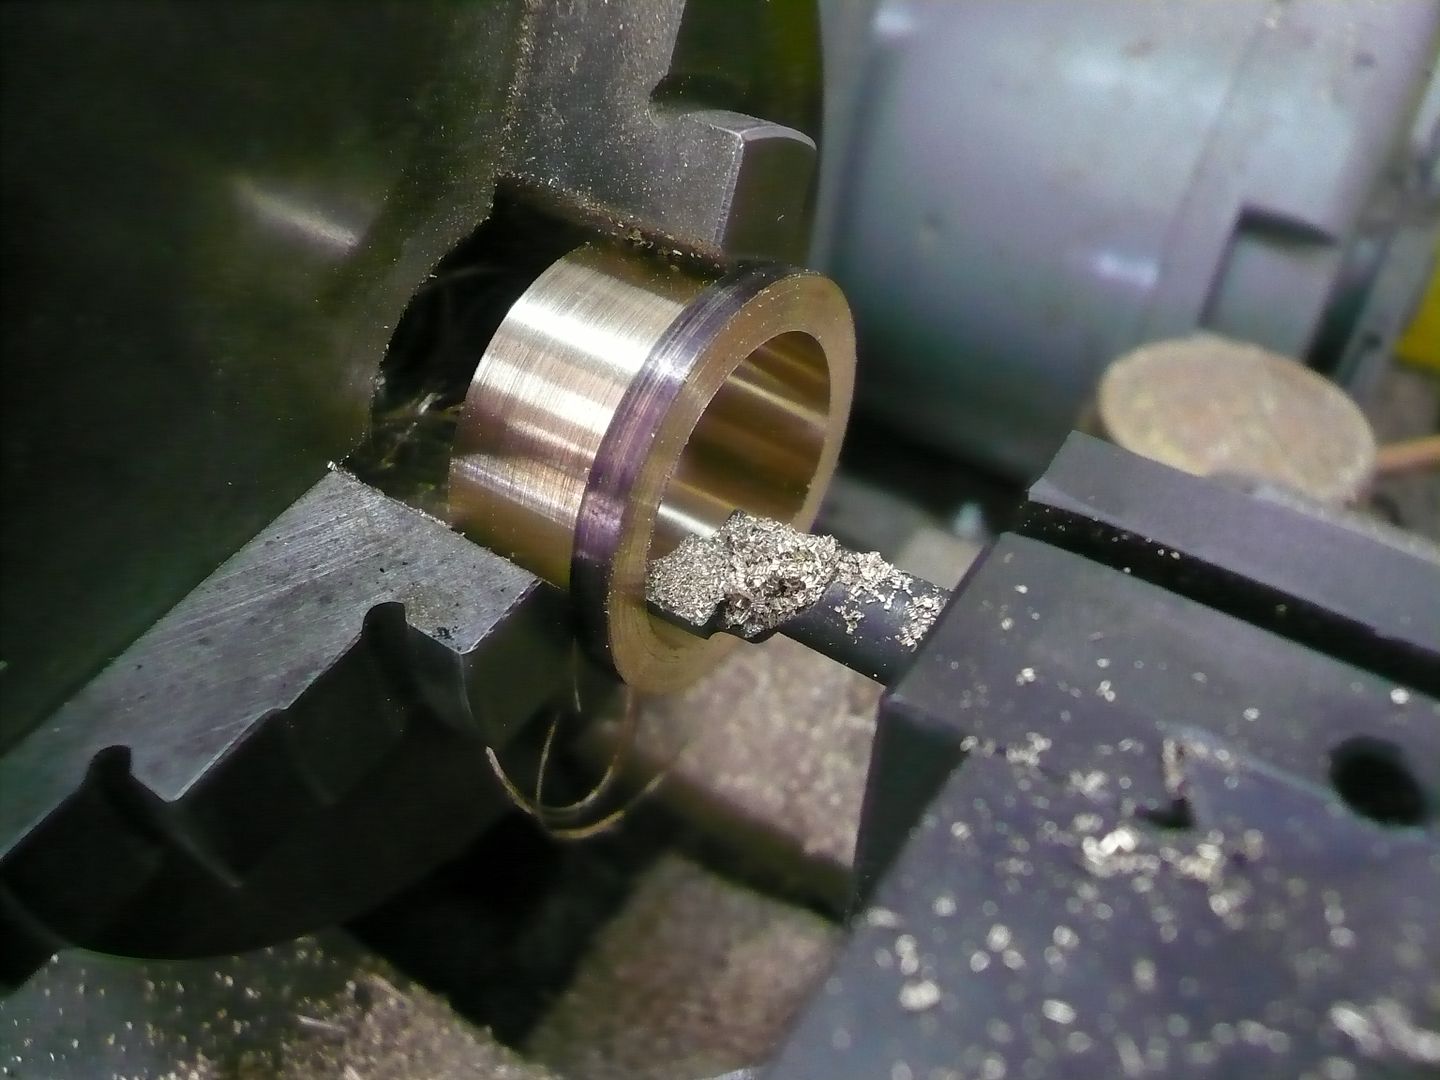
As an aside this bore has one of the smoothest finishes Ive ever gotten. I have no idea why. Wouldnt you know that, in this application, finish doesnt matter. Go figure.
The motor gets secured in the flange with a couple of set screws (one would do) and the flange gets soldered to the cover plate.
In use, the blower assembly is held in place by a tube that slides inside the smokestack. I made the tube using the same mandrel and technique I used to make the smoke stack.
Here are the pieces ready for assembly.
and here they are soldered.

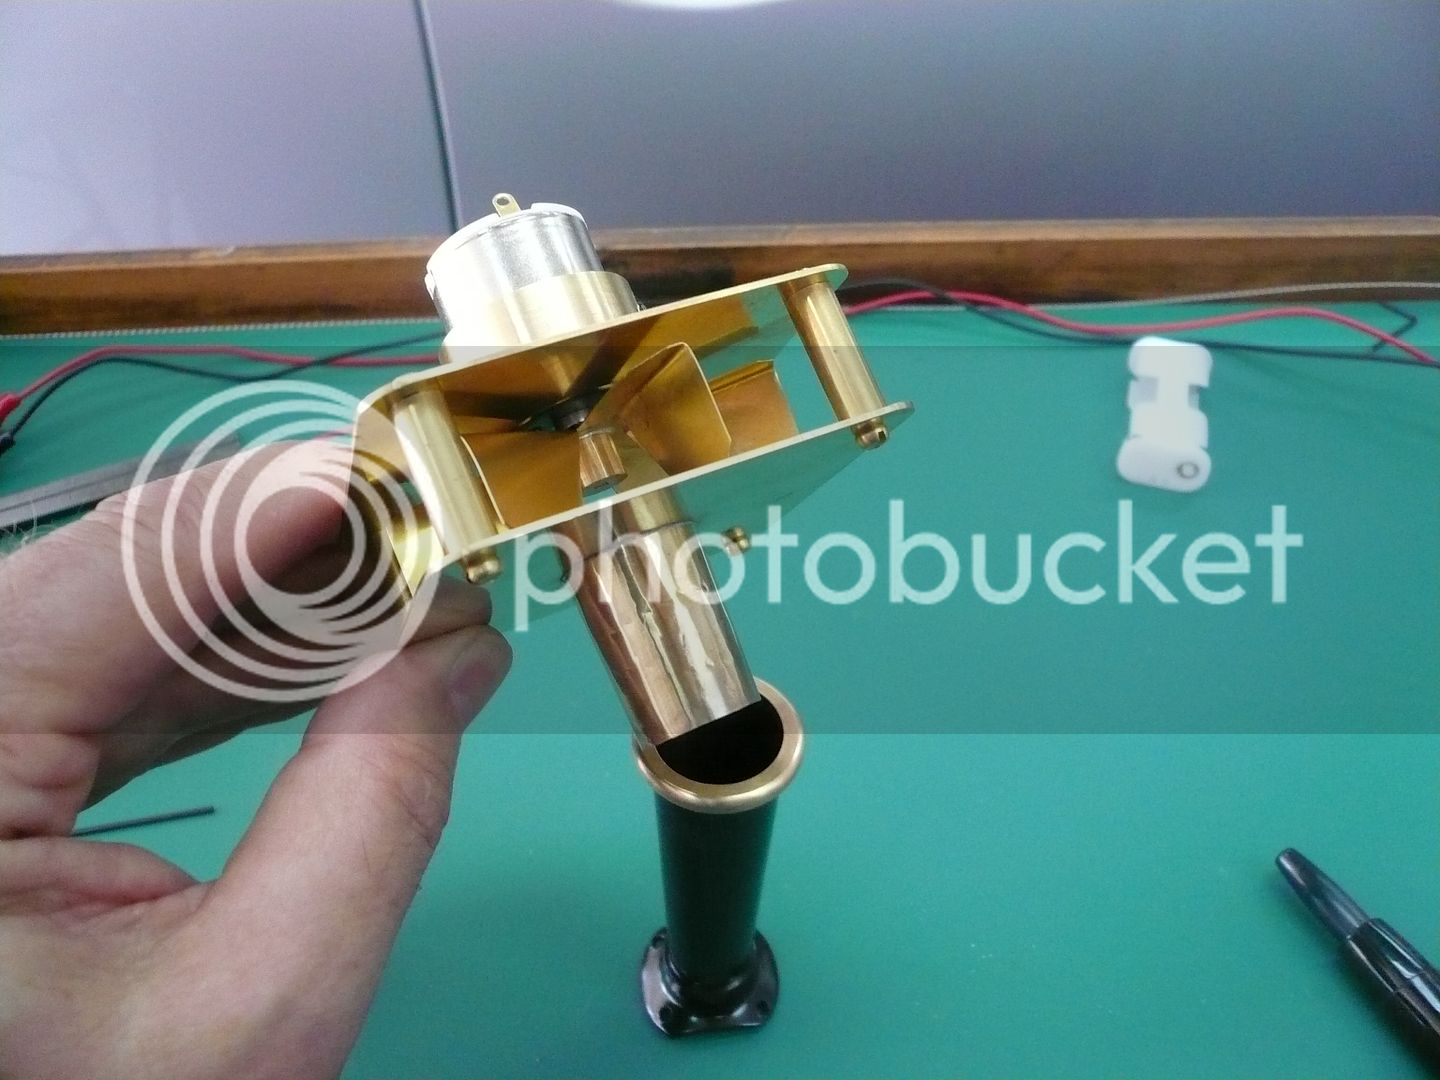
After balancing and aligning the impeller, the fan was assembled. This is how it mounts in the smokestack.
Originally I had planned to use a remote battery pack connected with jumpers but decided I liked the idea of a self contained unit better. That meant mounting two AA batteries and a switch.
The motor is rated 3.0-1.5 Volts so I mounted two batteries. Im running it at 1.5 volts, but if that doesnt provide enough draft, Ill re-wire it for 3 volts.
Heres the underside in mid-assembly.
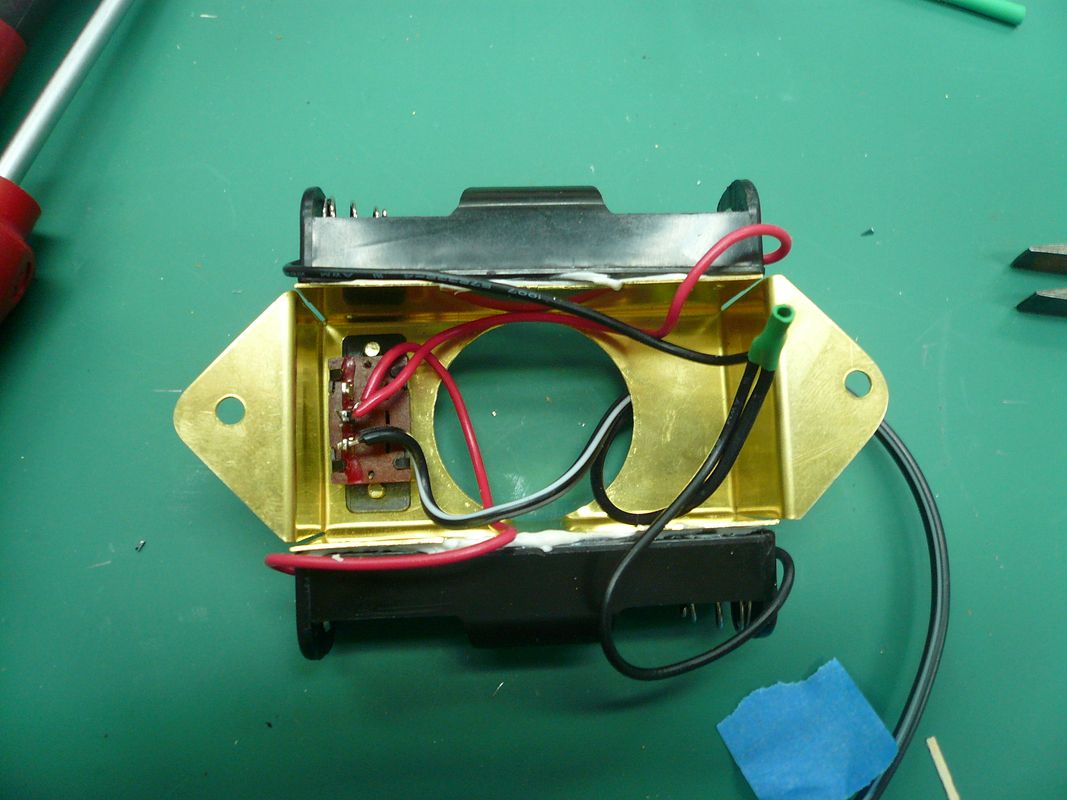
The battery holders are held on with E-6000 adhesive. I would have preferred screws, but because of the way the batteries fit in the holders I couldnt see a simple way to do it.
Heres another view of the final unit.

I think this is going to be a nice accessory and should really speed up initial steam build up. Thanks again to Doug Lanum for passing on the idea.
PM me if you want a copy of the impeller pattern.
Dennis
Draft Fan
While waiting for the paint to cure, I decided to make a draft fan. The fan is used to induce a draft when first firing up the engine.
The idea comes from Doug Lanum, who wrote this about his and his friends engine: We made small fans to put on top of the stack while building pressure. We found that the alcohol burners had flame going everywhere, so the fan keeps the fire going in the right direction. It also allows the steam pressure to build much quicker. Once pressure is built up, and the engine is running, the engine exhaust provides sufficient draft.
A picture of Dougs fan is here in Reply #54.
So you have an idea of where I'm going in this post, heres a shot of my finished fan.
The fan just slips onto the smokestack. Its self-contained and uses a 1.5V motor from Radio Shack. The basic dimensions are 2.5 x 2.5. The length of the AA batteries pretty much set the overall dimensions.
The impeller is 0.016 brass and started with a paper pattern glued to the brass. Black lines are cut lines (except for that one black radial that shouldnt be there) and blue are bend lines.
Bends were made by hand using smooth jaw pliers.
The center post (I cant think of the correct term) is soldered to the impeller and it secures the blade to the motor shaft with a set screw.
The motor is mounted in a flange bored to the OD of the motor.
As an aside this bore has one of the smoothest finishes Ive ever gotten. I have no idea why. Wouldnt you know that, in this application, finish doesnt matter. Go figure.
The motor gets secured in the flange with a couple of set screws (one would do) and the flange gets soldered to the cover plate.
In use, the blower assembly is held in place by a tube that slides inside the smokestack. I made the tube using the same mandrel and technique I used to make the smoke stack.
Here are the pieces ready for assembly.
and here they are soldered.
After balancing and aligning the impeller, the fan was assembled. This is how it mounts in the smokestack.
Originally I had planned to use a remote battery pack connected with jumpers but decided I liked the idea of a self contained unit better. That meant mounting two AA batteries and a switch.
The motor is rated 3.0-1.5 Volts so I mounted two batteries. Im running it at 1.5 volts, but if that doesnt provide enough draft, Ill re-wire it for 3 volts.
Heres the underside in mid-assembly.
The battery holders are held on with E-6000 adhesive. I would have preferred screws, but because of the way the batteries fit in the holders I couldnt see a simple way to do it.
Heres another view of the final unit.
I think this is going to be a nice accessory and should really speed up initial steam build up. Thanks again to Doug Lanum for passing on the idea.
PM me if you want a copy of the impeller pattern.
Dennis
- Joined
- Jul 16, 2007
- Messages
- 2,983
- Reaction score
- 1,047
Very nice fan Dennis. I had built something similar years ago when I used to fire my 1" Case. With all the litigation these days I only run it on air at shows.
Now for my next question: is that paint dry yet? I can't wait to see this thing in it's full glory.
George
Now for my next question: is that paint dry yet? I can't wait to see this thing in it's full glory.
George
Dennis,
Your fan looks great.
If you find that it is too aggressive, it may pull the flames out and the burners wont stay lit.
You many need to adjust the voltage or damper it down a bit.
The idea of the fan for this tractor does not take much draft to keep the flames going in the right direction.
Doug
Your fan looks great.
If you find that it is too aggressive, it may pull the flames out and the burners wont stay lit.
You many need to adjust the voltage or damper it down a bit.
The idea of the fan for this tractor does not take much draft to keep the flames going in the right direction.
Doug
- Joined
- Feb 25, 2008
- Messages
- 464
- Reaction score
- 5
George, Jim and Dean,
Sorry about the delay in posting. I've been away from the shop for awhile. I'm almost afraid to do another post about paint, but I wanted to show one more thing that I hope will be of interest. Please bear with me.
My Post #53
Pin Striping
Now that the paint is fully cured, theres one more detail to add before final assembly and thats some decorative pin striping. Ive striped old machines and tools before, but nothing as small as the tractor.
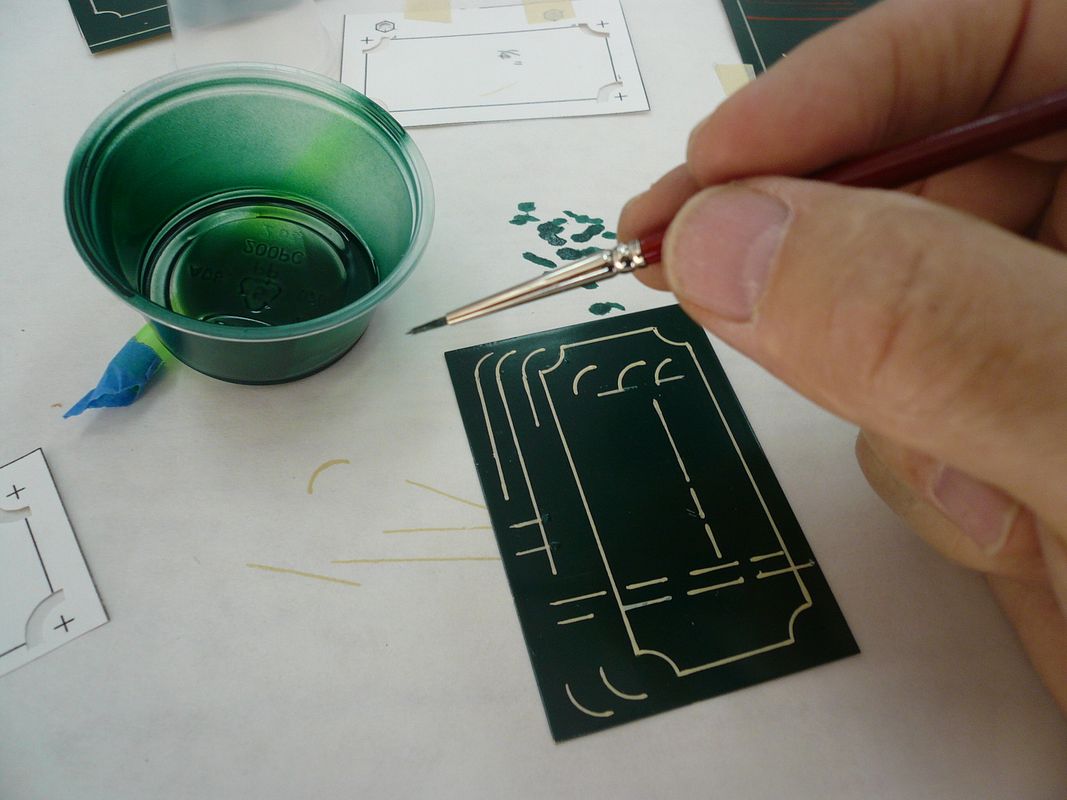
Im going to use old fashioned inking pens. I saw this done quite some time ago in an old Rudy Kouhoupt video. Theres also a brief mention in Christopher Vines How (not) To Paint A Locomotive. The inking pens can still be found at swap meets and garage sales in old drafting sets. Theyre usually pretty cheap. In case youre too young to know what they are, examples can be seen in this photo. Youll need both a compass and a pen.
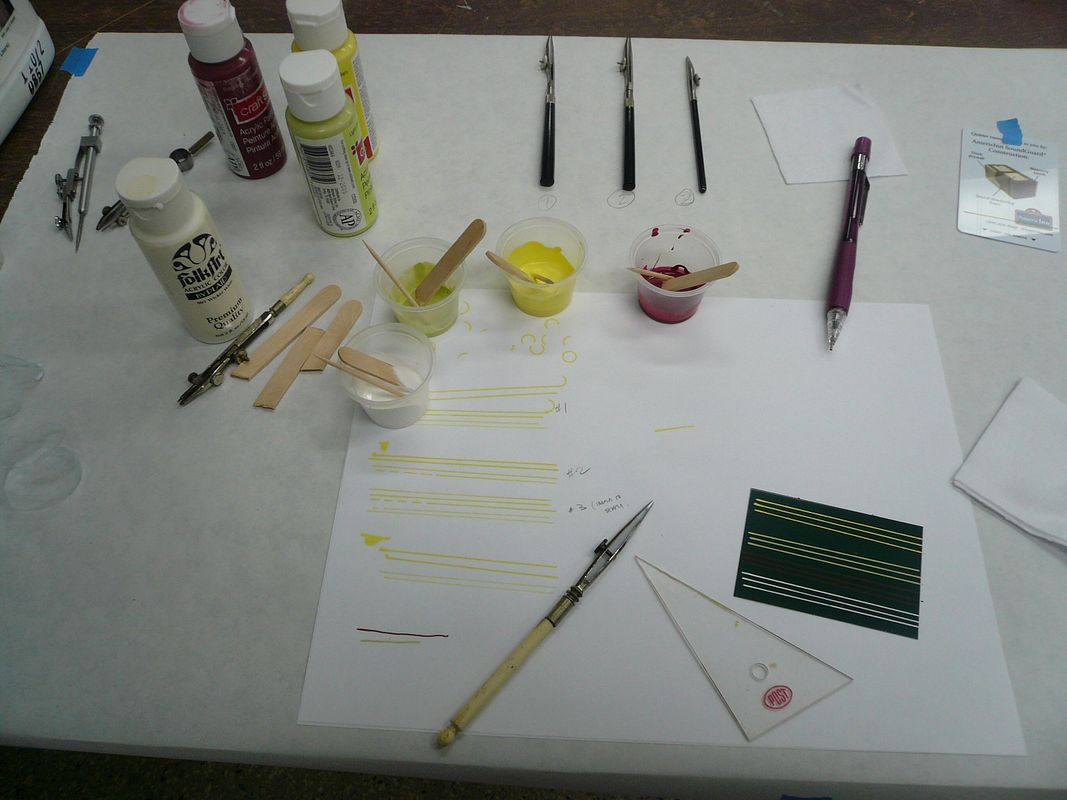
The first step is to pick the paint. In the above photo Im trying acrylic craft paint.
Craft paint works pretty well, but requires some thinning, after which some colors dont cover well. It has a flat lustre that I didnt like against the gloss base. Water clean-up is a plus though.
Sign Painters enamel like 1-Shot is great for flow and coverage and it comes in vivid, glossy colors. It works great in roller type stripers like Beuglers and is the paint of choice for most applications. However, for very narrow lines like Ill use on the tractor it tends to dry as a noticeably high (thick?) line.
Another option is drafting ink. The ink comes in lots of colors and is great for narrow lines. However, the inks arent very durable on glossy surfaces, so not a good choice for a model that will be handled.
The paint I ended up using (and usually do) is Model Master enamel. Its available in most US hobby shops and comes in small jars of either enamel or acrylic. Im using enamel for the tractor because I think the adhesion will be a little better.
Once I pick the paint I do lots of practice lines and designs.
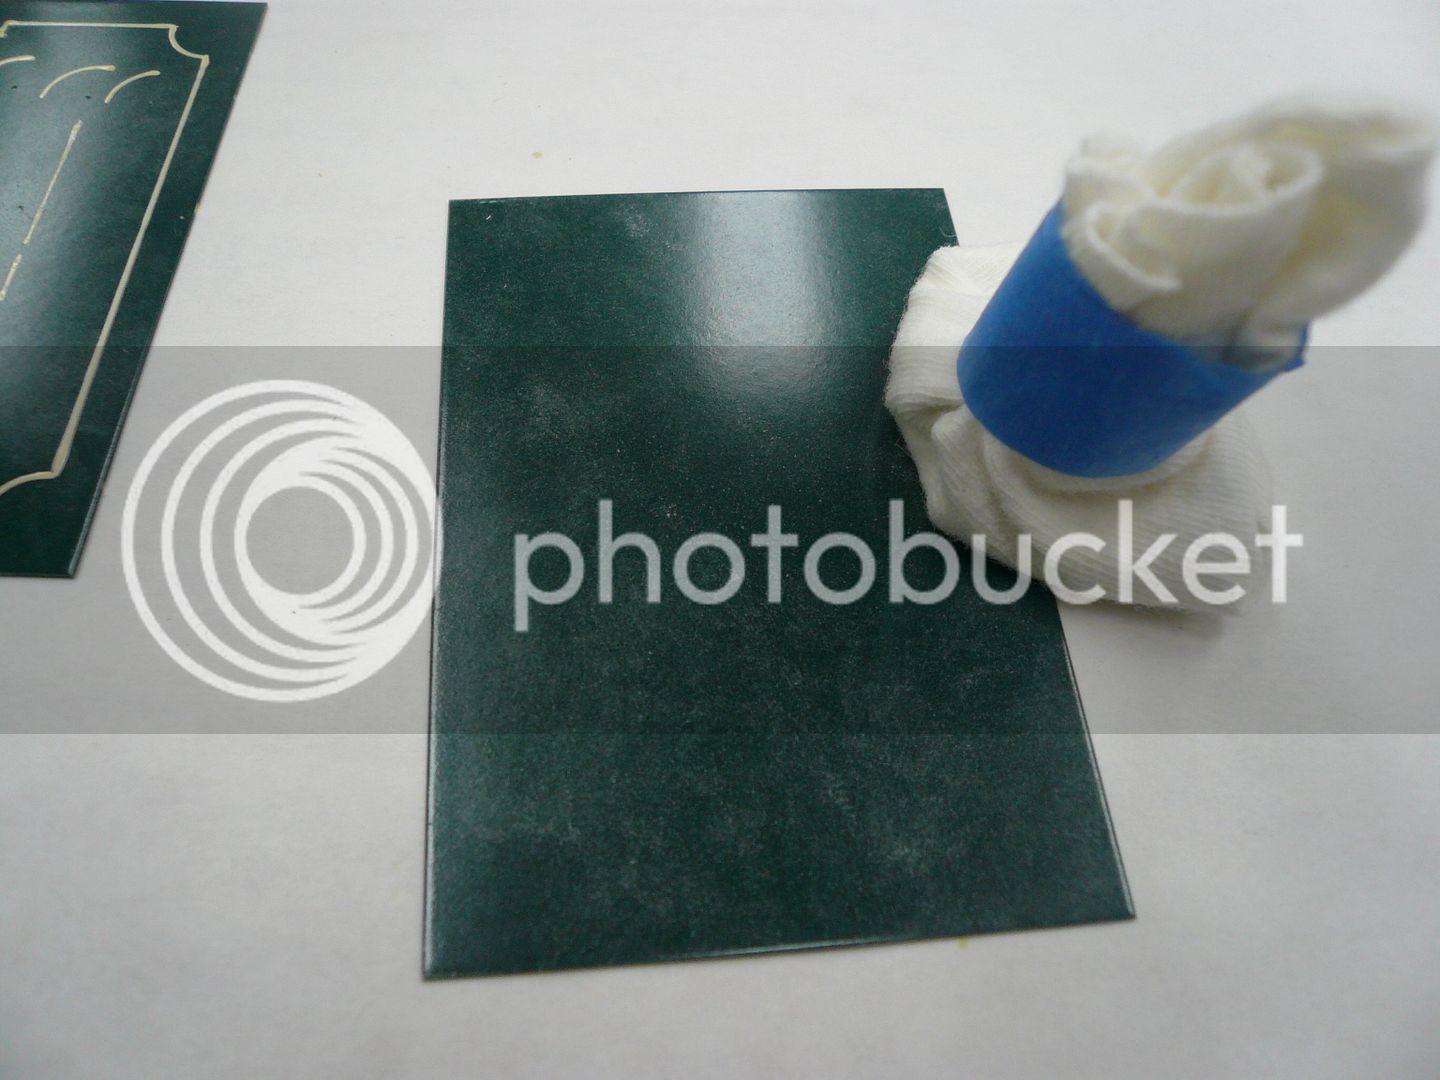
The paint jars are Model Master enamel and the large test piece is just white paper sprayed with a heavy coat of the green Im using. The smaller piece is a 2 x 3 piece of brass painted at the same time and in the same way as the production parts. I made up several of these test panels to use for practicing final lines and designs.
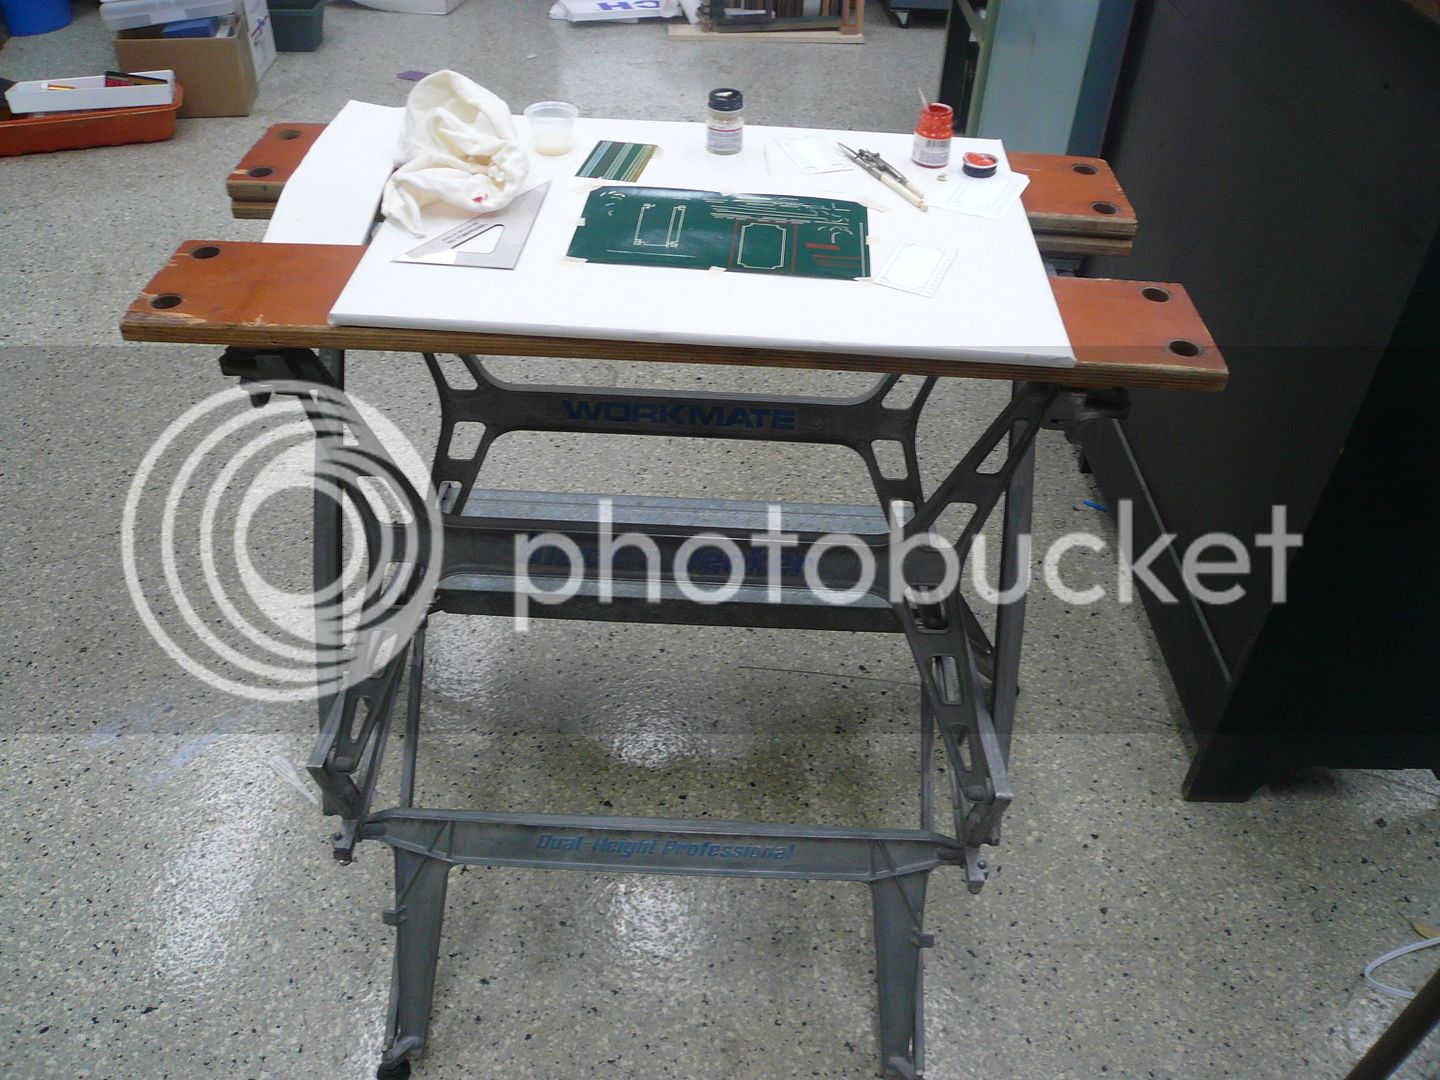
I like to stripe on a Workmate bench. Its a nice height (I can sit at it), its stable, and the split vise top offers a lot of versatility for holding parts to be striped. Plus you can move around it to stripe from the best angle.
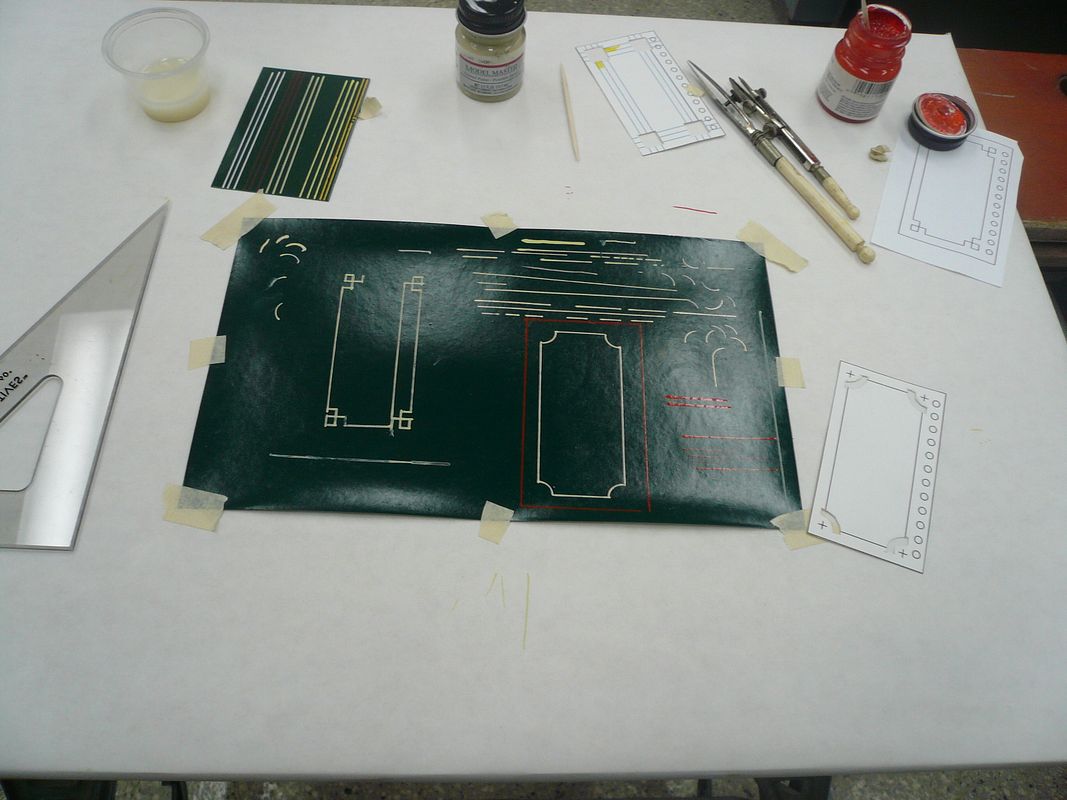
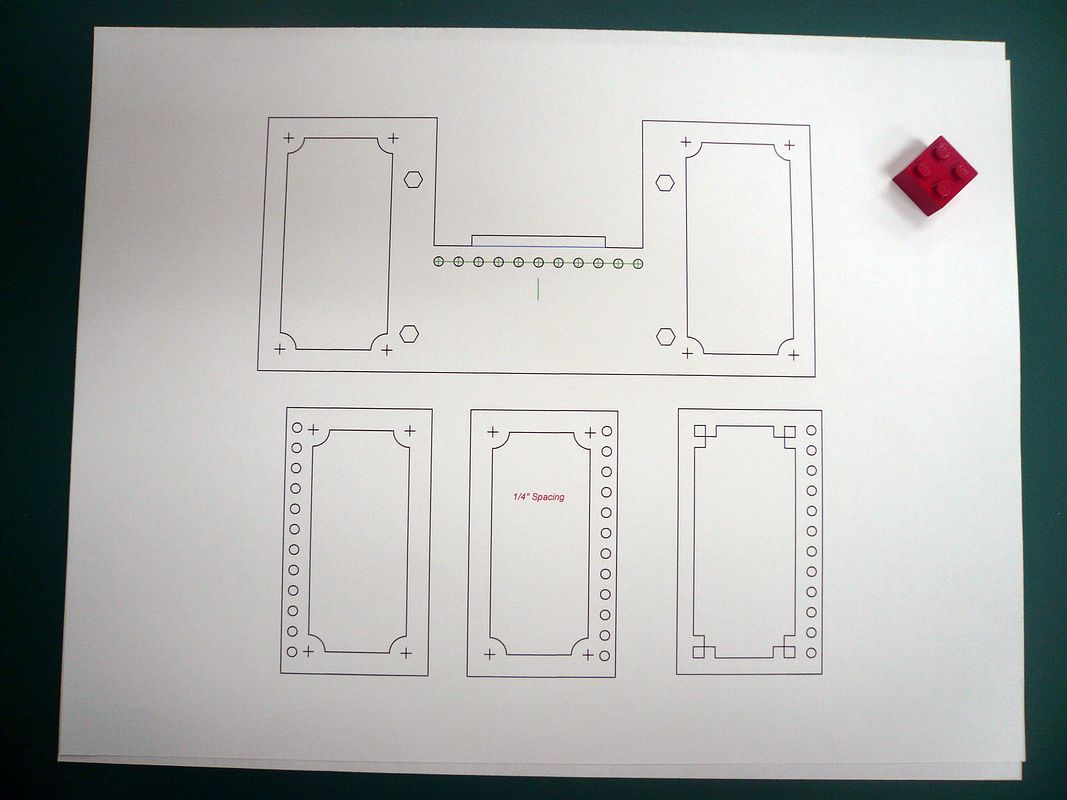
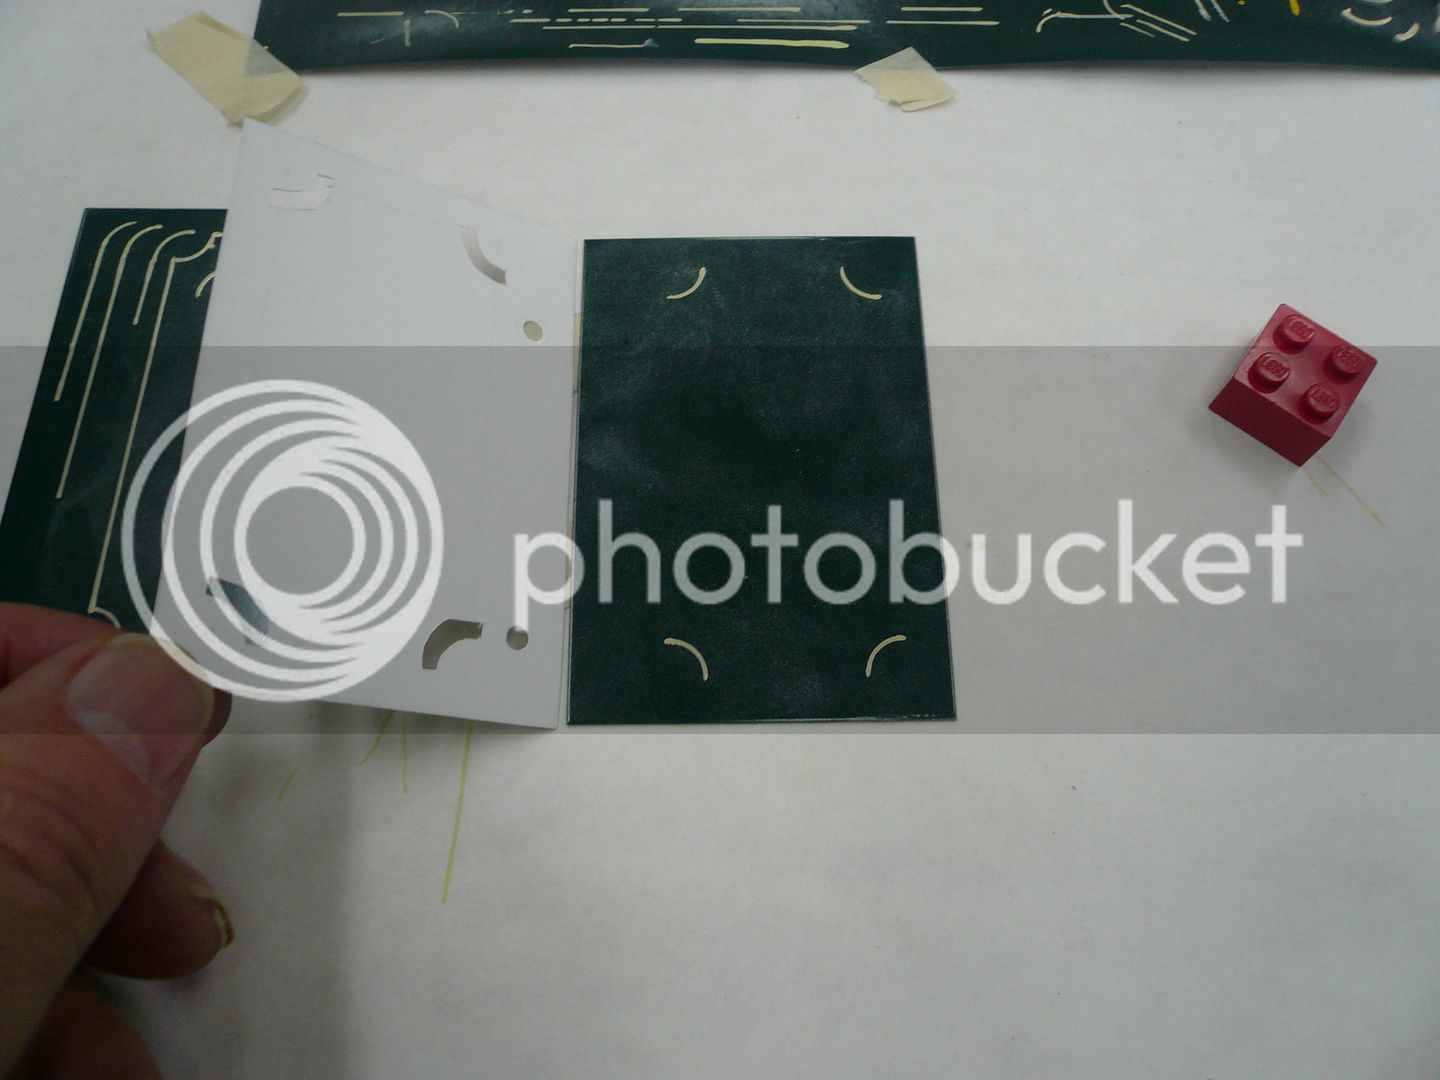
The process starts with a 1:1 layout of the pattern printed on card stock.
As a show and tell, following is a trial run on one of the test pieces.
Before the first line, I coat the part with a very light dusting of talc. This isnt absolutely necessary, but it seems to help the paint to start flowing. I use Johnsons Baby Powder. Read the label before buying it though. They make a talc powder and also a cornstarch powder. You want talc.
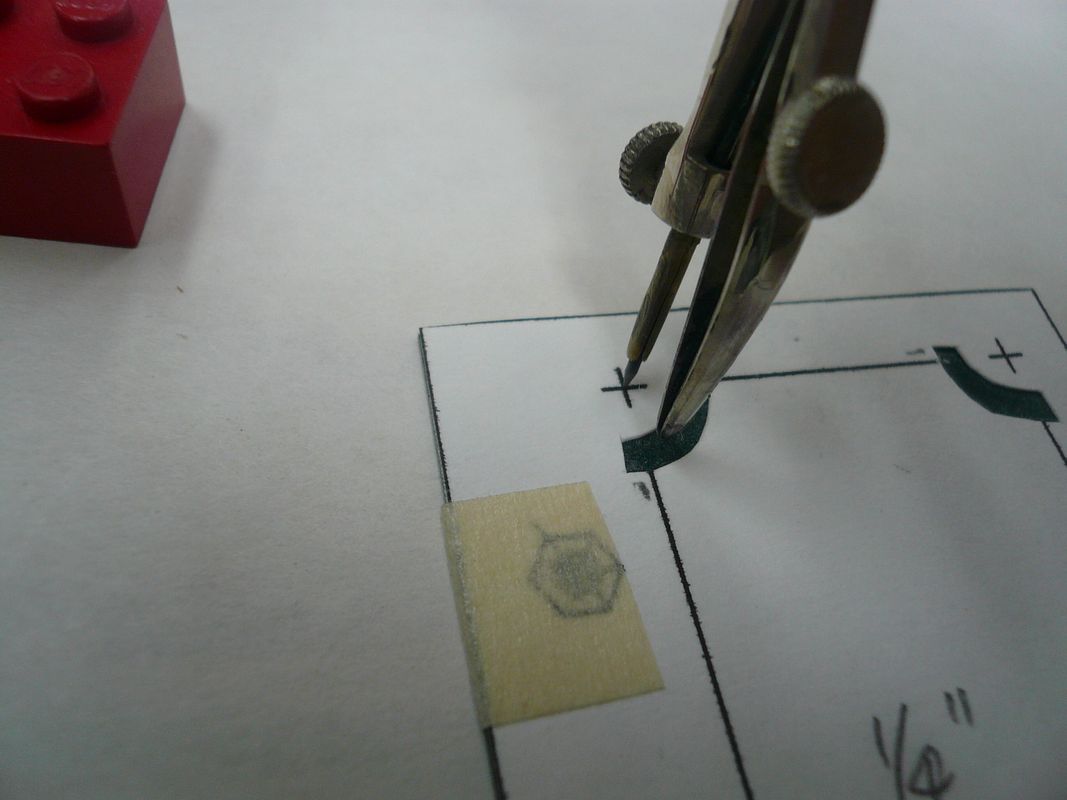
Next, cut out the pattern and trim out the curve sections just wide enough to clear the pen, but leave the center point marks. This gives a spot to hold the compass point stable without damaging the base coat.
Tape the pattern to the part. Put just a drop or two (too much and you get blobs) of paint in your compass and run several arcs on a test piece to make sure youre happy with the width. If you are, then draw in the curves. Eyeball the start and stop points based on the straight line positions on the pattern.
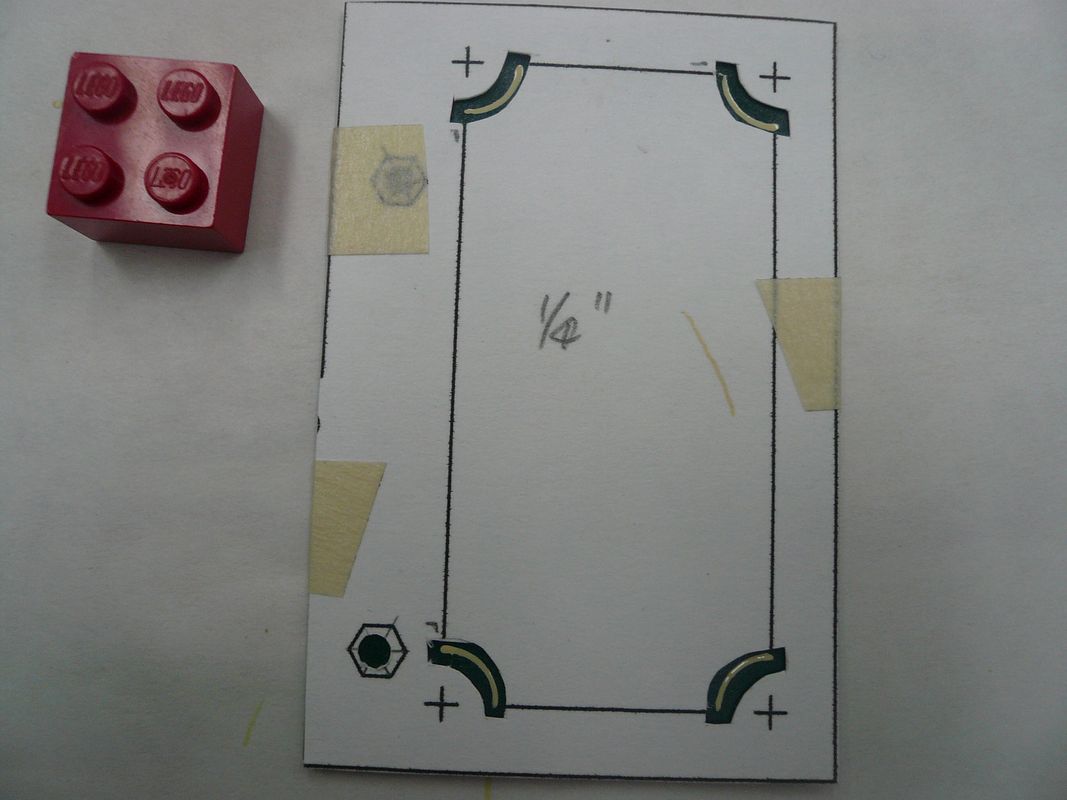
Normally Id stop here and let the paint on the curves dry thoroughly before moving the pattern. Since its a demo part, I went ahead and removed the pattern leaving just the corner curves.
(Note the trial piece to the left in the above photo. It was used to set final line widths. Once the line width is set, draw a series of sample curves with it. Youll need these when it comes to setting a matching line width for the straight sections.)
The edges of the curves are now the reference points for the straight line sections. Switch from the compass to the straight pen and set the line width to match the sample curves on your test piece. Then draw in the lines using a straight edge. I use a drawing triangle made for inking (Art Supply stores usually have them). They have a small recess along the edge that keeps paint from wicking under the triangle if you get too close to the line. Again, not essential, but handy.
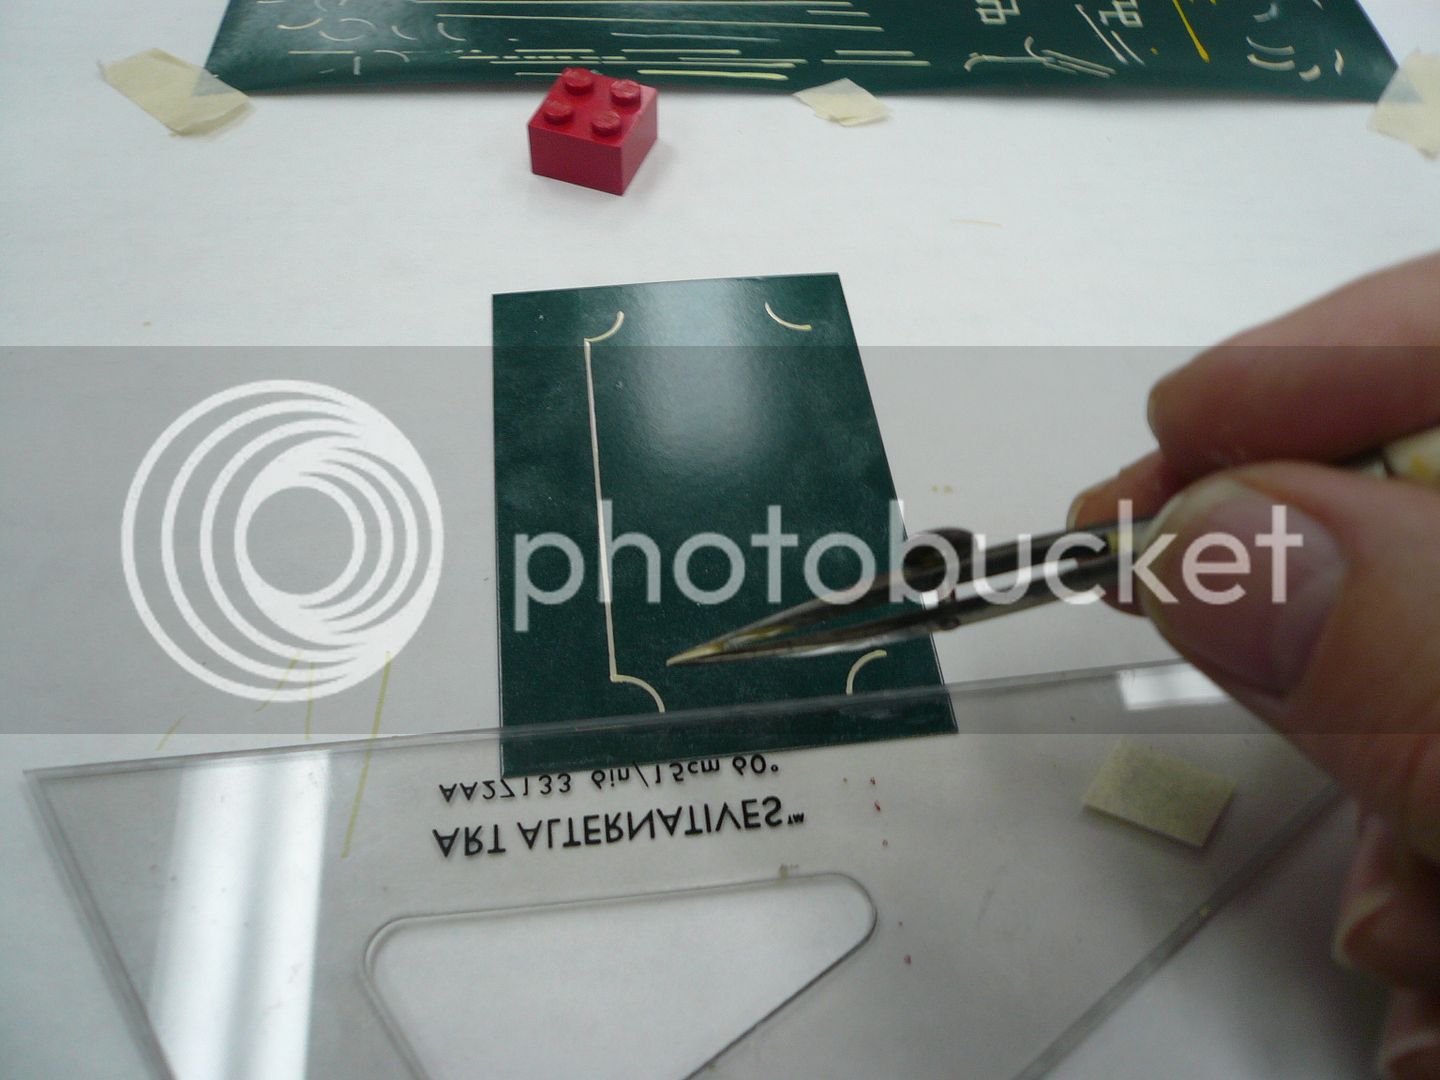
The photo shows about the maximum amount of paint to put in the pen. Too much and you get blobs at the beginning of the line. Its surprising how long a line can be drawn with just a few drops of paint.
If you screw up,
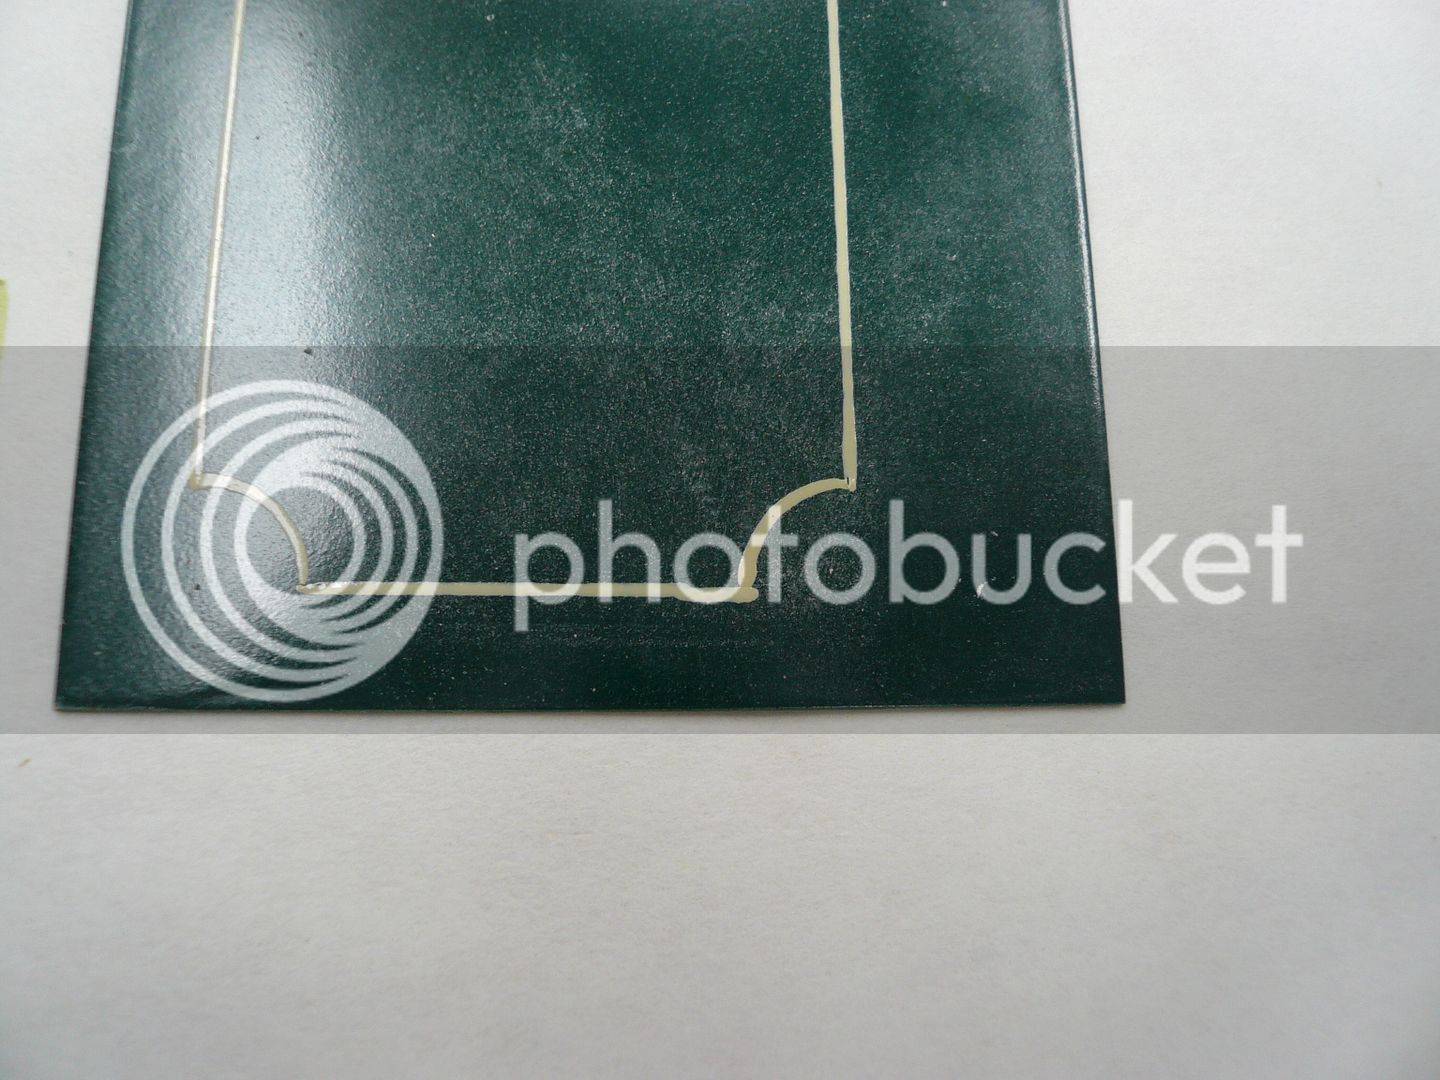
just wipe the line off.
and re-draw it.

A mistake like this is where having a fully cured base coat really pays off. I was able to wipe the enamel line off using mineral spirits without affecting the base paint. That probably couldnt have been done if the base was still soft. Also, had I been doing a production part, the curve paint would have been cured too, so I could have wiped off the entire line instead of just the screwed up part. That would make a neater repair.
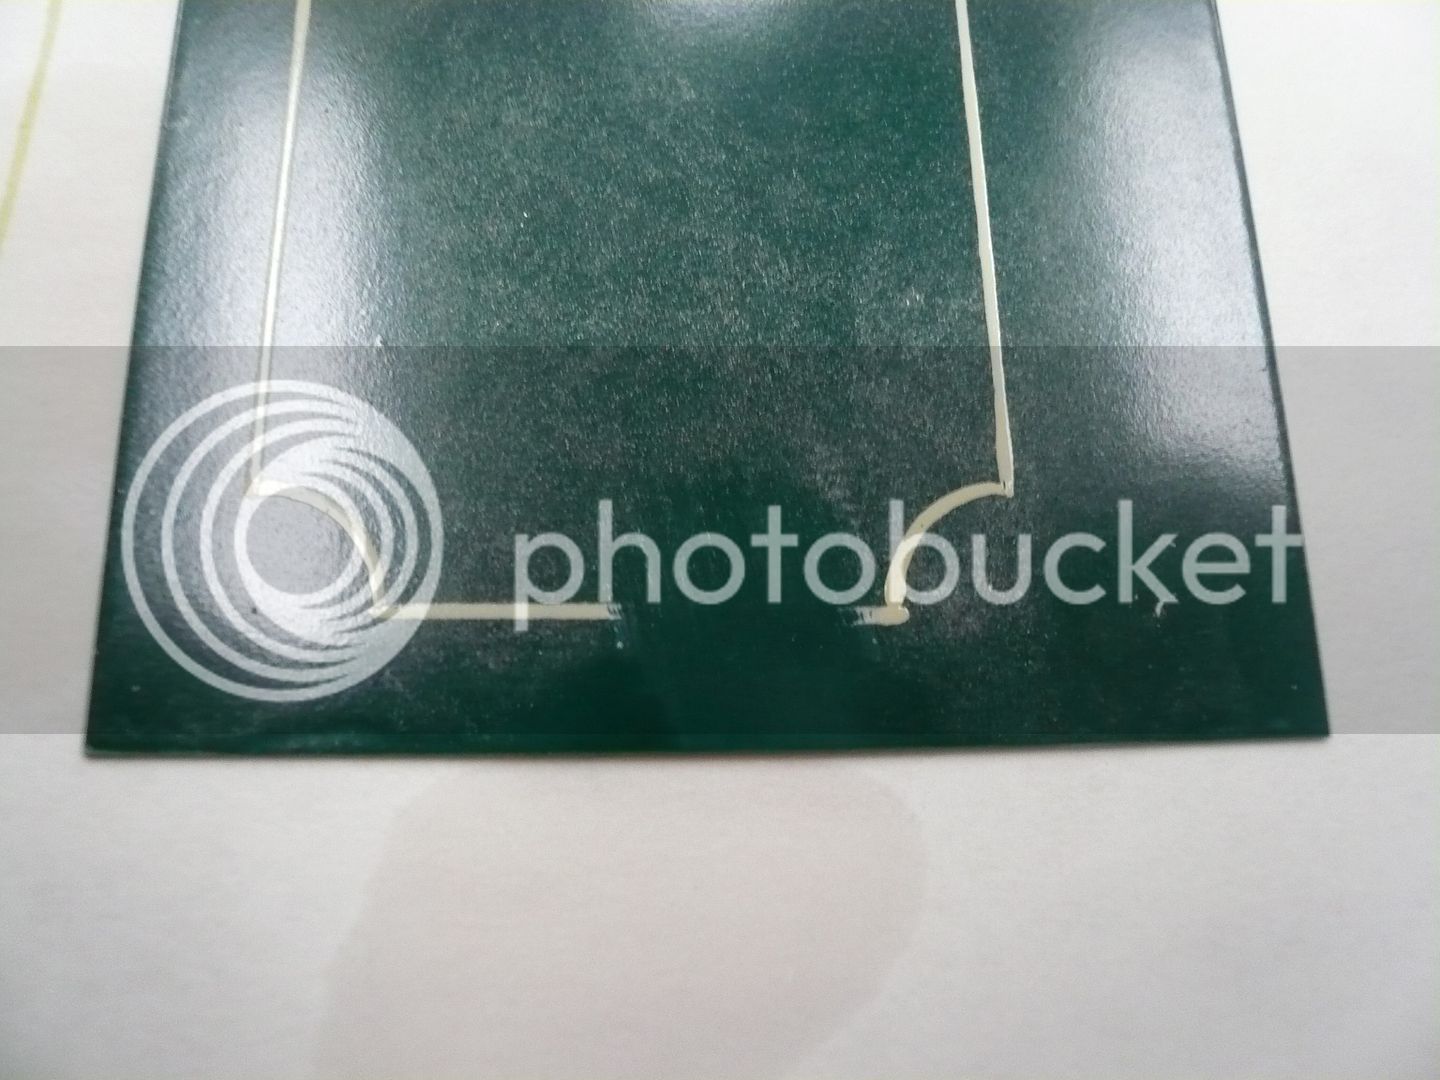
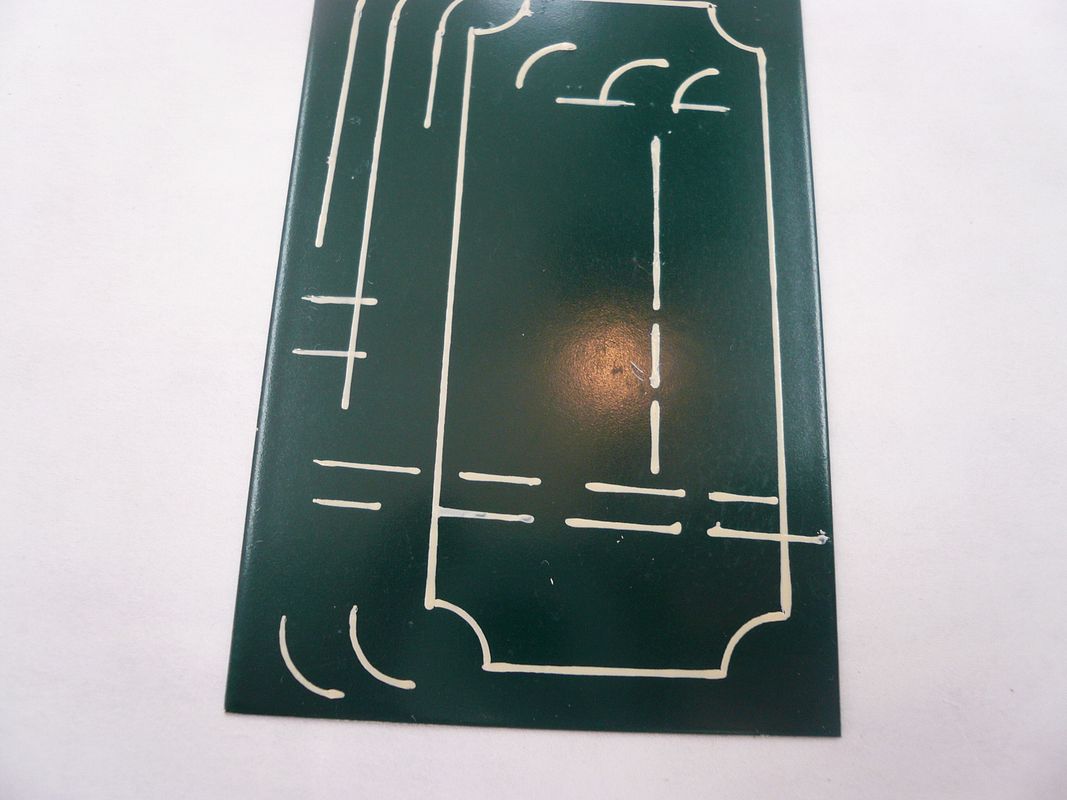
The other screw-up I normally make is overshooting a line. Examples can be seen on the lower left corner curve and on the two short crossing lines at left center.
These are fixed with a small touch-up brush and matching paint. Just paint over the overshot line using some base coat paint sprayed in a container.
The spray paint is pretty thin, so touch-up needs to be done in several coats to get coverage, but avoid build-up as much as you can.
Here are the lines repaired.
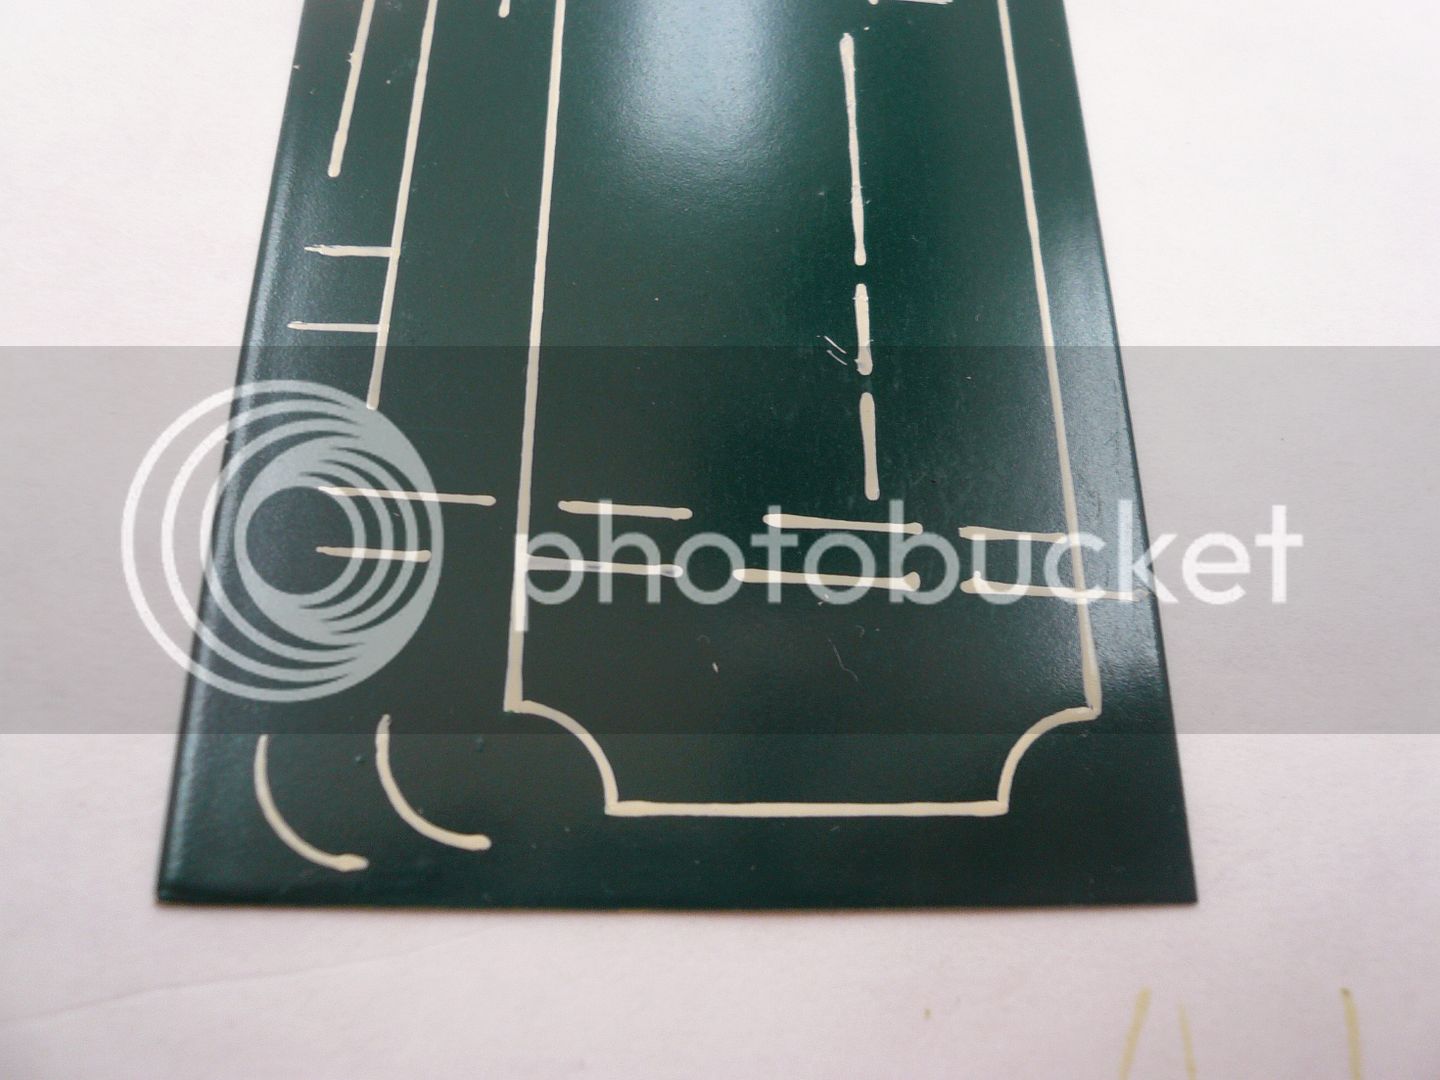
If you hold the part just right, you can still see the repairs as a small paint bump, but for the most part they disappear, particularly when looking at the overall piece.
Once Im happy with the sample pattern and line widths, I move to the production parts.
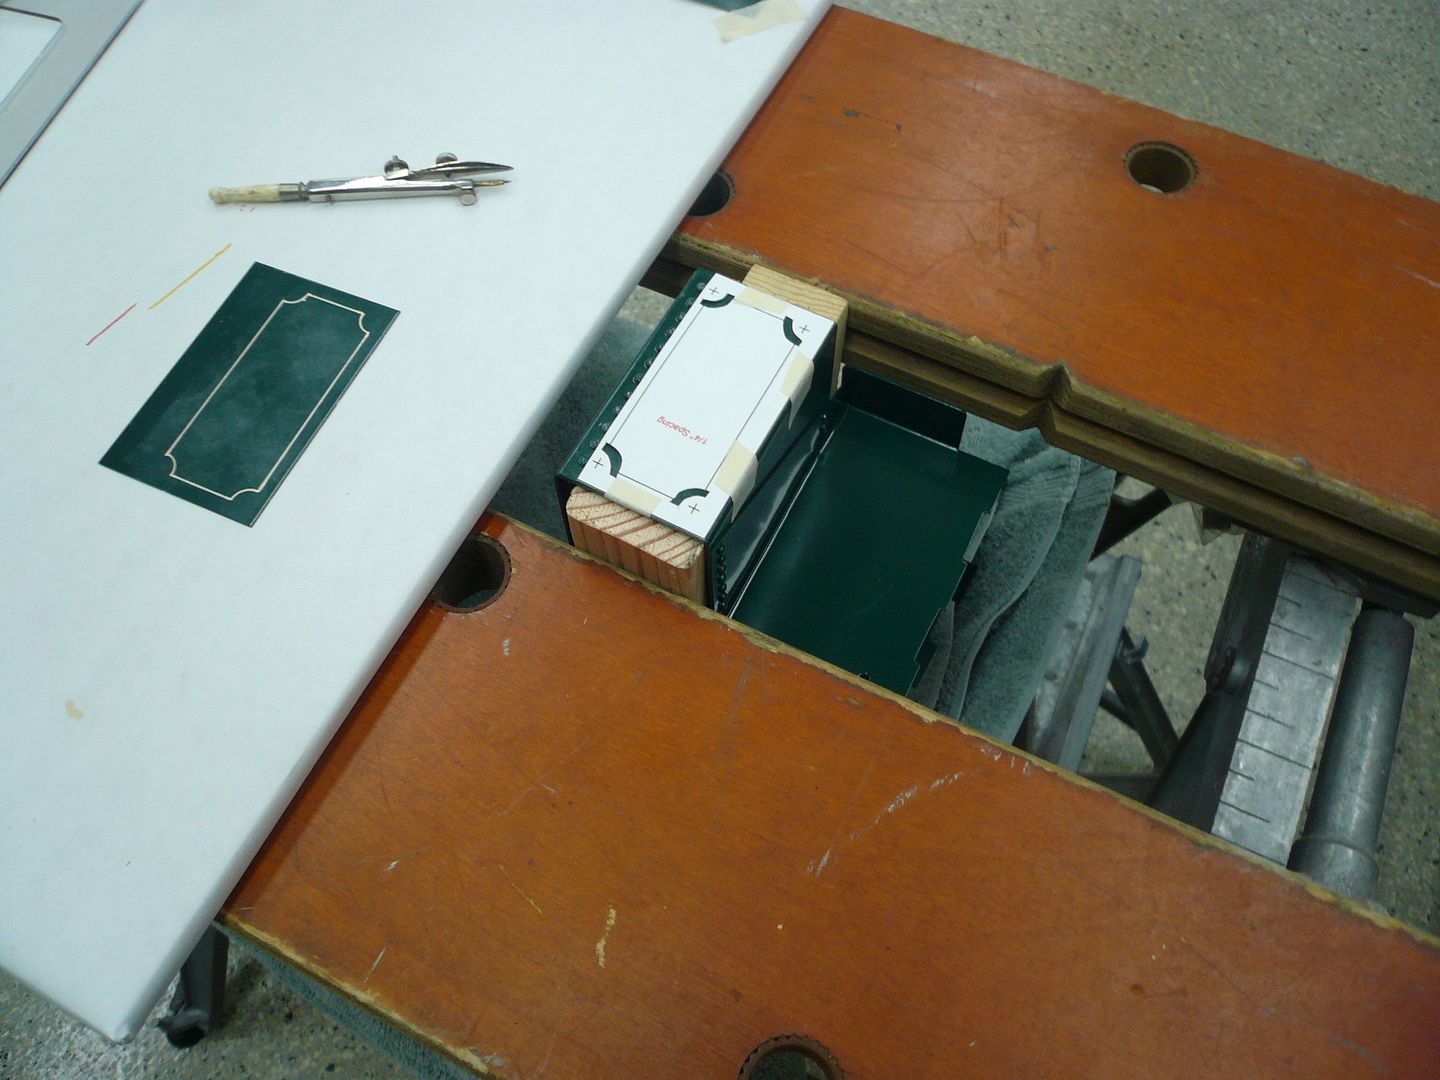
My tractor striping is on the fuel bunker assembly. The bunker is an odd shaped piece, but the Workmate center vice lets me clamp and position it so that the surface Im working on is as close to writing paper position as possible. The Workmate isnt essential, but very handy.
The bunker was done using the same process as the sample. I did each surface in turn, letting paint dry at each step before messing with it. Waiting for paint to dry can be a real test of your patience.
Heres the completed fuel bunker assembly.
And that completes the paint! Believe it or not, Im finally going to start assembly. Thanks for hanging with me.
Dennis
Sorry about the delay in posting. I've been away from the shop for awhile. I'm almost afraid to do another post about paint, but I wanted to show one more thing that I hope will be of interest. Please bear with me.
My Post #53
Pin Striping
Now that the paint is fully cured, theres one more detail to add before final assembly and thats some decorative pin striping. Ive striped old machines and tools before, but nothing as small as the tractor.
Im going to use old fashioned inking pens. I saw this done quite some time ago in an old Rudy Kouhoupt video. Theres also a brief mention in Christopher Vines How (not) To Paint A Locomotive. The inking pens can still be found at swap meets and garage sales in old drafting sets. Theyre usually pretty cheap. In case youre too young to know what they are, examples can be seen in this photo. Youll need both a compass and a pen.
The first step is to pick the paint. In the above photo Im trying acrylic craft paint.
Craft paint works pretty well, but requires some thinning, after which some colors dont cover well. It has a flat lustre that I didnt like against the gloss base. Water clean-up is a plus though.
Sign Painters enamel like 1-Shot is great for flow and coverage and it comes in vivid, glossy colors. It works great in roller type stripers like Beuglers and is the paint of choice for most applications. However, for very narrow lines like Ill use on the tractor it tends to dry as a noticeably high (thick?) line.
Another option is drafting ink. The ink comes in lots of colors and is great for narrow lines. However, the inks arent very durable on glossy surfaces, so not a good choice for a model that will be handled.
The paint I ended up using (and usually do) is Model Master enamel. Its available in most US hobby shops and comes in small jars of either enamel or acrylic. Im using enamel for the tractor because I think the adhesion will be a little better.
Once I pick the paint I do lots of practice lines and designs.
The paint jars are Model Master enamel and the large test piece is just white paper sprayed with a heavy coat of the green Im using. The smaller piece is a 2 x 3 piece of brass painted at the same time and in the same way as the production parts. I made up several of these test panels to use for practicing final lines and designs.
I like to stripe on a Workmate bench. Its a nice height (I can sit at it), its stable, and the split vise top offers a lot of versatility for holding parts to be striped. Plus you can move around it to stripe from the best angle.
The process starts with a 1:1 layout of the pattern printed on card stock.
As a show and tell, following is a trial run on one of the test pieces.
Before the first line, I coat the part with a very light dusting of talc. This isnt absolutely necessary, but it seems to help the paint to start flowing. I use Johnsons Baby Powder. Read the label before buying it though. They make a talc powder and also a cornstarch powder. You want talc.
Next, cut out the pattern and trim out the curve sections just wide enough to clear the pen, but leave the center point marks. This gives a spot to hold the compass point stable without damaging the base coat.
Tape the pattern to the part. Put just a drop or two (too much and you get blobs) of paint in your compass and run several arcs on a test piece to make sure youre happy with the width. If you are, then draw in the curves. Eyeball the start and stop points based on the straight line positions on the pattern.
Normally Id stop here and let the paint on the curves dry thoroughly before moving the pattern. Since its a demo part, I went ahead and removed the pattern leaving just the corner curves.
(Note the trial piece to the left in the above photo. It was used to set final line widths. Once the line width is set, draw a series of sample curves with it. Youll need these when it comes to setting a matching line width for the straight sections.)
The edges of the curves are now the reference points for the straight line sections. Switch from the compass to the straight pen and set the line width to match the sample curves on your test piece. Then draw in the lines using a straight edge. I use a drawing triangle made for inking (Art Supply stores usually have them). They have a small recess along the edge that keeps paint from wicking under the triangle if you get too close to the line. Again, not essential, but handy.
The photo shows about the maximum amount of paint to put in the pen. Too much and you get blobs at the beginning of the line. Its surprising how long a line can be drawn with just a few drops of paint.
If you screw up,
just wipe the line off.
and re-draw it.
A mistake like this is where having a fully cured base coat really pays off. I was able to wipe the enamel line off using mineral spirits without affecting the base paint. That probably couldnt have been done if the base was still soft. Also, had I been doing a production part, the curve paint would have been cured too, so I could have wiped off the entire line instead of just the screwed up part. That would make a neater repair.
The other screw-up I normally make is overshooting a line. Examples can be seen on the lower left corner curve and on the two short crossing lines at left center.
These are fixed with a small touch-up brush and matching paint. Just paint over the overshot line using some base coat paint sprayed in a container.
The spray paint is pretty thin, so touch-up needs to be done in several coats to get coverage, but avoid build-up as much as you can.
Here are the lines repaired.
If you hold the part just right, you can still see the repairs as a small paint bump, but for the most part they disappear, particularly when looking at the overall piece.
Once Im happy with the sample pattern and line widths, I move to the production parts.
My tractor striping is on the fuel bunker assembly. The bunker is an odd shaped piece, but the Workmate center vice lets me clamp and position it so that the surface Im working on is as close to writing paper position as possible. The Workmate isnt essential, but very handy.
The bunker was done using the same process as the sample. I did each surface in turn, letting paint dry at each step before messing with it. Waiting for paint to dry can be a real test of your patience.
Heres the completed fuel bunker assembly.
And that completes the paint! Believe it or not, Im finally going to start assembly. Thanks for hanging with me.
Dennis
My gosh, that's beautiful, Dennis!
I've never tried this. I think I have a couple of pens from my drafting classes years ago. I have to dig them up. You make me want to paint!
Thanks much for the tutorial. Very welcome, from my point of view.
I couldn't imagine this tractor being more beautiful with paint than in brass, but I'm sure seeing it now!
Won't have to hunt much for a POM nominee next month, that's for sure.
Dean
Similar threads
- Replies
- 111
- Views
- 21K