Briggs & Stratton 6S - A Beginnig

Home Model Engine Machinist Forum

Help Support Home Model Engine Machinist Forum:

This site may earn a commission from merchant affiliate links, including eBay, Amazon, and others.
Rick, Bill,
Thanks for bringing the historical perspective into the picture. It's interesting to me. You can't help but admire the manufacturing heritage of any of our engine models as you get into building them. My current build happens to be UK based but all the same you have to admire those folks for what they accomplished without (forgive me) computers. ::)

Cheers,
Phil
 
The Briggs engine numbers determine how the engine is built.

The model number is listed first and on the earlier models consist of displacement and cylinder block configuration and on later models indicate displacement, block configuration, starter equipment, type of carb, and electrical equipment.
The type number is the number assigned to a specific customer requirement.
The code number is a quality control telling date of manufacture, shift etc.
If you need to obtain any parts for your engine , the parts dealer needs all of these numbers to correctly supply your parts.
If you need further specifics I would be glad to get my service manual and post the complete chart. richard
 

The pin sticking out of the back of the crankcase is the pivot for the optional kick starter. richard
 
Richard that information is 100% correct for Briggs engines that were built after 1964.
Prior to 1964 there were no Code Numbers, and the Type Number identified configurations
specific to that particular engine.

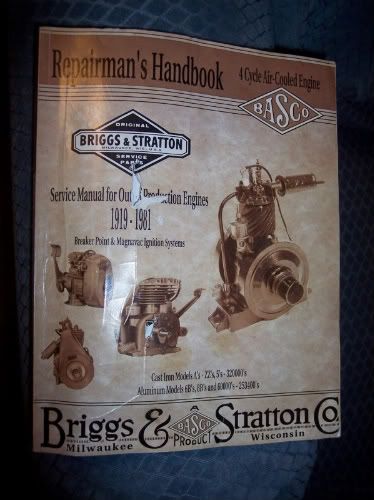
If you like Briggs manuals, do you have this one?

AntiqueBriggsManual.jpg


My copy is a bit worse for wear, but it covers the older models and numbering systems
quite well.

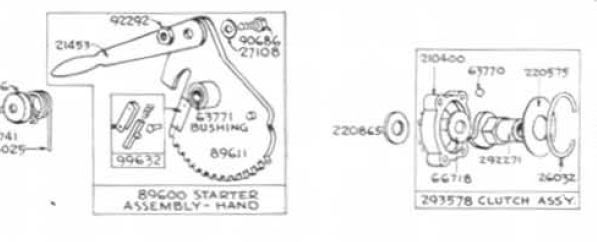
I have done a little more research on the 6S starters.
I haven't seen any kick start options, but I did find a parts listing for a lever starter.

6SLeverStartParts.jpg


I am thinking more every day that engine may have been a lever start design.
We will see if Briggs can confirm that.

Rick


I have a WS series Briggs 5/8 hp 2 inch bore and stroke, that was used on washing machines and other similar apps and it was equipped with a kick starter when I got it. The kick starter was mounted on the pto shaft and the starter clutch had a 2 "? vee pulley mounted on the clutch assy. The kick pedal was bolted on the larger gear segment pointing the opposite direction and mounted on the pin on the back of the engine block. It has a ccw rotation and a spraybar barb w/ a detached fuel tank. Unfortunately the kick starter has been misplaced since I obtained it in the early 60's. I do have the vintage service manual as well as the 6 inch thick dealer parts bench manual richard
 
Rick, Richard
Thanks so much for this additinal information. Rick...the only real guide I have looked at is the online manual for Briggs 6S's found at their website: http://www.briggsandstratton.com/pdf/owners_manual/100/Model 6S-Domestic.pdf

I hadn't noticed it before but on page 11 they show the same two drawings (and others) you includued in your post. So apparently there either was a lever start or an option to include it. That probably answers the question as to what the pin on the crankcase is. Now I have to wonder if this engine was ever so equipped ???.

The factory pics are amazing...and yeah...victorian dresses in a machine shop...definitely not a good combination, especially with line shaft driven machines as illustraded.

Thanks again for taking the time to research this, and if you hear anything back from Briggs, I would enjoy knowing.

Bill
 
This is getting interesting for me on the antique end.
Richard, I have never heard of a Briggs Model WS. Do you have any photos, or
links to where more information on it can be found?
I have restored several Model WM and WMB's This one turned out exceptionally nice
and it too ended up going to auction. I was a little shocked when the bidding ended
on it. It was dressed out to be a collectors show piece and the collectors wanted it
on that given day.

100_0540a.jpg


I do have an abbreviated story of that restoration on my personal webpages at:
http://home.comcast.net/~rake60/wmb_restoration.htm

Nothing from Briggs yet Bill.
It usually takes about three days.

Rick
 
Rick,
Nicely documented story on that restoration. Now I am going to have to seriously think about restoring this 6S ::) if I can find the parts I need. Not to rob your trade secrets or anything, but can you suggest any likely outlets for such parts? The bearings, gears and valves all seem to be in decent shape. As you already know it is missing the gas tank, carb, and air filter. In addition it needs the Magneto coil, a new set of rings, and probably a muffler.

Bill
 
Other than the Crankshaft and connecting rod, the parts from a Briggs 5S
are interchangeable with the 6S parts. Keep a watch on eBay.
A complete non-running 5S engine will usually go for $20 to $50.

John Smith has an eBay store that has a constantly changing inventory
of both new and used Briggs parts. He goes by briggsnut there.

Buzz Trabbic also maintains and eBay store under the name lots-a-junk.

If none of those can turn anything up, I can email you a list of nine other
people who buy and sell antique Briggs parts.

If you do decide to do that restoration. I want pictures! ;)

I have only restored one 6S. That restoration is documented as well on my
personal pages. http://home.comcast.net/~rake60/1951_briggs_model_6s.htm

Rick
 
Thsnks Rick,
I will begin checking those out for the parts I need. Based on your restoration pictures which are great by the way, I would say the basic iron of my 6S is in pretty good shape. I can only hope it would turn out as well as yours have!! For now though I need to get back to making chips on the half scale model. Thanks for all your help.

Bill
 
Here's a short update...still not a lot of time in the shop but minor progress on other fronts. I was trying to figure a way to scale down the serial#/oiling instructions label and make it as exact as possible. A little time with MS-Word (well more than a little) and then printing at various size percentages yielded the results shown below. The first pic is of the original label (from an earlier post). The second shot is the cylinder fin cover it will fit onto and finally a shot of the printed label. The actual size is 1.4" x 1.3" Off in a bit to have the printed label laminated at the office supply store and then to Lowes to see if I can fine some tinyl brass tacks or similar to use as rivets to attach the laminated label to the cover.


IMGP1109.JPG


IMG_0018.JPG


IMG_0020.JPG
 
Meanwhile I ordered a few pieces of brass and aluminum needed for the next parts. The gas tank will be machined from two pieces of brass and then joined together. Overall it will end up about 3.75" wide, 2.50" tall, and roughly 1.125" deep excluding the cap. There's gonna be more chips that material remaining but it seemed the best way to do it. Also shown is the aluminum piece that will become the cylinder head. Plan on doing some roughing machining on this today and tomorrow. I still need to finish boring the cylinder liner and honing it to size so that is on the weekend agenda as well.


IMG_0021.JPG


IMG_0022.JPG
 
This is really looking the business. Never seen anything quite like it, nice work
:bow:
 
The trip to Office Depot and the Home improvemt store worked out well as I found some brass plated round head nails of a perfect size. Trimmed the laminated label to width and finished cutting and filing the brass cover, then marked the 4 corner locations for the makeshift rivets. The rivets were inserted through the label and brass piece and cut off leaving just enough to pein over on the back side. The top and bottom extra laminate was trimmed to the top and bottom edges. Finally the cover was carefully curved to the approximate profile of the original and the top tab bent to the 90 degrees required.

IMGP1114.JPG


IMGP1123.JPG


IMGP1124.JPG
 
Awsome job wlindiii!! seeingyour keys I must ask. What kind of hyundai do you drive?
 
Thanks HYTECH. Its a SantaFe Limited AWD which I love!! The only problem I have had is a recurring air bag light which they have tried to fix on 4 occasions now and it still happens so i prety much ignore it now. Any ideas?

Bill
 
look on your receipts and give me the trouble codes they should be "Btrashx" then I can see if there is any common problems. You can access all the Shop Manuals and TSBs at www.hmaservice.com free signup with Email address. PM me your Vin and I can look up and see what they repaired.

that "Btrashx" is supose to be somthing like B2137 I used 4 Xs to show the format but the forum changed it.
Jasen
 
That cover came out very nice, Bill.
Glad to see another new post. I like this project!

Dean
 
Beautiful work Bill!

By the way, I did hear back from Briggs.
The original engine you have there was equipped with a lever starter.

Rick
 
Thanks Dean and Rick. Guess I will have to ad that little stud sticking out of the crankcase then but the lever start (which would be a very nice addition) will have to be a later addition. Still lots of parts to make yet. I finished dimensioning the cylinder head drawing and revampred the gas tank drawing a little yesterday. Thanks so much for checking on that though and passing the info. along!!

Bill
 

Latest posts

Back
Top