You are using an out of date browser. It may not display this or other websites correctly.
You should upgrade or use an alternative browser.
You should upgrade or use an alternative browser.
Brian Rupnow build--Hit and Miss air/steam engine
- Thread starter Brian Rupnow
- Start date

Help Support Home Model Engine Machinist Forum:
This site may earn a commission from merchant affiliate
links, including eBay, Amazon, and others.
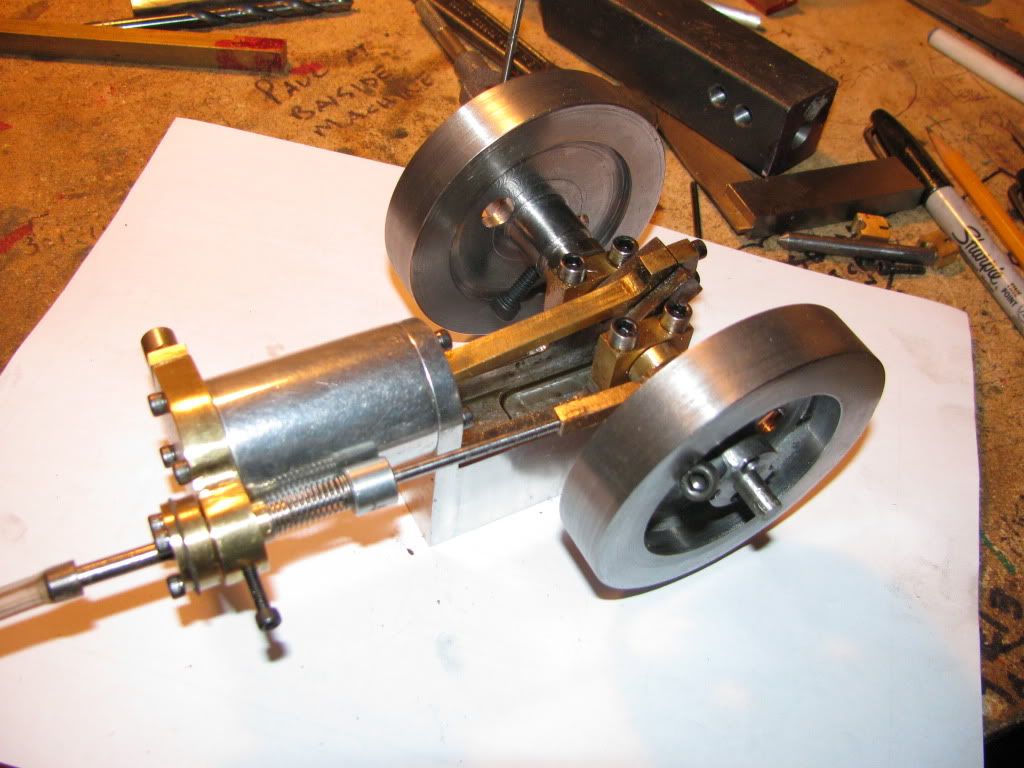
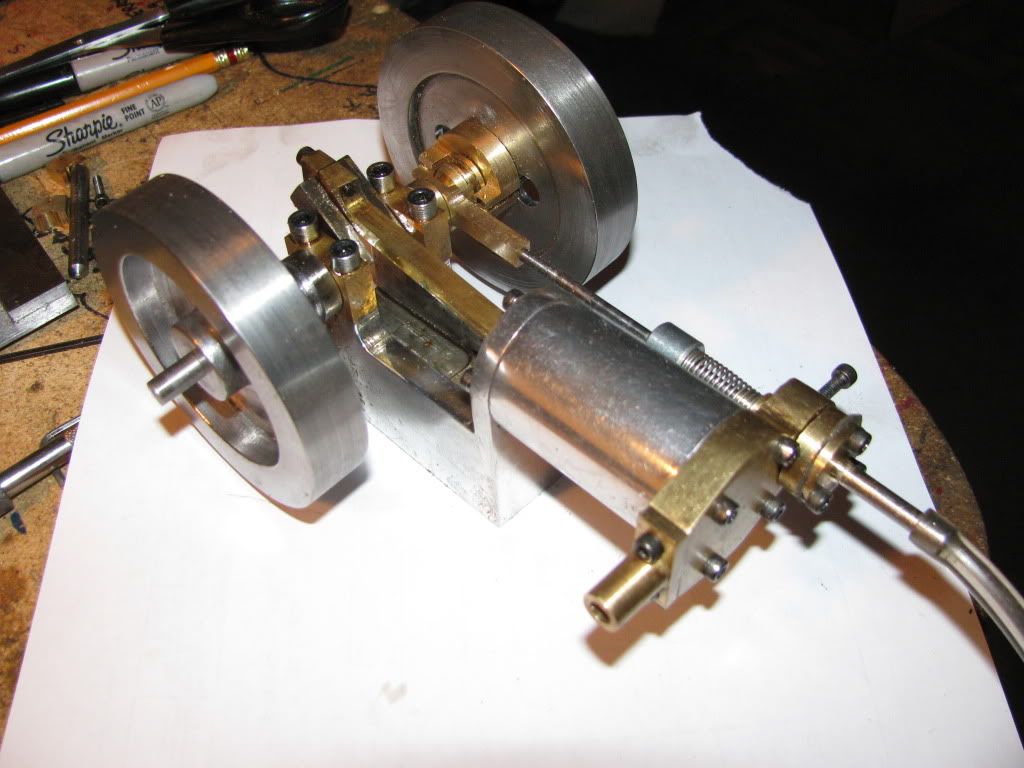
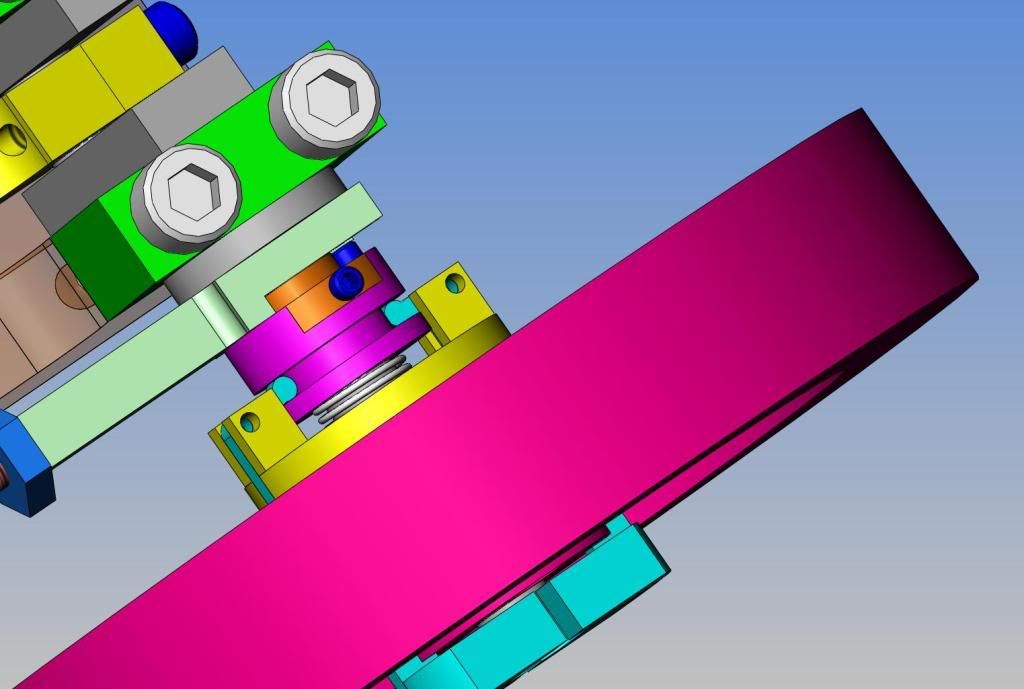
Its starting to get exciting now. I spent all morning building fiddly little brass parts, but this afternoon I decided to do some "first assembly", as I can't see my friend who MIGHT have a 0-80 tap and drill untill he gets home tonight. If I push the end of the "valve actuator lever" with a screwdriver (to simulate what the 0-80 cam screw will do) the flywheels take off like a shot, and the engine bellows like a---like a---well, kinda like a wounded duck!!! I have never built an engine before with such interesting sound effects. Hopefully, after I get the cam screw in place, and get the engine timed correctly, it will give more of a "pop" sound rather than sounding like the offspring of a mad Mallard and a Whoopee cushion. Tomorrow I have to make the arms for the governor and solder them to the weights, then try to assemble the governor---which methinks is too damn much like microsurgery.


arnoldb
Well-Known Member
- Joined
- Apr 8, 2009
- Messages
- 1,792
- Reaction score
- 12
Brian, that's looking good :bow:
Regards, Arnold
Rof} Rof}rather than sounding like the offspring of a mad Mallard and a Whoopee cushion.
Regards, Arnold
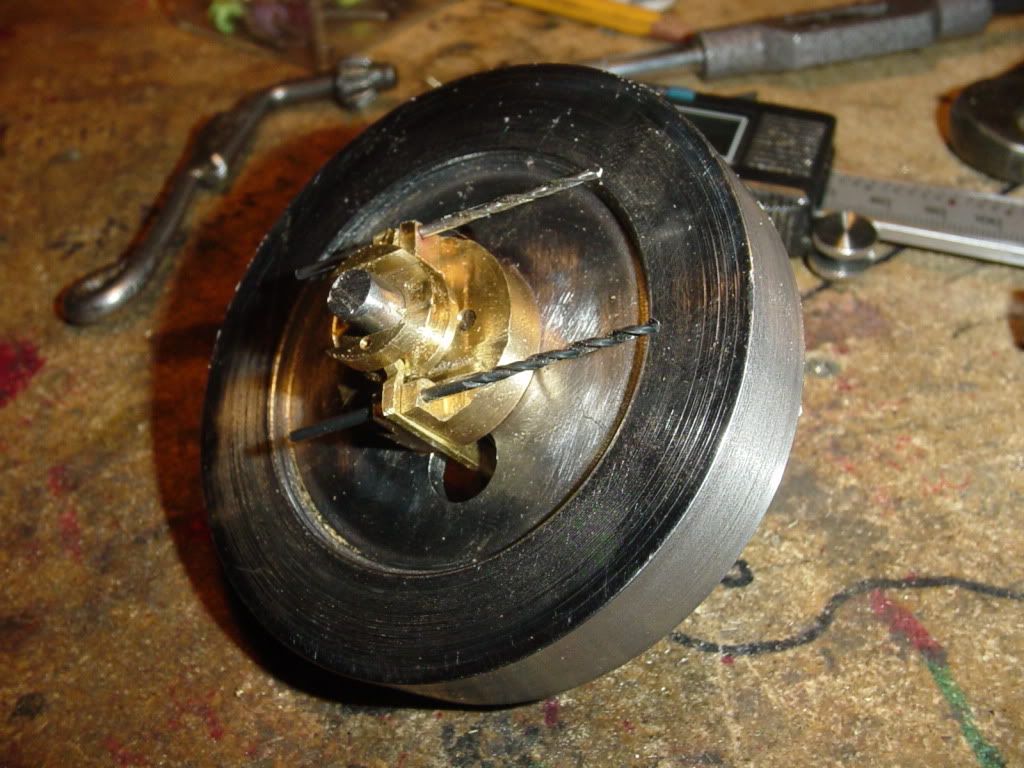
I spent the entire day today "frigging" with the flywheel mounted governor.--it works---it actually works!!! But it takes a heck of a lot of "frigging" with to get it to work. I have test ran it on my variable speed electric drill, and the weight arms do fly out under centrifugal force at mid range RPMs, and the spring does retract them when the drill slows down. Right now the sliding cam only moves about 0.050", and I need it to move about 0.080". It appears that the arms are hitting on the outer limits of the flywheel clearance holes, limiting the travel. Tomorrow I will elongate the clearance holes a bit and try to squeeze another 0.030" of travel out of the sliding cam.---I went today and bought a #0-80 tap and two tap drills---the hole tapping went fine, but now nobody in Barrie has 0-80 socket head cap screws.
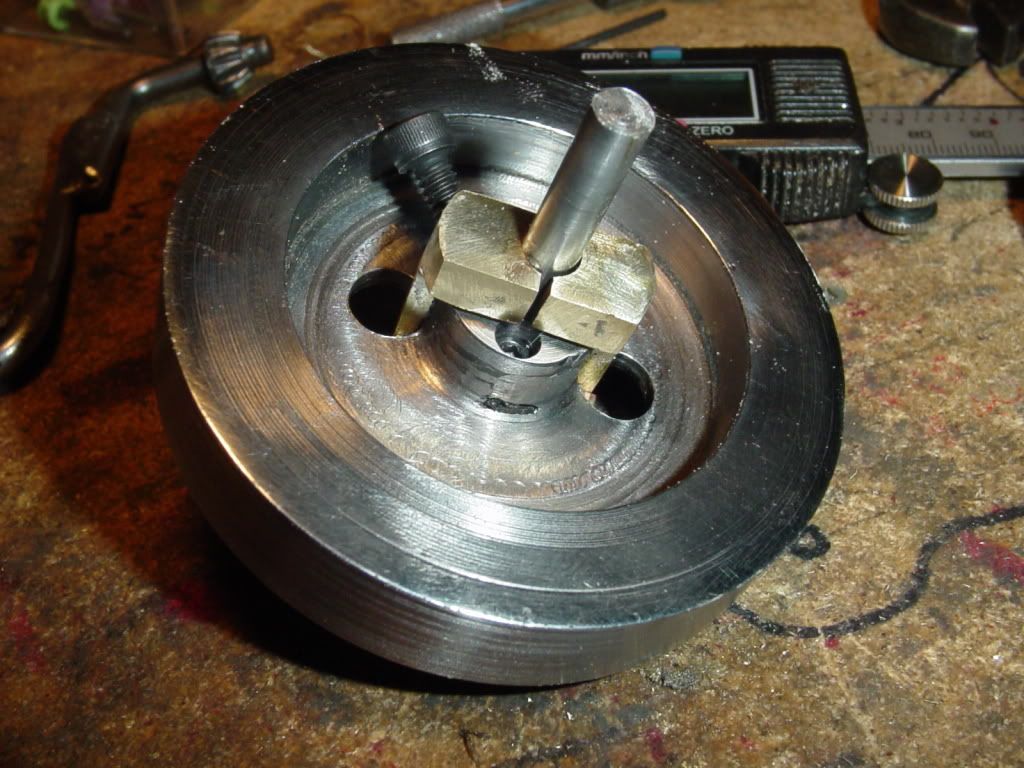


So---We have a runner. I can not get any 0-80 socket head capscrews in Barrie, and my "Nut and Bolt store" doesn't seem to be able to order them except in quantities of 50 (at an outrageous price). If anybody out there would like to take pity on me and send me one #0-80 socket head cup point set screw x 1/8" long, and one #0-80 socket head capscrew x 1/8" or 1/4" long, you would have my everlasting gratitude. See the link to my website for my mailing address. This morning I got up and decided to make a solid cam and see if I could get the engine to run as a conventional engine, and it runs very well as the video shows.---Brian

vlmarshall
Well-Known Member
- Joined
- Dec 28, 2008
- Messages
- 1,138
- Reaction score
- 1
Well, I've got some 0-80s here, you can have 'em if they'll help ya. Thread length is .180", .237" OAL. Ignore the short screw, I don't know how it got mixed in with the others. ;DBrian Rupnow said:..If anybody out there would like to take pity on me and send me one #0-80 socket head cup point set screw x 1/8" long, and one #0-80 socket head capscrew x 1/8" or 1/4" long, you would have my everlasting gratitude...

I just did some quick checking on my CAD mode, and it looks like maybe I can use one of the 0-80 socket head capscrews for a set screw in the valve actuator bushing. It looks like the head will clear everything ---if so, then its good luck, not good management.

- Joined
- Aug 25, 2007
- Messages
- 3,890
- Reaction score
- 715
Great Job, Brian! Glad to see it's running very well for you. The speed will probably vary some until it get's broken in some. Then it will be pretty consistent. It does take high pressure but not much are to run these engines.
Chuck
Chuck
I may have spoke to soon on the governor!! Its driving me nuts. The weights do fly out from centrifugal force, and move the sliding collar okay. However, when I slow the flywheel down, the spring doesn't have quite enough strength to return the sliding collar all the way to the low speed position. This can be fixed by changing to a heavier spring, but then I may have to add a bit of weight to the counterweights. This is the hair pulling part of the build, I guess.
I finally got the governor to work the way its supposed to, at least on the variable speed electric drill. This is a very finicky operation, largely because the pivotting conterweight arms are so small it is hard to make them with any real accuracy. I also picked up a spray can of International Red and painted the flywheels today. If the 0-80 screws that Vernon sent me get here this week, I may have a new video to post.
Brian, guess I am going to repeat my self again, thanks, thanks, thanks, hope by the end of this 100 degree no rain South Louisiana weather I can get started on some projects that you have shared with us, adding on to the shop for more room, the drawings are great and the pictures of the progressive build help when one is not sure how to hold things to get the desired product, again, thanks so much, Lathe Nut
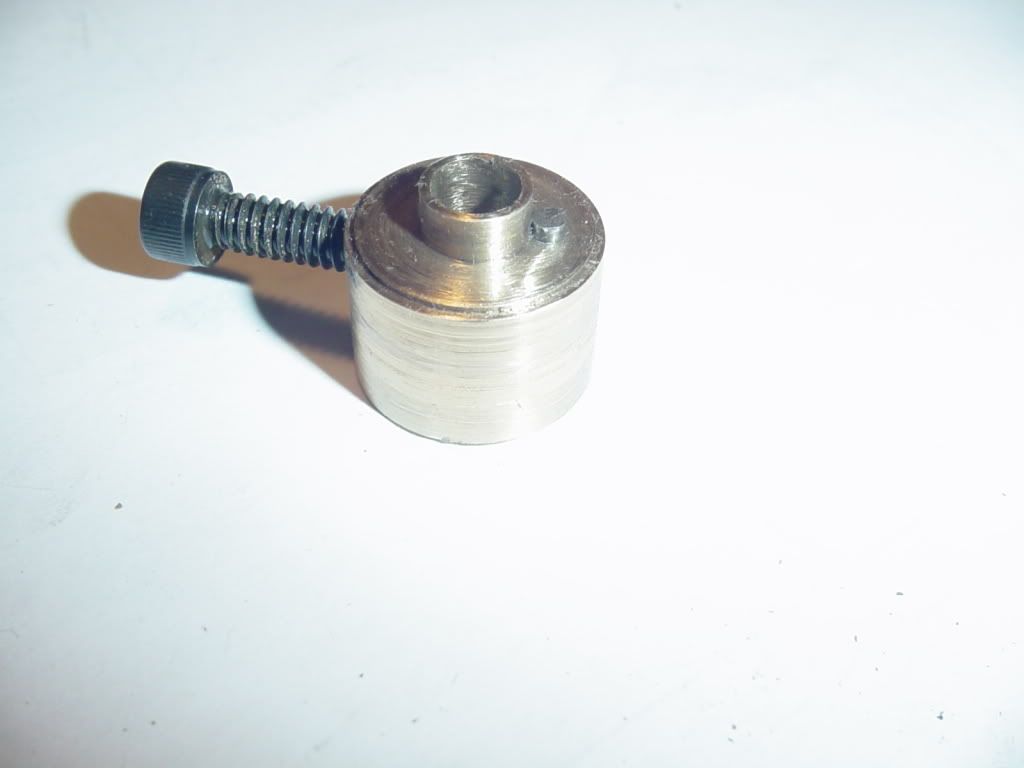
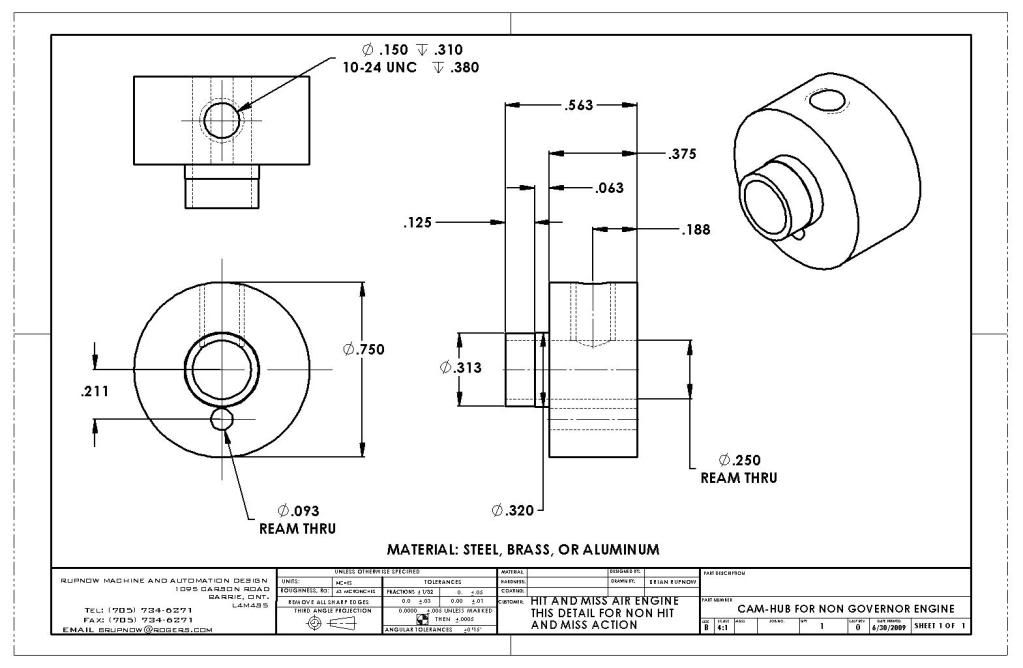
I have had numerous people emailing me and asking about the flywheels, and if they can build the engine as a conventional engine without the hit and miss function and the governors. The answer is---#1--The flywheels CAN be made from aluminum, and they CAN be made to 1/2" thick. ---and the non governor flywheel does NOT have to have the long extended hub as shown on my drawing.---I only made the extended hub that long so that both flywheels would be spaced out the same distance from the crankcase, and I wanted the extended hub to drive an o-ring drive pulley to power some secondary equipment.
----#2-You can build the engine with 2 identical flywheels and skip the governors. You will need to build a cam-hub similar to the one in the attached picture.--Please note that I built this from a "scrap" peice of brass and 3/32" steel rod---there is a bit of machining at the extreme outer diameter of the peice in the picture which serves no purpose and doesn't have to be there----And the one in the drawing will not be as thick as the one I show in the picture.
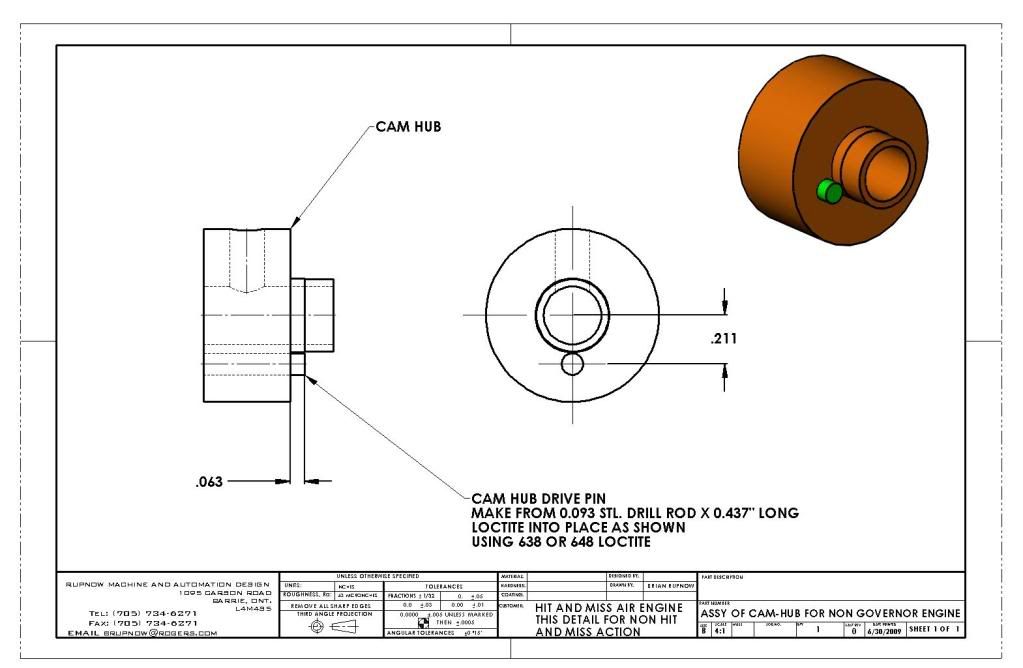
View attachment ASSY OF CAM-HUB FOR NON GOVERNOR ENGINE.PDF
View attachment CAM-HUB FOR NON GOVERNOR ENGINE.PDF
----#2-You can build the engine with 2 identical flywheels and skip the governors. You will need to build a cam-hub similar to the one in the attached picture.--Please note that I built this from a "scrap" peice of brass and 3/32" steel rod---there is a bit of machining at the extreme outer diameter of the peice in the picture which serves no purpose and doesn't have to be there----And the one in the drawing will not be as thick as the one I show in the picture.


View attachment ASSY OF CAM-HUB FOR NON GOVERNOR ENGINE.PDF
View attachment CAM-HUB FOR NON GOVERNOR ENGINE.PDF
vlmarshall
Well-Known Member
- Joined
- Dec 28, 2008
- Messages
- 1,138
- Reaction score
- 1
Haven't those 0-80 capscrews gotten there yet?? :-\
Vern---They came today, thank you very much. I have installed them and am trying to get the machine timed right now. I had it running good once, and then the hub slipped on the shaft and I lost the timing.
Well boys---Here ya go!!! Its running in hit and miss mode. After 2 hours of messing about with tiny, tiny, tiny #0-80 socket head capscrews and adjusting the timing, it runs. This video was made in the first 5 minutes of operation, so its a bit choppy. Its been setting on the corner of my desk running now for half an hour, and its getting much smoother. I am happy as a pig in mud!!!

DavesWimshurst
DavesWimshurst
- Joined
- Dec 7, 2008
- Messages
- 102
- Reaction score
- 3
Brian,
Excellent!!! :bow: :bow: :bow:
In only one month, so what are you going to build in July? :big:
Dave
Excellent!!! :bow: :bow: :bow:
In only one month, so what are you going to build in July? :big:
Dave
I may have shot myself in the foot a little by making the flywheels from steel. My theory was that if the flywheels were uber heavy, they would let the engine "coast" longer between firing cycles. What I overlooked was the fact that since they are so heavy, it takes considerably more kinetic energy to overcome their "resting inertia", so the engine has to fire 5 or 6 times to get the engine spinning fast enough to actuate the governors. If the flywheels had been made of aluminum, which is 1/3 the weight of steel, the firing profile would probably have been quite different. When I get back from the Canadian Rod Tour, I am going to build a small scale varying load machine to demonstrate how applied load affects the hit and miss cycle as the engine runs.
Similar threads
- Replies
- 0
- Views
- 957
- Replies
- 19
- Views
- 6K


