Brian Builds the Kerzel Hit and Miss I.C.

Home Model Engine Machinist Forum

Help Support Home Model Engine Machinist Forum:

This site may earn a commission from merchant affiliate links, including eBay, Amazon, and others.
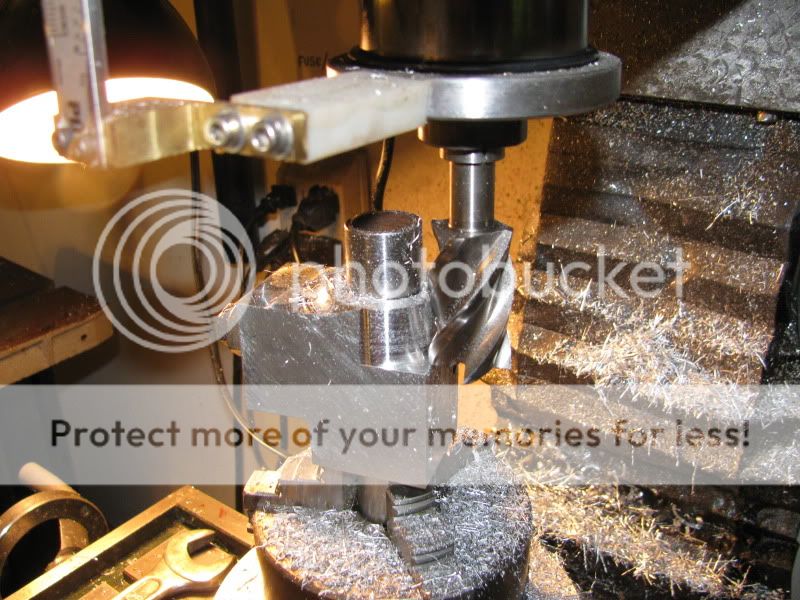
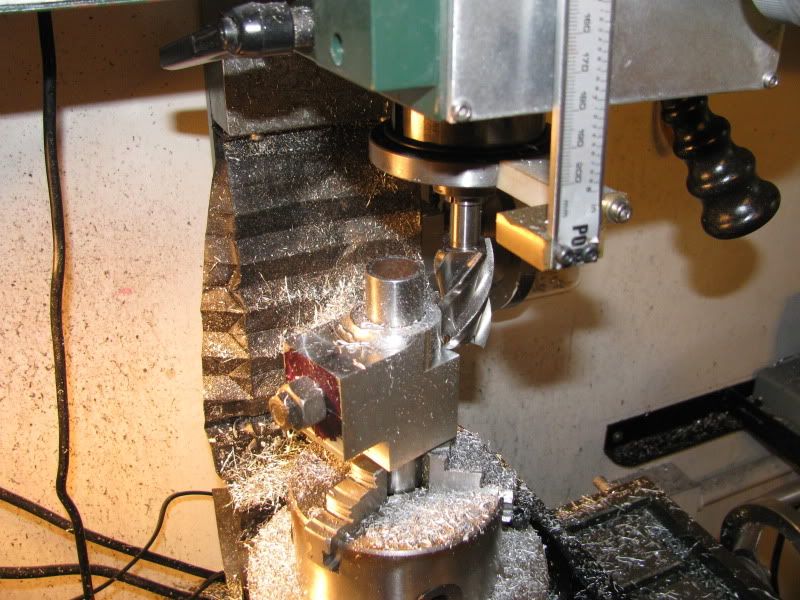
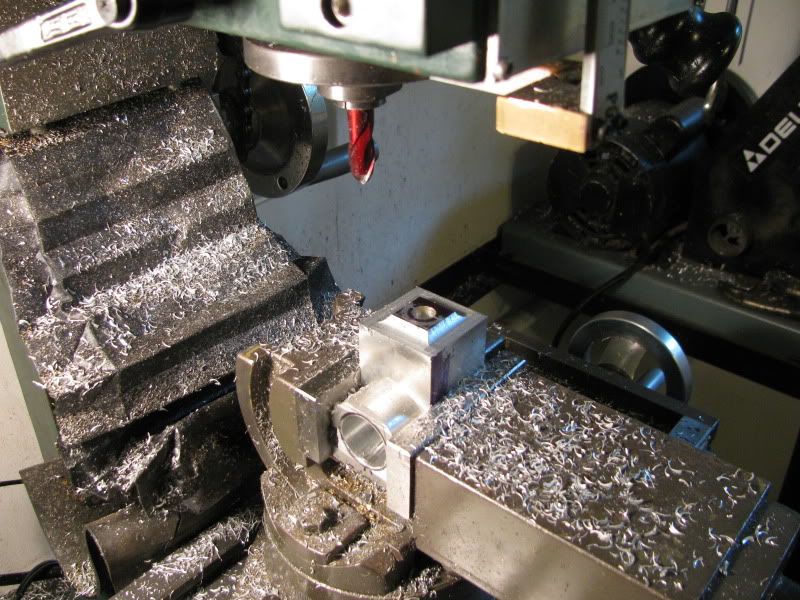
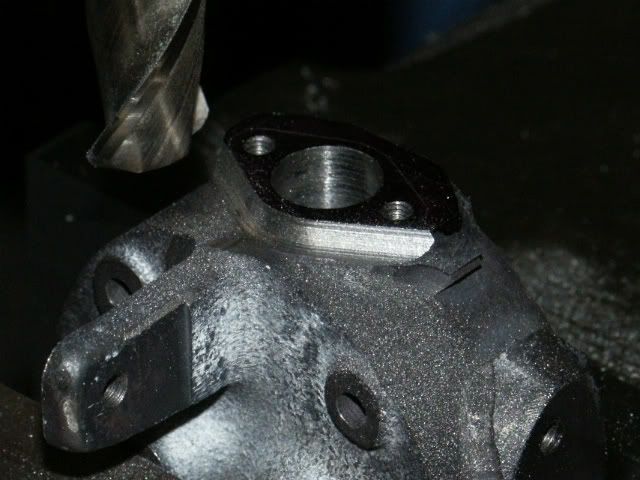
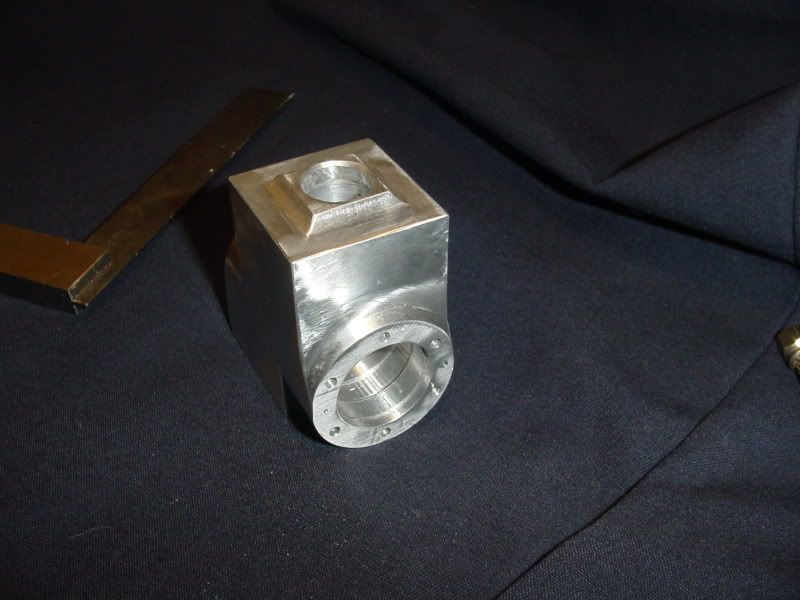
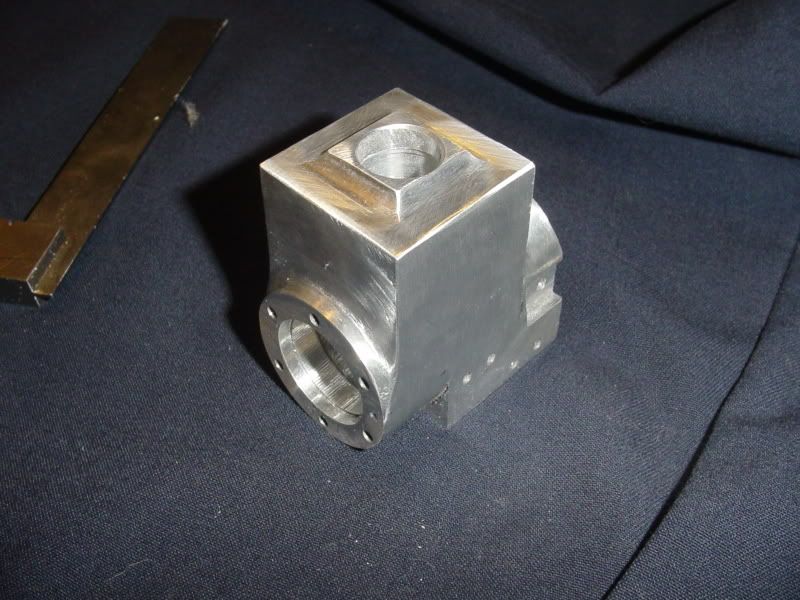
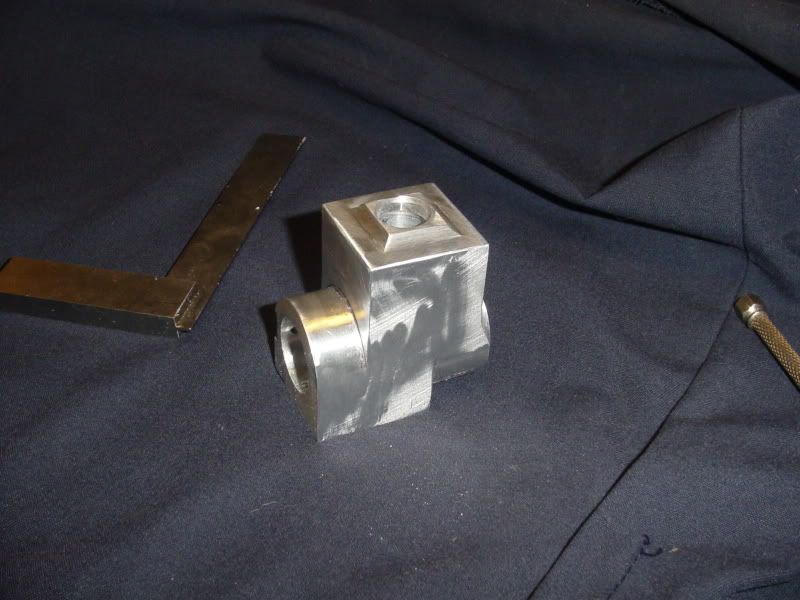
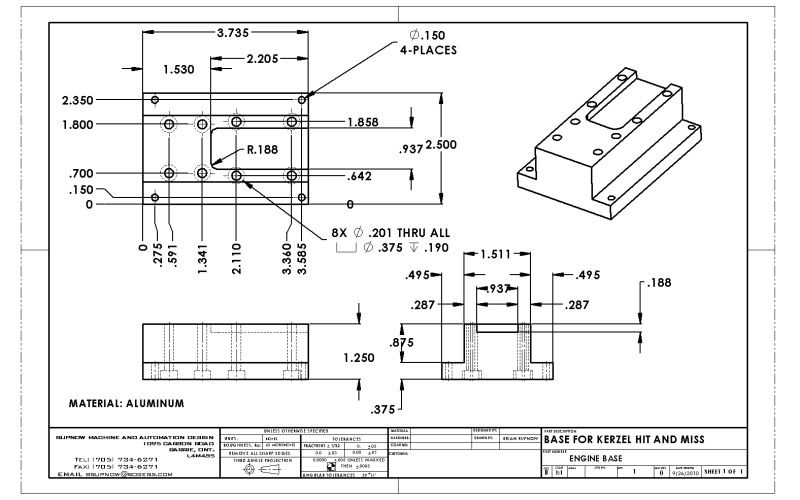
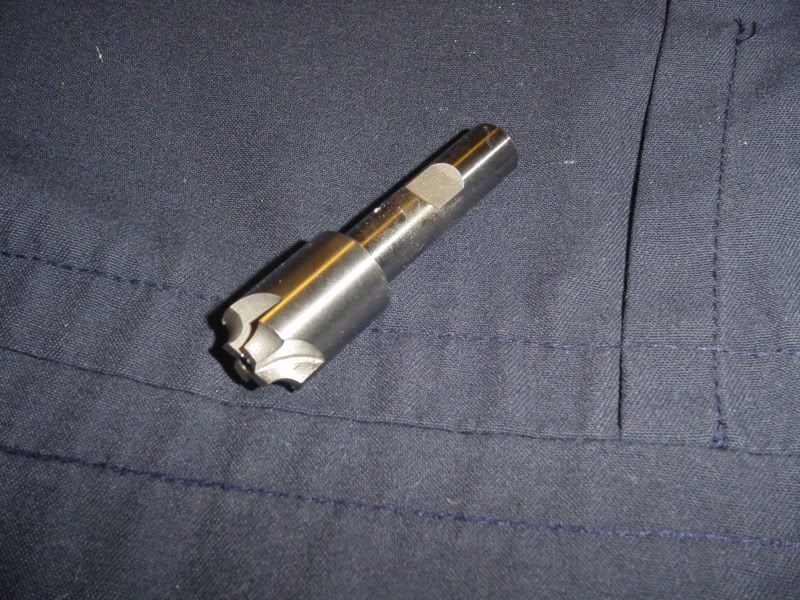
This is a rather dreadfull picture, in which I was attempting to show the 3 bores in the cylinder housing (water jacket). I drilled though with progressively larger drills, starting with 5/16" and ending with 3/4", which was the largest drill I have. This was stretching the limit of what my small mill will do without blowing a fuse, and it was compounded by the fact that my quill travel is only 2", while I was going through material 2 1/2" thick. --this meant a lot of running the head up and down the column as well as using the full quill travel. I used my boring head to go all the way through at 0.950, knowing that if I didn't get it dead on 0.950. I would be turning the outside diameter of the cylinder and could turn it 'to suit". The 1.00 diameter c'bore x 1/8" deep presented no problem. But when I got to the large c'bore about 1/3 of the way down the bore, I thought----Hmmmm---How the heck do I do that??? I zeroed out my depth vernier on the mill, cranked the offset on the boring bar down to a point where it would fit into the bore, ran the quill down to 1.125", backed off the advance screw on the boring head untill I could just feel the boring tool touching the inside wall of the bore (All this of course with the machine turned off), For every full turn of the adjusting screw, my boring bar advances 0.100"---So---I advanced it 1/4 turn which of course created big interference with the inside of the bore, then turned the quill by hand untill I had one full revolution completed, then turned the mill on at very low speed and gradually increased the speed untill it was turning without dragging, then repeated the process untill I had reached the bore which I wanted 1.311". Of course I had no way to measure this, s I was counting divisions on the tiny dial on my boring head. About this time, I began to realize that I should have done this in the four jaw chuck in the lathe. Oh well, live and learn!!! Once I reached the desired diameter, I measured the length of carbide on a similar boring bar and seeing as it was 0.25", I set the mill for a mid range RPM and backed the quill up 1/4" to give a counterbore 1/2" long as per the drawing for a water passage. I certainly don't recomend this method to anyone else. It works, but its kinda like wiping your a$$ with your elbow!!! It should have been done in the lathe using the 4 jaw chuck. Oh well, I "Goterdone" and its all hidden when everything is assembled. I'll know better next time!!!
BOREINCYLHOUSING002.jpg
 
"......kinda like wiping your a$$ with your elbow!!!"

Rof} Rof} Rof} Rof} Rof} Rof}

oh good lord! that is hysterical!


BC1
Jim

 
I'm not at all sure that I'm going about this the right way, but Hey---Its working. Love that rotary table with the chuck mounted on it!!!
machiningcylinderhousing002.jpg

machiningcylinderhousing003.jpg
 
I'm trying out a new tool that I haven't used before----A ball nosed end mill. (you can see that I have dyed it red so I don't keep picking it up and trying to use it in places where I want a conventional flat ended cutter.) It works very good to form a radius, and I'm pleased with that. However, I have found that if you have to mill away any flat area to get to the area where you want the radius (as in the attached picture) it leaves a number of small ridges behind it. They are very small ridges, so I;m sure they will come out with a bit of filing. I really wish I'd bought a rounding over tool to do the outside edges of the water jacket, but I didn't.---Instead I have a 45 degree chamfering end mill, so probably that is what I will use.
ballnosemill001.jpg
 
One thing I really like about your projects is that you keep moving at a steady pace. It's great to find regular updates and watch your projects move along... no time for boredom. Not sure where you find the energy, but your time and efforts are much appreciated.

Chuck
 
cfellows said:
One thing I really like about your projects is that you keep moving at a steady pace. It's great to find regular updates and watch your projects move along... no time for boredom. Not sure where you find the energy, but your time and efforts are much appreciated.

Hey, I give regular updates, too. Once a year whether I've accomplished anything or not! ;D

It does sometimes seem that Brian neither eats nor sleeps for days at a time. He's a bit of a machine himself. Certainly does keep the progress reports coming.
 
Great progress Brian, Its lookin darn good.

I have had the same problem with the ball end mill and flat surfaces in the past.

When I want a rounded inside corner I use a regular end mill for 95% of the material removal. But I leave a square of material in the corner which is exactly the radius of the ball end mill I want to use. Then I bring the ball end mill about .0005 above the surface and proceed the cut the square into a radius. This makes a lot less filing and sanding work.

Kel
 
Thanks for your interest guys. If nobody answered or commented, I would not post. Chuck---I'm not sure about the energy thing. When I've got loads of "'real" engineering work, I don't have energy left to do much playing in my little machine shop. This last 3 weeks "real" work has been thin on the vine, and I have injured a nerve in my back/leg/groin/testicle---take your pick, they all hurt like a son of a gun. I'm living on percocets and laying around on heating pads, but I get bored to tears and end up machining things to keep from going nuts. I've been and had bloodwork, given urine samples, had x-rays, and ultrasounds, and am hoping like hell that they all come back negative.
 
Jasonb said:
If you were on this side of the pond I could let you have the corian, I've not turned it but when you mill it you will get loads od white flakes that will stick to everything with static. Not too bad for the sizes we are likely to mill but when I'm using it for counter tops with the router its like confetti. I find it also make svery good durable formers when flanging metal, use it on some gear guards for my traction engine just the other week, you can see the former middle pic top row

I think their "bouganvillia" would be a good match to the colour in your rendering :D

If you are stuck for tungsten then Hemingway here in the UK sell small discs for just that use.

Jason

We have found that taking the tungsten button off an old set of motorcycle points and soldering them onto your new breaker works very well. The tungsten solders nicely, and the points are free if you look around.
 
If I have a flat area that meets another with an internal fillet I use a radius edge cutter, you can buy them but I grind them on old slot drills it also removes metal far quicker than you can will a bull nose cutter. A fly cutter with a small radius end does the same job

ignitor4.jpg


Jason
 
Well there!!! That wasn't so bad. You will see that I missed the radius on the side opposite the cylinder head---there IS a story behind that, but it doesn't bear telling. My internal water reservoir isn't as big as the drawing calls for, but thats because I was limited by the offset in the boring bars I have, and I didn't want to grind one up special for this. When you are reaching through a 5/8" diameter hole to do it, the shank of the boring tool starts to rub the inside edge of the hole before you get to much more than 1" inside diameter at the reservoir, where it calls for 1.311 diameter. (and yes, I did it in the four jaw chuck on my lathe.) I don't think it matters a heck of a lot, as these hit and miss engines don't generate much heat anyways, and some water will be better than no water at all. I was right about the ridges left in a flat surface by the ball nosed cutter---They filed out very easily. No other real surprises or disasters were encountered, and the first part is finished. (Whoops---I just noticed as I posted this that I missed a tapped #10-24 hole in the top of the rounded portion opposite from the head end where an oiler screws in.)
cylinderwaterjacketfinished002.jpg

cylinderwaterjacketfinished004.jpg

cylinderwaterjacketfinished001.jpg
 
You are coming along quickly Brian and it all looks great too. Am very much enjoying the ride!!

Bill
 
Looking good Brian.
I liked seeing the model work too. Very helpful.
Looking forward to much more.
 
Seeing as how I've taken such great liberties with Mr. Kerzels engine base, and seeing as I've thrown out an invitation to build this project with me, I thought I would post any parts which I decided to modify.---Starting with the engine base. I am not going to turn the base into a fuel tank. to me there is just too much possibility of it leaking or exploding. I will have a seperate fuel tank by itself.
ENGINEBASE-2.jpg


View attachment ENGINE BASE.PDF
 
I really like the design of this water jacket. I'm sure though, that with just a light press fit of the cylinder liner into the water jacket, that it is going to leak. Not at the cylinder head end, because the flange around the end of the liner is "squeezed" between the cylinder head and the water jacket by the 6 head bolts. However, at the other end, I can see it leaking. I will have to investigate a high temperature sealing compound to coat that end of the cylinder liner with before assembling everything. Also, the 3 threaded holes in the side of the water jacket break into this area too, so I will need some sealant on the bolts which hold the push rod guides in place.
 
Brian, great build, I don't know if it has been mentioned on this thread or on his site, so I hope that I am not being repetitious. The discussion of Tungsten for point contacts, it is available at your local welding shop in the form of TIG electrode. The green marked electrode is pure tungsten and the red mark is 2% Thoriated. There are several new alloys being used now to try and avoid the Thoriated, because it is slightly radioactive and the electrode sizes run from around .020 to .125 and up. One thing to remember when using pure tungsten is that it can oxidize over time and not give a good contact, if you are using milli-amps to run a CDI, tungsten is not required, stainless will suffice for contacts, but a conventional coil/point ignition system requires something better. Just tidbit of thought. Thanks Tad
 
Thanks Tad---Good information. Now that the 3D model is finished, I asked my software about the assembly statistics, and it informed me that there are a total of 81 parts, with 59 of these being "unique" parts.----And thats not counting any nuts or bolts.
 
Brian Rupnow said:
I really like the design of this water jacket. I'm sure though, that with just a light press fit of the cylinder liner into the water jacket, that it is going to leak. Not at the cylinder head end, because the flange around the end of the liner is "squeezed" between the cylinder head and the water jacket by the 6 head bolts. However, at the other end, I can see it leaking. I will have to investigate a high temperature sealing compound to coat that end of the cylinder liner with before assembling everything. Also, the 3 threaded holes in the side of the water jacket break into this area too, so I will need some sealant on the bolts which hold the push rod guides in place.

Brian. I have used this product for several years with out a single problem. Its also good for high temp applications and can even be used on IC engine exhaust flanges. I used it instead of the Toro OHV rebuild gasket kit just a few days ago to solve an oil leak problem (its an old 3 speed heavy duty GTS 200 Super Recycler that I just can't bring myself to part with.) It worked like a charm and saved me "down time" and about $35 for the gasket kit.

Good stuff! Its easy to apply, remove, or replace. Its a modern replacement for old fashioned gaskets, and it will work well to address your IC engine sealing needs.

http://www.supergluecorp.com/pro-seal

Below is what I use.

http://www.supergluecorp.com/pro-se...ers/red-hi-temp-rtv-silicone-instant-gasket-0

Its about $4 a tube at Harbor freight!

http://www.harborfreight.com/catalogsearch/result?category=&q=pro+seal

-MB
 
MetalButcher---Thank you for the information. I think I can get that locally. If not, I will order some from the website.---Brian
 
I had to go over to the south end of Barrie this morning to discuss a new design job with one of my customers. All of the tooling shops in Barrie are over in the south end, about as far from where I live as you can be and still be in the same city.---So---I stopped at one of my favourite tool shops and bought a "Rounding Off" milling cutter. I've never used one before, but it looks like it will be just the cats meow for cosmetic edges on some of the things I build. It will get tried out soon on the water jacket for this Kerzel engine.
ROUNDINGOVERTOOL001.jpg
 
Back
Top