Brian builds Atkinson Engine

Home Model Engine Machinist Forum

Help Support Home Model Engine Machinist Forum:

This site may earn a commission from merchant affiliate links, including eBay, Amazon, and others.
I enjoy my "Daily Brian". Your quiet humour and skilled workmanship give me much pleasure. And I regard it as a singular privilege to be able to join you in your endeavours. Thank you.

Jim
 
Hey Brian I am here looking in at some top notch work. I read and enjoy all your post I have from day one it always makes my day. Cliff
 
Excellat progress on your engine Brian. I am looking forward to see it run. I seen on another thread you are making the ignition coil system for it. As always your work is superb.

Don
 
Work has pretty well came to a stop on this project, until I get my belt and pulleys. Yesterday afternoon after touring around Black Creek Pioneer Village all afternoon with my grandkids, I limped home and built the stand for the belt tensioner. I can't build the shaft that goes with it , nor the tensioner pulley, until I an sure about the size of the belt and pulleys which I don't have yet. Tomorrow I will try for the third time to get the correct 12 volt coil so I can go ahead and build a "shock box" to share between this engine and my webster engine.
BELTTENSIONERSTAND001.jpg
 
My belt and pulleys for the Atkinson engine arrived today. They were purchased thru a company called S.I.T. INDEVA INC. in Charlotte North Caroloina. The pulleys cost $5.18 each and the belt cost $17.40. The pulleys are part number PDMT21T5/28 AND HAVE 28 TEETH. THEY ARE 1.88" (48mm) dia. over the flanges,0.588" (15mm) wide over the flanges, 0.839" thru the bore (21.3mm) with a 1 1/4" dia hub (32mm). They are not bored nor set screwed. the belt is part #U6005T/10 10T5/600 AND IS 3/8" (9.6mm) wide x .088" 2.2mm) thick. This set up is supposed to work with the pulleys on 230mm c/c of the pulleys. (In reality the c/c on the Atkinson engine is 227mm, thus the requirement for a tensioner wheel. When the package showd up here, I see that my credit card has been sharged $64.00, so I guess the extra money must have been for shipping and handling.---It also states that the country of origin is Italy.
BELTSANDPULLEYS001.jpg
 
gotta love those surprise shipping charges :( But I can almost hear it running Brian
 
We are ready to ROCK AND ROLL!!!! The belt was just a bit too long, so I bumped up the diameter of the belt tensioning pulley fom the originally called for 1" to 2" and that worked out fine. It misses my fuel line (barely) and seems to have adequate tension. All I have to do now (hopefully) is time the valves and ignition and get my "spark box" ready.
READYTOROCKANDROLL004.jpg

READYTOROCKANDROLL002.jpg
 
These are the instructions Jan Ridders provided for timing the engine. Jans first languabe is not English, but he does a pretty credible job in his drawings and instructions. I hope I can sort this one out---
ATKINSONTIMING.jpg
 
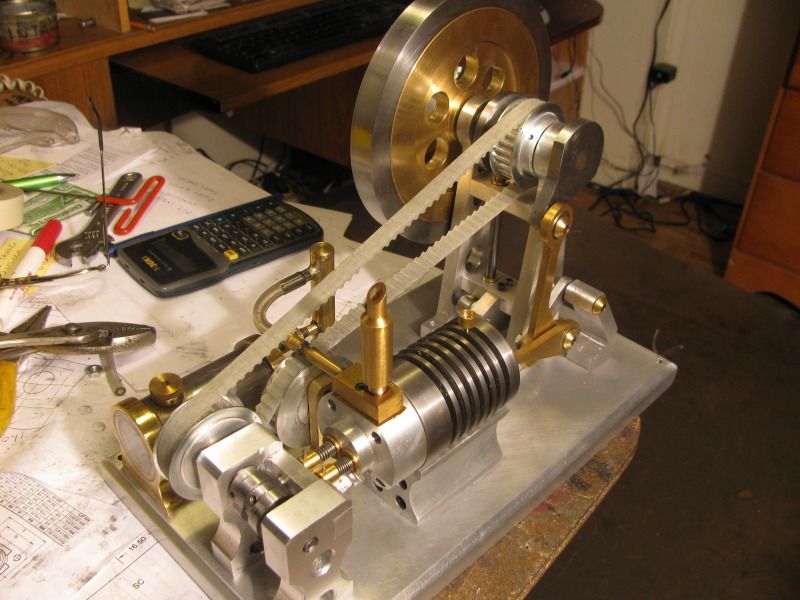
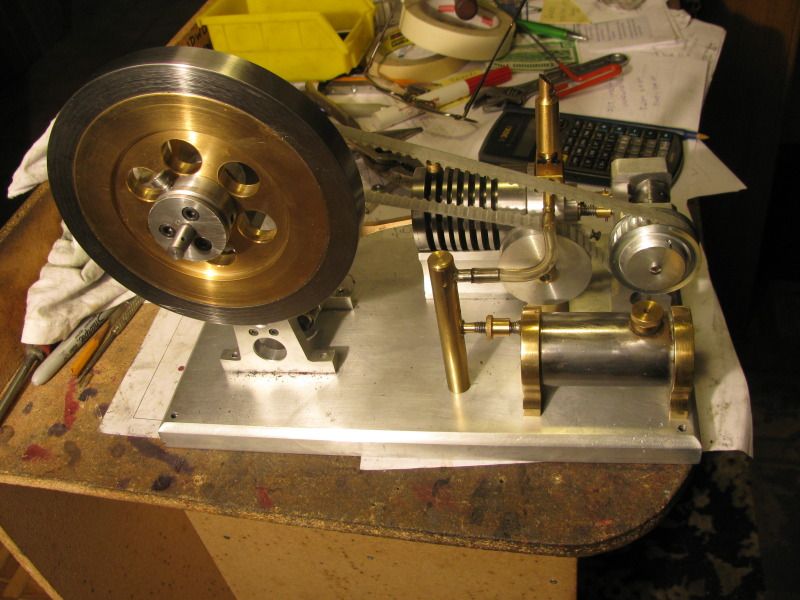
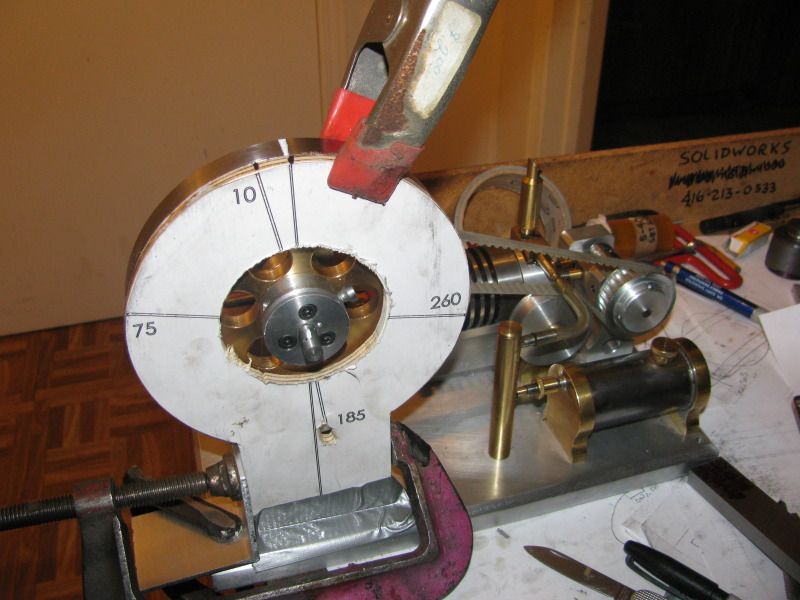
I must say, the timing was amazingly easy. That bit of white-out on top of the flywheel was set with the piston at top dead center. Since the flywheel is only held with 3 set-screws, I also used a centerpunch to "dimple" a spot on top of the crank arm. I advanced the flywheel counterclockwise untill the white mark was in line with the ten degree line, and turned the inlet cam until it was just putting pressure on the inlet valve, then locked down the set screws in the cam. I then advanced to the 75 degree line and checked to see if the intake valve was fully closed. (it was).Then I aligned the white mark with the 185 degree line (seen through the hole) and rotated the spark timing cam until it was up against the rubbing block on the ignition points, ready to open them and then locked it down with the set screws in it. I kept rotating untill the white mark was ligned up with the 260 degree line and set the exhaust cam to a point where it was starting to exert pressure on the stem of the exhaust valve and locked it down. Then I kept rotating untill the white line was once again lined up with the 10 degree line and checked to see if the exhaust valve was fully closed (it was). After that, I slowy rotated the flywheel through one complete revolution, and forgetting about the crazy action of the Atkinson engine I checked to see if the valves, ignition points, and piston were in the relative position and sequence I would expect them to be on a normal 4 cycle engine, and they were right on. ---Hope I've done this all correctly!!!
 
I hear a drum roll playing off in the distance :)
 
Nearly there Brian. Keeping my fingers crossed.

Vince
 
Just a very quick update before I shut down for the night. I cobbled up an electrical system, half filled the tank with Naptha, and used my electric drill as a starting device. At first I got a lot of popping and farting, so I knew it was getting fuel and spark. Then the firing died away, and nothing-----So, tomorrow I'll check and see if any of my timing settings slipped a bit, or whats happening.
 
Alright!

Getting close now Brian; keep us posted.

Dave
 
It isn't exactly that I don't trust the vapour carburetor.--Its just that as the song says, "I've been a fool for lesser things!!" I checked all my settings on the engine this morning, and nothing had moved or slipped. I have a brand new Traxxas 4033 carb that I bought when building the "Kerzel" hit and miss engine (Just in case I needed it.)-I was fortunate enough to build a good working carburetor for the Kerzel, and I didn't need the Traxxas. It only took 15 minutes this morning to make an adapter to mount the Traxxas on the Atkinson, so I thought that before I start tearing things apart looking for problems, maybe I will try it. The elastic bands are on there until the Loctite 638 drys to take any sag out of the system, and then we'll try this whole business again.
traxxas4033001.jpg
 
Well, it starts. It runs. But it don't run for long. 15 seconds on its own is the longest run I've had. (Quite thrilling) I tried switching to real gasoline instead of Naptha (per Gail from New Mexico's advice from 2 years ago.)--That made a small bit of difference and a lot more stink, but didn't improve things enough. I have advanced and retarded the timing, untill I think I have reached the optimum performance band (which was pretty well right on as per Jans instructions.) I don't seem to have as much compression now as I did when I first installed the valves. This is all sounding very familiar isn't it.---Sounds a great deal like an echo of when I built the Kerzel and tried to get it running. I have faffled about enough today, and based on my Kerzel experience I am going to go directly to the valves tomorrow. Not that I think anything is wrong with what I have done to date, but there are only two causes for bad compression, the valves and the piston seal. Hopefully its only a matter of more lapping, particularly now that the engine has been "run in" quite a bit today and things always change a bit after that is done.
 
This process sounds very familiar. It is nice to know that I am not the only one to have this sort of problem (challenge). I am watching with interest because I am sure there are simpler ways to find the solution than those I tried. And I think you might be the bloke to find them.

Jim
 
Brian I just wanted to say that I have been fascinated by the Atkinson engines. I just haven't had the time to build one. I really like this one, good luck with the final sorting out.

Art
 
Back
Top