Atlas 618 Lathe Restore

Home Model Engine Machinist Forum

Help Support Home Model Engine Machinist Forum:

This site may earn a commission from merchant affiliate links, including eBay, Amazon, and others.

jolijar

Active Member
Joined
Aug 27, 2010
Messages
33
Reaction score
1
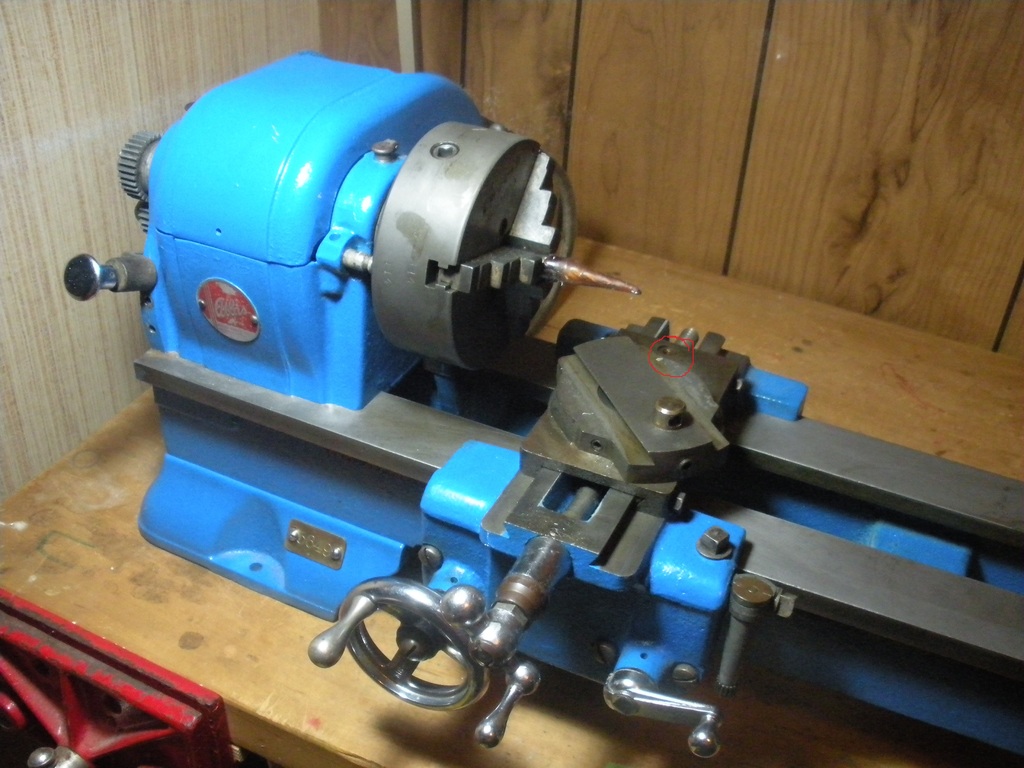
I have been trying to pick up a small lathe for a few years now and haven't found one I like... till now... I picked an atlas 618 at an auction today.

I think its pretty much all here. The only part missing is the motor and belt which I will need to get. It is covered in light surface rust so I am going to take it apart and rebuild it so that I will have a nice little lathe to work with this summer.

I have already taken the tail stock and carriage off the frame along with the lead screw. I was surprised at how simple the design is. It only took me a few minutes to break it down.

There are however a few things I am concerned about. I haven't started taking apart the headstock yet and quite frankly it kinda scares me. I don't want to accidentally muck things up is there anything I should look out for in particular?

Anyone know a good source for a motor, pulley, and belt?

Also I just noticed that one of the gears on the selector is missing one tooth... I will also need a replacement for it.

what is the best way to remove the rust?

I'll try to take pictures later (my camera is dead right now)

 
Pictures!

Note the lathe came completely assembled I disassembled it.

I cant seem to figure out how the headstock gears come out I must be missing something obvious.
Also anyone have any idea how old this is? I cant seem to find a date on it.


DSCN1798.JPG


DSCN1799.JPG


DSCN1801.JPG


DSCN1803.JPG
 
Google for te manual, they help a lot with disassembly!!

Nice little lathe to start on!

For rust I use a Besheild product called Rust Free.
Works like a charm!

Andrew
 
I recently acquired a Atlas 10/36 and am working on restoring it. I used a Scotch Brite and a lot of elbow grease and It cleaned up very well. I then repainted and reassembled. The cross feed brass nut was very worn so there was way too much play.. I have made a few chips and a MT3 dead center for the headstock. It takes time to work the bugs out but I think the Atlas will be a good machine until something better is available.

Lots of luck with your restore. eBay and Amazon are a good place to look for a manual.

Have a great day
Dennis
 
I found a copy of the manual for free online. :)
 
I cant seem to get the main spindle out its funny because none of the other parts have given me any trouble.

I know there's a woodruff key in the gear but I cant seem to get to it. I think the bearings are stuck to the shaft. as I can move all the other pieces on the inside. I have it soaking now.

DSCN1806.JPG
 
Ive been using that one as a reference... Also he has a nice tool holder I am going to make. The issue is that while the shaft rotates freely it does not slide out even a little so I cant get enough room to pull out the second key. I'm going to take it to my machining class tomorrow and see if we cant get it to break free.
 
I got the shaft out it required a bit of persuasion. The bearings look okay but I think I might replace them anyways if they are relitively inexpensive.
 
I was going to tell you how to disassemble the spindle, but you have now got it out.

But for the benefit of others who might have the same problem at some time or other, this is how it is done.

1. Push the spindle as far forwards as possible, until the woodruff key contacts the inner bearing shield.

2. Pull the bull gear and all the other bits that slide along the spindle backwards as far as they will go. This will allow to be seen just over half the length of the woodruff key.

3. Where the key touches the bearing shield, you can just get in under the end of the key something like a scriber or ice pick point. Flip up that front piece of the key so that it rotates in it's slot, allowing it to be pulled out with a pair of long nosed pliers. The spindle should then slide out past the nose rear bearing cover.

Putting it back together is great fun, taking hours sometimes to get the key back into it's slot, but there is an easy mod that I came up with when I had my Atlas 10F that you can do that makes things much easier.

Very gently remove the rear bearing cover from behind the nose bearing (it is a gentle tap out, and back in again), and file a small square slot into the edge of it where the key would normally fit against it. Don't file too deep, only just enough to allow the spindle to pass through with the key already fitted, otherwise oil will fly everywhere, as that cover helps to retain the oil around the bearing. Mount the cover with the filed slot at the top.

Once that little mod is done, it only usually takes a couple of minutes to disassemble and reassemble the spindle into the headstock.

I hope that explained it OK


John
 
thats pretty much how it came out... it took a bit of effort but once I got the shaft to start moving it came out easy... yea not looking forward to putting it back in...

The front bearing is stuck on the shaft still is it a press fit or should it come off easily? I am thinking of replacing them with new ones (assuming I find an appropriate replacement.)
 
Jolijar,

Do that tiny filing mod and it will save you a lot of grief.

The bearing on mine wasn't too tight at all, definitely it wasn't press fitted.

On the 10F, because of the shape of the bearing outer race, it was a special Timken one, made especially for the lathe and only available from Clausing, and cost an absolute fortune.

Because mine were brinelled (the inner rollers had formed tiny depressions in the outer races) as it had stood for years with the preload still on the bearings, I had a friend regrind the inner surface of the outer races and I just bought new 'normal' Timken taper races of the same size and fitted the new inners to the old reground outers, about 1/4 of the cost, and they worked perfectly for many years until I let the lathe go.

John
 
Hello Jolijar,

Attached is a link to some Atlas / Clausing Bulletins that show the basic maintenance procedures and give detailed instructions on how to remove the spindle and back gears, which is necessary to replace the spindle belt. This wasn't on the Clausing website the last time I checked, but fortunately someone has saved it. http://scottandersonpipes.com/atlas_press/tb_6bg.htm

Regards,
Mike

P.S. The front spindle bearing is a light press fit on the spindle. Be careful when reassembling the headstock to remember the inner dust shields before installing the spindle and make sure that the 'notch' is aligned with the oil hole at the top.
 
One thing you might look into doing while you have it apart. In the big gear on the spindle is a set screw that locks it to the shaft. On mine it comes loose periodically so I would go up one size on the threaded hole so you can use a larger Allen wrench on it. As it is now the wrench is so small that you can't tighten it very well.
gbritnell
 
What size belts do I need? I am almost ready to reassemble the headstock...
 
I kinda guessed on the size of the headstock belt I got a 34" v belt in there that I think will be about right when I mount up the tensioner I guesstimated with a piece of string. I also picked up a 1/3 hp motor for it and I have the carriage disassembled and ready for paint. Without any major hickups I am hoping to get this running in the next month or so.
 
Hello Jolijar,

I haven't had an Atlas 618 for awhile, but looking in my notebook, the headstock to countershaft belt (Atlas PN M6-127A) was a 3L-310 and the countershaft to motor belt (Atlas L9-125) was a 3L-210. The 34" length belt that you chose will be just fine, your countershaft will just be a little further back from the lathe. Same goes with the motor to countershaft belt, nothing is critical because you are in the process of setting up the lathe bench and motor mounting location. Good luck with your new lathe.

Regards,
Mike
 
So I have been working on this project off and on for awhile and I am just about finished with it.
tosc4e3f7
DSCN1924.jpg


tosc4e3f7
I am missing the screw and cover that holds the brass feed nut? (circled in red).

I still need to
attach the tailstock (paint is drying)
attach the cross slide (paint is drying)
source the gears for the crossfeed

and finally I still need to remove the pulleys from the countershaft. This last part has been giving me some trouble. Right now the inside pulley and stopper both rotate freely but I cant get it to slide back and forth. I am going to bring it with me to the shop at my college and see if I cant carefully press it out.
 
Good news... I got the counter shaft pulley apart.
Bad news. The bearings are shot and need to be replaced
Ugly news. I broke the casting and will have to braze or weld it.

To leave things on an up note I managed to procure a piece of steel that will make a perfect tool post holder.
 

Latest posts

Back
Top