American LaFrance Steam Fire Pumper

Home Model Engine Machinist Forum

Help Support Home Model Engine Machinist Forum:

This site may earn a commission from merchant affiliate links, including eBay, Amazon, and others.
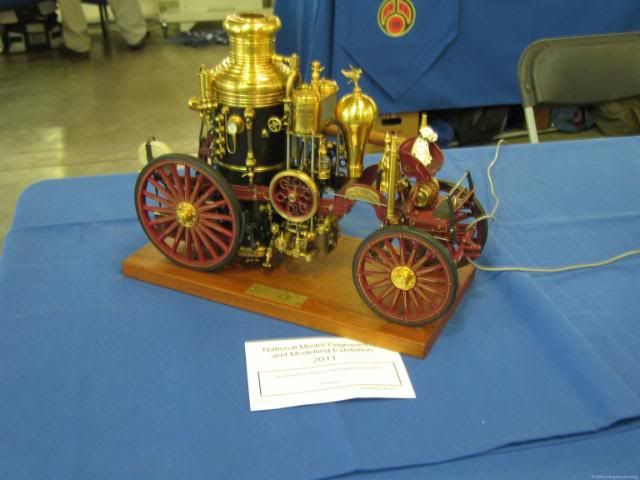
Good Evening, The plans for the La France call for a lot of items to be made from flat stock, especially the brake levers, brackets and supports. From my perspective this would be kind of boring to look at. The four attached pictures shows the basic technique that I have applied to achieve a 3-D effect and helps to represent a cast piece.

Picture #1 shows a flat piece of 0.030" thick brass sheet that has been shaped for one of the two front foot brake arms. There are 3 collars attached to the flat brass via 2-56 FHMS. The one at the left will be for the link to the next brake lever. The one in the center will be pinned via a taper pin to a shaft that links both arms together. The one to the right is the mounting hole for the foot bar. The curved piece is 0.062" diameter brass rod that is being shaped to fit in between the right and center collar.

Picture #2 shows the 0.062" diameter brass rods in place.

Picture #3 shows the assembly all soldered together and ready for clean up. I use a Eutectic 157 solder and liquid flux. This particular solder and flux is great for dis semiliar metals. In this case I was able to just unscrew the 2-56 screws from the soldered assembly. Sometimes a little solder will flow into the tapped hole area and I have to drill them out. I use flat head screws so there is less head contact with the main assembly therefore less clean up work to do.

Picture #4 shows the cleaned up arm in place on the front of the La France. The shaft in the center collar will be flush with the outside surface and pinned with a 00 taper pin at a later date. I like to use taper pins instead of set screws. It makes for a cleaner installation and they can be hidden under the paint if they are not to be removed.

Thank you for you interest and support


IMG_0004_1.jpg


IMG_0005_1.jpg


IMG_0007.jpg


IMG_0008.jpg
 
I have been able to squeeze in a little time on the LaFrance. I am concentrating on the brake rigging right now. The foot pedal and its levers are done. The first attached picture shows the first transfer lever and the prototype adjustable rod end. The lever was fabricated from brass flat and round stock as described in the previous post. The second picture is a closeup of the adjustable rod end. I think I was a little too aggressive with the file in rounding the edges. So I will hold back on my filing a little bit. So now I am setting up to make 12 of the little guys.

IMG_0085.jpg


IMG_0086.jpg
 
Since I have the 1/3 CASE and 1/4 Scale sawmill pretty well squared away for a show next week, I have been able to spend a little time on the LaFrance brake rigging.
Picture #1 shows the curb side foot lever and the first transfer lever with a link and rod ends in place. The levers will be fastened to their shafts via 00 taper pins.
Picture #2 shows the rest of the rod ends needed plus a few extra. I need to hand file the radius on the end. I will do that as I need them.
Picture #3 shows a rod end with the shoulder bolt to link it to the lever. The shoulder bolt is made from 1/8" hex brass bar stock. The length of the shoulder is 0.120" x 0.092" diameter. The threads are 2-56 by 0.070" long. I still need to make 12 more of those little guys.

Thank you once again for your interest and support.

IMG_0008.jpg


IMG_0009.jpg


IMG_0010.jpg
 
Work has been progressing on the LaFrance. I made a minor mistake in the placement of a hole for the brake lever shaft in the left side frame. So I dismantled what I had to correct my mistake. While it is apart I decided to finish the boiler as much as possible or at least to the hydro test stage. I have posted the boiler build in the "Boiler" section. It is entitled "Boiler Build For American LaFrance Engine". I started that post because of boiler specific questions I had. So, if interested take a look. Thank you for your interest and support.
 
With the successful hydro on the boiler of 200 psig plus a little, I can now move to other areas of the build. I had a chance to do some head scratching this weekend about the coal bunker. The attached pictures show the beginnings. I am trying to work up a steel panels with copper rivets assembly. The bunker will have the basic dimensions and look per the drawings, just a different assembly technique other than soldering everything together. Besides, rivets are "cool" looking.

The second picture shows how I bent the corner pieces. I clamped a 3/8" diameter drill blank with the piece of metal to be bent in my milling machine vise. I used a block of wood and a hammer to gentle bend the metal around the drill blank. The metal is CRS 0.030" thick sheet stock from McMaster-Carr.

I did find a source for some neat brass shapes. They had half round brass that is 3/16" x 1/8" tall that I will solder around the top perimeter of the bunker. Their web site is:

http://www.lewisbrass.com/index.htm


IMG_01.jpg


IMG_02.jpg


IMG_03.jpg
 
I got the clamps from MSC (Manhattan Supply Company). They are called "Kant Twist". You can google MSC and order from their online catalog.
 
Very nice work Larry. Your fixturing to shape the spokes is quite clever and the finished wheels look great.

Regards,
Mike
 
Larry,
This is such a nice project, unique and with lots of beautiful detail too. I also like the combination of the metalwork and woodworking. I know we sometimes joke about wood being "the brown stuff". but when it comes together as it has in your project its a work of art every bit as much as metal. Keep it coming :)

Bill
 
Gentlemen, thank you very much for your kind comments.

A little more work has been done on the coal bunker for the LaFrance. The outside pieces are butt joints with a strap on the inside. 0.062" diameter copper rivets have been used to hold the pieces together. Picture #1 gives you a flavor of what it looks like. I have not made the typical cut out in the back panel because I like the look of the wood deck that goes across the back portion of the bunker. Plus the full panel will give me more room for graphics. I plan to have painted on the panel LRD No.4 (Laurence Russell DuFour). There will be brackets for the wood step that is located at the bottom edge of the bunker. If you look inside the bunker you will see a small panel, this is the draft door. Picture #2 shows the draft door open. Picture #3 shows the bottom of the bunker. I had a neat piece of 1/2" wide stainless steel piano hinge that was incorporated for the draft door and the ash pan. The ash pan will be riveted to the two tabs and will allow the pan to drop completely down and out of the way for cleaning the bottom side of the boiler.

Looking at the boiler in Picture #2 you can just barely see two bushings on the other side of the draft door panel. These bushings are at the mud ring. I plan to plumb them so a valve can be on each bushing. The valves will be on the open side of the bunker. One valve will be for a blow down valve and the second will be used for connecting an air supply line for running the LaFrance at indoor shows.

IMG_0233.jpg


IMG_0234.jpg


IMG_0235.jpg
 
Absolutely gorgeous Buddy
Pete
 
Well, the first picture shows what the coal bunker turned into. The coal bunker was just not coming together as I had pictured in my mind and I was not happy with it. :'( I tried to adjust this and that and it went from bad to worse. :( So it is now in the scrap bin. It was a great exercise and now I know what not to do.

So, while I wait for the new sheet stock for the coal bunker to arrive I worked on the fire box door and latch. The other three pictures show the results of my efforts. I think they are keepers. :)


IMG_0237.jpg


IMG_0238.jpg


IMG_0239.jpg


IMG_0240.jpg
 
Hi Larry

Great work, its comming on real nice.

I hope you don't mind me posting this picture of a LaFrance that caught my eye at the Harrogate show.

IMG_3255.jpg


Stew
 
Stew, thanks for sharing, I do appreciate it. It is amazing how many of these LaFance engines are out there. Wouldn't be neat to have all of them gathered in one place for show and tell. then have a good old fashion competition like in the old days to see how fair and how high one could shoot a stream of water.

Stew, if you have anymore shots, I would be interested in seeing them. Send me a pm and we can share email addresses. Thanks again.
 
Greetings, well I have a new beginning on the coal bunker. The attached pictures sort of tell the story.

Picture #1 shows the new sheet metal clamped in a bending fixture. The fixture is a piece of 1/4" aluminum plate. There are 2 fixed 3/4" diameter posts and a fixed 3/8" x 1-1/2" aluminum bar between the posts. The surface of the aluminum bar is flush or tangent with the 3/4" diameter posts. The other aluminum bar is for clamping purposes.

Picture #2 shows the results of the bending process. I clamped the fixture plate in my bench vise and used a wooden block and hammer to gentle bend the steel sheet around the 3/4" diameter posts. It was very easy to do. The steel sheet is only 0.030" thick.

Picture #3 shows the newly bent sheet metal attached to the boiler. I am liking this coal bunker a lot better than my first attempt. It has the nice clean round edges I was looking for. It should make a great canvas, so to speak, for the artist to do something similar as shown in picture #4.

Picture #4 is a rear shot of the American LaFrance Fire Engine located in the American LaFrance fire engine museum in Charleston, SC.

IMG_0244.jpg


IMG_0245.jpg


IMG_0246.jpg


IMG_0247.jpg
 
Larry,
Very impressive build!
I want to order those clamps.
Please tell me what the catalog number is?
 
Giovanni, the MSC catalog page is 1163. They list from 1" to 12" capacity. The ones you have seen in my posts have been the 1" and 2" capacity. The 1" capacity is catalog #08087017 and the 2" capacity is catalog #08087033. It is very easy to set up an account to order on line. Once you do, you can expect a big blue book coming to you via UPS. Happy clamping :big:
 
Another plug for MSC from a happy customer. Order by 5pm, at your door by 10 am the next day.

NOT the cheapest, but it's always in stock.

Go to their website Giovanni, and look around....amazing stuff.

www.mscdirect.com
 
Thanks friends,
Just ordered 7 of each.
Should bring me some clamping luck.LOL!
 
Back
Top