Adding Vernier Caliper to indicate lathe saddle travel

Home Model Engine Machinist Forum

Help Support Home Model Engine Machinist Forum:

This site may earn a commission from merchant affiliate links, including eBay, Amazon, and others.

Brian Rupnow

Design Engineer
Project of the Month Winner
Joined
May 23, 2008
Messages
14,967
Reaction score
8,242
Location
Barrie, Ontario, Canada
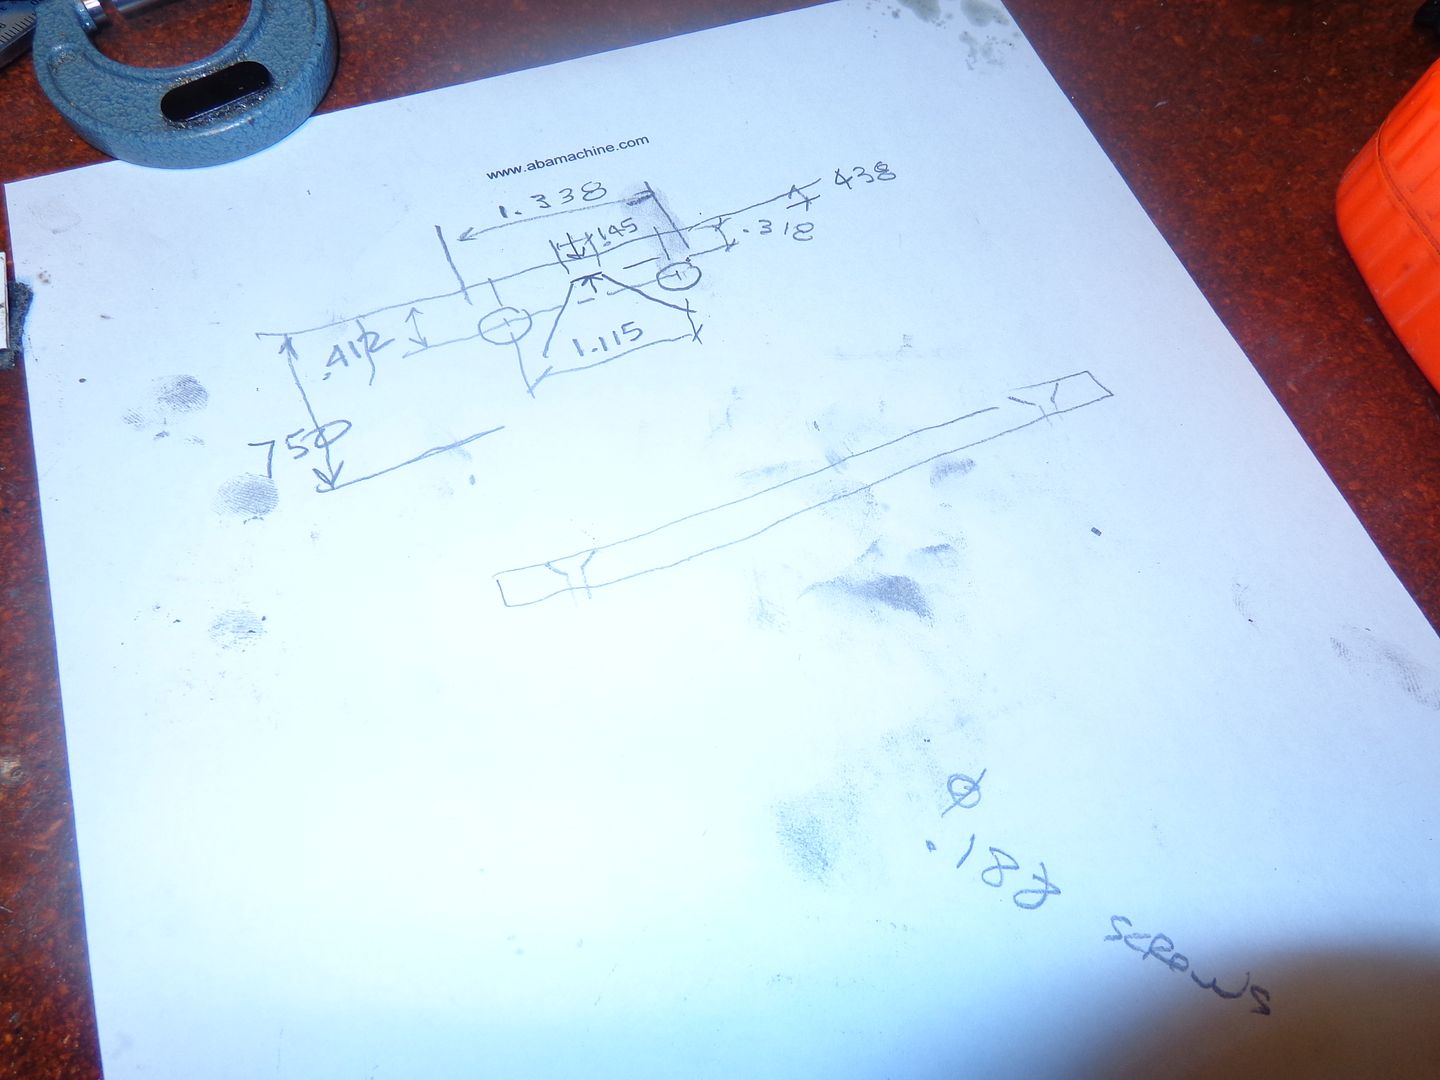
I have never been able to depend on the accuracy of the travel indicator dial on my lathe saddle. It always gets me close, but only close. If I build my "oscillating engine", I have to bore the cylinder to a very precise depth. The travel on my tailstock spindle is only 1 3/8" which is not enough. The cylinder will have to be bored with a boring tool held in the toolpost on my compound rest. For many years now I have thought about adding a Vernier caliper to my lathe to act as a poor man's DRO.----But----I didn't want to disassemble the cross slide to start drilling and tapping attachment points to it. This morning I studied on it for a while, and decided the tapped holes which hold the way-wipers would work for what I want to do, and still be able to hold the way wiper. So----First a hand sketch and some head scratching.
 
Last edited:
And then into a "to scale" printed off profile, glued to a cardboard backing and tried on for size to see if it is what I want--
 
Last edited:
So far, so good. That seems to hold the Vernier in a very stable manner. Now to figure out a mount for the other end.
 
I will have to soon make the radiator for my Howell V4, there are literally hundreds of fins on the 1/2" square brass core to cut. I was wondering what method I should use for spacing them out. The hand wheel on the saddle isn't good enough, so Brian's method is one idea, but I may still consider buying a dial gauge with a long travel. I recall, years ago, seeing a turner that had a dial gauge type of thing that had a wheel that ran along the ways on the lathe, just had to be aware of the revolutions that it did.

Paul.
 
  • Like
Reactions: gus
One way is to use a setting gauge utilising a scrap mike. I have( somewhere) the remains of Martin Cleeve depth gauge fitted to his ML7.

Part of it is barely visible in one of the photos in his Screwcutting in the Lathe. However, a full write up is in ME- somewhere in the 50's. I have it- somewhere.

I saved it on an external drive.

Norman

Actually it is October 1956 but in my search, there is a more sophisticated one by a D.H.Downie- possibility a Canadian but my memory is ancient
 
Finished!! It works very well, I can reset it to zero at any point in it's 6" travel, I didn't have to drill any new holes in the lathe, and all it cost was $3 for a battery to revive the old Electronic Vernier caliper. I quit using electronic calipers a year ago and went back to a dial type mechanical Vernier because I like it better. It took me four years to realize that Verniers are good for marking out and rough measuring, but micrometers are for measuring anything that really matters. I modified my rear carriage stop to hold the other part of the Vernier. It takes me about 15 seconds to remove the caliper from the brackets or to re-install it. The Vernier will only be mounted for specific tasks, otherwise it will get all gunked up and not work.
 
Even if you had gauge blocks... figure the stack for a 0.885" travel, clean them up, assemble, pinch the stack while positioned at the start point, remove the stack; do the cut until the carriage stop against the stop. No notion of how close you are to the end other than eyeball the gap to the stop.

I had four electronic calipers stop working in a 3 years period, the dial calipers never failed me when used for the intended accuracy.
 
Hi Brian,

Good Idea. Gus copycatting this idea. Been racking my brains to DIY Poor Man's DRO for the mini lathe. I did one for the vertical mill to cut cams last year. Cost peanuts to buy a MIC Digital Caliper v/s $''arm n leg'' for a good DRO. Recalled the Heidenhahn DRO cost me US$2000 back in 1992.

DRO for the lathe will have spring loaded return. Here's my DIY DRO for the vertical mill.

IMG_1287.jpg
 
Like it very much Brian.Nice and simple.May try it on my C4.The saddle/rack is a calibrated dial but each mark is 0.5mm.Is it easy to set accurately
using the coarse feed.If its simple to unclip you still have the caliper
for normal use.Can still be used with the carriage stop if you make another
 
I made some carriage stops a while back, and I use them reasonably often, but I don't consider them overly accurate. An un-noticed piece of swarf between the stop and the carriage is all it takes to be out at least a few thou.

I like this idea and I'll be stealing it as well! Thanks Brian.
 
Hi Brian
I knocked tougher something similar a couple of years ago to fit my ML7 when Princess Auto hade some 12” calipers on cheap (around $10.00). It just clamps to the saddle and the ways with brass shims. Like you said it’s on and off in a minute when you need it and out of the way when you don’t. One of the hidden benefits I have found with it is the odd time when I have to work in metric. You may be surprised just how often you use it.

IMG_0435.jpg
 
Bob, Brilliant, I have an equally grubby Myford but an old Mk1 Super7B. But what I like is that I also have a fabricated Stent tool and cutter grinder that has dials galore but none on the x-y travel.

Thank you- twice

Norman
 
http://start-model-engineering.co.uk/machines-and-tooling/minilathe/micro-dro/

I made one of these a few weeks ago and it is fast, accurate and cheap. I also made a mount for a linear scale a couple of years ago and it works well but takes quite a while to mount on the lathe. The tire gauge is less than $10 and is easily moved and used at other locations. I have even used it on the drill press.
 
Brian, Craftex B2227L? If so, you can turn off the lead screw with the handle to the left of the apron, engage the leadscrew with the apron leadscrew engagement, and move the carriage with the crank at the right hand side of the tail end for much finer feed and dial graduations.

I imagine you won't ever use it now that you've got a DRO though.

Let me know if that's the machine and if you'd like some details on my tailstock cam lock or reversing the leadscrew for cutting left hand threads.
 

Latest posts

Back
Top