


44-henry
Well-Known Member
- Joined
- Dec 5, 2008
- Messages
- 62
- Reaction score
- 22
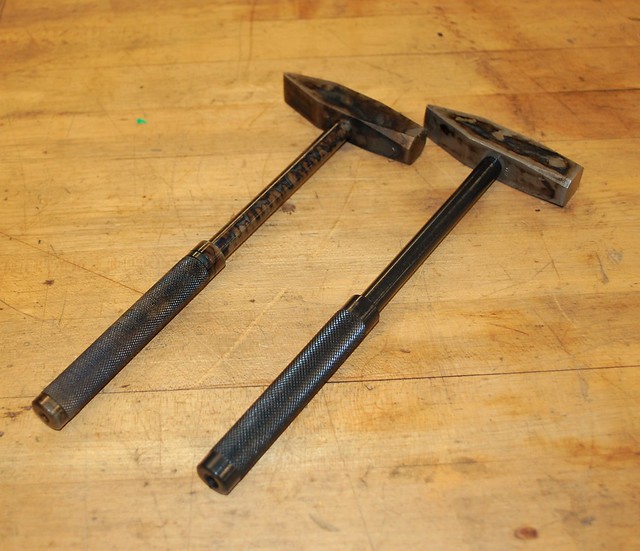
I thought I would share a couple photos of the projects that my students did this semester. Take the common machinist hammer project that most of us have done at one time or another and add a bit of bone and charcoal color casehardening and charcoal bluing and it turns out quite nice I think. The ovens here have been running almost non-stop for the last couple weeks between the casehardening and bluing, but I think the students turned out some really nice pieces.

For those of you not familiar with the process of bone and charcoal color case hardening you can find info on the thread I started while at the University of North Dakota. The thread from this forum is available at:
http://www.homemodelenginemachinist.com/showthread.php?t=4520
The charcoal bluing is a process is interesting and not all that difficult to do if you have a heat treatment furnace that is suitable for color case hardening. At some point I will post additional photos that detail the process step by step, but for now I will describe what steps were taken.
The parts that were blued were common 1018 mild steel. The areas that were not knurled were polished in the lathe to about 320 grit and than burnished with a brown 3M Scotch Brite pad. Following this the parts were soaked in a bath of acetone to remove all traces of oil and than wiped dry with a clean cotton cloth. Care was taken not to touch the parts with bare hands following this.
I had a heavy gauge steel box that was large enough to fit the number of hammer handles I was doing at one time, a lid was fashioned that fit the box securely. The box was thoroughly cleaned using acetone and than filled about 1/3 with wood charcoal of the type sold by Brownells. The previously cleaned parts were than placed in a single layer keeping at least 1 inch of space separating them from other parts and the sides of the box. The box is tapped lightly to settle the charcoal around the pieces. Following this another layer of charcoal, about 1-2 inches deep is added to the box and additional layers of handles were added. The box was finely topped off with another layer of charcoal and this layer was tamped down and the lid was secured. I have found it is important to make sure there are no gaps between the last layer of charcoal and the lid of the box.
Following this the box was placed in the furnace and fire bricks were added to the lid to keep it weighted down and to help prevent warpage that might result in excess oxygen reaching the pack. The temperature of the furnace was set at 900 degree Fahrenheit and allowed to soak, in this instance, for eight hours. Following the soak the parts were allowed to cool down slowly in the oven and were not opened until they had reached room temperature. The resulting iron oxide layer proved to be durable and even in color. With a coat of oil on the surface it might best be described as appearing like wet India ink. Many others who practice this process mention that the parts should be soaked in oil and left untouched for at least a day. I have no opinion on the importance of this, but I have always followed these instructions and the finishes I have produced have looked good and had good wearing characteristics, more experimentation would be necessary to prove whether this is important or not however.
Variations:
In the past I have played around with the process and have found that shorter cycles can be effective, but I have also had to re-adjust the pieces in the pack, and repeat the process to get good results. I have noticed hear that one longer soak period seems to provide good, consistent results. It is also possible to play around with the temperature and the lower temperatures can give different shades of blue. In this instance, the students liked the contrast of the black against the color case hardened heads so that is what we went with.
Though both of these finishes have traditionally been used in the firearms sector, particularly during the 19th and early 20th centuries, they do produce very attractive finishes that are equally at home with fine tools and model engine parts. If you have an interest in this type of work I would encourage you to experiment with the process.