18 TPI threads go fast!

Home Model Engine Machinist Forum

Help Support Home Model Engine Machinist Forum:

This site may earn a commission from merchant affiliate links, including eBay, Amazon, and others.

BobWarfield

Well-Known Member
Joined
Dec 27, 2007
Messages
1,151
Reaction score
1
I'm doing a CNC conversion on an IH Mill and needed to thread the Z-axis leadscrew bracket to take the ballnut's 18 TPI threads. Pretty straightforward, but I hadn't cut a thread quite this large or coarse before, and in fact, it had been probably 18 months since I did a single point threading operation.

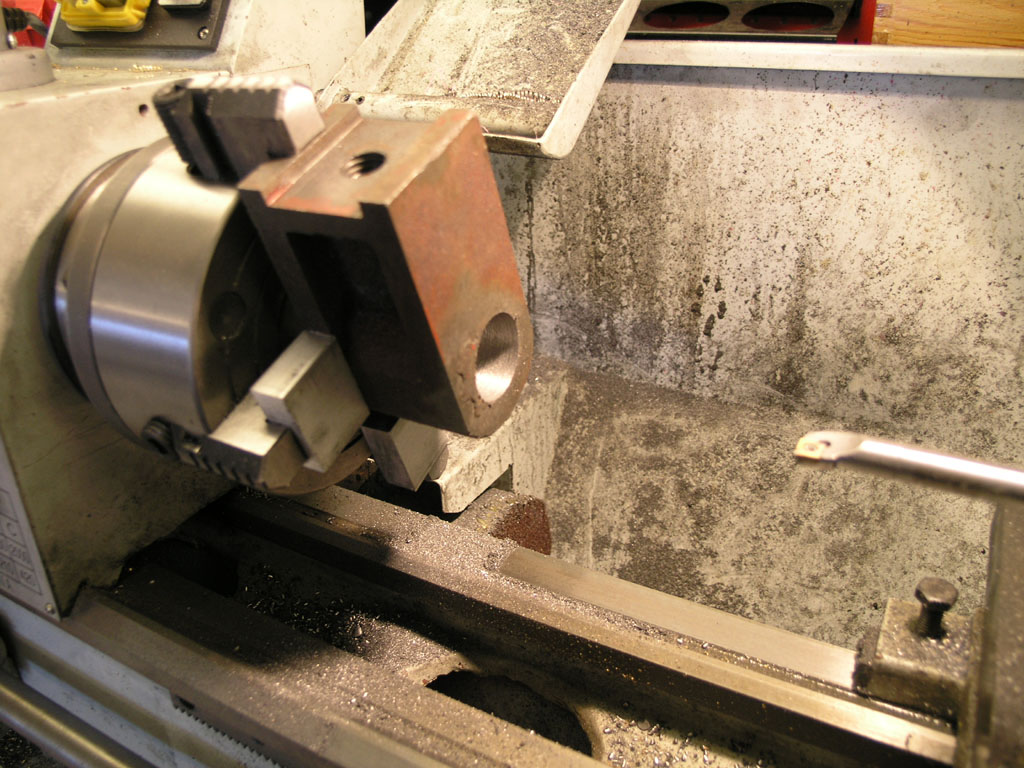
Lining up and workholding this odd-shaped piece was a minor nuisance. Not much to indicate on--rough casting and rough ACME threads. I settled for this method as close enough:

P1010801.JPG


It worked fine. I then used my CCMT boring bar (Micro 100) to bore out to the minor diameter for this inside thread:

P1010803.JPG


Next up is threading, but my lathe has change gears, so that was step 1 before threading. BTW, bicycle cone wrenches are the key to those silly locknuts! A cone wrench is very thin. A set can be had cheaply off eBay and let you get the lock nuts tight and in the right place.

Next I dug out my Carmex indexable threading tool. it's a nice gadget, though not real cheap. They go on sale at Enco periodically, and that's where I got mine. Here's how things looked:

P1010805.JPG


Sorry the threading tool is out of focus, but you get the idea. It worked really nicely in the cast iron despite how fast things traverse for an 18 TPI!

I cut in several passes, with each passes using less depth of cut since the cut is wider. If you keep the same depth every pass you take more material each pass. I used 0.010, 0.006, 0.004, and 0.004 to get the total 0.024" depth for these threads. I did not cut a should inside, just popped the feed handle at approx the same location each time and it worked out fine. The threaded portion is much deeper than the actual threads. I also didn't chamfer the end, but probably should have.

In any event, all's well that ends well:

P1010804.JPG


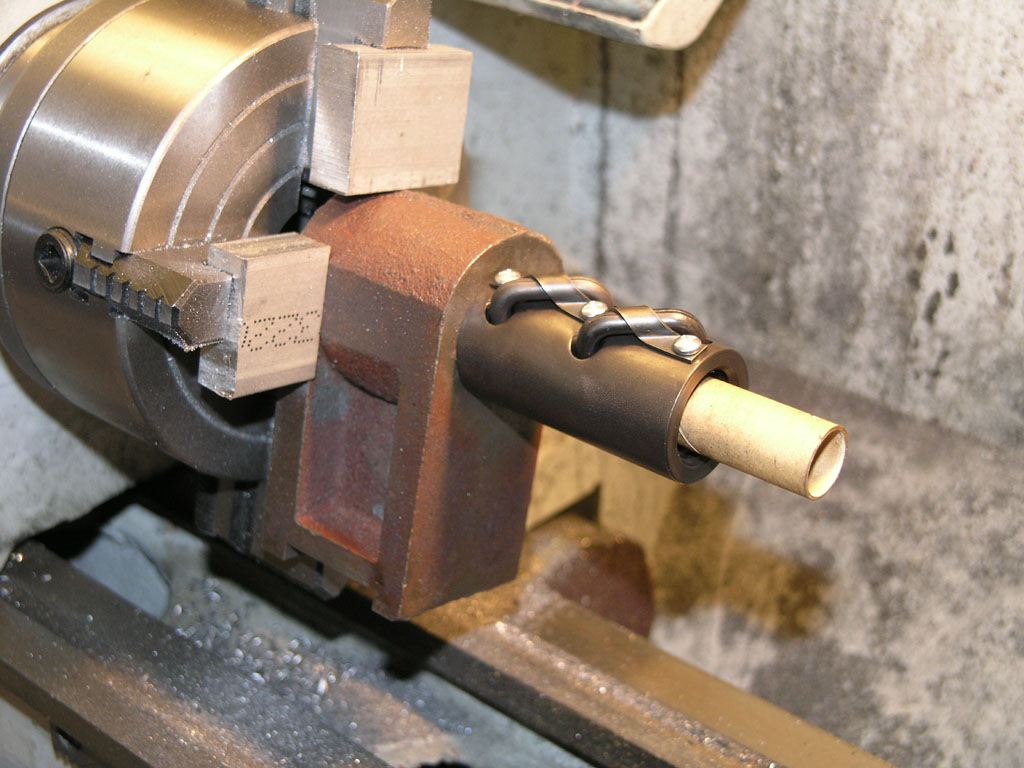
The ballnut fits like a glove. Note the cardboard tube. If you pull that out the little balls all jump out and run and hide among the chips. Very bad news!

Cheers,

BW
 
Bob,

Nice pics. You solved a problem I had once doing a job in the four jaw with those aluminum spacers. Wonder why I never thought of that. :-[ :p

You sure were a dare devil without a shoulder inside. My luck I would have broke the cutter. ::)

Bernd
 
Heh, it's those shallow cuts I was taking and the soft cast iron that saved my cutter, no doubt.

Best,

BW
 
Ok, I've stared at the pics for a few minutes now and I'll ask the question that I hope isn't only in my head...

Why the blocks between the chuck jaws and the part? It looks like the jaws would close down on it. If not the way they are, surely if they were reversed.

I'm pretty sure you would have had a good reason, I'm just missing it. :)

-Sparky
 
Sparky,

I think that the 3 jaws with the blocks would actually touch or not close down enough to clamp the part. I've run into this several times. Bob's got a good set up there. Also the mass is more centered for turning when running a higher RPM. That's my educated guess. ::) :D

Bernd
 
There's a bucket of those blocks sitting handy for just such an occassion. And yes, the jaws touch way before they grip this part. Grab a few blocks and you're off and running.

I didn't choose to run this at very high rpm as it was already pretty far off center.

Cheers,

BW
 
Question for my own education:

The "top" jaw obviously had to be set that way; if you had reversed the other 3 it seems you could have done without the blocks. Would that have worked?
 
Sure. But it would've taken a lot longer to unwind all three jaws and reverse them. Especially if you consider you're going to want to reverse them back as this is the configuration I most often use.

I also considered dragging out the faceplate, but in the end, this was so easy to do it's the path I took.

I keep a little bucket of these kinds of scraps. They're largely for shimming, and clamping, and protecting material from various jaws. These aluminum blocks are about the biggest thing in there. They're MIC-6 plate which is ground on two sides. Note that I've also got a handful of pennies in the bucket. I saw that trick somewhere. They're handy to put between workpiece and jaw because they're soft and will protect the work. Some sheet metal and shim stock in there too.

Best,

BW
 
Thanks for asking that, Kvom. That's part of what I was wondering before too, but I figured I'd bugged Bob enough on this one already. ;)

-Sparky
 
Why all the 'bugging', if it is safe, let Bob do as he pleases, without all the third degree.

Bogs
 
i was going to keep quiet but since you guys are all noticing and questing this set up, I won't. you're right to question it. In general, its not a good idea to use packing like this - a bit like trying to stand a 2x8 on its edge. thin packing is fine, that'd be like a 2x8 used flat.... but on edge like that it creates too much distance between the fixed item (jaw) and the work. It has the potential as a safety issue as well - as opposed to a directly on the jaws - things get knocked loose a bit and bang there's a crash. A much more solid set up would have been to take a minute and reverse the jaws. I'm glad it worked for Bob and that's fine, but before you take away that this is correct practice, know there are dissenters ;D
 
That is very clever setup.. The iron workpiece can bite into the aluminum helping to hold it all together .Wouldnt be my everyday tactic but I'll keep it in mind for special circumstances....A clumbsy newbie might be able to bump the workpiece loose, a hardened machinist shouldnt have any trouble .
 
Not quite finished with this one.

Bob has been challenged, with the wolves all around him, and nowhere to go.

Actually, if you want to go into detail, you are all wrong.

The most stable would be as Bob has it with blocks on the long sides, and only reverse the one on the radiused end. That would be giving the most surface area support to the job.

Actually, it looks like Bob almost got there with his first shot, but changed the setup for the other shots. Fettling the casting ridge would also have made for a more rigid setup. Or leave it with the ridge and use as is, but with a shorter ali block pressing onto the casting ridge, so giving a nice soft metal dig-in grip.

There are lots of ways to secure a job like this, but Bob was very close to ideal with his setup, OK the ali blocks could have been a bit more square than oblong, but taking into consideration the small loading he was putting on the job, the setup was perfectly safe.

Bogs
 
hey bob i have a question for you..............why would one use ballnut's????
i'm not questioning your design i just don't know what they are ???
as far as you set up goes...........it worked .........no one got hurt............whats all the chatter about?

i for one have had to set up some weird pieces and the set ups were real scary looking ( your set up is not scary) they all worked and that's the main thing.

one set up that comes to mind was a very large casting (about 2500 pounds) it was a strange shape and i could only get three of the four jaws on it (like your part) it wouldn't go on a face plate. i just went slow and carefull..............it worked.

chuck
 
Hello,
What does fettling mean? ??? ???
My vocabulary needs improving. ;D
Thanks,
Fred
PS even the spell checker did not like it. :big:
 
pelallito said:
What does fettling mean? ??? ???

"To get ready or put in order; prepare something or oneself."

or basically, tinker about with it till it's right ;)

CC
 
John, wolves? no where to go? as my kids would say, chill dude. Besides he hasn't been challenged, it worked for him great, i pointed out for other newbies that its not most secure setup, that packing is better low and wide rather than tall.... but whether i;m right or wrong or you agree or not, its just a discussion....anyway onward and upward :D

fettling, specific to castings, means very rough filling or grinding to knock off some the rough spots like on seam
 
Sorry about that Fred, it seems to be a dying word, even in the UK. But still used a lot in the area I live in. Just me not thinking again, using non international English.

Mcgyver has got it explained.

Where I live it usually relates to the metal casting or pottery industry, and it means taking all the rough edges off, as in the join seam on a casting, it is rough filed or ground off, leaving behind a fairly smooth but not a machined quality surface.

The best definition I have found is here

http://www.worldwidewords.org/qa/qa-fet1.htm

Hope that has explained it OK.

John

 
Back
Top