18 Cylinders Isotta Fraschini (straight six-cylinder x3 )

Home Model Engine Machinist Forum

Help Support Home Model Engine Machinist Forum:

This site may earn a commission from merchant affiliate links, including eBay, Amazon, and others.
Beautiful crankshaft and toolpost grinder. Well done.

What was the spindle speed of your home made toolpost grinder?
What was the diameter, width and grit size of the stone?

Mike
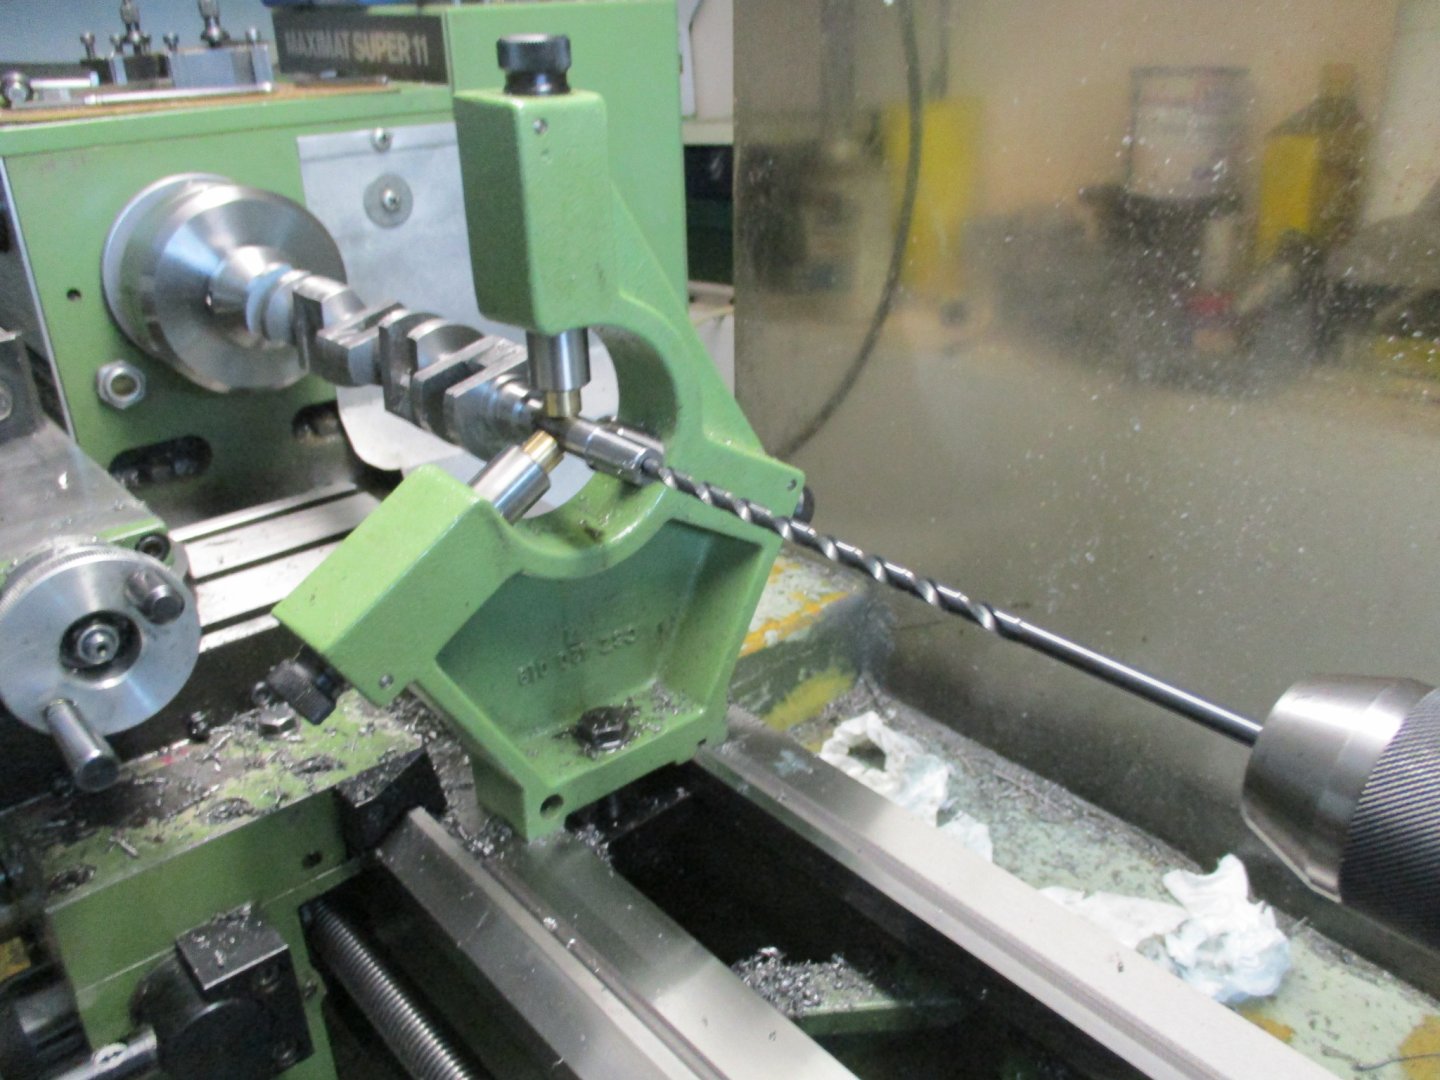
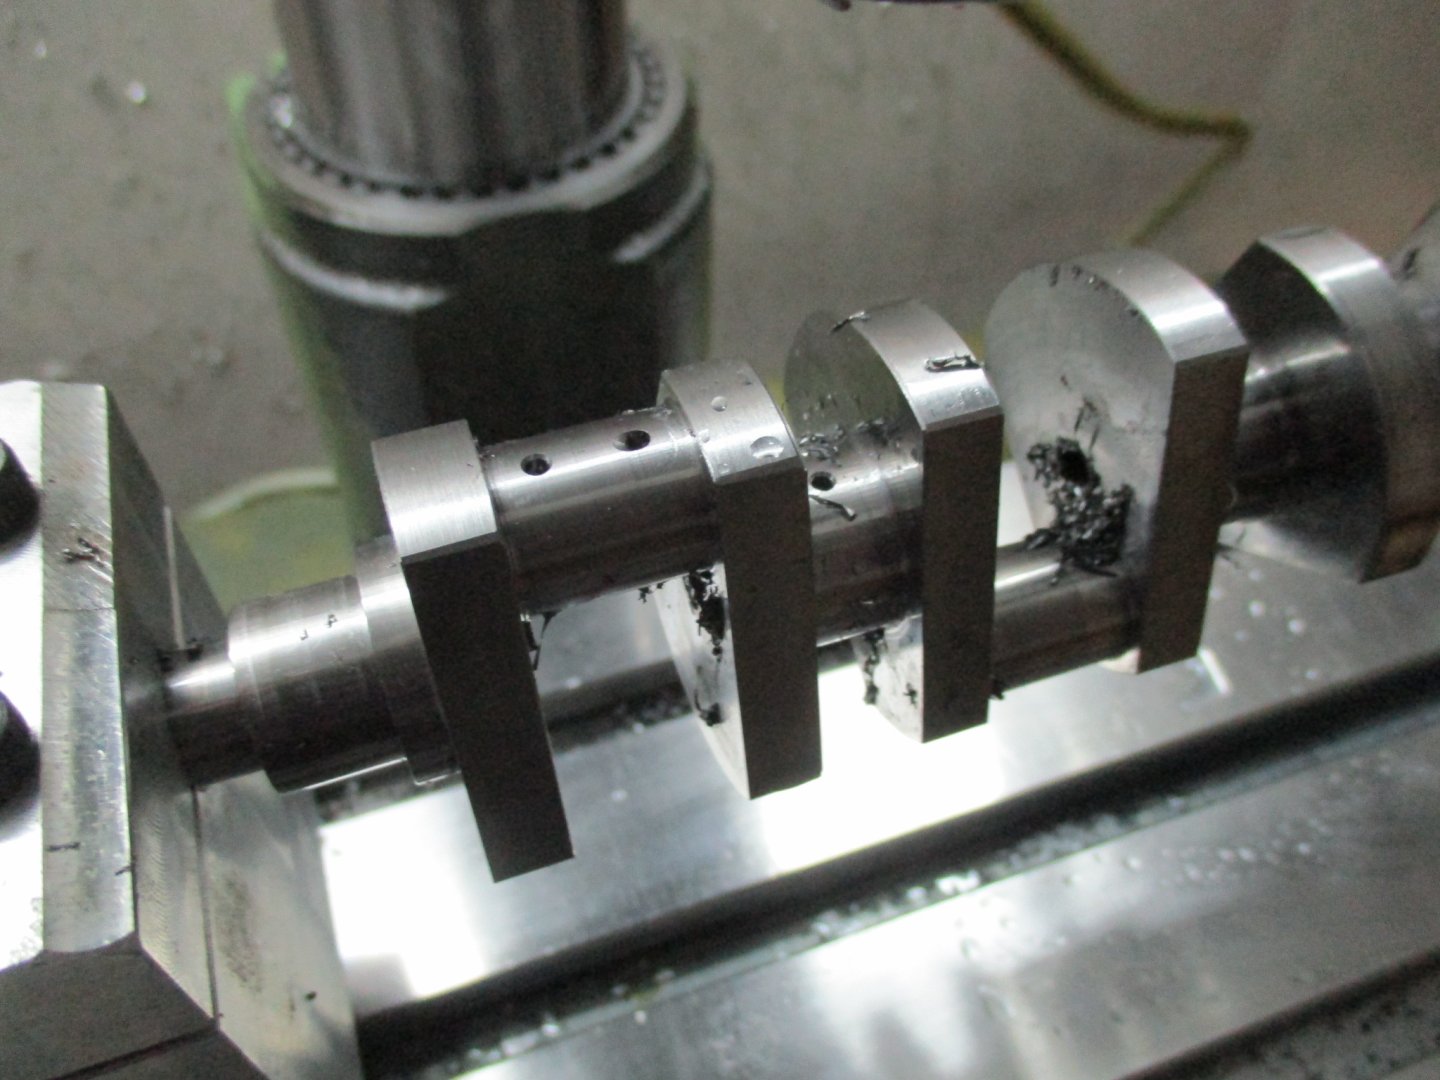
with pulley ratio in reduction 1: 2 the grinding wheel turns up to 6600 rpm , the engine over 13,000 rpm but i can adjust the revs with the potentiometer
I have several stones, from diameter 90 (pink color) mm to 110 mm , grit 120-220
 
Nice and very refined work, while you are doing the grinding you don't use coolant?
 
The connecting rods are made up of a central and 2 lateral connecting rods
The lateral connecting rods are fixed by means of a hardened pin derived from a commercial pin, shortened by grinding
I used a cup wheel mounted on a high-speed electrospindle, the same one I use to mill aluminum.
bielle assierme.jpg
Biella madre new.jpg


the connecting rods have been sandblasted

IMG_3256.JPG
IMG_3257.JPG


the hardened pin is press fit and held in place by a grub screw
 
some phases of construction

first phase of the lateral connecting rods
IMG_2931.JPG


IMG_2930.JPG


second phase

IMG_2932.JPG


drilling and threading of the 4 screws of the main connecting rod

IMG_2913.JPG


the small keyboard that controls the milling machine
IMG_2919.JPG


second phase of the main connecting rod fixed on a reference fixture

IMG_2922.JPG


the empty skeleton of the lateral connecting rods
IMG_2939.JPG
 
Wow,

I am amazed with how quickly and efficiently you work. It seems one week you are contemplating tackling a new engine and tossing CAD ideas around, then the next week you are cranking out parts. And so many at the same time. A mere mortal would be making each part one at a time, but not you. Well done.
 

Foketry !​


I have a question
Do you use washer in this position ?
Thanks !
View attachment 138039
I do not use bronze shims for 3 reasons: the thickness of the connecting rod decreases and is already quite critical, the rotation movement is small, in this position there is always oil.....
 
Wow,

I am amazed with how quickly and efficiently you work. It seems one week you are contemplating tackling a new engine and tossing CAD ideas around, then the next week you are cranking out parts. And so many at the same time. A mere mortal would be making each part one at a time, but not you. Well done.
I hope I don't have to redo parts, I did some checks on the project, the most important, but there could be some error that forces me to redo parts, they are all prototypes, only the final test will tell me if I have designed everything well.
Only when I cast the aluminum engine block and put the parts together will I discover the mistakes...
 
crankshaft V 10 -72° project DOHC
the crankshafts for my multi-cylinder engines (two 12 cilindersOHC )are of 42CrMo4 steel ( 4140 ) the material has been at home for over 10 years and most internal stresses have disappeared
The photos are the guideline for the construction, pre-turn , than milling as much as possible this is to avoid stress in the workpiece, use sharp hss milling cutters
then cylindrical grinding with oversize, this goes remarkably faster than turning and the next step is grinding to size, the clamping is always done with a fixture so that there is no pressure on the workpiece (this is the case when you clamp between centers).dril the center hole and oilholes for the bearings and the connecting rods , eventually polisch and finaly Nitrated
TIR no more than 0.02 mm no loads applyd
 

Attachments

  • IMG_1318.JPG
    IMG_1318.JPG
    191.9 KB · Views: 2
  • IMG_1319.JPG
    IMG_1319.JPG
    181.3 KB · Views: 2
  • IMG_1320.JPG
    IMG_1320.JPG
    188.3 KB · Views: 2
  • IMG_1321.JPG
    IMG_1321.JPG
    194 KB · Views: 2
  • IMG_1323.JPG
    IMG_1323.JPG
    189 KB · Views: 3
  • IMG_1322.JPG
    IMG_1322.JPG
    200.1 KB · Views: 2
  • IMG_1324.JPG
    IMG_1324.JPG
    211.9 KB · Views: 4
  • IMG_1328.JPG
    IMG_1328.JPG
    197.7 KB · Views: 2
  • IMG_1333.JPG
    IMG_1333.JPG
    185.5 KB · Views: 4
  • IMG_1333.JPG
    IMG_1333.JPG
    185.5 KB · Views: 2
next foto's
very nice work sir!!!

Some questions - - - -
1. how are you getting the nitriding done?
2. your bearing shells - - well - - - do you have a thread on here?
would love to understand your steps?
3. you drilled a lube hole through the center of the crankshaft
how are you getting the oil into the journals on the crank ends?
how are you getting the oil to do the circuitous course through the various webs/members/etc?

(hopefully not viewed as questions for frustration - - - just trying to understand the practical outworkings)
 
1 -gasNitriding is done by a professionel firm
2 - bronze ( RG7 )bearing shells have a light press fitting and a silver steel pin of diameter 4mm prevents rotating (the hole is for the oil )
3- center hole 6mm in the cranckschaft for the oil > closed on the webs , feeding from an oil gallery in the lower crankcase
oil from the center hole trou the connecting rod journals by a 1.6mm hole , connecting rods are from 7075 riding direct on the Nitrided cranckshaft (this works just fine on my 2 12 cilinder engines )

pressurised filtered oil via oil gallery in the lower crankcase tho the bronze cranckshaft bearings then to the connecting rods lower end , just like the real ones
 

Attachments

  • IMG_1340.JPG
    IMG_1340.JPG
    205.2 KB · Views: 4
  • IMG_1548.JPG
    IMG_1548.JPG
    235.8 KB · Views: 4
  • IMG_1019.JPG
    IMG_1019.JPG
    248.8 KB · Views: 4
  • juni2007 -2 009.jpg
    juni2007 -2 009.jpg
    139.9 KB · Views: 8
The phases of construction of the bushings for main rod (Bronze type: CuSn12)

IMG-3029.jpg


I cut a bar into 2 equal parts and soldered them with tin
IMG-3026.jpg


IMG-3027.jpg


the internal and external turning phase, taking care not to separate the 2 welded pieces

IMG-3028.jpg


To separate the 2 bushing halves it is necessary to heat with a gas flame
 
Last edited:

Latest posts

Back
Top