1/8 Rider Ericsson - Home build

Home Model Engine Machinist Forum

Help Support Home Model Engine Machinist Forum:

This site may earn a commission from merchant affiliate links, including eBay, Amazon, and others.
Joined
Feb 18, 2013
Messages
400
Reaction score
231
To be honest I am surprised I am starting yet another engine after completing the Twin Horizontal steam engine just recently so I must have my mojo back again :)
I have decided to attempt a 1/8 scale Rider Ericsson pumping engine but I will be doing the cast parts myself because a) These are not readily available in the UK and b) I always like a challenge!
It's been a bumpy start really since I downloaded a 1/4 scale model off GrabCad and during the re-scaling to 1/8th on SolidWorks I have discovered numerous errors in that model which has slowed me way down on creating the correct solid model to work from. This always happens!
I do have the build manual for the 1/4 scale (Steam and Stirling engines you can build) but I was relying on the GrabCad model being accurate for the casting details as these are not fully dimensioned in the text. So be warned that all on that site is not always accurate.
I will persevere however and re-work as required.
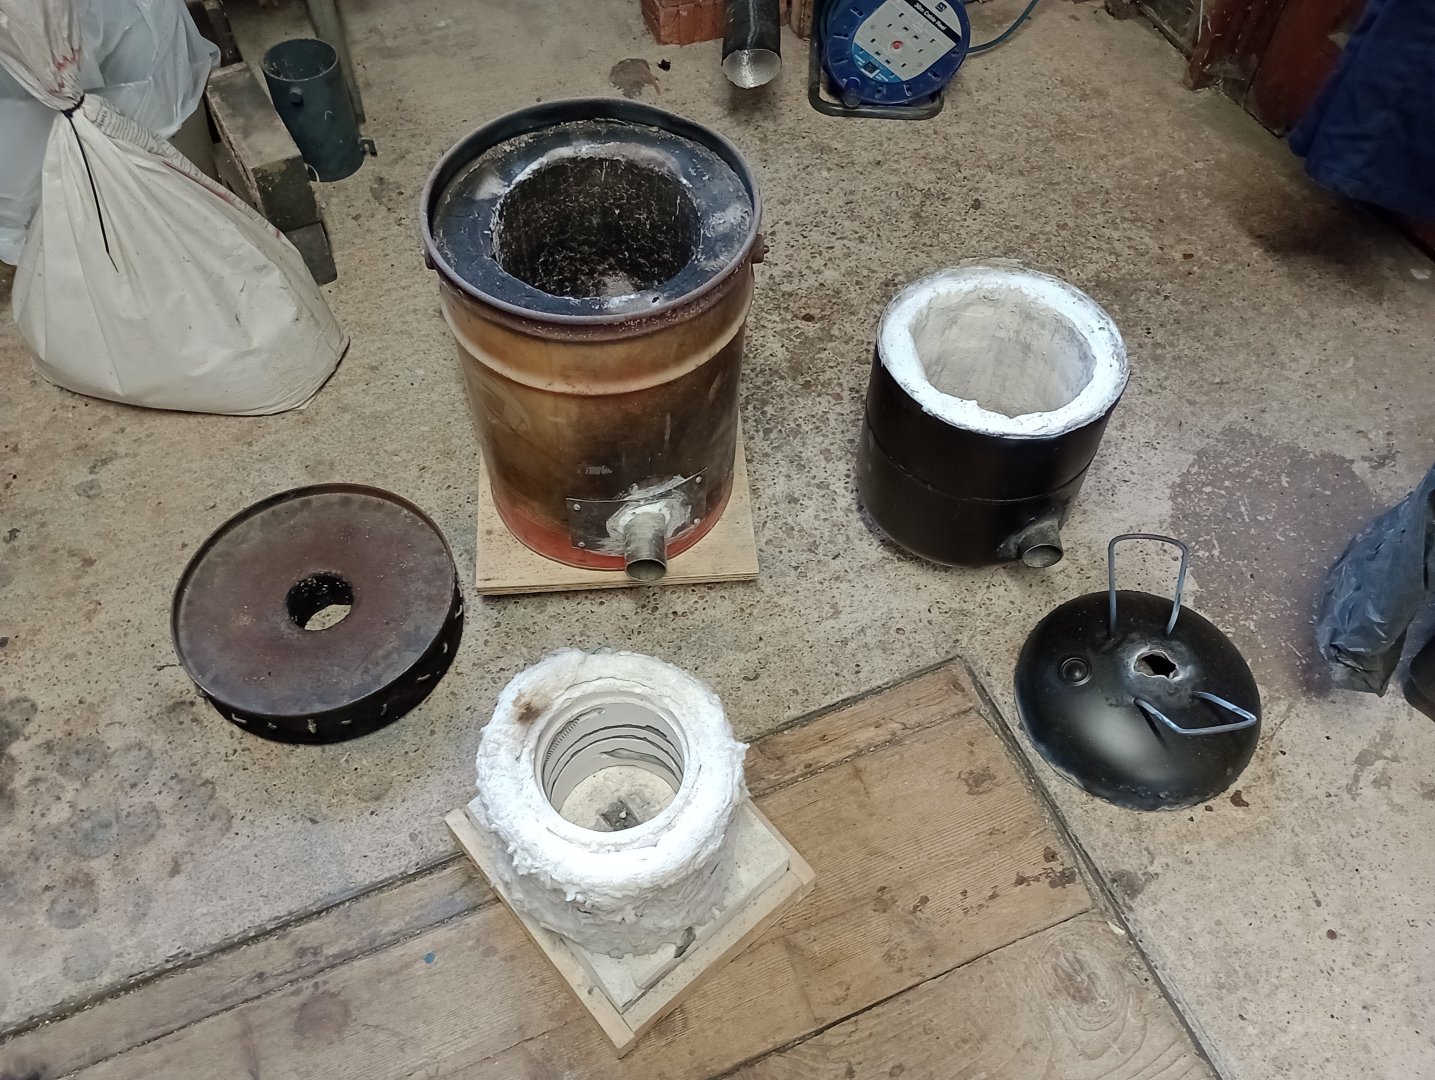
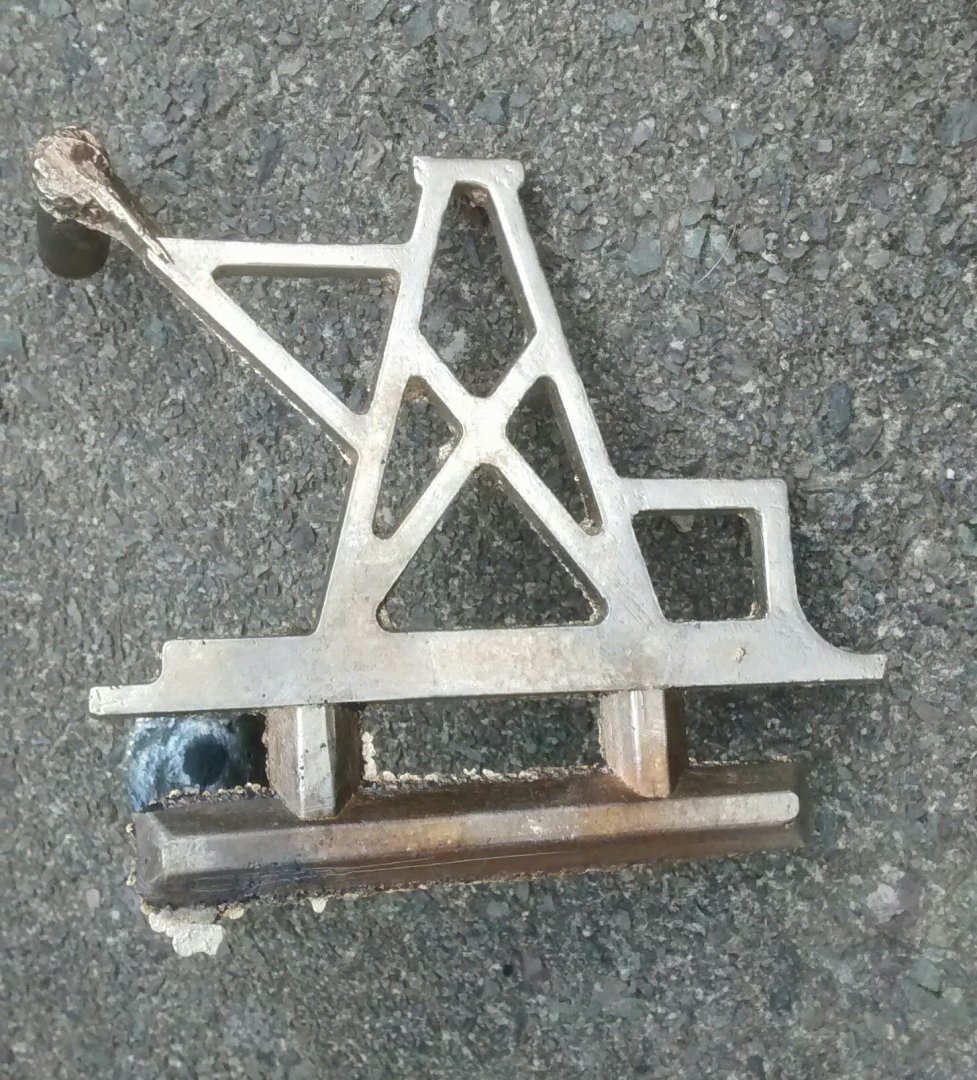
So far I have remodelled the frame legs and will hopefully cast these using the 'Lost PLA method' but I have never attempted such a thin section and wide casting before.
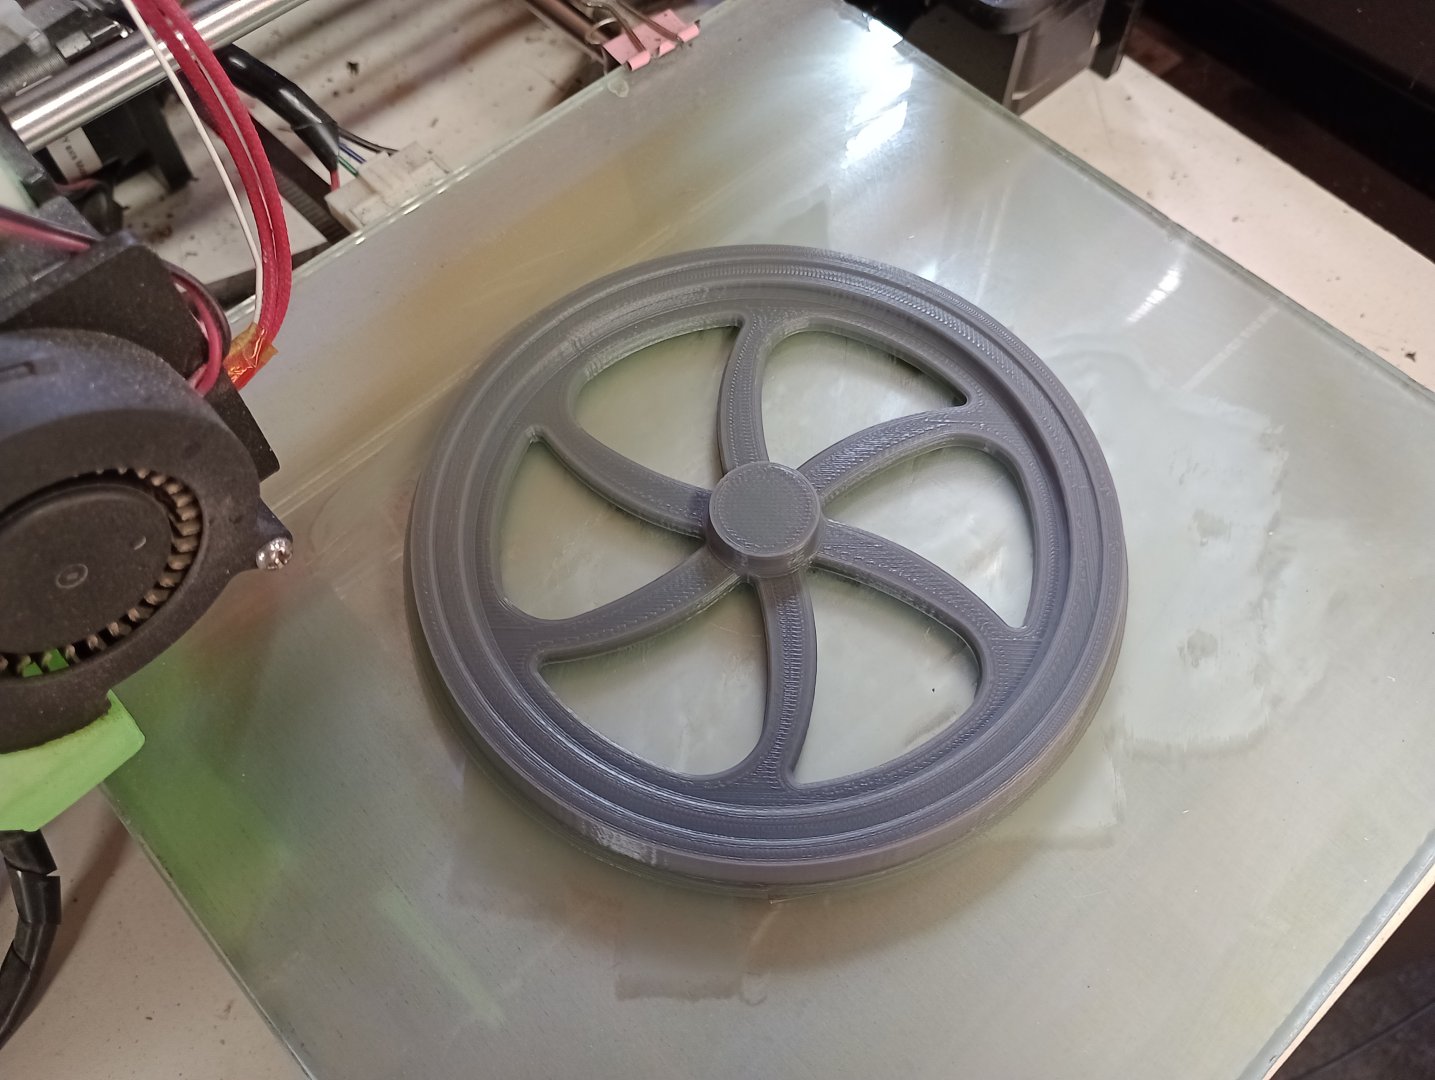
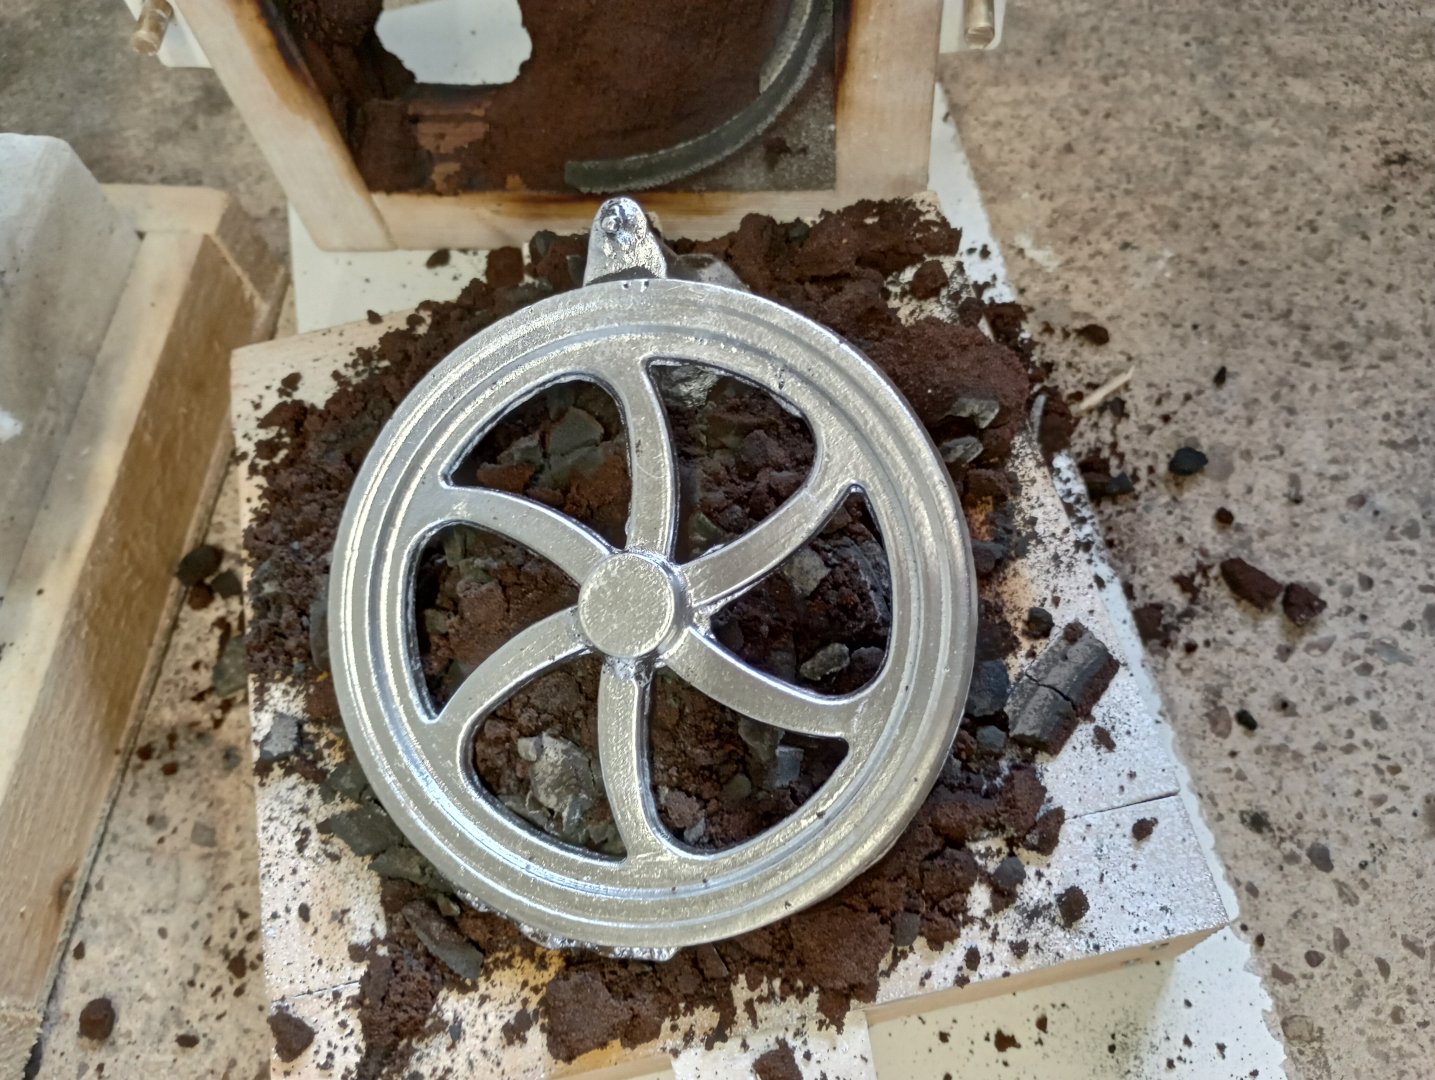
The Flywheel will be sand cast and so far I have created one half of the split pattern.
 

Attachments

  • Rider-Flywheel.jpg
    Rider-Flywheel.jpg
    187.2 KB · Views: 9
  • Rider legs.jpg
    Rider legs.jpg
    411.1 KB · Views: 4
One thing I learned the hard way is that you often have to add draft angle, and machining allowances to 3D model, when making a pattern.

Most 3D models I have seen are not set up as patterns, but instead represent the as-machined dimensions of the parts.

And you have to add shrinkage when you 3D print the patterns, since the castings will be smaller than the patterns.
I think I normally use a factor of about 1.015 multiplier on patterns.

I have not done a lot of thin castings, but the ones I have done I fed from gates on both sides.

For the Rider legs, I would probably have two wide knife gates on either side (perhaps 1.5" wide), and a U-shaped runner sytem.

Good luck.
You got a furnace?

.
 
Green Twin, I do exactly the same for the patterns and usually add a little extra on faces requiring machining to ensure clean up.
With lost wax/PLA there is no need for draft as the pattern is sacrificed. This method is great for small and/or difficult to sand cast.
I have both electric and propane furnaces which are home built and used for some 10 years. I mostly cast aluminium, brass and tin bronze but may do the legs in a zinc aluminium alloy.
Rich
 
Rich-
It sounds like you have a lot of casting experience, in which case we need a lot more photos of your casting work and equipment.

I have not done lost-PLA, but have seen others do it with very respectable results.

I use resin-bound sand, and so I can get away with no draft sometimes, or very little draft.

Some parts do lend themselves to the lost wax/PLA process.

If you are doing brass and tin bronze, then you may be able to do gray iron, depending on the rating of the refractory in your furnace and on your lid.
Gray iron is not much hotter than brass/bronze.
Gray iron needs a Morgan clay-graphite Salamander-Super ferrous-metal-rated crucible, rated at 2,900 F, or equivalent.

I really like casting metal, and it opens up a lot of possibilities for me.
I routinely cast gray iron using resin-bound sand, and a diesel-fired burner.

Good luck.
We need pictures !

Pat J
 
Pat,
I have quite some experience in casting but still make silly errors and am constantly learning and revising techniques.

I would dearly love to try resin bonded sand as I do have problems with edges being fragile in Petrobond .
Petrobond is also useless when its cold weather as it seems to behave more powdery and needs warming up to get a good mould strength.
Supplies of resin bonded sand seem to be only available to commercial foundries here in UK.

It has been on my bucket list to do Iron and I did make a waste oil burner for that purpose but got sick of the noisy air compressor cutting in all the time and altering the regulator setting so I never progressed from Bronze
I know you can do Iron with Propane but it uses an awful lot of gas so maybe I will revisit the oil burner some time.

I use Salamander Super crucibles and most work is with A2 size as I tend to cast smaller items.

Attached is a pic of some of my furnaces which are crude but work for me.
The large one is quite old and of the rammed up refractory design (its dirty inside as I used it to burn off paint on some scrap). This furnace has served me well but the initial heat up time is longer due to heating the thick liner.
The smaller black furnace is a recent build and is lined with ceramic blanket and coated with high temperature refractory paint and heats up very quickly again on Propane.
The small electric furnace, of which I made two, has a cast 'Arelcrete' refractory liner and wrapped simply with ceramic blanket. Elements are self wound from Kanthal A1 and is around 1700 watts and takes around 40 mins to melt an A2 crucible of Brass. I usually have to replace the elements every year depending on use.
In use I simply switch off the supply and lift the furnace off the base to gain access to the crucible which saves risking elements touching the crucible tongs.
The second identical electric furnace I use for burnout of PLA flasks under PID control.
Also attached is sample of lost PLA casting. You can see how the process picks up all the layer lines but these were going to be machined so I didn't bother sanding the patterns.
I always use vacuum assist on this technique.

Oh, and I will try to cover the casting side as this project develops.
Cheers
Rich
 

Attachments

  • Lost PLA parts.jpg
    Lost PLA parts.jpg
    182.9 KB · Views: 3
  • Furnaces.jpg
    Furnaces.jpg
    358.9 KB · Views: 2
Rich-
I think I have gotten beyond the mistake phase (I hope) after many years.
I started backyard casting in 2011.

For years I made every conceivable mistake that one can make when doing foundry work, or so it would seem.

I finally have the process and setup down to memory, and so I don't have to think about what needs to be done.

The resin bound sand is not very easy to find unless you know someone who will sell a small quantity of it.
The art-iron folks around here purchase kits with 3,500 lbs of OK85 commercial sand (very dry), and 5 gallons of resin, plus 1 gallon of hardener, and some catalyst.
That is the smallest amount I have found for sale, so that quantity will set you back a bit, and that much sand is difficult to handle.
The sand has to stay absolutely dry, so I repack it from a large bag into individual 5 gallon plastic buckets.

The coated furnaces seem to be very popular these days.
I have heard of some ceramic blanket failures on the lid, even if coated, when melting iron.
I know of one person who melts iron in a coated ceramic blanket furnace.

I used a 1" Mizzou cast refractory as my hot face on my latest furnace, backed up with a layer of insulating fire brick, and then two layers of ceramic blanket.
My latest furnace looks rough, but it performs well, and is pretty much impervious to iron temperatures.

What sort of slurry do you use?
I looked at slurry, but it had a shelf life of perhaps 1 year, and so I did not purchase any.

I use a Delavan siphon nozzle, with compressed air, and a Toro leaf blower for combustion air.
I run diesel only, and have run it down to about 28 F with no problems.
Diesel self-lights with a siphon nozzle, and so no need for propane.

I have a pressure nozzle burner under design/construction, and that uses a gear pump from a commercial heating unit.
The motor driving the gear pump is a small fractional hp unit, and so one day I will phase out the siphon nozzle/compressed air and use the pressure nozzle burner.

I tried propane, but always had trouble keeping the vapor pressure up, and it was difficult to judge level in the tank.
The cooler the outside ambient, the worse the propane problem became.

I use propane for aluminum only for smaller melts.

The slurry dip, burnout, vacuum assist, etc. are a lot of extra steps, but the results I have seen are shockingly good, like your castings.

An alternative to resin bound sand is sand bound with sodium silicate.
They sell it at the pottery supply houses, and you can set it with either CO2, or a catalyst.
The SS molds must not be overgassed, else they will be very weak.

SS does not have the bad fumes that the resin has.
I wear a commercial chemical respirator with the resin mixing.

It seems hard to believe that PLA will burn out that cleanly (I guess you are using PLA), but I have seen it done, and it seems to work well.

Pat J
 
Pat
Standard PLA burns out pretty good at 500 deg C but 600 is better. I usually let the mould cool and then blow out with compressed air before re-heating to around 300 deg C prior to pouring. Sometimes you do get some residual contaminants that show as a stain in the metal but nothing serious. Yes it is a long winded process but a must on small pieces.
I use SRS Industrial 'A' refractory plaster for the moulds In stainless tubular flasks as per jewellery casting. Its in powder form and mine is still ok after 2 years.
I have used Silicate mainly for cores and on one occasion for a mould but I do find it harder to extract the pattern from SS sand.
Today was still printing patterns and hope to start some casting soon but need to make a special rectangular flask for the leg components.
 
The powdered refractory is a superb idea.

For filling patterns, I changed to a powdered filler, which is a wall patching material, after constantly having the pre-mixed filler go bad before I could use it.

How does the vacuum work?
I guess that is applied when you pour in the refractory?

Sodium silicate is very sticky, and a lot of wax has to be used on the pattern.

Resin bound molds are not as sticky as SS.
Resin has a "set" time, and a "strip" time.
The patterns are pulled during the strip time.
I forgot and did not pull the patterns from the resin sand one time, and they were basically glued permanently into the sand.
Most of those patterns were ruined when I tried to extract them.

Between the set time and the strip time, the mold is still hardening, and it has to be on a flat surface, else it will warp just enough to cause a runout. Resin molds are suppose to sit for 24 hours prior to use, to allow full cure, but you can get around that by lightly flaming the molds with a gentle propane flame, and pour right after making the mold.
I use a ceramic mold coat, and get an excellent finish with that product.

I use a small automotive slide hammer to pull patterns from resin sand.
A light impact is all it takes to break the pattern away from the mold.

I looked at one of those small electric furnaces, but my buddy says the store bought crucibles don't last very long, and are expensive.
I think you have the right idea with building your own electric furnace, and using a Morgan.

The beauty of the electric furnace is that one does not have to drag all the heavy equipment outside, and then worry about rain, etc.

It is great to compare notes with others who are making castings.
You have a great setup, and a nice selection of funaces.

I have my first furnace, which was built too heavy, and so is now retired, a small hard-fire brick furnace for quick aluminum melts, and then a lower-mass iron furnace. I have a mini oil-fired iron furnace in the works.

One really can't have too many furnaces.

Good luck. Post photos.

Pat J
 
Pat, I've seen a few videos where someone uses plain epoxy (like one would use in wooden boat construction) with plain sand. Any idea how that would compare with the product you are using?
 
Pat,
The vacuum is used several times in the process.
1. Vacuum after mixing for 5 mins
2. Vacuum the mould when filled for 5mins
3. The burnt out flask, preheated, is vacuumed from the bottom during filling with molten metal. This assists filling under atmospheric pressure. The refractory plaster is quite permeable which allows this method to work.

Today I have printed a couple of further patterns.
The walking beam was printed in two halves and glued together to avoid using horrible supports during printing.
The Yoke was printed and the circular bosses glued on, again to avoid printing problems. Buildplate support was required but this was unavoidable and can be cleaned up.
Both parts have been lightly sanded, which I try to avoid, to improve as cast finish. PLA is awful to sand!!!
The yoke is going to be a challenge to cast due to the shape and I am unsure I will be able to use my normal technique..hmmm needs some thought
 

Attachments

  • Walk Beam and Yoke.jpg
    Walk Beam and Yoke.jpg
    88.8 KB · Views: 2
Pat, I've seen a few videos where someone uses plain epoxy (like one would use in wooden boat construction) with plain sand. Any idea how that would compare with the product you are using?
I have read about a few using epoxy in lieu of a resin binder, but have not heard the outcome.
There are a number of different binder types, and I forget the exact technical name for the one I use.

The trick is to bind the grains of sand together, but beyond that there are some issues with what happens during and after the pour, and I have heard that molds that are too strong will not expand during the pour, and can damage the casting.

Keep in mind that handling resin binder requires a commercial chemical respirator, and so epoxy may also require precautions, and don't assume the smoke/fumes after a pour are safe either.

The percentage of resin binder to sand is small, and I suspect the same would apply to epoxy.
And you would want to pay attention to set time and strip time, else the epoxy will do the same as the resin, ie: glue your pattern to the sand.

The resin binder instructions do mention that the sand must be very dry, and I think the commercial sand I use (OK85) is baked in an oven.
Moisture in the sand will cause a mold failure with resin binder.
.
 
Today was more 3D printing, hours of it!
The baseplate is still printing (3 hours worth) and this, like the flywheel, is a pattern for sand casting.
I have printed the linkage parts and assembled them on a common sprue ready for investing and ultimately casting in brass.
Yes they could have been machined but they are fiddly and I am a bit lazy. There will be some machining of these afterwards anyway.
In the meantime, the flywheel pattern halves have been painted to improve release from the sand.
 

Attachments

  • Prepwork.jpg
    Prepwork.jpg
    185.5 KB · Views: 3
The more I use a 3D printer, the less desire I have to manually make patterns.
I did learn the manual pattern making process, but it is slow and tedious, and usually not as accurate as a 3D printed pattern.

I would like to learn the lost PLA process.
I can see a place for that with some castings.

I use to paint my patterns, but the paint generally takes 24 hours to dry, which really slows things down.
I have started using shellac, and I much prefer it due to less fumes, easy sanding, and dry times as low as 30 minutes.

I was initially going to adhere to some variation on pattern color coding scheme, but these tend to vary, and I realized that nobody ever sees my patterns anyway, and so color coding is wasted effort.
Better to focus on making quality castings.

Do you have a runner and gate plan for the flywheel ?
Some use the flywheel rim as the runner, and while that works, I can't bring myself to do that (although in the beginning, that is actually how I did it, because everyone else was doing it that way).
.
 
Pat, I am the same. I hate making patterns when I can let the printer churn away for hours and do it for me.
However, I hate sanding PLA, its awful stuff and I hate filling and sanding too so I decided for once to paint to help reduce the lines. It probably doesn't matter as the finished model will be painted anyway so maybe high build primer may work?
I did a test ram up on one half on the bare print and it was encouraging.

All my flywheels so far (six in total) I have done just that and run a riser from the central hub and got away with it. Occasional defects have been where sand has either washed out or dropped into the cavity but these were tiny defects and most removed during machining.

A tricky casting for me was on a beam engine frame in Brass which took me quite a few goes to get right (ish)
 

Attachments

  • Frame_cast.jpg
    Frame_cast.jpg
    263.8 KB · Views: 2
  • flywheels.jpg
    flywheels.jpg
    197.8 KB · Views: 3
Those are great looking castings.

The lines in PLA prints are something I have yet to work out easily.
I bought some automotive skim coat, but have not tried it yet.

It is surprising how deep the lines go too.

One approach I have considered is to just make the castings with the lines in them, and use a sanding and/or a ceramic sponge 2"dia. disk in a tool and die grinder to buff out the lines.

They make some Relok stuff for a 2" disk.
The coarse sponges will remove a lot of material relatively quickly without digging or leaving sanding lines.

.
 
Most times I follow the same approach and machine/sand the casting as it's easier.
Fillers are ok for sand patterns but to be avoided with investment patterns due to burnt out ash. I sometimes us wax to fill major defects on these parts.
 
Today I had a trial at the flywheel casting. The old wooden flask was really a bit too small to say the least with about 5mm to spare.
As usual I found the edges of the Petrobond lifting so I knew there was going to be plenty of flash to dress. Am thinking of trying green sand again or maybe my Petrobond needs rejuvenating?
None the less, I decided to try it.
First disaster was the electric furnace failed just as the melt was commencing. A quick switch to furnace number two sorted that.
Next was a messy pour and the mould stopped accepting metal whilst the riser was only half full so I wasn't optimistic.
However, the result was successful with only a few minor defects where sand broke away.
I think the result is very usable and will be ultimately painted so these defects can be addressed in the prep.
The alloy used was from a car wheel which I have found is quite soft as cast and my attempts to heat treat didn't work previously so any small tapped threads are pretty weak and awful.
 

Attachments

  • Ally-melt.jpg
    Ally-melt.jpg
    178.3 KB · Views: 2
  • Rider-Cast Flywheel.jpg
    Rider-Cast Flywheel.jpg
    318.5 KB · Views: 2
  • Iffy mould.jpg
    Iffy mould.jpg
    300.2 KB · Views: 2
I am not sure what alloy is used in cast wheels, but a quick internet check says they are mostly A356.

I used petrobond sand first, and always had problems with it.
I added non-detergent motor oil to it, and I think I ruined the entire batch.
I am saving it in case I can figure out how to de-oil it.

Petrobond dries out very easily.
I have been told that generally one should add alcohol to Petrobond, and almost never add oil.
I will have to look up the exact alcohol they recommend using.

A muller makes quick work of Petrobond, but I have seen some put it in a tarp, and walk on it on the floor, with good results.
Petrobond does give a very nice surface finish if you don't overheat your metal.

Petrobond seems to be prone to washouts, and so a good runner and gate system is important to keep the velocity of the molten metal down.
I have had breakouts even with resin bound sand, and as long as it is an additive thing that can easily be machined off, I just leave the mold as-is. Generally speaking, if you have your draft angle and fillets right, you will not break off resin-bound sand.

Some folks use a tall sprue, and I think that is a mistake. I started out using very tall sprues, and learned that you really only need to get the sprue out the top of the mold, and perhaps put a pouring ring around it.

Before I figured out gray iron, I thought I would always have to use A356, and so I researched how to heat treat/temper it (not sure what the correct term is).

I use the method described in the "Foseco Non-Ferrous Foundryman's Handbook", and it seemed to make the aluminum much harder, and cleaner to machine and drill.

The Foesco method for a T6 rating on A356 is as follows:
Step 1:
Solution Treatment is 950 F (510 C) for eight hours, followed by a water quench.
(I use a cold water quench. Some use a hot water quench to reduce warpage, but I don't get warpage with a cold water quench.)
Step 2:
Precipitation Treatment is 325 F (163 C) for six hours, followed by a normal cool down in air.

I have heard many say that 8 hours is not needed to heat treat aluminum, but the white papers say that the solution treating process does not begin until after 6 hours at 950 F, and so I think 8 hours is needed at 950 F.

I did get some aluminum parts too close to the kiln heating elements, and the radiant heat melted the parts, so you may need to shield the parts. I did not have electronic heat control, and so I think that was my biggest problem.

Treated aluminum parts have a dull finish to them.

I tried greensand, and had terrible results with it, but I was pouring iron.
I have seen some superb results with greensand and aluminum, so I know for a fact that you can achieve Petrobond quality using greensand.

Greensand really needs to be mulled too, just like Petrobond, so I am not sure you are gaining anything by using greensand.

I have also heard numerous times that burned Petrobond must be discarded, but a local art-iron foundry uses Petrobond by the ton, and they never discard the burned Petrobond sand. They use new Petrobond as a facing sand, and then backfill the flask with used Petrobond.
There are a lot of myths in the backyard casting world, and people adhere to them religiously, even if they are false.


.
 
Some report that they have mulled a small amount of Isopropyl Alcohol (90%?) into their Petrobond, with good results, using a spray bottle.

Here is some information I found online about making your own oil-based sand:

K-BOND was developed in about 1995 at Kent State University.

We set about to find a suitable alternative (oil-based sand). After about 3 months of testing, we had evaluated many sources of bentone and many sources of "smokeless" oils. (By the way, Petrobond is also made with Bentone.) We found that virtually all organo-bentones will work well. With this in mind, we bought the cheapest one we could find.
For the oil, we settled on AMOCO Indopol L-100. This was listed as being a "food grade" material that burned cleanly. Later, we found out that Indopol is the main ingredient of most smokeless 2-stroke oils.

The basic recipe for K-BOND is: 100 lb. of very fine silica sand (100 to 150 GFN)
6 - 7 lb. of Bentone (cheapest you can find)
3 lb. of Indopol L-100 oil
0.10 to 0.20 lb. of Propylene Carbonate (or Methanol or Isopropanol)

If the sand become too dry to mold, we add more Indopol. If it lacks any strength, first we add more Propylene Carbonate. If that does not bring up the strength, we add more Bentone.
We have used this stuff several times a week for aluminum, bronze and iron castings. We have never thrown out the pile, we just add too it. We don't get a room full of blue haze when we pour our molds.
...the best part, we make castings that are incredibly smooth with extremely fine detail.
I am personally very pleased that some of you have taken the initiative to use K-BOND.

Dedicated to Metal Casting Education...

Tom Cobett

Cleveland, Ohio
 

Latest posts

Back
Top