How to align machine vice

Home Model Engine Machinist Forum

Help Support Home Model Engine Machinist Forum:

This site may earn a commission from merchant affiliate links, including eBay, Amazon, and others.

SignalFailure

Well-Known Member
Joined
Jan 1, 2008
Messages
366
Reaction score
2
Finally dragged kicking and screaming into the 20th (no, not 21st) century today I went out and bought a 'micro mill' (sieg X1 type). Got it all set up and took a couple of test cuts and must admit I'm happy as a pig in the proverbial.

One thing is puzzling me though: how do I set up the machine vice such that the jaws are parallel (or perpendicular) to the direction of travel of the table (bearing in mind that this a basic $30 machine vice)?

With it set up 'as is' I scribed a line parallel to the edge of a trued up piece of metal then fed it across and drilled two holes with a centre drill - they were fractionally out of alignment (about 0.25mm over 40mm travel).

TIA

Paul
 
Do you want the correct 3 hour long textbook method or the cheap and cheerful 30 second method?

Well I don't have 3 hours so that's up to some one else, so get a piece of flat bar as high as your vise and 1 - 1/2 " longer, thickness has to be eqal or slightly less than your tee slots. Saw a piece out so you have a U shape with 1/2" or so wide legs and about 1/2 the hight deep.
Now deburr and stuff this in the vise upside down so the ears of the U stick in the tee slots and tighten the vise up pushing it against the tee slot.

Now depending on how your vise is constructed it may not line up with the slots for the mounting bolts, in which case you need a packing piece to achieve this.

Sound long winded but once you have the packer and U shape lining up is seconds away
 
Hi mount a DTI and run it along the vice jaw back and fourth and adjust the vice until you have a zero reading on your DTI from one end to the other,hope this helps .
Rob

P1250002.JPG
 
Rob, I don't have a DTI yet but I'll remember that, thanks!

John, got it...simple and effective, especially if the U is the same width as the slots ;)
 
I keyed my vise so I can toss it on for "close enough" jobs. Clamp a parallel in the vise with about 1/4" sticking out the top. Flip the vise, bottom side up, and set the parallel into the back t-slot on the mill table. Clamp the vise to the table, make some temp. clamps if you don't have a clamping kit, and tighten it down. Gently tap the vise back so that the parallel is snug against the back of the t-slot. Now you mill across the base of the vise. cutting a slot the same width as the t-slots in the table, then drill and tap each side so you can mount the keys. Make the keys from mild steel, milling them to a nice snug slip-fit in the t-slots, drill and counterbore them, and bolt them to your vise. Piece of cake. Here are some pics and a write-up on another site:

http://madmodder.net/index.php?topic=982.msg7273#msg7273
 
Thanks websterz, useful write-up, I've already discovered the annoying vice handle vs table feed handles conflict and see you have a solution to that too ;D
 
sportandmiah said:
I bought a Micro Mill a few months ago and love it. Below is a great set of educational videos that you can watch or save to watch at a later time. They are excellent and teach the basics of most aspects of machining. There are 9 or 10 parts, and include setting up a mill and vise.

http://techtv.mit.edu/genres/24-how-to/videos/142-machine-shop-1

That looks like an excellent series of videos...I'm downloading them now, many thanks!
 
Forgot to mention that if you have a couple of vises and more than one machine the U shaped method will work on all providing that the thickness is less than the smallest T slot and it's large enough to fit the largest vise.
It doesn't have to be a dead nuts fit as you push it to butt up on one edge.

My large vise had the locating tennons fitted but I removed them as it has to fit two machines and sometimes I need to have it mounted at an angle anyway.

I personally don't like swivel vises for general work as they increase the hight and decrease the rigidity.
 
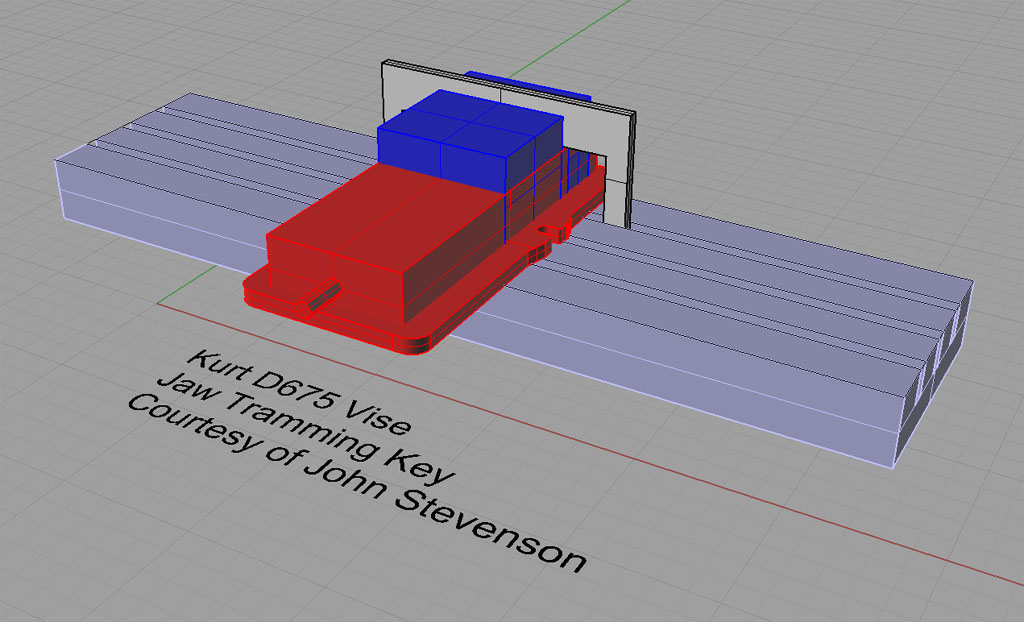
The John Stevenson Vise Jaw Tramming Key:

JawKey3D.jpg


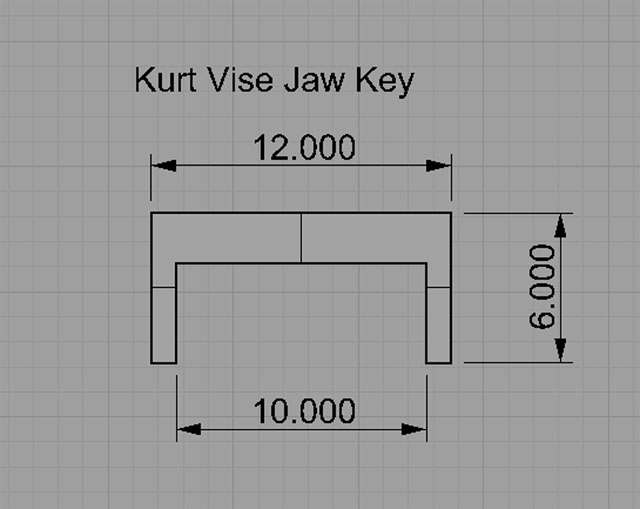
Dimensions:

KeyDimensions.jpg


Cheers,

BW
 
'Lest there be any doubt' eh Bob? ;D

I've almost finished making one, had to chain drill/saw out the most of the metal as milling on a micro mill would take days! Just need to thin the whole thing to fit the slots and I'm done.
 
EvanVH said:
Hey Bob

My kurt 6" vise has key slots on the bottom side. I use them all of the time to get my vice tramed in.

http://www.practicalmachinist.com/vb/showthread.php?t=152001


Evan


Yeah, they're definitely the conventional wisdom. And if it came that way, great. But if it didn't, why bother when this is so much easier to create and works for any number of vises?

Cheers,

BW
 
Instead of the u-shaped piece of steel, couldn't one just use 2 lengths of square bar clamped in the vice either side, angled at 45° or so, so that the ends are in the t-slots?

Giles
 
gilessim said:
Instead of the u-shaped piece of steel, couldn't one just use 2 lengths of square bar clamped in the vice either side, angled at 45° or so, so that the ends are in the t-slots?

Tha did cross my mind too Giles but I managed to overcome my inherent laziness in favour of (hopefully) more accuracy :D

As it's a 'gadget' I've made I know I'll keep it somewhere specific whereas a couple of bits of steel I'm sure I'd use/lose at some point!
 
Sorry Paul ,it wasn't meant as a dig, your quite right, making little jigs and special tools etc. is all part of the fun!

Giles (chronic inherent laziness sufferer)
 

Latest posts

Back
Top